window GMC ENVOY 2005 Owner's Guide
[x] Cancel search | Manufacturer: GMC, Model Year: 2005, Model line: ENVOY, Model: GMC ENVOY 2005Pages: 502, PDF Size: 2.77 MB
Page 111 of 502

Manual Rearview Mirror with
OnStar
®and Compass
The vehicle may have a manual rearview mirror with
OnStar®and an eight-point compass display located in
the upper right.
Control buttons for the OnStar
®system are at the
bottom of the mirror. See your GM dealer for more
information on the OnStar
®system. Also, seeOnStar®
System on page 2-47for more information about the
services OnStar®provides.
Mirror Operation
While sitting in a comfortable position, adjust the
rearview mirror so you can see clearly behind your
vehicle. Grip it in the center and move it up or down and
side to side. The day/night control, located at the
bottom of the mirror, adjusts the mirror to reduce
headlamp glare from behind during evening or dark
conditions. Push the control for daytime use; pull it for
night use.
Compass Display
O
(On/Off):Press this button to turn the compass on
or off. The compass display, can show a maximum
of two characters. For example, NE is displayed
for north-east.
When the ignition and the compass/temperature feature
are on, character boxes will appear for about
two seconds. After two seconds, the mirror will display
the direction the vehicle is facing.
Compass Calibration
When on, the compass automatically calibrates as the
vehicle is driven. If, after two seconds, the display
does not show a compass direction, (N for North, for
example), there may be a strong magnetic �eld
interfering with the compass. Such interference may be
caused by a magnetic antenna mount, magnetic
note pad holder, or a similar magnetic item. If the
letter C should ever appear in the compass window,
the compass may need calibration.
Press and hold the on/off button for nine seconds to
activate the compass calibration mode. CAL will
be displayed in the compass window on the mirror.
The mirror can be calibrated by driving the vehicle in
circles at 5 mph (8 km/h) or less until the display shows
a direction.
2-39
Page 112 of 502

Compass Variance
Compass variance is the difference between earth’s
magnetic north and true geographic north. The mirror is
set to zone eight upon leaving the factory. It will be
necessary to adjust the compass to compensate for
compass variance if you live outside zone eight. Under
certain conditions, such as during a long-distance,
cross-country trip, it will be necessary to adjust for
compass variance. If not adjusted to account for compass
variance, the compass could give false readings. To
adjust for compass variance do the following:
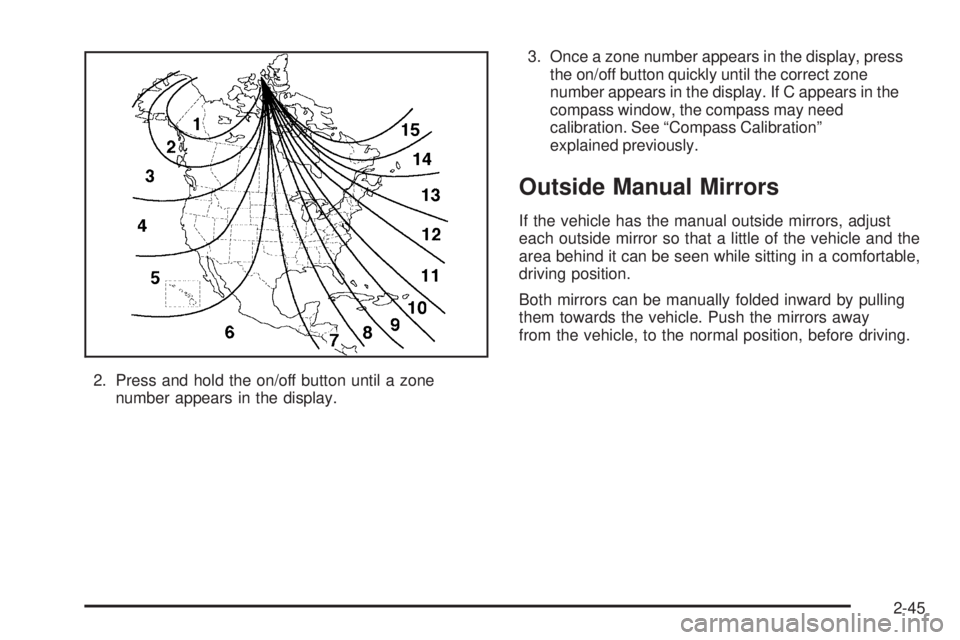
1. Find the current location and variance zone number
on the following zone map.
2. Press and hold the on/off button until a zone
number appears in the display.
3. Once a zone number appears in the display, press
the on/off button quickly until the correct zone
number appears in the display. If C appears in the
compass window, the compass may need
calibration. See “Compass Calibration” explained
previously.
2-40
Page 114 of 502

Compass Calibration
When on, the compass automatically calibrates as the
vehicle is driven. If, after two seconds, the display does
not show a compass direction, (N for North, for example),
there may be a strong magnetic �eld interfering with the
compass. Such interference may be caused by a
magnetic antenna mount, magnetic note pad holder, or a
similar magnetic item. If the letter C should ever appear in
the compass window, the compass may need calibration.
Press and hold the on/off button for nine seconds to
activate the compass calibration mode. CAL will be
displayed in the compass window on the mirror.
The mirror can be calibrated by driving the vehicle in
circles at 5 mph (8 km/h) or less until the display shows
a direction.
Compass Variance
Compass variance is the difference between earth’s
magnetic north and true geographic north. The mirror is
set to zone eight upon leaving the factory. It will be
necessary to adjust the compass to compensate for
compass variance if you live outside zone eight. Under
certain conditions, such as during a long-distance,
cross-country trip, it will be necessary to adjust for
compass variance. If not adjusted to account for compass
variance, the compass could give false readings.
To adjust for compass variance do the following:
1. Find the current location and variance zone number
on the following zone map.2. Press and hold the on/off button until a zone
number appears in the display.
3. Once a zone number appears in the display, press
the on/off button quickly until the correct zone
number appears in the display. If C appears in the
compass window, the compass may need
calibration. See “Compass Calibration”
explained previously.
2-42
Page 116 of 502

Compass Calibration
When on, the compass automatically calibrates as the
vehicle is driven. If, after two seconds, the display
does not show a compass direction, N for North, for
example, there may be a strong magnetic �eld
interfering with the compass. Such interference may be
caused by a magnetic antenna mount, magnetic
note pad holder, or a similar magnetic item. If the
letter C should ever appear in the compass window, the
compass may need calibration.
Press and hold the on/off button for nine seconds to
activate the compass calibration mode. CAL will
be displayed in the compass window on the mirror.
The mirror can be calibrated by driving the vehicle in
circles at 5 mph (8 km/h) or less until the display shows
a direction.
Compass Variance
Compass variance is the difference between earth’s
magnetic north and true geographic north. The mirror is
set to zone eight upon leaving the factory. It will be
necessary to adjust the compass to compensate for
compass variance if you live outside zone eight. Under
certain conditions, such as during a long-distance,
cross-country trip, it will be necessary to adjust for
compass variance. If not adjusted to account for compass
variance, the compass could give false readings. To
adjust for compass variance do the following:
1. Find the current location and variance zone number
on the following zone map.
2-44
Page 117 of 502

2. Press and hold the on/off button until a zone
number appears in the display.3. Once a zone number appears in the display, press
the on/off button quickly until the correct zone
number appears in the display. If C appears in the
compass window, the compass may need
calibration. See “Compass Calibration”
explained previously.
Outside Manual Mirrors
If the vehicle has the manual outside mirrors, adjust
each outside mirror so that a little of the vehicle and the
area behind it can be seen while sitting in a comfortable,
driving position.
Both mirrors can be manually folded inward by pulling
them towards the vehicle. Push the mirrors away
from the vehicle, to the normal position, before driving.
2-45
Page 119 of 502

Outside Convex Mirror
{CAUTION:
A convex mirror can make things (like other
vehicles) look farther away than they really are.
If you cut too sharply into the right or left lane,
you could hit a vehicle. Check your inside
mirror or glance over your shoulder before
changing lanes.
The passenger’s outside mirror is convex. A convex
mirror’s surface is curved so more can be seen from the
driver’s seat.
Outside Heated Mirrors
If the vehicle has this feature, when the rear window
defogger is turned on, the outside driver’s and
passenger’s rearview mirrors also heat to help clear them
of ice, snow, and condensation. SeeDual Climate Control
System on page 3-21orDual Automatic Climate Control
System on page 3-23for more information.
OnStar®System
OnStar®uses global positioning system (GPS) satellite
technology, wireless communications, and call centers
to provide you with a wide range of safety, security,
information, and convenience services.
A complete OnStar
®user’s guide and the terms and
conditions of the OnStar®Subscription Service
Agreement are included in the vehicle’s glove box
literature. For more information, visit www.onstar.com or
www.onstarcanada.com. Contact OnStar
®at
1-888-4-ONSTAR (1-888-466-7827), or press the
OnStar
®button to speak to an OnStar®advisor 24 hours
a day, 7 days a week.
Terms and conditions of the Subscription Service
Agreement can be found at www.onstar.com or
www.onstarcanada.com.
2-47
Page 126 of 502

Storage Areas
Glove Box
Open the glove box by pulling the side of the handle
towards the driverside.
Overhead Console
Your vehicle may have this feature. The overhead
console may include a reading lamps, HomeLink®
transmitter and a sunroof switch. SeeSunroof on
page 2-60andHomeLink®Transmitter on page 2-49
for more information.
If your vehicle has a third row seat, and has a power
operated rear quarter glass, the switches for operating
the rear quarter glass are also located in the overhead
console. These switches allow the driver to open
and close each third row seat window separately.
)(Driver’s Quarter Glass):Press button downward
to open or upward to close the drivers side (left)
quarter glass for the third row seat.
((Passenger’s Quarter Glass):Press button
downward to open or upward to close the passengers
side (right) quarter glass for the third row seat.
Center Console Storage Area
If your vehicle has this console compartment, squeeze
the front lever while lifting the top to open it.
Your vehicle’s console will be equipped with cupholders
located on the front and rear of the storage compartment.
The console may also contain one or more of the
following components:
Rear Seat Audio Controls
Rear Seat Accessory Power Outlets
Rear Climate Control
If your vehicle has the center armrest compartment, lift
the cover by pulling up on the latch handle located
underneath the front edge of the armrest. The storage
area includes slots for cassettes or compact discs.
2-54
Page 139 of 502

The main components of your instrument panel are the following:
A. Exterior Lamp Control. SeeHeadlamps on
page 3-15. Dome Lamp Override Button. SeeDome
Lamp Override on page 3-18. Instrument Panel
Brightness Control. SeeInstrument Panel Brightness
on page 3-18. Fog Lamp Button (If Equipped).
SeeFog Lamps on page 3-17.
B. Air Outlets. SeeOutlet Adjustment on page 3-28.
C. Turn Signal/Multifunction Lever. SeeTurn
Signal/Multifunction Lever on page 3-7.
D. OnStar
®and Audio Steering Wheel Controls. See
Audio Steering Wheel Controls on page 3-136.
E. Instrument Panel Cluster. SeeInstrument Panel
Cluster on page 3-33.
F. Audio Steering Wheel Controls. SeeAudio Steering
Wheel Controls on page 3-136.
G. Ignition Switch. SeeIgnition Positions on page 2-19.
H. Audio System. SeeAudio System(s) on page 3-65.
I. Climate Controls. SeeDual Climate Control
System on page 3-21.
J. Hood Release. SeeHood Release on page 5-10.K. Driver Information Center (DIC) Steering Wheel
Controls. SeeDriver Information Center (DIC)
on page 3-51.
L. Transfer Case Controls. See “Automatic Transfer
Case” underFour-Wheel Drive on page 2-26.
Traction Assist Button. SeeTraction Assist
System (TAS) on page 4-9.
M. Shift Lever. SeeShifting Into Park (P) on page 2-31.
N. Lighter. SeeAshtrays and Cigarette Lighter on
page 3-20.
O. Accessory Power Outlets. SeeAccessory Power
Outlets on page 3-19.
P. Parking Brake. SeeParking Brake on page 2-30.
Q. Rear Window Washer/Wiper. See “Rear Window
Washer/Wiper” underWindshield Washer on
page 3-10.
R. Rear Window Defogger. See “Rear Window
Defogger” underDual Climate Control System on
page 3-21andDual Automatic Climate Control
System on page 3-23.
S. Glove Box. SeeGlove Box on page 2-54.
3-5
Page 144 of 502

Windshield Washer
L(Windshield Washer):To spray washer �uid on the
windshield, press the windshield washer paddle. The
wipers will clear the window and then either stop
or return to your preset speed.
{CAUTION:
In freezing weather, do not use your washer
until the windshield is warmed. Otherwise the
washer �uid can form ice on the windshield,
blocking your vision.
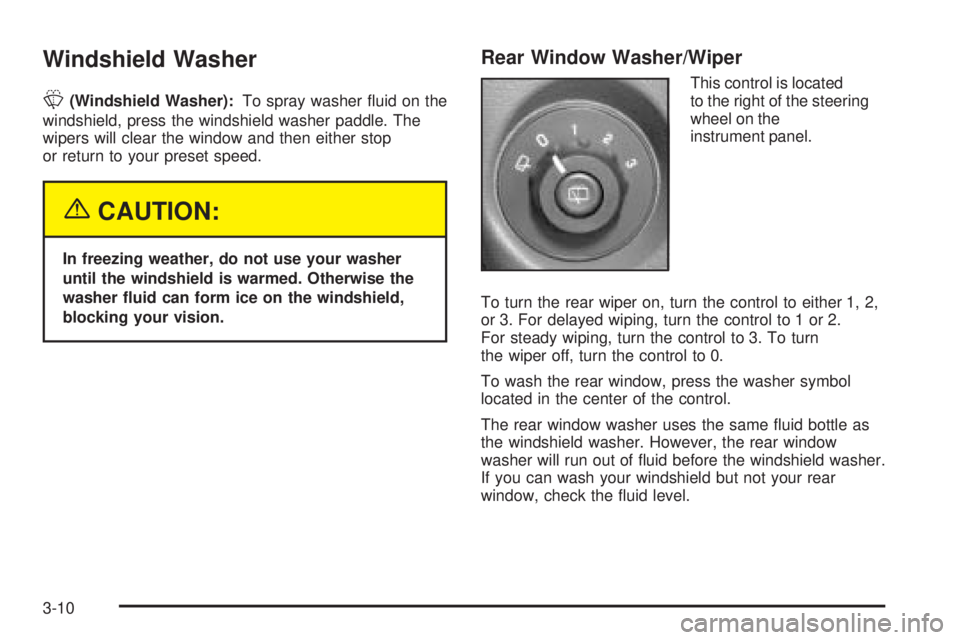
Rear Window Washer/Wiper
This control is located
to the right of the steering
wheel on the
instrument panel.
To turn the rear wiper on, turn the control to either 1, 2,
or 3. For delayed wiping, turn the control to 1 or 2.
For steady wiping, turn the control to 3. To turn
the wiper off, turn the control to 0.
To wash the rear window, press the washer symbol
located in the center of the control.
The rear window washer uses the same �uid bottle as
the windshield washer. However, the rear window
washer will run out of �uid before the windshield washer.
If you can wash your windshield but not your rear
window, check the �uid level.
3-10
Page 155 of 502

Climate Controls
Dual Climate Control System
With this system you can control the heating, cooling
and ventilation for your vehicle.
9(Fan):Turn the left knob clockwise or
counterclockwise to increase or decrease the fan speed.
If the knob is in off mode, outside air will still enter the
vehicle, and will be directed based on the position of the
mode knob. The temperature can still be adjusted
using the temperature knob.
Turn the right knob clockwise or counterclockwise to
direct the air�ow inside of your vehicle.To change the current mode, select one of the following:
H(Vent):This mode directs air to the instrument
panel outlets.
)(Bi-Level):This mode directs about half of the air
to the instrument panel outlets; then directs most of
the remaining air to the �oor outlets. A little air is
directed toward the windshield and the side window
outlets. Cooler air is directed to the upper vents
and warmer air to the �oor outlets.
6(Floor):This mode directs most of the air to the
�oor outlets with a little air directed to the windshield and
the side window outlets. The recirculation button
cannot be selected while in �oor mode.
h(Recirculation):Recirculation mode is used to
recirculate the air inside of your vehicle. When this button
is pressed, an indicator light in the button will come on to
let you know that it is active. Use this mode to help
prevent outside odors and/or dust from entering your
vehicle or to help cool the air inside of your vehicle more
quickly. The air conditioning compressor will also come
on when this mode is activated. While in recirculation
mode, the windows may fog when the weather is cold and
damp. To clear the fog, select either the defog or defrost
mode and increase fan speed.
3-21