lights GMC ENVOY 2009 Get To Know Guide
[x] Cancel search | Manufacturer: GMC, Model Year: 2009, Model line: ENVOY, Model: GMC ENVOY 2009Pages: 20, PDF Size: 0.87 MB
Page 3 of 20

3
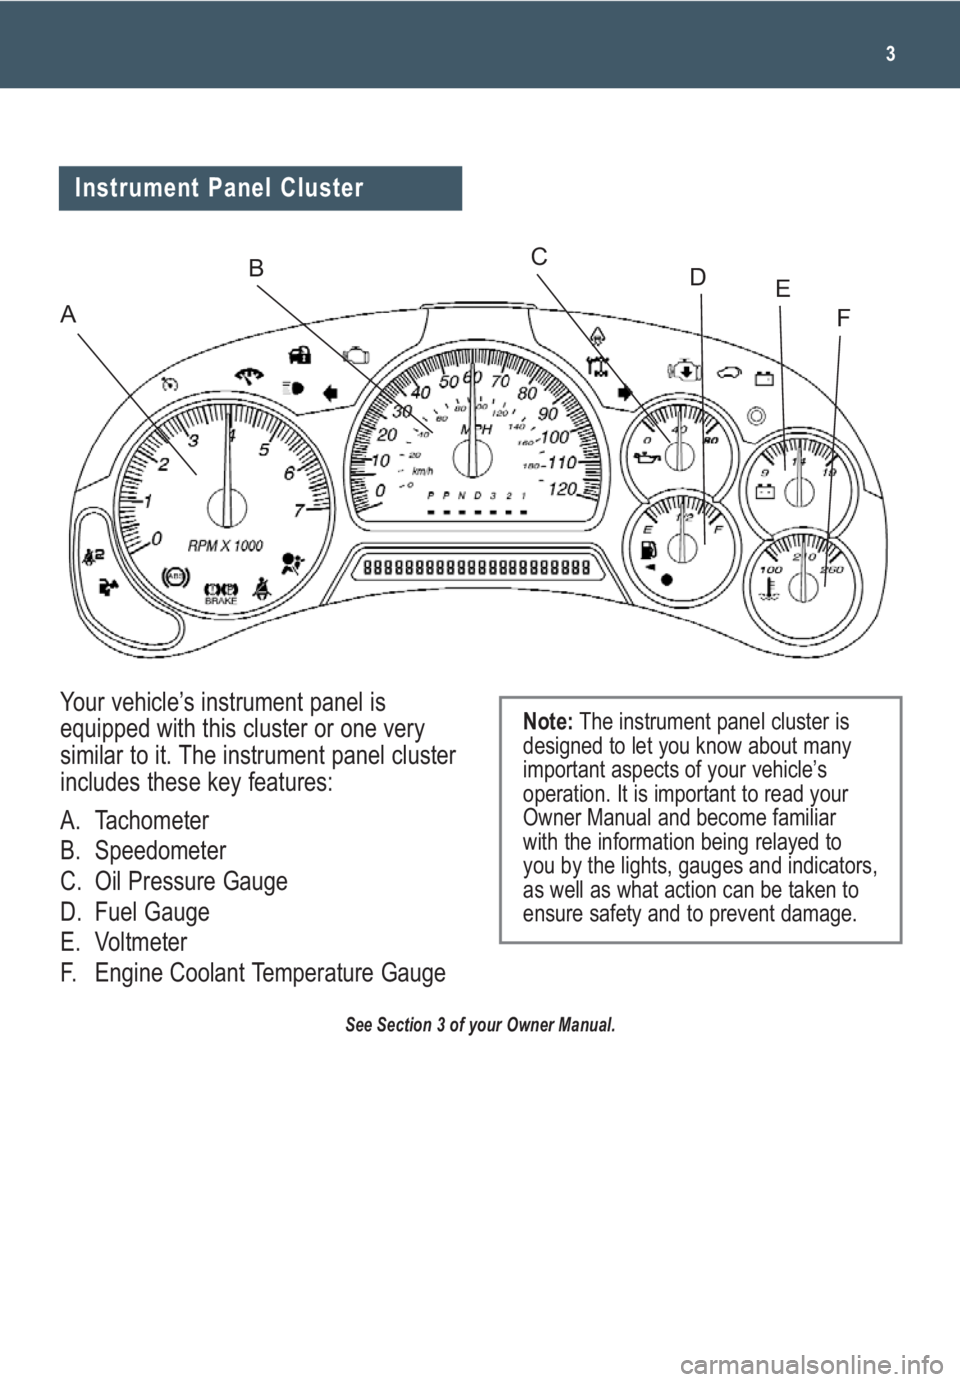
Your vehicle’s instrument panel is
equipped with this cluster or one very
similar to it. The instrument panel cluster
includes these key features:
A. Tachometer
B. Speedometer
C. Oil Pressure Gauge
D. Fuel Gauge
E. Voltmeter
F. Engine Coolant Temperature Gauge
See Section 3 of your Owner Manual.
Note:The instrument panel cluster is
designed to let you know about many
important aspects of your vehicle’s
operation. It is important to read your
Owner Manual and become familiar
with the information being relayed to
you by the lights, gauges and indicators,
as well as what action can be taken to
ensure safety and to prevent damage.
Instrument Panel Cluster
A
BCDE
F
Page 9 of 20

9
Rear Seat Climate Controls
(if equipped)
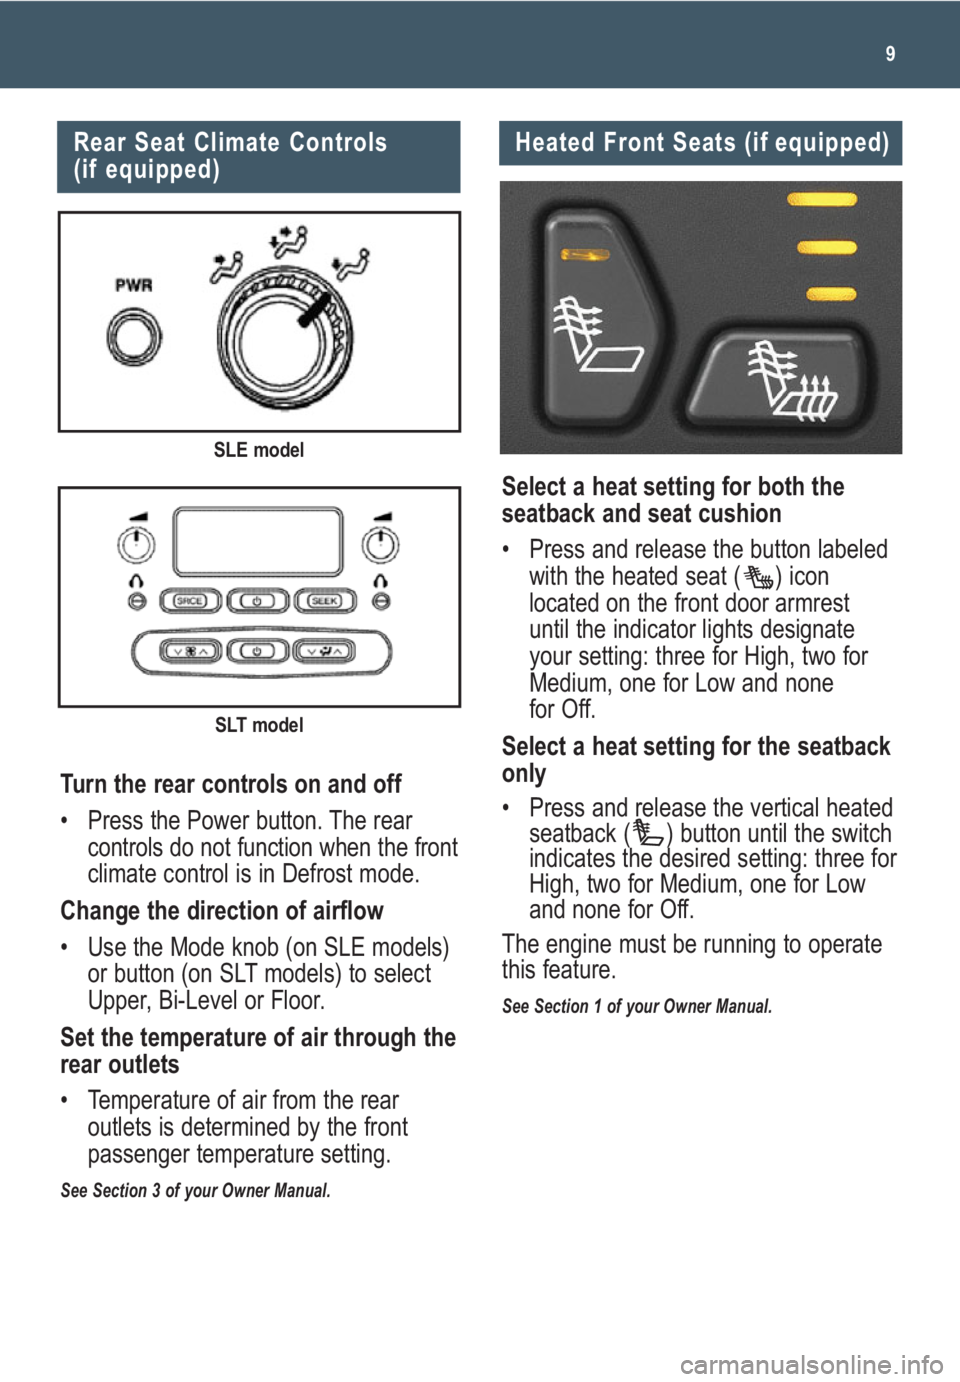
Turn the rear controls on and off
• Press the Power button. The rear
controls do not function when the front
climate control is in Defrost mode.
Change the direction of airflow
• Use the Mode knob (on SLE models)
or button (on SLT models) to select
Upper, Bi-Level or Floor.
Set the temperature of air through the
rear outlets
• Temperature of air from the rear
outlets is determined by the front
passenger temperature setting.
See Section 3 of your Owner Manual.
SLT model
SLE model
Heated Front Seats (if equipped)
Select a heat setting for both the
seatback and seat cushion
• Press and release the button labeled
with the heated seat ( ) icon
located on the front door armrest
until the indicator lights designate
your setting: three for High, two for
Medium, one for Low and none
for Off.
Select a heat setting for the seatback
only
• Press and release the vertical heated
seatback ( ) button until the switch
indicates the desired setting: three for
High, two for Medium, one for Low
and none for Off.
The engine must be running to operate
this feature.
See Section 1 of your Owner Manual.
Page 13 of 20

13
CONVENIENCE
Headlamp Controls
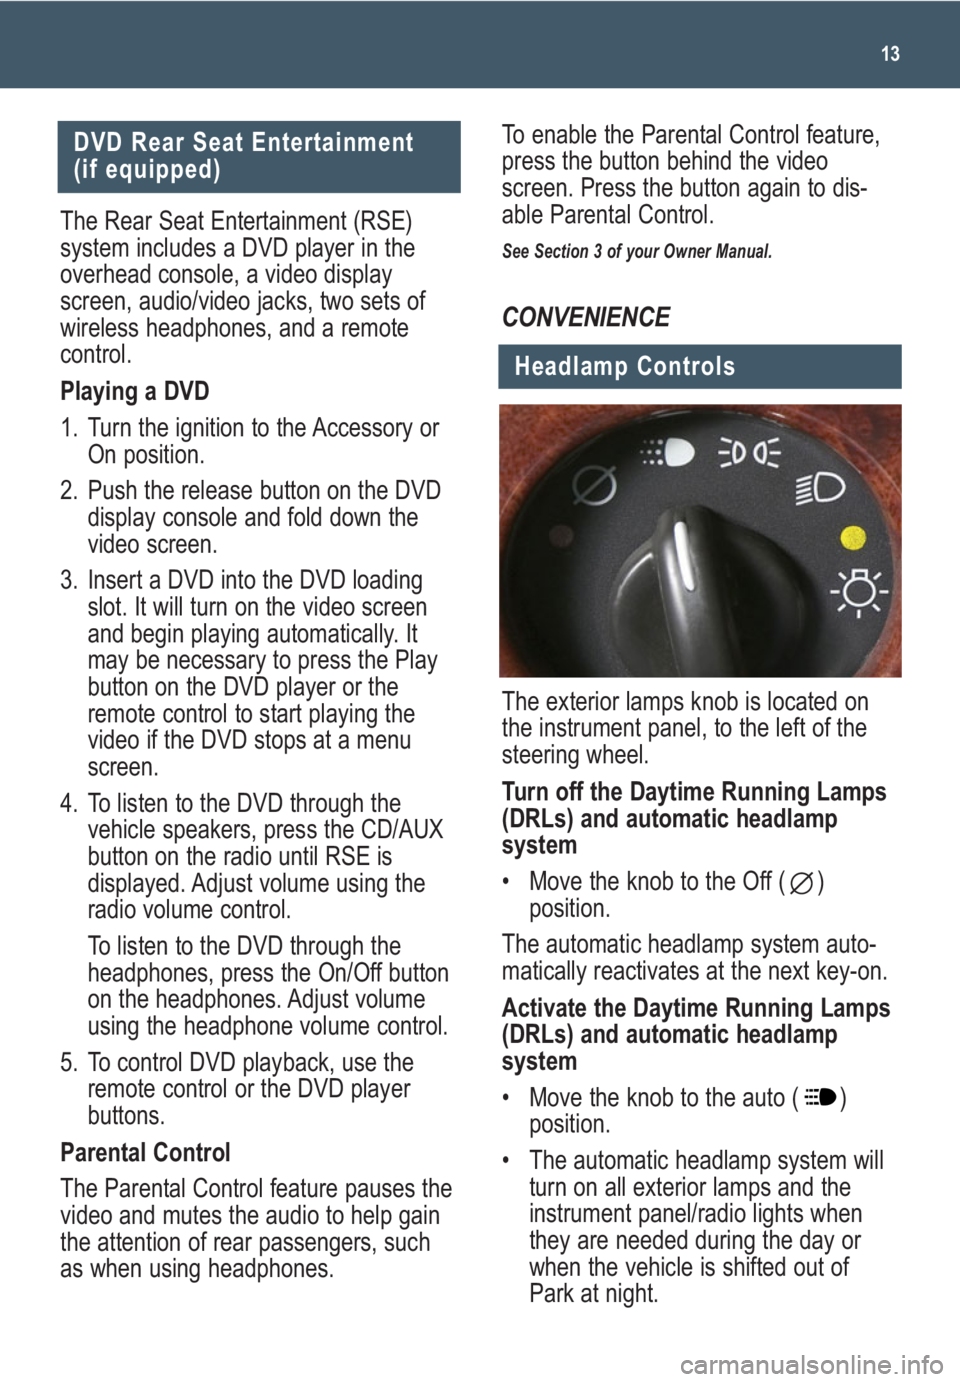
The exterior lamps knob is located on
the instrument panel, to the left of the
steering wheel.
Turn off the Daytime Running Lamps
(DRLs) and automatic headlamp
system
• Move the knob to the Off ( )
position.
The automatic headlamp system auto-
matically reactivates at the next key-on.
Activate the Daytime Running Lamps
(DRLs) and automatic headlamp
system
• Move the knob to the auto ( )
position.
• The automatic headlamp system will
turn on all exterior lamps and the
instrument panel/radio lights when
they are needed during the day or
when the vehicle is shifted out of
Park at night.
DVD Rear Seat Entertainment
(if equipped)
The Rear Seat Entertainment (RSE)
system includes a DVD player in the
overhead console, a video display
screen, audio/video jacks, two sets of
wireless headphones, and a remote
control.
Playing a DVD
1. Turn the ignition to the Accessory or
On position.
2. Push the release button on the DVD
display console and fold down the
video screen.
3. Insert a DVD into the DVD loading
slot. It will turn on the video screen
and begin playing automatically. It
may be necessary to press the Play
button on the DVD player or the
remote control to start playing the
video if the DVD stops at a menu
screen.
4. To listen to the DVD through the
vehicle speakers, press the CD/AUX
button on the radio until RSE is
displayed. Adjust volume using the
radio volume control.
To listen to the DVD through the
headphones, press the On/Off button
on the headphones. Adjust volume
using the headphone volume control.
5. To control DVD playback, use the
remote control or the DVD player
buttons.
Parental Control
The Parental Control feature pauses the
video and mutes the audio to help gain
the attention of rear passengers, such
as when using headphones.To enable the Parental Control feature,
press the button behind the video
screen. Press the button again to dis-
able Parental Control.
See Section 3 of your Owner Manual.
Page 14 of 20

Getting to Know Your Envoy14
Interior Lamps
Your vehicle is equipped with illuminated
entry and exit lighting as well as dome
lamps.
Activate illuminated entry feature
• Open a door or press the Unlock button on your Remote Keyless Entry
transmitter.
• With all doors closed, the dome lamps stay illuminated briefly and turn
off automatically.
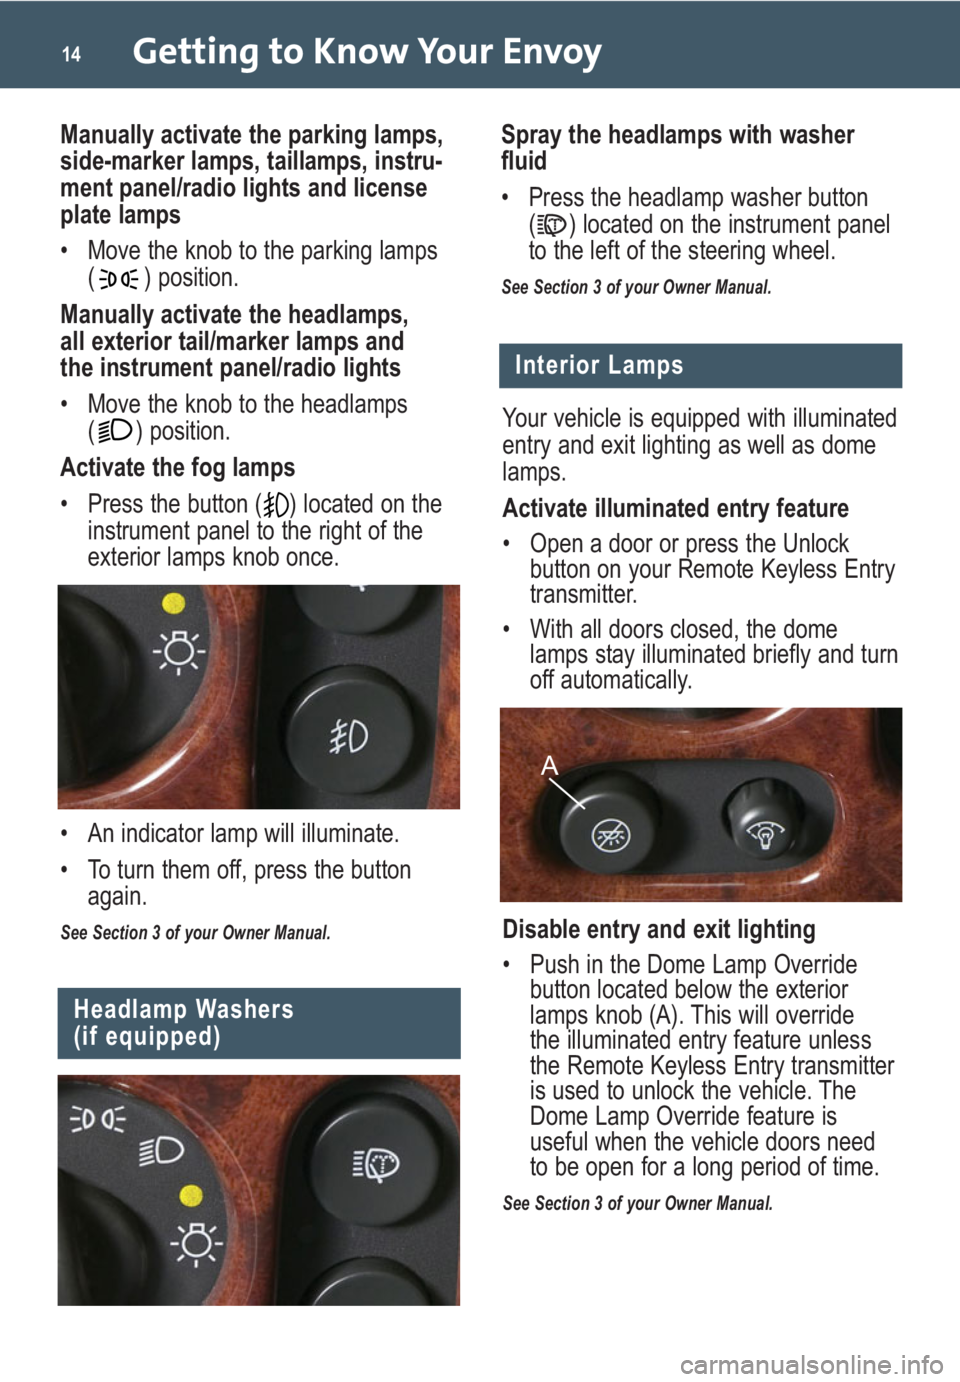
Disable entry and exit lighting
• Push in the Dome Lamp Override button located below the exterior
lamps knob (A). This will override
the illuminated entry feature unless
the Remote Keyless Entry transmitter
is used to unlock the vehicle. The
Dome Lamp Override feature is
useful when the vehicle doors need
to be open for a long period of time.
See Section 3 of your Owner Manual.
A
Headlamp Washers
(if equipped)
Spray the headlamps with washer
fluid
• Press the headlamp washer button
( ) located on the instrument panel
to the left of the steering wheel.
See Section 3 of your Owner Manual.
Manually activate the parking lamps,
side-marker lamps, taillamps, instru-
ment panel/radio lights and license
plate lamps
• Move the knob to the parking lamps( ) position.
Manually activate the headlamps,
all exterior tail/marker lamps and
the instrument panel/radio lights
• Move the knob to the headlamps ( ) position.
Activate the fog lamps
• Press the button ( ) located on the instrument panel to the right of the
exterior lamps knob once.
• An indicator lamp will illuminate.
• To turn them off, press the button again.
See Section 3 of your Owner Manual.