lights GMC ENVOY 2009 Owner's Manual
[x] Cancel search | Manufacturer: GMC, Model Year: 2009, Model line: ENVOY, Model: GMC ENVOY 2009Pages: 474, PDF Size: 2.56 MB
Page 1 of 474

Seats and Restraint System............................. 1-1
Front Seats
............................................... 1-2
Rear Seats
..............................................1-11
Safety Belts
.............................................1-13
Child Restraints
.......................................1-32
Airbag System
.........................................1-55
Restraint System Check
............................1-70
Features and Controls..................................... 2-1
Keys
........................................................ 2-3
Doors and Locks
....................................... 2-7
Windows
.................................................2-13
Theft-Deterrent Systems
............................2-16
Starting and Operating Your Vehicle
...........2-20
Mirrors
....................................................2-39
OnStar
®System
......................................2-43
Universal Home Remote System
................2-46
Storage Areas
.........................................2-51
Sunroof
..................................................2-55
Instrument Panel............................................. 3-1
Instrument Panel Overview
.......................... 3-4
Climate Controls
......................................3-19
Warning Lights, Gages, and Indicators
........3-27
Driver Information Center (DIC)
..................3-47
Audio System(s)
.......................................3-62Driving Your Vehicle....................................... 4-1
Your Driving, the Road, and the Vehicle
....... 4-2
Towing
...................................................4-38
Service and Appearance Care.......................... 5-1
Service
..................................................... 5-3
Fuel
......................................................... 5-5
Checking Things Under the Hood
...............5-10
Rear Axle
...............................................5-43
Four-Wheel Drive
.....................................5-44
Front Axle
...............................................5-44
Headlamp Aiming
.....................................5-45
Bulb Replacement
....................................5-46
Windshield Wiper Blade Replacement
.........5-50
Tires
......................................................5-53
Appearance Care
...................................5-103
Vehicle Identi�cation
...............................5-111
Electrical System
....................................5-112
Capacities and Speci�cations
...................5-120
Maintenance Schedule..................................... 6-1
Maintenance Schedule
................................ 6-2
Customer Assistance Information.................... 7-1
Customer Assistance and Information
........... 7-2
Reporting Safety Defects
...........................7-14
Vehicle Data Recording and Privacy
...........7-16
Index................................................................ 1
2009 GMC Envoy and Envoy Denali Owner ManualM
Page 8 of 474

Power Lumbar
On vehicles with power
lumbar, the control is
located on the outboard
side of the seat.
To increase or decrease support, hold the control
forward or rearward.
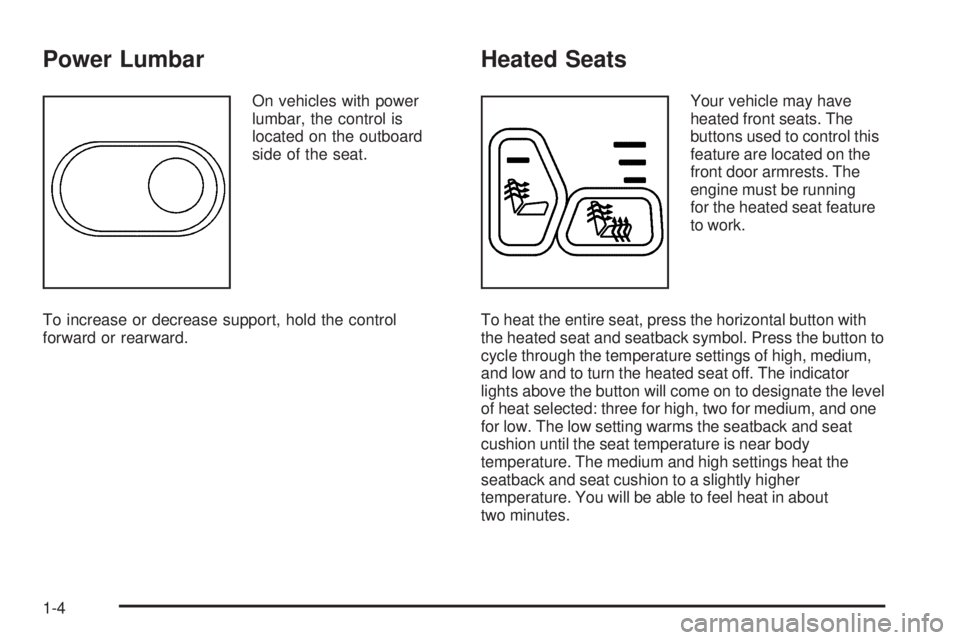
Heated Seats
Your vehicle may have
heated front seats. The
buttons used to control this
feature are located on the
front door armrests. The
engine must be running
for the heated seat feature
to work.
To heat the entire seat, press the horizontal button with
the heated seat and seatback symbol. Press the button to
cycle through the temperature settings of high, medium,
and low and to turn the heated seat off. The indicator
lights above the button will come on to designate the level
of heat selected: three for high, two for medium, and one
for low. The low setting warms the seatback and seat
cushion until the seat temperature is near body
temperature. The medium and high settings heat the
seatback and seat cushion to a slightly higher
temperature. You will be able to feel heat in about
two minutes.
1-4
Page 81 of 474

Remote Keyless Entry (RKE)
System Operation
The Remote Keyless Entry (RKE) transmitter functions
work up to 30 feet (9 m) away from the vehicle.
There are other conditions which can affect the
performance of the transmitter. SeeRemote Keyless
Entry (RKE) System on page 2-4.
K(Unlock): Press once to
unlock the driver door. The
parking lamps �ash and
the interior lights come on.
Press
Ka second time
within three seconds
to unlock all the doors.
To program different feedback settings through the
Driver Information Center (DIC), seeDriver Information
Center (DIC) on page 3-47.
Q(Lock):Press to lock all the doors. PressQagain
within three seconds and the horn chirps.
L(Panic):Press to sound the horn. The headlamps
and taillamps �ash for up to 30 seconds. To turn it
off, press
Lagain, or wait 30 seconds, or start
the vehicle.
Programming Transmitters to the
Vehicle
Only RKE transmitters programmed to the vehicle will
work. If a transmitter is lost or stolen, a replacement can
be purchased and programmed through your
dealer/retailer. When the replacement transmitter is
programmed to the vehicle, all remaining transmitters
must also be programmed. Any lost or stolen
transmitters no longer work once the new transmitter is
programmed. Each vehicle can have up to four
transmitters programmed to it.
2-5
Page 97 of 474

Ignition Positions
The ignition switch has
four different positions.
Press the brake pedal, and turn the ignition to ON/RUN
to shift out of P (Park).
Notice:Using a tool to force the key to turn in the
ignition could cause damage to the switch or
break the key. Use the correct key, make sure it is
all the way in, and turn it only with your hand. If the
key cannot be turned by hand, see your
dealer/retailer.A (LOCK/OFF):This position locks the ignition and
transmission. The key can only be removed in
LOCK/OFF.
The steering can bind with the wheels turned off center.
If this happens, move the steering wheel from right to
left while turning the key to ACC/ACCESSORY. If
this doesn’t work, then the vehicle needs service.
B (ACC/ACCESSORY):This is the position in which
you can operate electrical accessories.
C (ON/RUN):This position can be used to operate the
electrical accessories and to display some instrument
panel warning and indicator lights. The switch stays
in this position when the engine is running.
If you leave the key in the ACC/ACCESSORY or
ON/RUN position with the engine off, the battery could
be drained. You may not be able to start the vehicle
if the battery is allowed to drain for an extended period
of time.
D (START):This is the position that starts the engine.
When the engine starts, release the key. The ignition
switch returns to ON/RUN for driving.
A warning tone will sound when the driver door is
opened, the ignition is in ACC/ACCESSORY or
LOCK/OFF and the key is in the ignition.
2-21
Page 106 of 474

4n(Four-Wheel Low):This setting also engages the
front axle and delivers extra torque. It sends maximum
power to all four wheels. You might choose this setting if
you are driving off-road in deep sand, deep mud, and
climbing or descending steep hills.
{CAUTION:
Shifting the transfer case to Neutral can cause the
vehicle to roll even if the transmission is in
P (Park). You or someone else could be seriously
injured. Be sure to set the parking brake before
placing the transfer case in Neutral. SeeParking
Brake on page 2-33.
Neutral:Shift the vehicle’s transfer case to Neutral only
when towing the vehicle. SeeRecreational Vehicle
Towing on page 4-38for more information.An indicator light in the knob will show you which
position the transfer case is in. The indicator lights will
come on brie�y when you turn on the ignition and
one will stay on. If the lights do not come on, you should
take the vehicle to your dealer/retailer for service. An
indicator light will �ash while shifting the transfer case. It
will stay on when the shift is complete. If the transfer
case cannot make a requested shift, it will return to the
last chosen setting.
If the service Four-Wheel Drive Warning Light on the
instrument panel cluster stays on, you should take
the vehicle to your dealer/retailer for service. See
Service Four-Wheel Drive Warning Light on page 3-44
for further information.
Shifting Into Four-Wheel High or Automatic
Four-Wheel Drive
Turn the knob to Four-Wheel High or Automatic
Four-Wheel Drive. This can be done at any speed
unless you are shifting out of Four-Wheel Low. The
indicator light will �ash while shifting. It will remain on
when the shift is complete.
2-30
Page 115 of 474

Mirrors
Manual Rearview Mirror
Adjust the mirror to see clearly behind your vehicle.
Hold the mirror in the center to move it up or down and
side to side. The day/night adjustment lets you adjust the
mirror to avoid glare from the lamps behind you. Move the
lever to the right for nighttime use and to the left for
daytime use.
Vehicles with OnStar
®have three control buttons located
at the bottom of the mirror. See your dealer/retailer for
more information on the system and how to subscribe to
OnStar
®. SeeOnStar®System on page 2-43for more
information on the services OnStar®provides.
Automatic Dimming Rearview Mirror
The vehicle may have an automatic-dimming rearview
mirror with a compass and/or temperature display.
SeeCompass on page 2-40for more information about
the compass display. See “Temperature Display”
after in this section.
Vehicles with OnStar
®have three control buttons
located at the bottom of the mirror. See your
dealer/retailer for more information on the system andhow to subscribe to OnStar
®. SeeOnStar®System on
page 2-43for more information on the services
OnStar
®provides.
O(On/Off):Press to turn the dimming feature on
or off.
TEMP (Temperature):Press to turn the temperature
display on or off.
Automatic Dimming Mirror Operation
Automatic dimming reduces the glare of lights from
behind the vehicle. The dimming feature comes on and
the indicator light illuminates each time the vehicle is
started.
Temperature Display
PressOor depending on the mirror, press TEMP to
turn the temperature display on or off.
To adjust between Fahrenheit and Celsius:
1. Press and hold
Oor depending on the mirror,
press TEMP until either a �ashing F or C appears.
2. Press
Oor TEMP again to change the display to
the desired unit of measurement. After
approximately four seconds of inactivity, the new
unit locks in and the display returns.
2-39
Page 133 of 474

Instrument Panel Overview...............................3-4
Hazard Warning Flashers................................3-6
Horn .............................................................3-6
Tilt Wheel.....................................................3-6
Turn Signal/Multifunction Lever.........................3-7
Turn and Lane-Change Signals........................3-7
Headlamp High/Low-Beam Changer..................3-8
Flash-to-Pass.................................................3-8
Windshield Wipers..........................................3-8
Windshield Washer.........................................3-9
Rear Window Wiper/Washer.............................3-9
Headlamp Washer........................................3-10
Cruise Control..............................................3-10
Headlamps..................................................3-13
Headlamps on Reminder................................3-14
Daytime Running Lamps (DRL).......................3-14
Automatic Headlamp System..........................3-14
Fog Lamps ..................................................3-15
Instrument Panel Brightness...........................3-16
Dome Lamps ...............................................3-16
Dome Lamp Override....................................3-16
Entry Lighting...............................................3-16Exit Lighting.................................................3-17
Reading Lamps............................................3-17
Electric Power Management...........................3-17
Battery Run-Down Protection..........................3-18
Accessory Power Outlet(s).............................3-18
Ashtray(s) and Cigarette Lighter......................3-19
Climate Controls............................................3-19
Dual Climate Control System..........................3-19
Dual Automatic Climate Control System...........3-22
Outlet Adjustment.........................................3-26
Rear Climate Control System.........................3-26
Warning Lights, Gages, and Indicators............3-27
Instrument Panel Cluster...............................
.3-28
Speedometer and Odometer...........................3-29
Trip Odometer..............................................3-29
Tachometer.................................................3-29
Safety Belt Reminders...................................3-30
Airbag Readiness Light..................................3-31
Passenger Airbag Status Indicator...................3-32
Charging System Light..................................3-33
Voltmeter Gage............................................3-34
Section 3 Instrument Panel
3-1
Page 145 of 474

Ending Cruise Control
There are three ways to turn off the cruise control:
Step lightly on the brake pedal.
Move the cruise switch to9.
Shift the transmission to N (Neutral).
Erasing Speed Memory
The cruise control set speed memory is erased when
the cruise control or the ignition is turned off.
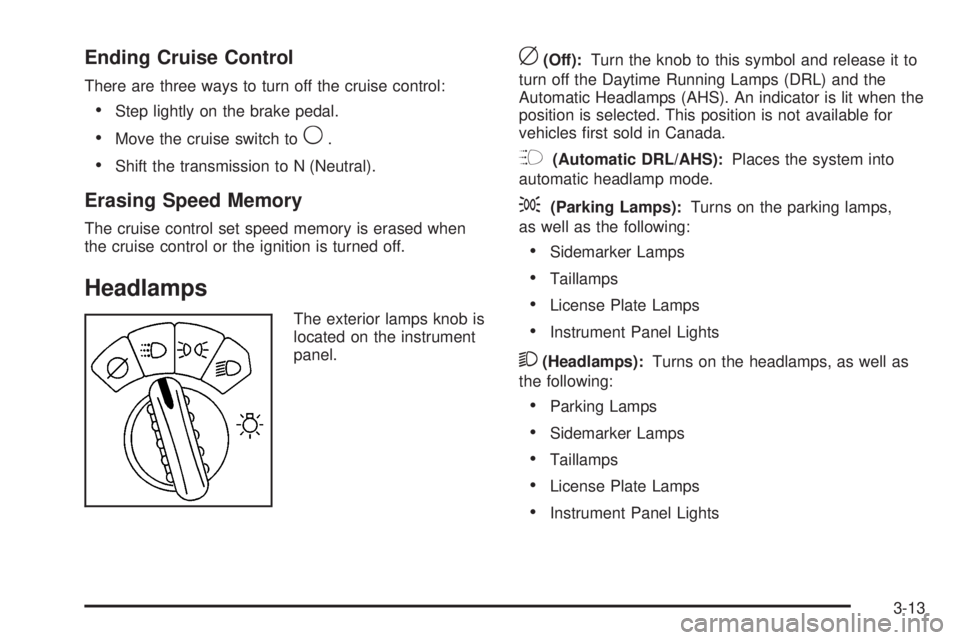
Headlamps
The exterior lamps knob is
located on the instrument
panel.
c(Off):Turn the knob to this symbol and release it to
turn off the Daytime Running Lamps (DRL) and the
Automatic Headlamps (AHS). An indicator is lit when the
position is selected. This position is not available for
vehicles �rst sold in Canada.
?(Automatic DRL/AHS):Places the system into
automatic headlamp mode.
;(Parking Lamps):Turns on the parking lamps,
as well as the following:
Sidemarker Lamps
Taillamps
License Plate Lamps
Instrument Panel Lights
2(Headlamps):Turns on the headlamps, as well as
the following:
Parking Lamps
Sidemarker Lamps
Taillamps
License Plate Lamps
Instrument Panel Lights
3-13
Page 146 of 474

Headlamps on Reminder
A reminder tone sounds when the headlamps or
parking lamps are manually turned on, if the driver’s
door is open and the ignition is in LOCK/OFF or
ACC/ACCESSORY. To turn the tone off, turn the knob
all the way counterclockwise.
In the automatic mode, the headlamps turn off once the
ignition key is in LOCK/OFF.
Daytime Running Lamps (DRL)
Daytime Running Lamps (DRL) can make it easier for
others to see the front of your vehicle during the day.
Fully functional DRL are required on all vehicles
�rst sold in Canada.
The DRL system makes the headlamps come on at
reduced brightness when the following conditions
are met:
The ignition is on.
The exterior lamps knob is in automatic
headlamp mode.
The light sensor detects daytime light.
The transmission is not in P (Park).When the DRL are on, only the headlamps will be on.
The taillamps, sidemarker, instrument panel lights
and other lamps will not be on.
When it begins to get dark, the headlamps automatically
switch from DRL to the regular headlamps.
Automatic Headlamp System
When it is dark enough outside, the Automatic
Headlamp System turns on the headlamps when
the vehicle is started and after the transmission
has been shifted out of the P (Park) position.
The headlamps, taillamps, sidemarker, and parking
lamps will come on. The instrument panel lights
and radio lights will also turn on at normal brightness.
Once on, the system remains on during these conditions
even if the vehicle is shifted back into P (Park).
The vehicle has a light sensor on the top of the
instrument panel. Do not cover the sensor or the system
may come on whenever the ignition is on and the
vehicle is shifted out of the P (Park) position.
The system could also turn on the lamps when driving
through a parking garage, heavy overcast weather
or a tunnel. This is normal.
3-14
Page 147 of 474

There is a delay in the transition between the daytime
and nighttime operation of the Daytime Running
Lamps (DRL) and the automatic headlamp systems,
so that driving under bridges or bright overhead street
lights does not affect the system. The DRL and
automatic headlamp system are only affected when the
light sensor sees a change in lighting lasting longer
than the delay.
If the vehicle is started in a dark garage, the automatic
headlamp system comes on after the transmission
is shifted out of P (Park). Once the vehicle leaves the
garage, it takes about one minute for the automatic
headlamp system to change to DRL if it is light outside.
During that delay, the instrument panel cluster might
not be as bright as usual. Make sure the instrument
panel brightness control is in the full bright position.
If the vehicle is running and the automatic headlamp
system is already on, it can be turned off by turning and
releasing the headlamp control at the off position.
The automatic headlamp system stays off until you turn
and release the headlamp control at the off position
again. SeeHeadlamps on page 3-13.Fog Lamps
The fog lamp button is located on the instrument panel
to the right of the exterior lamps knob. Use the fog
lamps for better vision in foggy or misty conditions.
The ignition must be in ON/RUN for the fog lamps
to work.
#:Press to turn the fog lamps on or off. An indicator
light turns on near the button while the fog lamps
are on. Fog lamps turn off whenever the high-beam
headlamps are on.
Some localities have laws that require the headlamps
to be on along with the fog lamps.
3-15