ECU GMC ENVOY DENALI 2005 Owner's Guide
[x] Cancel search | Manufacturer: GMC, Model Year: 2005, Model line: ENVOY DENALI, Model: GMC ENVOY DENALI 2005Pages: 502, PDF Size: 2.66 MB
Page 128 of 502
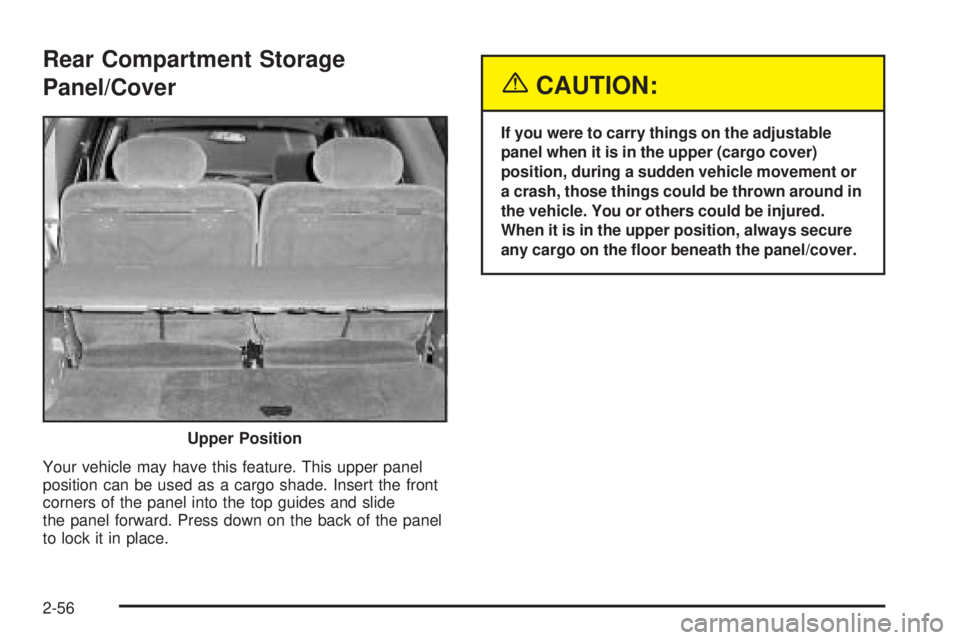
Rear Compartment Storage
Panel/Cover
Your vehicle may have this feature. This upper panel
position can be used as a cargo shade. Insert the front
corners of the panel into the top guides and slide
the panel forward. Press down on the back of the panel
to lock it in place.
{CAUTION:
If you were to carry things on the adjustable
panel when it is in the upper (cargo cover)
position, during a sudden vehicle movement or
a crash, those things could be thrown around in
the vehicle. You or others could be injured.
When it is in the upper position, always secure
any cargo on the �oor beneath the panel/cover.
Upper Position
2-56
Page 130 of 502
Rear Floor Storage Lid
{CAUTION:
If any removable convenience item is not
secured properly, it can move around in a
collision or sudden stop. People in the vehicle
could be injured. Be sure to secure any such
item properly.
Your vehicle has a rear cargo area with a removable
storage lid.
To remove the rear �oor storage lid, do the following:
1. Press the latch release and lift up the latch handle.
2. Raise the lid slightly to unhook it.
3. Pull the lid toward you to release it from the forward
mounting tabs.
To reinstall the rear �oor storage lid, reverse the
previous steps. Make sure the lid is secure by applying
slight pressure to the latch until you hear it click.
Convenience Net
Your vehicle may have this feature. A convenience net
in the rear of your vehicle helps keep small items in
place during sharp turns or quick stops and starts. The
net is not designed to retain these items during
off-road use. The net is not for larger, heavier items.
To use the convenience net, do the following:
1. Attach the upper loops to the retainers on both
sides of the liftgate opening. The label should be
in the upper passenger’s side corner, visible
from the rear of the vehicle.
2. Attach the lower hooks to the rear cargo tie downs
on the �oor.
2-58
Page 131 of 502
Cargo Cover
If your vehicle has a cargo cover, you can use it to
cover items in the cargo area of your vehicle.
To install the cargo cover, do the following:
1. Align the endcap with the pocket in the trim panel
located behind the rear seat.
2. Squeeze the opposite endcap, align it with the
pocket located on the opposite side of the trim
panel and release.
3. Grasp the handle and unroll the cover. Latch the
posts into the sockets on the inside of the vehicle
to secure it.
To remove the cargo cover, do the following:
1. Release the cover from the latch posts and carefully
roll it back up.
2. Squeeze one endcap and remove it from the
pocket in the trim panel.
3. Remove the cargo cover from the other endcap so
that you can remove the shade from the vehicle.{CAUTION:
An improperly stored cargo cover could be
thrown about the vehicle during a collision
or sudden maneuver. You or others could be
injured. If you remove the cover, always store
it in the proper storage location. When you
put it back, always be sure that it is
securely reattached.
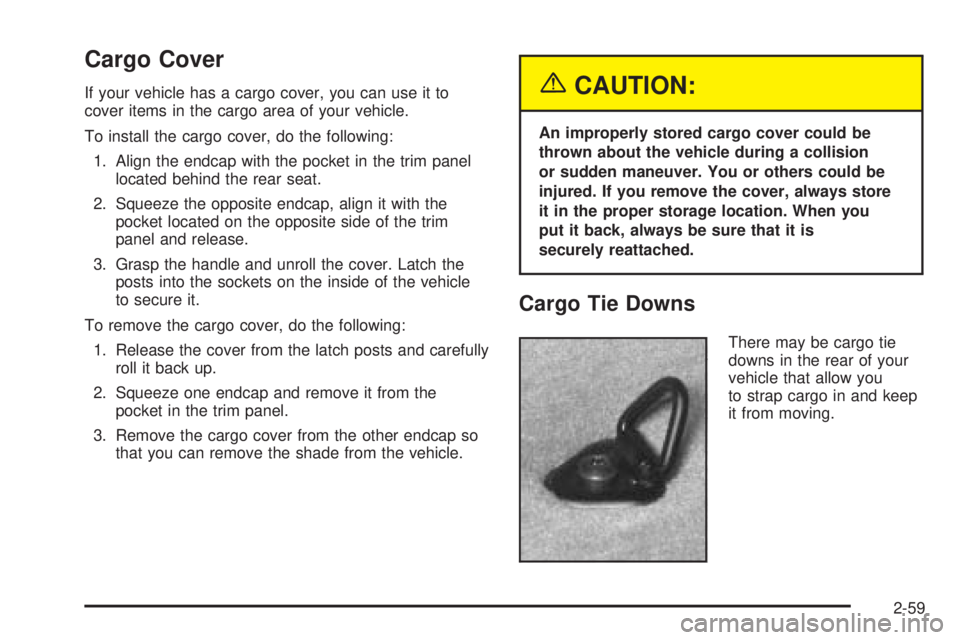
Cargo Tie Downs
There may be cargo tie
downs in the rear of your
vehicle that allow you
to strap cargo in and keep
it from moving.
2-59
Page 136 of 502
Oil Pressure Gage........................................3-45
Change Engine Oil Light................................3-46
Security Light...............................................3-46
Cruise Control Light......................................3-47
Reduced Engine Power Light.........................3-47
Highbeam On Light.......................................3-48
Service Four-Wheel Drive Warning Light..........3-48
Check Gages Warning Light...........................3-49
Gate Ajar Light.............................................3-49
Fuel Gage...................................................3-50
Low Fuel Warning Light.................................3-51
Check Gas Cap Light....................................3-51
Driver Information Center (DIC).......................3-51
DIC Operation and Displays...........................3-52
DIC Warnings and Messages.........................3-55
DIC Vehicle Customization.............................3-59Audio System(s).............................................3-65
Setting the Time...........................................3-65
Radio with CD (Base Level)...........................3-66
Radio with CD (MP3)....................................3-77
Radio with Cassette and CD..........................3-93
Radio with Six-Disc CD................................3-107
Rear Seat Entertainment System...................3-121
Navigation/Radio System..............................3-134
Rear Seat Audio (RSA)................................3-134
Theft-Deterrent Feature................................3-135
Audio Steering Wheel Controls......................3-136
Radio Reception.........................................3-137
Care of Your Cassette Tape Player...............3-137
Care of Your CDs and DVDs........................3-138
Care of Your CD and DVD Player.................3-139
Fixed Mast Antenna....................................3-139
XM™ Satellite Radio Antenna System............3-139
Chime Level Adjustment...............................3-139
Section 3 Instrument Panel
3-2
Page 180 of 502
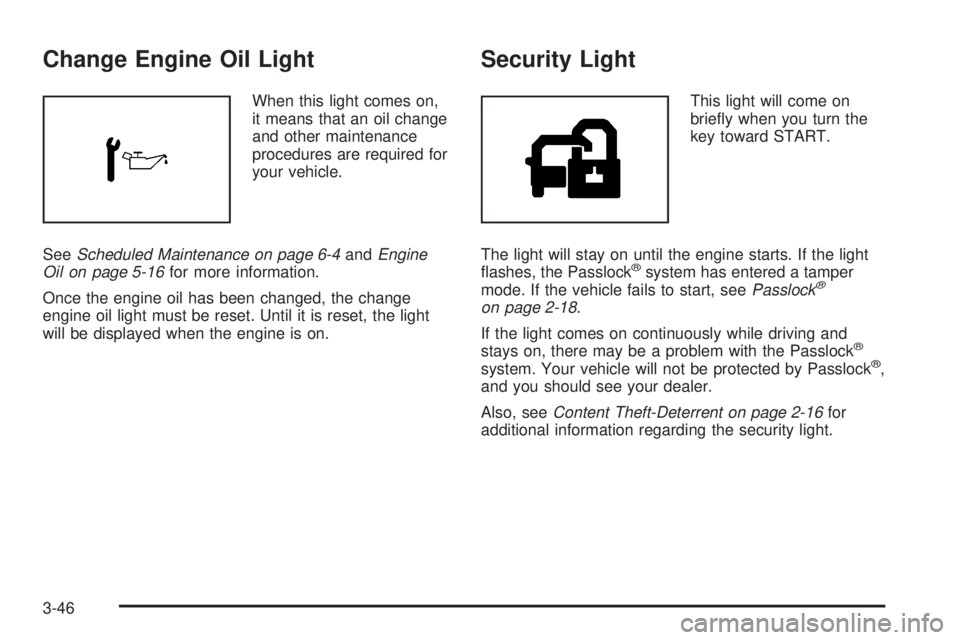
Change Engine Oil Light
When this light comes on,
it means that an oil change
and other maintenance
procedures are required for
your vehicle.
SeeScheduled Maintenance on page 6-4andEngine
Oil on page 5-16for more information.
Once the engine oil has been changed, the change
engine oil light must be reset. Until it is reset, the light
will be displayed when the engine is on.
Security Light
This light will come on
brie�y when you turn the
key toward START.
The light will stay on until the engine starts. If the light
�ashes, the Passlock
®system has entered a tamper
mode. If the vehicle fails to start, seePasslock®
on page 2-18.
If the light comes on continuously while driving and
stays on, there may be a problem with the Passlock
®
system. Your vehicle will not be protected by Passlock®,
and you should see your dealer.
Also, seeContent Theft-Deterrent on page 2-16for
additional information regarding the security light.
3-46
Page 185 of 502
Low Fuel Warning Light
The light next to the fuel gage will come on brie�y when
you are starting the engine.
This light comes on when the fuel tank is low on fuel.
To turn it off, add fuel to the fuel tank. SeeFuel on
page 5-5.
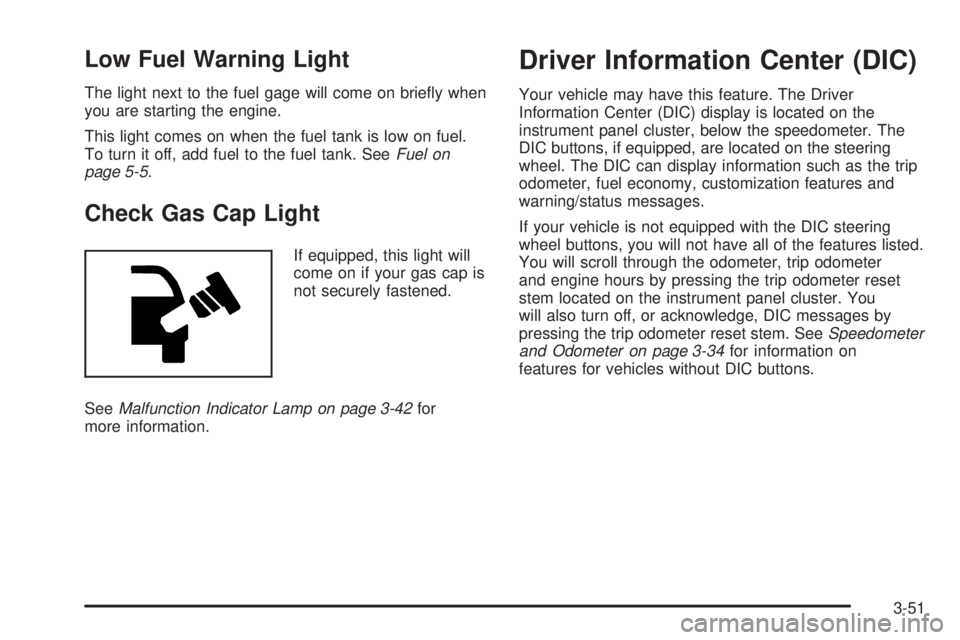
Check Gas Cap Light
If equipped, this light will
come on if your gas cap is
not securely fastened.
SeeMalfunction Indicator Lamp on page 3-42for
more information.
Driver Information Center (DIC)
Your vehicle may have this feature. The Driver
Information Center (DIC) display is located on the
instrument panel cluster, below the speedometer. The
DIC buttons, if equipped, are located on the steering
wheel. The DIC can display information such as the trip
odometer, fuel economy, customization features and
warning/status messages.
If your vehicle is not equipped with the DIC steering
wheel buttons, you will not have all of the features listed.
You will scroll through the odometer, trip odometer
and engine hours by pressing the trip odometer reset
stem located on the instrument panel cluster. You
will also turn off, or acknowledge, DIC messages by
pressing the trip odometer reset stem. SeeSpeedometer
and Odometer on page 3-34for information on
features for vehicles without DIC buttons.
3-51
Page 208 of 502
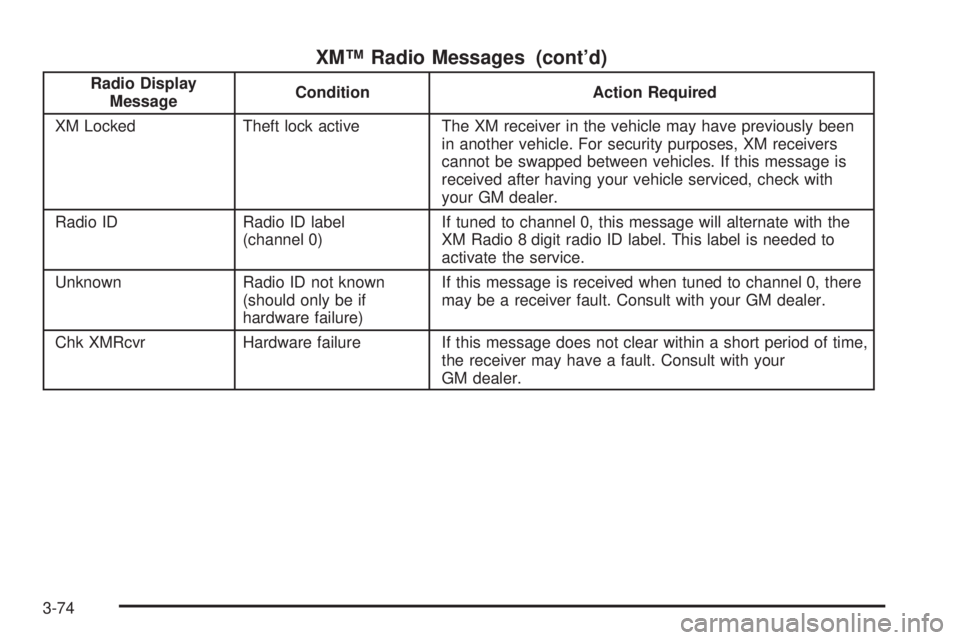
XM™ Radio Messages (cont’d)
Radio Display
MessageCondition Action Required
XM Locked Theft lock active The XM receiver in the vehicle may have previously been
in another vehicle. For security purposes, XM receivers
cannot be swapped between vehicles. If this message is
received after having your vehicle serviced, check with
your GM dealer.
Radio ID Radio ID label
(channel 0)If tuned to channel 0, this message will alternate with the
XM Radio 8 digit radio ID label. This label is needed to
activate the service.
Unknown Radio ID not known
(should only be if
hardware failure)If this message is received when tuned to channel 0, there
may be a receiver fault. Consult with your GM dealer.
Chk XMRcvr Hardware failure If this message does not clear within a short period of time,
the receiver may have a fault. Consult with your
GM dealer.
3-74
Page 219 of 502
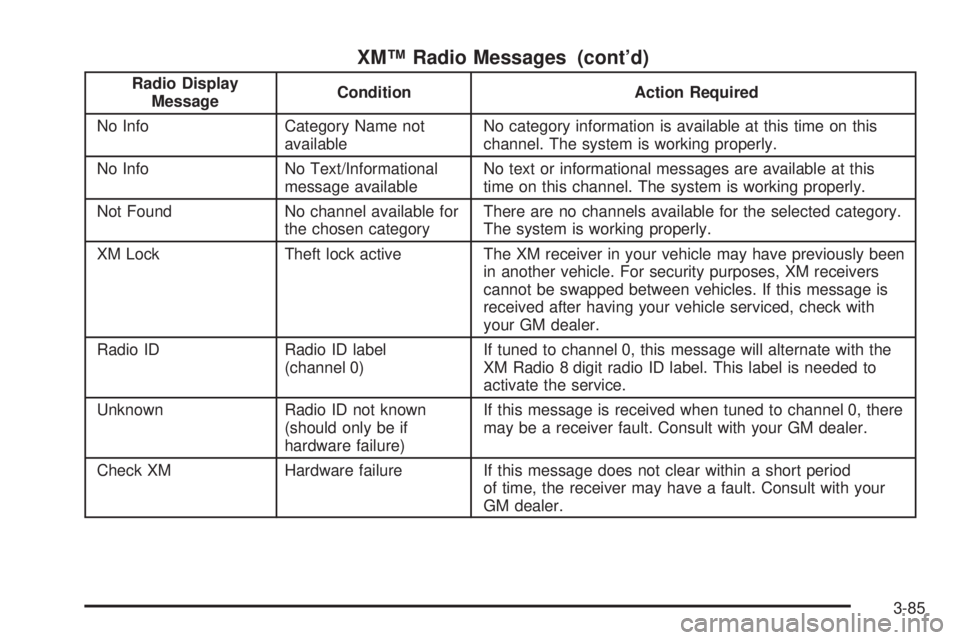
XM™ Radio Messages (cont’d)
Radio Display
MessageCondition Action Required
No Info Category Name not
availableNo category information is available at this time on this
channel. The system is working properly.
No Info No Text/Informational
message availableNo text or informational messages are available at this
time on this channel. The system is working properly.
Not Found No channel available for
the chosen categoryThere are no channels available for the selected category.
The system is working properly.
XM Lock Theft lock active The XM receiver in your vehicle may have previously been
in another vehicle. For security purposes, XM receivers
cannot be swapped between vehicles. If this message is
received after having your vehicle serviced, check with
your GM dealer.
Radio ID Radio ID label
(channel 0)If tuned to channel 0, this message will alternate with the
XM Radio 8 digit radio ID label. This label is needed to
activate the service.
Unknown Radio ID not known
(should only be if
hardware failure)If this message is received when tuned to channel 0, there
may be a receiver fault. Consult with your GM dealer.
Check XM Hardware failure If this message does not clear within a short period
of time, the receiver may have a fault. Consult with your
GM dealer.
3-85
Page 234 of 502
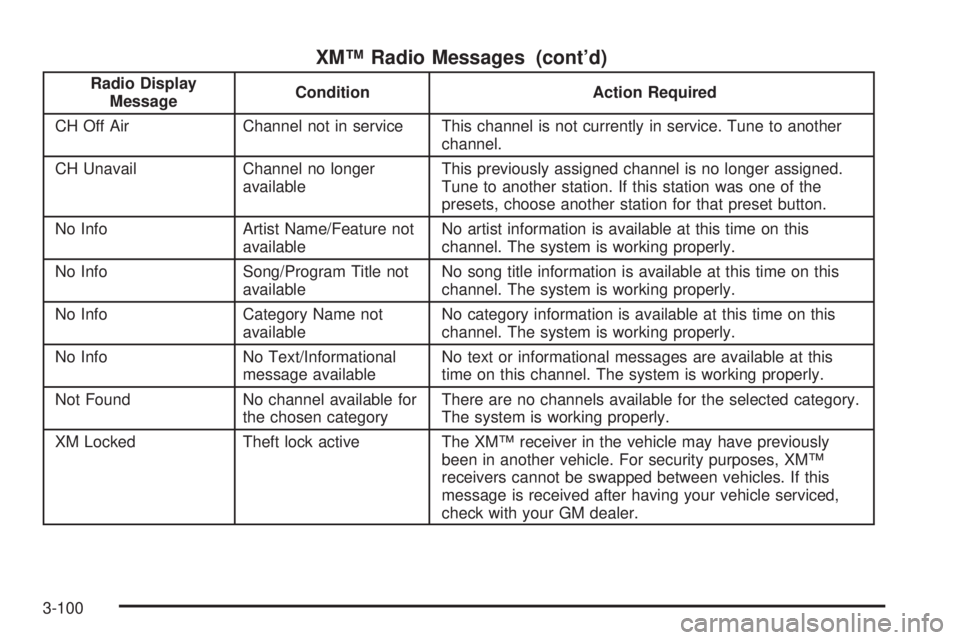
XM™ Radio Messages (cont’d)
Radio Display
MessageCondition Action Required
CH Off Air Channel not in service This channel is not currently in service. Tune to another
channel.
CH Unavail Channel no longer
availableThis previously assigned channel is no longer assigned.
Tune to another station. If this station was one of the
presets, choose another station for that preset button.
No Info Artist Name/Feature not
availableNo artist information is available at this time on this
channel. The system is working properly.
No Info Song/Program Title not
availableNo song title information is available at this time on this
channel. The system is working properly.
No Info Category Name not
availableNo category information is available at this time on this
channel. The system is working properly.
No Info No Text/Informational
message availableNo text or informational messages are available at this
time on this channel. The system is working properly.
Not Found No channel available for
the chosen categoryThere are no channels available for the selected category.
The system is working properly.
XM Locked Theft lock active The XM™ receiver in the vehicle may have previously
been in another vehicle. For security purposes, XM™
receivers cannot be swapped between vehicles. If this
message is received after having your vehicle serviced,
check with your GM dealer.
3-100
Page 248 of 502
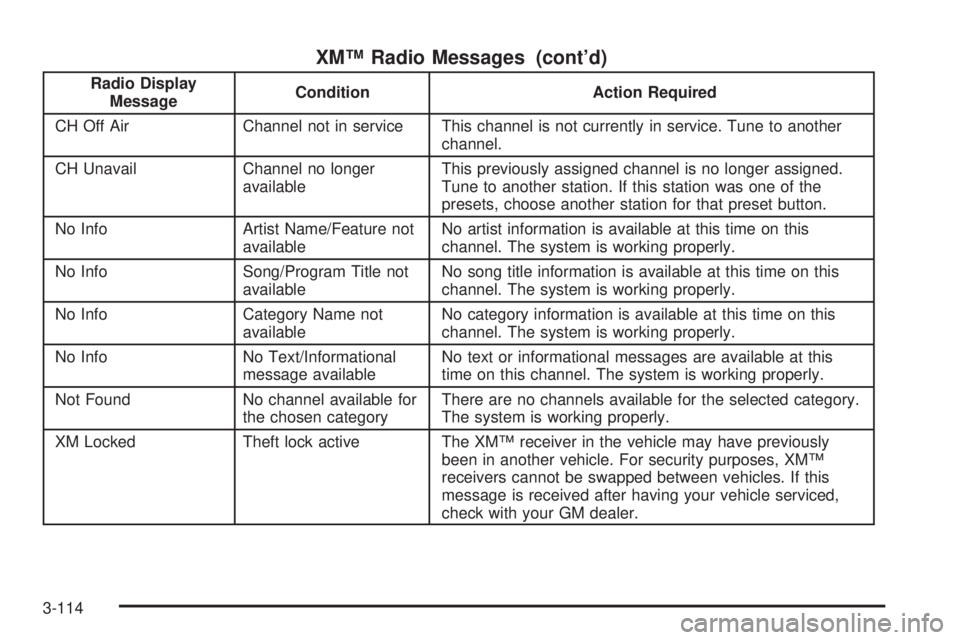
XM™ Radio Messages (cont’d)
Radio Display
MessageCondition Action Required
CH Off Air Channel not in service This channel is not currently in service. Tune to another
channel.
CH Unavail Channel no longer
availableThis previously assigned channel is no longer assigned.
Tune to another station. If this station was one of the
presets, choose another station for that preset button.
No Info Artist Name/Feature not
availableNo artist information is available at this time on this
channel. The system is working properly.
No Info Song/Program Title not
availableNo song title information is available at this time on this
channel. The system is working properly.
No Info Category Name not
availableNo category information is available at this time on this
channel. The system is working properly.
No Info No Text/Informational
message availableNo text or informational messages are available at this
time on this channel. The system is working properly.
Not Found No channel available for
the chosen categoryThere are no channels available for the selected category.
The system is working properly.
XM Locked Theft lock active The XM™ receiver in the vehicle may have previously
been in another vehicle. For security purposes, XM™
receivers cannot be swapped between vehicles. If this
message is received after having your vehicle serviced,
check with your GM dealer.
3-114