tire GMC ENVOY DENALI 2009 Owners Manual
[x] Cancel search | Manufacturer: GMC, Model Year: 2009, Model line: ENVOY DENALI, Model: GMC ENVOY DENALI 2009Pages: 474, PDF Size: 2.54 MB
Page 1 of 474
Seats and Restraint System............................. 1-1
Front Seats
............................................... 1-2
Rear Seats
..............................................1-11
Safety Belts
.............................................1-13
Child Restraints
.......................................1-32
Airbag System
.........................................1-55
Restraint System Check
............................1-70
Features and Controls..................................... 2-1
Keys
........................................................ 2-3
Doors and Locks
....................................... 2-7
Windows
.................................................2-13
Theft-Deterrent Systems
............................2-16
Starting and Operating Your Vehicle
...........2-20
Mirrors
....................................................2-39
OnStar
®System
......................................2-43
Universal Home Remote System
................2-46
Storage Areas
.........................................2-51
Sunroof
..................................................2-55
Instrument Panel............................................. 3-1
Instrument Panel Overview
.......................... 3-4
Climate Controls
......................................3-19
Warning Lights, Gages, and Indicators
........3-27
Driver Information Center (DIC)
..................3-47
Audio System(s)
.......................................3-62Driving Your Vehicle....................................... 4-1
Your Driving, the Road, and the Vehicle
....... 4-2
Towing
...................................................4-38
Service and Appearance Care.......................... 5-1
Service
..................................................... 5-3
Fuel
......................................................... 5-5
Checking Things Under the Hood
...............5-10
Rear Axle
...............................................5-43
Four-Wheel Drive
.....................................5-44
Front Axle
...............................................5-44
Headlamp Aiming
.....................................5-45
Bulb Replacement
....................................5-46
Windshield Wiper Blade Replacement
.........5-50
Tires
......................................................5-53
Appearance Care
...................................5-103
Vehicle Identication
...............................5-111
Electrical System
....................................5-112
Capacities and Specications
...................5-120
Maintenance Schedule..................................... 6-1
Maintenance Schedule
................................ 6-2
Customer Assistance Information.................... 7-1
Customer Assistance and Information
........... 7-2
Reporting Safety Defects
...........................7-14
Vehicle Data Recording and Privacy
...........7-16
Index................................................................ 1
2009 GMC Envoy and Envoy Denali Owner ManualM
Page 4 of 474

Vehicle Symbol Chart
Here are some additional symbols that may be found on
the vehicle and what they mean. For more information
on the symbol, refer to the index.
0:Adjustable Pedals
9:Airbag Readiness Light
#:Air Conditioning
!:Antilock Brake System (ABS)
g:Audio Steering Wheel Controls or OnStar®
$:Brake System Warning Light
":Charging System
I:Cruise Control
B:Engine Coolant Temperature
O:Exterior Lamps
#:Fog Lamps
.:Fuel Gage
+:Fuses
i:Headlamp High/Low-Beam Changer
j:LATCH System Child Restraints
*:Malfunction Indicator Lamp
::Oil Pressure
}:Power
/:Remote Vehicle Start
>:Safety Belt Reminders
7:Tire Pressure Monitor
F:Traction Control
M:Windshield Washer Fluid
iv
Page 7 of 474
Power Seats
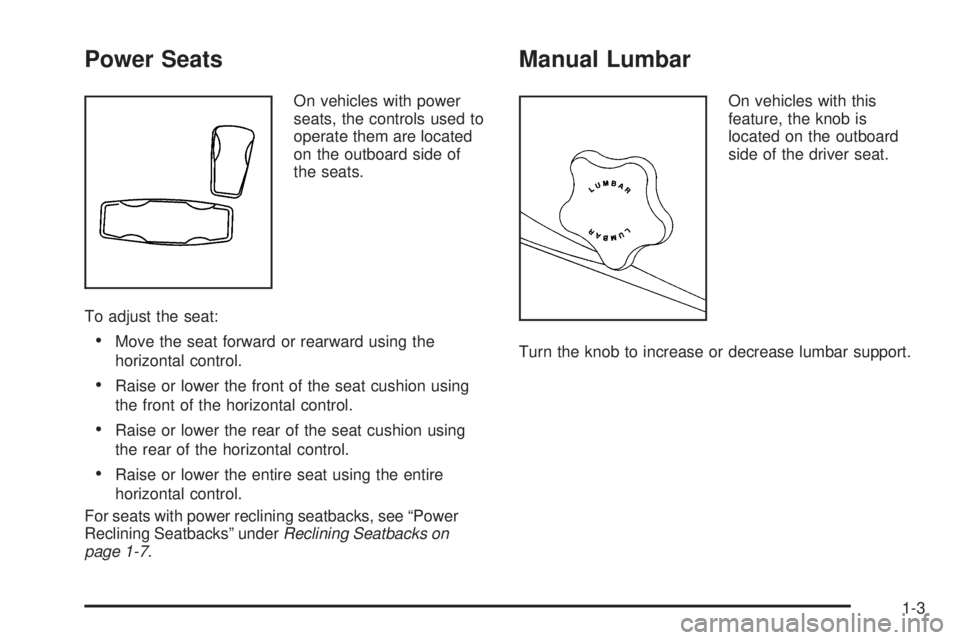
On vehicles with power
seats, the controls used to
operate them are located
on the outboard side of
the seats.
To adjust the seat:
Move the seat forward or rearward using the
horizontal control.
Raise or lower the front of the seat cushion using
the front of the horizontal control.
Raise or lower the rear of the seat cushion using
the rear of the horizontal control.
Raise or lower the entire seat using the entire
horizontal control.
For seats with power reclining seatbacks, see “Power
Reclining Seatbacks” underReclining Seatbacks on
page 1-7.
Manual Lumbar
On vehicles with this
feature, the knob is
located on the outboard
side of the driver seat.
Turn the knob to increase or decrease lumbar support.
1-3
Page 8 of 474
Power Lumbar
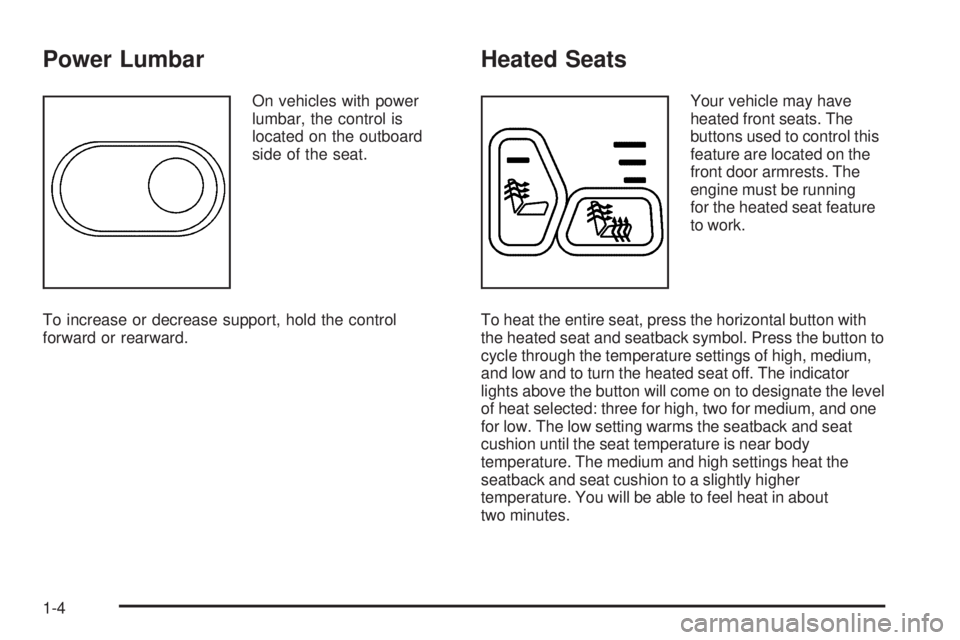
On vehicles with power
lumbar, the control is
located on the outboard
side of the seat.
To increase or decrease support, hold the control
forward or rearward.
Heated Seats
Your vehicle may have
heated front seats. The
buttons used to control this
feature are located on the
front door armrests. The
engine must be running
for the heated seat feature
to work.
To heat the entire seat, press the horizontal button with
the heated seat and seatback symbol. Press the button to
cycle through the temperature settings of high, medium,
and low and to turn the heated seat off. The indicator
lights above the button will come on to designate the level
of heat selected: three for high, two for medium, and one
for low. The low setting warms the seatback and seat
cushion until the seat temperature is near body
temperature. The medium and high settings heat the
seatback and seat cushion to a slightly higher
temperature. You will be able to feel heat in about
two minutes.
1-4
Page 73 of 474
Adding Equipment to Your
Airbag-Equipped Vehicle
Q:Is there anything I might add to or change
about the vehicle that could keep the airbags
from working properly?
A:Yes. If you add things that change your vehicle’s
frame, bumper system, height, front end or side
sheet metal, they may keep the airbag system from
working properly. Changing or moving any parts of
the front seats, safety belts, the airbag sensing and
diagnostic module, steering wheel, instrument panel,
roof-rail airbag modules, ceiling headliner or pillar
garnish trim, rearview mirror, front sensors, rollover
sensor module, or airbag wiring can affect the
operation of the airbag system.
In addition, your vehicle has a passenger sensing
system for the right front passenger’s position, which
includes sensors that are part of the passenger’s
seat. The passenger sensing system may not
operate properly if the original seat trim is replaced
with non-GM covers, upholstery or trim, or with GM
covers, upholstery or trim designed for a different
vehicle. Any object, such as an aftermarket seat
heater or a comfort enhancing pad or device,
installed under or on top of the seat fabric, could alsointerfere with the operation of the passenger sensing
system. This could either prevent proper deployment
of the passenger airbag(s) or prevent the passenger
sensing system from properly turning off the
passenger airbag(s). SeePassenger Sensing
System on page 1-64.
If you have any questions about this, you should
contact Customer Assistance before you modify
your vehicle. The phone numbers and addresses for
Customer Assistance are in Step Two of the
Customer Satisfaction Procedure in this manual.
SeeCustomer Satisfaction Procedure on page 7-2.
If your vehicle has rollover roof-rail airbags, see
Different Size Tires and Wheels on page 5-72
for additional important information.
Q:Because I have a disability, I have to get my
vehicle modied. How can I nd out whether this
will affect my airbag system?
A:If you have questions, call Customer Assistance.
The phone numbers and addresses for Customer
Assistance are in Step Two of the Customer
Satisfaction Procedure in this manual. SeeCustomer
Satisfaction Procedure on page 7-2.
In addition, your dealer/retailer and the service manual
have information about the location of the airbag sensors,
sensing and diagnostic module and airbag wiring.
1-69
Page 88 of 474
Liftgate/Liftglass
{CAUTION:
It can be dangerous to drive with the liftgate or
liftglass open because carbon monoxide (CO) gas
can come into your vehicle. You cannot see or
smell CO. It can cause unconsciousness and even
death. If you must drive with the liftgate open or if
electrical wiring or other cable connections must
pass through the seal between the body and the
liftgate or liftglass:
Make sure all other windows are shut.
Turn the fan on your climate control system to
its highest speed and select the control setting
that will force outside air into your vehicle. See
“Climate Control System” in the Index.
If you have air outlets on or under the
instrument panel, open them all the way. See
Engine Exhaust on page 2-37.
Liftgate Release
To unlock the liftgate, use the power door lock switch or
the remote keyless entry transmitter. SeeRemote
Keyless Entry (RKE) System Operation on page 2-5.
The liftglass will also unlock when the liftgate is
unlocked.
Press the button on the liftglass to open it. To open the
entire liftgate, lift the handle located in the center of
the liftgate. When the liftgate is opened, the liftglass will
lock after a short delay.
Emergency Release for Opening
Liftgate
1. Remove the trim plug, located on the inside of the
liftgate in the center, to expose the access hole in
the trim panel.
2. Use a tool to reach through the access hole in the
trim panel.
3. Pry the left release lever up to the unlock position.
Pry the right release lever up to unlatch the liftgate.
4. Reinstall the trim plug.
2-12
Page 104 of 474
To shift to the 3 (Third) position, you must rst press the
large button on the shift handle. While the button is
pressed, move the shifter in the 3 (Third) position.
2 (Second):This position reduces vehicle speed even
more than 3 (Third) without using the brakes. You can
use 2 (Second) on hills. It can help you control vehicle
speed as you go down steep mountain roads, as you use
your brakes off and on.
To shift to the 2 (Second) position, you must rst press
the large button on the shift handle. While the button is
pressed, move the shifter in the 2 (Second) position.
You can also use 2 (Second) for starting the vehicle from
a stop on slippery road surfaces.
1 (First):This position reduces vehicle speed even
more than 2 (Second) without using the brakes. You can
use it on very steep hills, or in deep snow or mud. If
the shift lever is put in 1 (First) while the vehicle
is moving forward, the transmission will not shift into
rst gear until the vehicle is going slowly enough.
To shift to the 1 (First) position, you must rst press the
large button on the shift handle. While the button is
pressed, move the shifter in the 1 (First) position.Notice:Spinning the tires or holding the vehicle in
one place on a hill using only the accelerator pedal
may damage the transmission. The repair will not be
covered by the vehicle warranty. If you are stuck, do
not spin the tires. When stopping on a hill, use the
brakes to hold the vehicle in place.
Four-Wheel Drive
If the vehicle has four-wheel drive, the engine’s driving
power can be sent to all four wheels for extra traction.
Read the following before using four-wheel drive,
to become familiar with its operation. You should use
Two-Wheel High for most normal driving conditions.
Notice:Driving on clean, dry pavement in
Four-Wheel-Drive High or Four-Wheel-Drive Low for
an extended period of time may cause premature
wear on your vehicle’s powertrain. Do not drive on
clean, dry pavement in Four-Wheel-Drive High or
Four-Wheel-Drive Low for extended periods of time.
Notice:If you continually drive your vehicle with the
transfer case in AUTO or Four-Wheel Drive, you
could shorten the life of the transfer case or the
Four-Wheel Drive system. The selector switch should
be left in Two-Wheel Drive High mode. Only use
AUTO and Four-Wheel Drive when you need extra
traction such as in wet or slippery road conditions.
2-28
Page 124 of 474
Programming the Universal Home
Remote System
For questions or help programming the Universal
Home Remote System, call 1-800-355-3515 or go to
www.homelink.com.
Programming a garage door opener involves
time-sensitive actions, so read the entire procedure
before starting. Otherwise, the device will time out and
the procedure will have to be repeated.
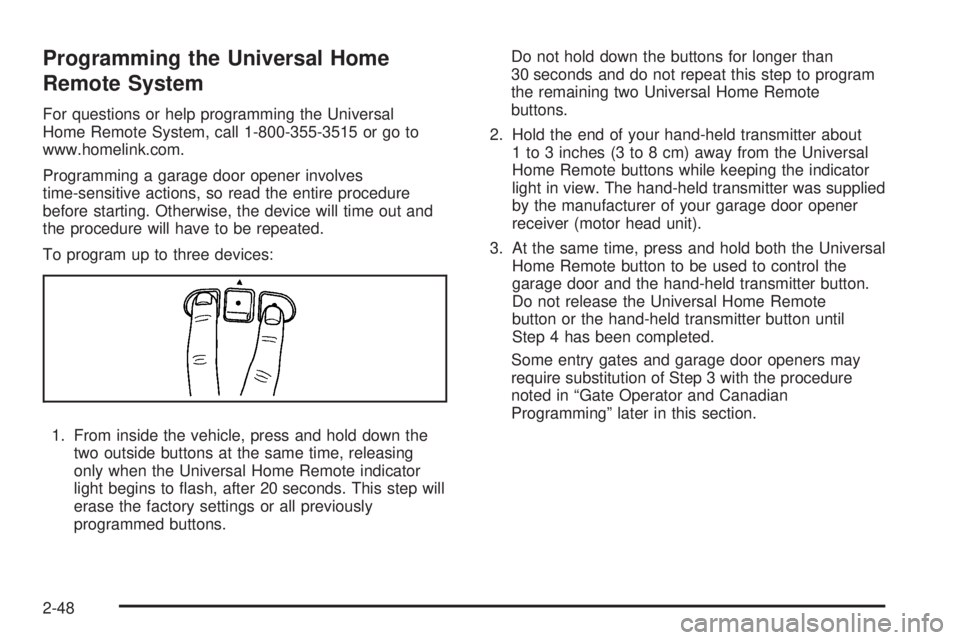
To program up to three devices:
1. From inside the vehicle, press and hold down the
two outside buttons at the same time, releasing
only when the Universal Home Remote indicator
light begins to ash, after 20 seconds. This step will
erase the factory settings or all previously
programmed buttons.Do not hold down the buttons for longer than
30 seconds and do not repeat this step to program
the remaining two Universal Home Remote
buttons.
2. Hold the end of your hand-held transmitter about
1 to 3 inches (3 to 8 cm) away from the Universal
Home Remote buttons while keeping the indicator
light in view. The hand-held transmitter was supplied
by the manufacturer of your garage door opener
receiver (motor head unit).
3. At the same time, press and hold both the Universal
Home Remote button to be used to control the
garage door and the hand-held transmitter button.
Do not release the Universal Home Remote
button or the hand-held transmitter button until
Step 4 has been completed.
Some entry gates and garage door openers may
require substitution of Step 3 with the procedure
noted in “Gate Operator and Canadian
Programming” later in this section.
2-48
Page 134 of 474
Brake System Warning Light..........................3-35
Antilock Brake System (ABS) Warning Light.....3-36
StabiliTrak
®Service Light...............................3-36
StabiliTrak®Indicator Light.............................3-37
Engine Coolant Temperature Gage..................3-37
Tire Pressure Light.......................................3-38
Malfunction Indicator Lamp.............................3-38
Oil Pressure Gage........................................3-42
Change Engine Oil Light................................3-43
Security Light...............................................3-43
Cruise Control Light......................................3-43
Reduced Engine Power Light.........................3-44
Highbeam On Light.......................................3-44
Service Four-Wheel Drive Warning Light..........3-44
Check Gages Warning Light...........................3-45
Gate Ajar Light.............................................3-45
Fuel Gage...................................................3-46
Low Fuel Warning Light.................................3-47
Check Gas Cap Light....................................3-47Driver Information Center (DIC).......................3-47
DIC Operation and Displays...........................3-48
DIC Warnings and Messages.........................3-51
DIC Vehicle Customization.............................3-56
Audio System(s).............................................3-62
Setting the Clock..........................................3-63
Radio(s)......................................................3-64
Using an MP3..............................................3-80
XM Radio Messages.....................................3-84
Navigation/Radio System...............................3-86
Bluetooth
®...................................................3-86
Rear Seat Entertainment (RSE) System...........3-96
Rear Seat Audio (RSA)................................3-109
Theft-Deterrent Feature................................3-110
Audio Steering Wheel Controls......................3-110
Radio Reception.........................................3-111
Fixed Mast Antenna....................................3-112
XM™ Satellite Radio Antenna System............3-112
Chime Level Adjustment...............................3-112
Section 3 Instrument Panel
3-2
Page 142 of 474

To wash the rear window, press=located in the
center of the control.
The rear window washer uses the uid from the same
reservoir as the windshield washer. However, the
rear window washer runs out of uid before the
windshield washer. If the windshield can be washed,
but not the rear window, check the uid level.
Headlamp Washer
For vehicles with a
headlamp washer system,
the headlamp washer
button is located on the
instrument panel.
Press the button briey and then release to wash the
headlamps.
This system is separate from the other washer systems.
Cruise Control
With cruise control, a speed of about 25 mph (40 km/h)
or more can be maintained without keeping your foot
on the accelerator. Cruise control does not work
at speeds below about 25 mph (40 km/h).
If you apply the brakes, the cruise control shuts off.
{CAUTION:
Cruise control can be dangerous where you cannot
drive safely at a steady speed. So, do not use the
cruise control on winding roads or in heavy traffic.
Cruise control can be dangerous on slippery roads.
On such roads, fast changes in tire traction can
cause excessive wheel slip, and you could lose
control. Do not use cruise control on slippery roads.
3-10