lock GMC ENVOY XUV 2004 Owners Manual
[x] Cancel search | Manufacturer: GMC, Model Year: 2004, Model line: ENVOY XUV, Model: GMC ENVOY XUV 2004Pages: 460, PDF Size: 2.99 MB
Page 334 of 460

A cold ¯uid check can be made after the vehicle has
been sitting for eight hours or more with the engine off,
but this is used only as a reference. Let the engine
run at idle for ®ve minutes if outside temperatures are
50ÉF (10ÉC) or more. If it's colder than 50ÉF (10ÉC), you
may have to idle the engine longer. Should the ¯uid
level be low during this cold check, you
mustcheck the
¯uid hot before adding ¯uid. Checking the ¯uid hot
will give you a more accurate reading of the ¯uid level.
Checking the Fluid Level
Prepare your vehicle as follows:
·Park your vehicle on a level place. Keep the engine
running.
·With the parking brake applied, place the shift lever
in PARK (P).
·With your foot on the brake pedal, move the shift
lever through each gear range, pausing for about
three seconds in each range. Then, position the shift
lever in PARK (P).
·Let the engine run at idle for three minutes or more.Then, without shutting off the engine, follow
these steps:
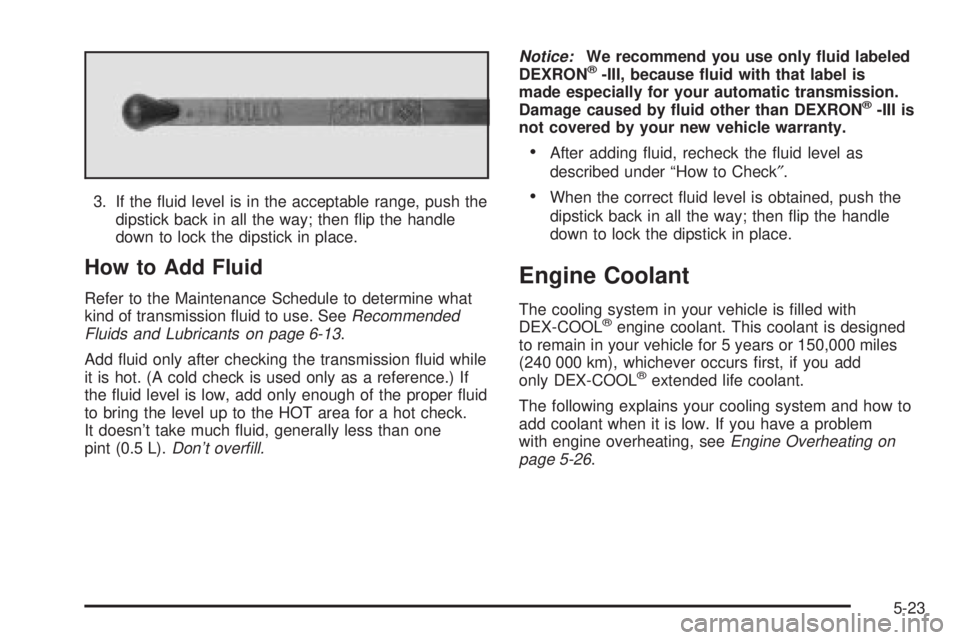
The automatic
transmission dipstick
handle with the
transmission and lock
symbol is located in the
engine compartment
on the passenger's side of
the vehicle.
See
Engine Compartment Overview on page 5-12for
more information on location.
1. Flip the handle up and then pull out the dipstick
and wipe it with a clean rag or paper towel.
2. Push it back in all the way, wait three seconds and
then pull it back out again. Check both sides of the
dipstick, and read the lower level.
5-22
Page 335 of 460

3. If the ¯uid level is in the acceptable range, push the
dipstick back in all the way; then ¯ip the handle
down to lock the dipstick in place.
How to Add Fluid
Refer to the Maintenance Schedule to determine what
kind of transmission ¯uid to use. SeeRecommended
Fluids and Lubricants on page 6-13.
Add ¯uid only after checking the transmission ¯uid while
it is hot. (A cold check is used only as a reference.) If
the ¯uid level is low, add only enough of the proper ¯uid
to bring the level up to the HOT area for a hot check.
It doesn't take much ¯uid, generally less than one
pint (0.5 L).
Don't over®ll.Notice:
We recommend you use only ¯uid labeled
DEXRONž-III, because ¯uid with that label is
made especially for your automatic transmission.
Damage caused by ¯uid other than DEXRON
ž-III is
not covered by your new vehicle warranty.
·After adding ¯uid, recheck the ¯uid level as
described under ªHow to Check².
·When the correct ¯uid level is obtained, push the
dipstick back in all the way; then ¯ip the handle
down to lock the dipstick in place.
Engine Coolant
The cooling system in your vehicle is ®lled with
DEX-COOLžengine coolant. This coolant is designed
to remain in your vehicle for 5 years or 150,000 miles
(240 000 km), whichever occurs ®rst, if you add
only DEX-COOL
žextended life coolant.
The following explains your cooling system and how to
add coolant when it is low. If you have a problem
with engine overheating, see
Engine Overheating on
page 5-26.
5-23
Page 344 of 460

How to Add Coolant to the Radiator
1. You can remove the radiator pressure cap when
the cooling system, including the radiator pressure
cap and upper radiator hose, is no longer hot.
Turn the pressure cap slowly counterclockwise
about one full turn.
If you hear a hiss, wait for that to stop. A hiss
means there is still some pressure left.2. Then keep turning the pressure cap. Remove the
pressure cap.
5-32
Page 360 of 460

When the differential is cold, add enough lubricant to
raise the level to 1/2 inch (12 mm) below the ®ller
plug hole.
When the differential is at operating temperature
(warm), add enough lubricant to raise the level to the
bottom of the ®ller plug hole.
What to Use
To determine what kind of lubricant to use, seeRecommended Fluids and Lubricants on page 6-13.
Bulb Replacement
For the type of bulbs, seeReplacement Bulbs on
page 5-50.
For any bulb changing procedure not listed in this
section, contact your dealer.
Headlamps
1. Open the hood.
2. Lift the inner quick release clips.
3. Pull the headlamp assembly away from the vehicle.
4. Remove the cover from the headlamp bulb.
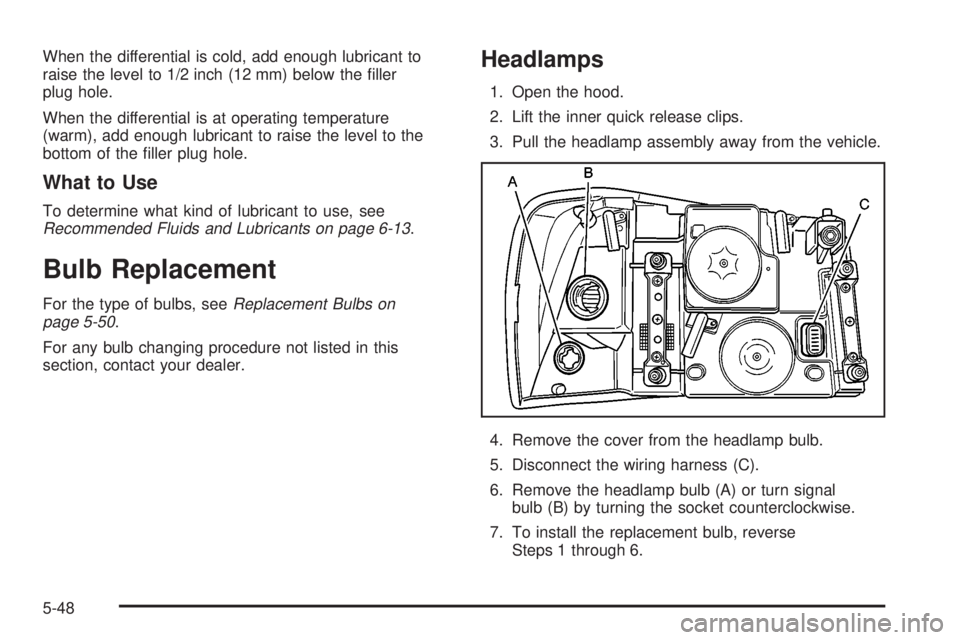
5. Disconnect the wiring harness (C).
6. Remove the headlamp bulb (A) or turn signal
bulb (B) by turning the socket counterclockwise.
7. To install the replacement bulb, reverse
Steps 1 through 6.
5-48
Page 361 of 460

Taillamps and Turn Signal Lamps
1. Drop the tailgate.
2. Remove the two
screws from the lamp
assembly.
3. Pull the assembly away from the vehicle.4. Unclip the wiring
harness (B).
5. Remove the socket (Turn Signal Lamp (A) or Brake
Lamp (C)) by rotating it counterclockwise.
6. Holding the socket, pull the bulb to release it from
the socket.
7. Push the new bulb into the socket until it clicks.
8. Reverse steps 1 through 5 to reinstall the lamp
assembly.
5-49
Page 362 of 460

Replacement Bulbs
Exterior Lamp Bulb Number
Halogen Headlamps
Low Beam 9006 HB4
High Beam 9005 HB3
Front Sidemarker Lamps 194
Front Turn Signal Lamps 3457
Tail and Stoplamps 3057
Rear Turn Signal Lamps 3057
Back Up Lamps 3157
For any bulb not listed here, contact your dealer.
Windshield Wiper Blade
Replacement
Windshield wiper blades should be inspected at least
twice a year for wear or cracking.
Notice:Allowing the wiper blade arm to touch the
windshield when no wiper blade is installed
could damage the windshield. Any damage that
occurs would not be covered by your warranty. Do
not allow the wiper blade arm to touch the
windshield.
1. To remove the old wiper blades, lift the wiper arm
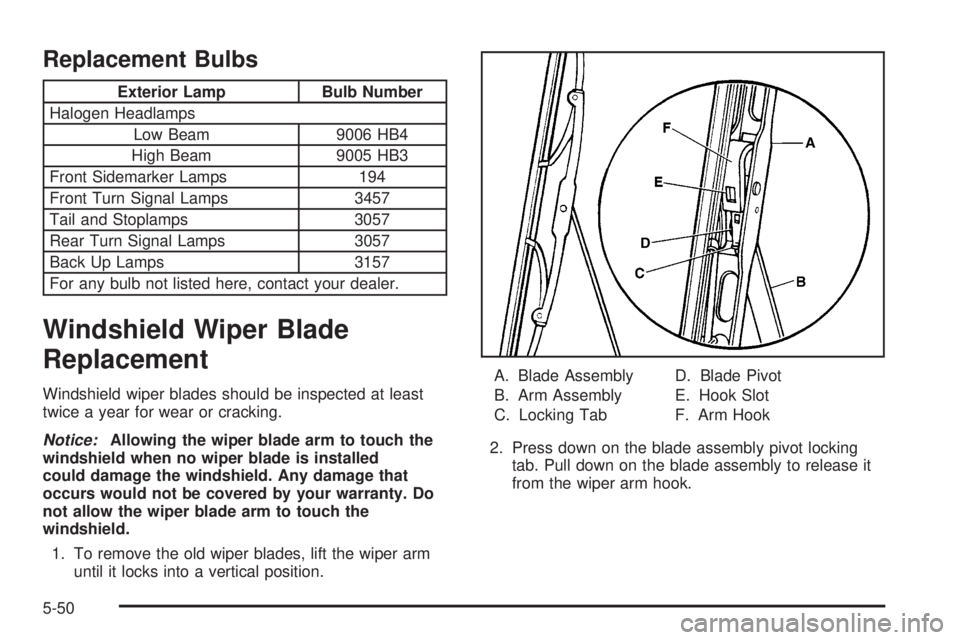
until it locks into a vertical position.A. Blade Assembly
B. Arm Assembly
C. Locking TabD. Blade Pivot
E. Hook Slot
F. Arm Hook
2. Press down on the blade assembly pivot locking
tab. Pull down on the blade assembly to release it
from the wiper arm hook.
5-50
Page 363 of 460

3. Remove the insert from the blade assembly. The
insert has two notches at one end that are locked
by the bottom claws of the blade assembly. At
the notched end, pull the insert from the blade
assembly.
4. To install the new wiper insert, slide the insert (D),
notched end last, into the end with two blade
claws (A). Slide the insert all the way through the
blade claws at the opposite end (B). The plastic
caps (C) will be forced off as the insert is fully
inserted.
5. Be sure that the notches are locked by the bottom
claws. Make sure that all other claws are properly
locked on both sides of the insert slots.A. Claw in Notch
B. Correct Installation
C. Incorrect Installation
6. Put the blade assembly pivot in the wiper arm
hook. Pull up until the pivot locking tab locks in
the hook slot.
7. Carefully lower the wiper arm and blade assembly
onto the windshield.
5-51
Page 364 of 460

Backglass Wiper Blade Replacement
SeeWindshield Wiper Blade Replacement on page 5-50for instructions on how to change the backglass wiper
blade. The backglass wiper blade will not lock in a
vertical position like the windshield wiper blade, so care
should be used when pulling it away from the vehicle.
Tires
Your new vehicle comes with high-quality tires made by
a leading tire manufacturer. If you ever have questions
about your tire warranty and where to obtain service,
see your GM Warranty booklet for details. For additional
information refer to the tire manufacturer's booklet
included with your vehicle's Owner's Manual.
{CAUTION:
Poorly maintained and improperly used tires
are dangerous.
·Overloading your tires can cause
overheating as a result of too much
CAUTION: (Continued)
CAUTION: (Continued)
friction. You could have an air-out and a
serious accident. See ªLoading Your
Vehicleº in the Index.
·Underin¯ated tires pose the same danger
as overloaded tires. The resulting accident
could cause serious injury. Check all tires
frequently to maintain the recommended
pressure. Tire pressure should be checked
when your tires are cold.
·Overin¯ated tires are more likely to be
cut, punctured or broken by a sudden
impact Ð such as when you hit a pothole.
Keep tires at the recommended pressure.
·Worn, old tires can cause accidents. If
your tread is badly worn, or if your tires
have been damaged, replace them.
Tire Sidewall Labeling
Useful information about a tire is molded into the
sidewall. The following illustrations are examples of a
typical P-Metric and a LT-Metric tire sidewall.
5-52
Page 381 of 460

To use the air in¯ator, attach the appropriate nozzle
adapter to the end of the hose if required. Then attach
that end of the hose to the object you wish to in¯ate.
Attach the other end of the hose to the outlet.
Press and release the switch to turn the air in¯ator on.
The indicator light will remain on when the in¯ator is
running.
The system has an internal clock to prevent overheating.
The system will allow about ®ve minutes of running
time, then the compressor will stop. The indicator light
will then begin to ¯ash. When the indicator is off,
the in¯ator can be started again by pressing the switch.
If the compressor is still hot, it may only run for a
short time before shutting off again.
Press and release the switch to turn the in¯ator off.
Place the in¯ator kit tools in the pouch and store
it properly. Remove the in¯ator hose from the outlet
during loading and unloading. Load leveling will
not function with the in¯ator hose attached to the
in¯ator outlet.To reinstall the cover, line up the tabs at the back of the
cover, put it in place and latch the tabs.
A continuous ¯ashing indicator light may also indicate a
malfunction in the air suspension system.
{CAUTION:
In¯ating something too much can make it
explode, and you or others could be injured.
Be sure to read the in¯ator instructions, and
in¯ate any object only to its recommended
pressure.
5-69
Page 383 of 460

Changing a Flat Tire
If a tire goes ¯at, avoid further tire and wheel damage
by driving slowly to a level place. Turn on your
hazard warning ¯ashers.
{CAUTION:
Changing a tire can be dangerous. The vehicle
can slip off the jack and roll over or fall on you
or other people. You and they could be badly
injured or even killed. Find a level place to
change your tire. To help prevent the vehicle
from moving:
1. Set the parking brake ®rmly.
2. Put the shift lever in PARK (P).
3. If you have a four-wheel-drive vehicle,
be sure the transfer case is in a drive
gear ± not in NEUTRAL.
4. Turn off the engine and do not restart
while the vehicle is raised.
5. Do not allow passengers to remain in the
vehicle.
CAUTION: (Continued)
CAUTION: (Continued)
6. Put the wheel blocks at the front and rear
of the tire farthest away from the one
being changed. That would be the tire on
the other side, at the opposite end of the
vehicle.
The following steps will tell you how to use the jack and
change a tire.
5-71