tail gate GMC ENVOY XUV 2004 User Guide
[x] Cancel search | Manufacturer: GMC, Model Year: 2004, Model line: ENVOY XUV, Model: GMC ENVOY XUV 2004Pages: 460, PDF Size: 2.99 MB
Page 119 of 460
Storage Areas
Glove Box
To open your glove box, pull the handle on the front of
the glove box and lower the door.
Overhead Console
The overhead console includes sunglasses storage and
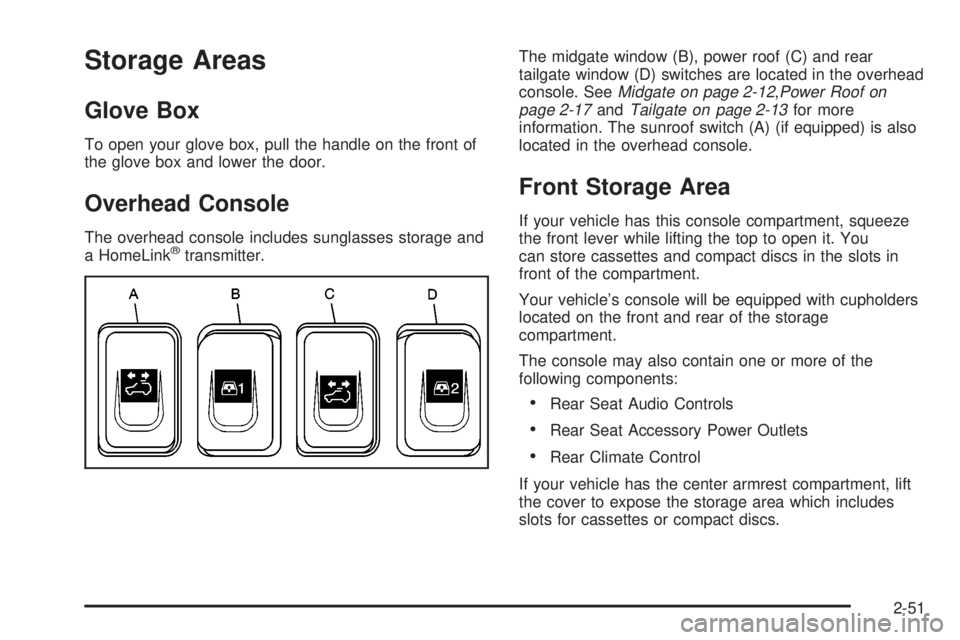
a HomeLinkžtransmitter.The midgate window (B), power roof (C) and rear
tailgate window (D) switches are located in the overhead
console. See
Midgate on page 2-12,Power Roof on
page 2-17andTailgate on page 2-13for more
information. The sunroof switch (A) (if equipped) is also
located in the overhead console.
Front Storage Area
If your vehicle has this console compartment, squeeze
the front lever while lifting the top to open it. You
can store cassettes and compact discs in the slots in
front of the compartment.
Your vehicle's console will be equipped with cupholders
located on the front and rear of the storage
compartment.
The console may also contain one or more of the
following components:
·Rear Seat Audio Controls
·Rear Seat Accessory Power Outlets
·Rear Climate Control
If your vehicle has the center armrest compartment, lift
the cover to expose the storage area which includes
slots for cassettes or compact discs.
2-51
Page 120 of 460

All-Weather Cargo Area
Your vehicle has the ability to operate in many different
con®gurations (midgate up or down, rear glass up or
down, tailgate up or down, power roof open or closed),
allowing the cargo and passenger area to be open
to the environment. To allow the vehicle to operate in
these con®gurations, it is equipped with different
features to help it resist the elements and protect cargo
inside the cargo area. Some of the features that help
with this are the cargo area ¯oor drains and the
cargo mat. These are designed to quickly direct water
out of the cargo box.
Cargo Area Floor Drains
Your vehicle has two cargo-area ¯oor drains located
behind the midgate near the sides of the cargo
area. These drains should be cleaned periodically to
allow water to exit the cargo area.
After hauling dirt, wood chips, pebbles etc. you will need
to ¯ush the cargo area ¯oor drains with water if it
becomes clogged. But ®rst you will have to remove the
drain cover by using the following steps:
1. Lower the midgate.
2. Lift the midgate ¯ap to access the cargo area ¯oor
drain covers.3. Remove the push pin found in the top surface of
the ¯oor drain cover.
4. Lift each ¯oor drain cover straight up.
Reverse the procedure to reinstall the drain covers.
2-52
Page 134 of 460
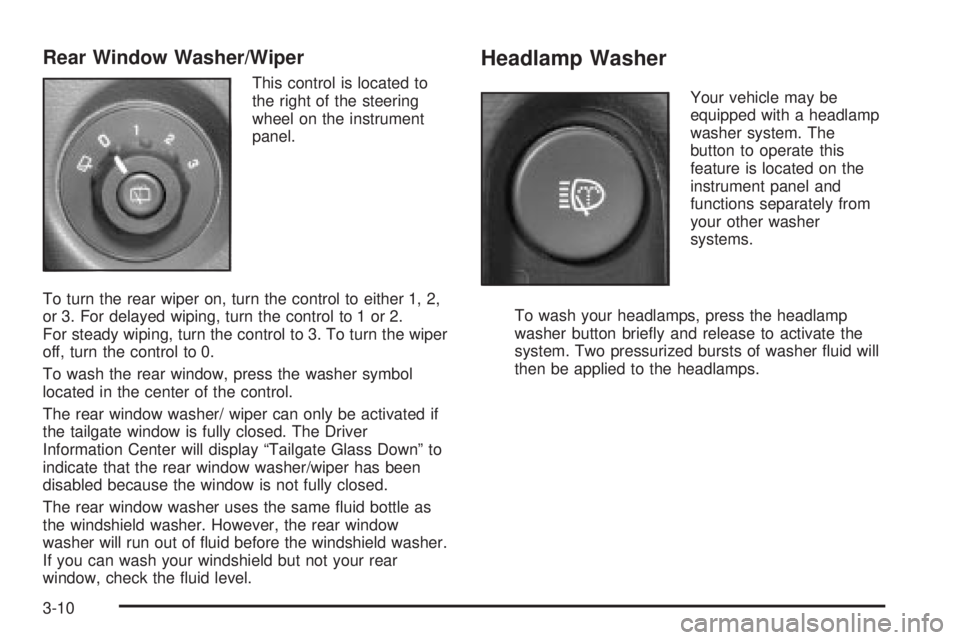
Rear Window Washer/Wiper
This control is located to
the right of the steering
wheel on the instrument
panel.
To turn the rear wiper on, turn the control to either 1, 2,
or 3. For delayed wiping, turn the control to 1 or 2.
For steady wiping, turn the control to 3. To turn the wiper
off, turn the control to 0.
To wash the rear window, press the washer symbol
located in the center of the control.
The rear window washer/ wiper can only be activated if
the tailgate window is fully closed. The Driver
Information Center will display ªTailgate Glass Downº to
indicate that the rear window washer/wiper has been
disabled because the window is not fully closed.
The rear window washer uses the same ¯uid bottle as
the windshield washer. However, the rear window
washer will run out of ¯uid before the windshield washer.
If you can wash your windshield but not your rear
window, check the ¯uid level.
Headlamp Washer
Your vehicle may be
equipped with a headlamp
washer system. The
button to operate this
feature is located on the
instrument panel and
functions separately from
your other washer
systems.
To wash your headlamps, press the headlamp
washer button brie¯y and release to activate the
system. Two pressurized bursts of washer ¯uid will
then be applied to the headlamps.
3-10
Page 146 of 460
Rear Window Defogger
The lines you see on the rear window warm the glass.
Press this button to turn the rear window defogger on or
off. The rear window defogger can only be activated if
the tailgate window is fully closed. The Driver
Information Center will display ªTailgate Glass Downº to
indicate that the rear window defogger has been
disabled because the window is not fully closed. An
indicator light in the button will come on to let you know
that the rear window defogger is active. The rear
window defogger will automatically turn off approximately
ten minutes after the button is pressed.
If your vehicle is equipped with heated mirrors, this
button will activate them.
Notice:Don't use anything sharp on the inside of
the rear window. If you do, you could cut or damage
the warming grid, and the repairs wouldn't be
covered by your warranty. Do not attach a temporary
vehicle license, tape, a decal or anything similar
to the defogger grid.
Outlet Adjustment
Use the air outlets located in the center and on the side
of your instrument panel to direct the air¯ow.
Ventilation System
For mild outside temperatures when little heating or
cooling is needed, use the vent setting to direct outside
air through your vehicle.
Your vehicle's ventilation system supplies outside air to
the inside of your vehicle when it is moving. With the
side windows closed, air will ¯ow into the front air inlet
grilles, through the vehicle and out the air exhaust
valves.
Outside air will also enter the vehicle when the heater
or the air conditioning is running, unless you have
selected recirculation mode.
3-22
Page 150 of 460

You may notice a slight change in engine performance
when the air-conditioning compressor shuts off and
turns on again. This is normal.
A/C OFF (Air Conditioning Off):When you turn the
air conditioning off, the words ªA/C OFFº will appear on
the display. When the air conditioning is selected or
in AUTO mode, the system will run the air conditioning
automatically.
Defogging and Defrosting
Fog on the inside of windows is a result of high humidity
(moisture) condensing on the cool window glass. This
can be minimized if the climate control system is
used properly. You can use either defog or front defrost
to clear fog or frost from your windshield.
-(Defog):Use this setting to clear the windows of fog
or moisture. This setting will deliver air to the ¯oor
and windshield outlets.
0(Front Defrost):Press the front defrost button to
clear the windshield and side windows of frost or
fog quickly. The system will automatically control the fan
speed if you select defrost from AUTO mode. If the
outside temperature is 40ÉF (4ÉC) or warmer, your air
conditioning compressor will automatically run to
help dehumidify the air and dry the windshield. Do not
drive the vehicle until all the windows are clear.
Rear Window Defogger
The rear window defogger uses a warming grid to
remove fog from the rear window.
<(Rear):Press this button to turn the rear window
defogger on or off. The rear window defogger can
only be activated if the tailgate window is fully closed.
The Driver Information Center will display ªTailgate
Glass Downº to indicate that the rear window defogger
has been disabled because the window is not fully
closed.
An indicator light in the button will come on to let you
know that the rear window defogger is activated.
The rear window defogger will turn off approximately
10 minutes after the button is pressed. If you need
additional warming time, press the button again.
Notice:Using a razor blade or sharp object to clear
the inside rear window may damage the rear
window defogger. Repairs would not be covered by
your warranty. Do not clear the inside of the rear
window with sharp objects.
3-26
Page 183 of 460

PARK TO OPERATE ROOF
Stop the vehicle and shift into PARK (P) to operate
the roof.
CLEAR ROOF OBSTRUCTION
One or more obstacles are preventing the roof request
from being performed. Check the roof for any
obstacles.
CLOSE THE ROOF
The roof must be closed to enable future roof and/or
tailgate operations.
OPEN THE ROOF
The roof must be opened to enable future roof and/or
tailgate operations.
ROOF CLOSED
The roof is closed and latched.
CLOSE OR OPEN THE ROOF
The roof must be fully opened or fully closed while the
vehicle is in motion.
ROOF IS CLOSING
The roof is moving in the closed direction.
ROOF IS OPENING
The roof is moving in the opened direction.
ROOF OPENED
The roof is opened and stowed.
3-59
Page 184 of 460
REAR WIPER OBSTRUCTION
Check the rear wiper. An object is preventing it from
moving to the off position. Tailgate glass operations
cannot be performed if the rear wiper is not in the off
position.
CLOSE THE TAILGATE
The tailgate must be closed to operate the
tailgate glass.
TAILGATE GLASS DOWN
The rear wiper/defog request cannot be performed
because the tailgate glass is down.
TAILGATE OPEN
The tailgate is in drop mode. Operate the vehicle with
caution.
TAILGATE AJAR
The tailgate is ajar and should be closed before moving
the vehicle.
SEE MANUAL ±TAILGATE
Window position needs to be reset. Activate the tailgate
window up switch and continue to hold it for two
seconds after the window is fully closed. Then activate
the tailgate window down switch and continue to
hold it for two seconds after the window is fully open.
If this process does not restore tailgate function,
see your dealer for service.
TIGHTEN FUEL CAP
If the vehicle's fuel cap is not tightened properly, this
message may appear on the DIC and a chime will
sound. Fully reinstall the fuel cap. The diagnostic system
can determine if the fuel cap has been left off or
improperly installed. A loose or missing fuel cap will
allow fuel to evaporate into the atmosphere. The
DIC message will remain on until the message is
cancelled with the return button on the steering wheel.
The DIC message will also be cancelled if the ignition
is turned off.
The DIC message and the Service Engine Soon light
may come on again during a second trip if the fuel cap is
still not tightened properly. See
Malfunction Indicator
Lamp on page 3-38for more information.
3-60
Page 361 of 460

Taillamps and Turn Signal Lamps
1. Drop the tailgate.
2. Remove the two
screws from the lamp
assembly.
3. Pull the assembly away from the vehicle.4. Unclip the wiring
harness (B).
5. Remove the socket (Turn Signal Lamp (A) or Brake
Lamp (C)) by rotating it counterclockwise.
6. Holding the socket, pull the bulb to release it from
the socket.
7. Push the new bulb into the socket until it clicks.
8. Reverse steps 1 through 5 to reinstall the lamp
assembly.
5-49
Page 428 of 460
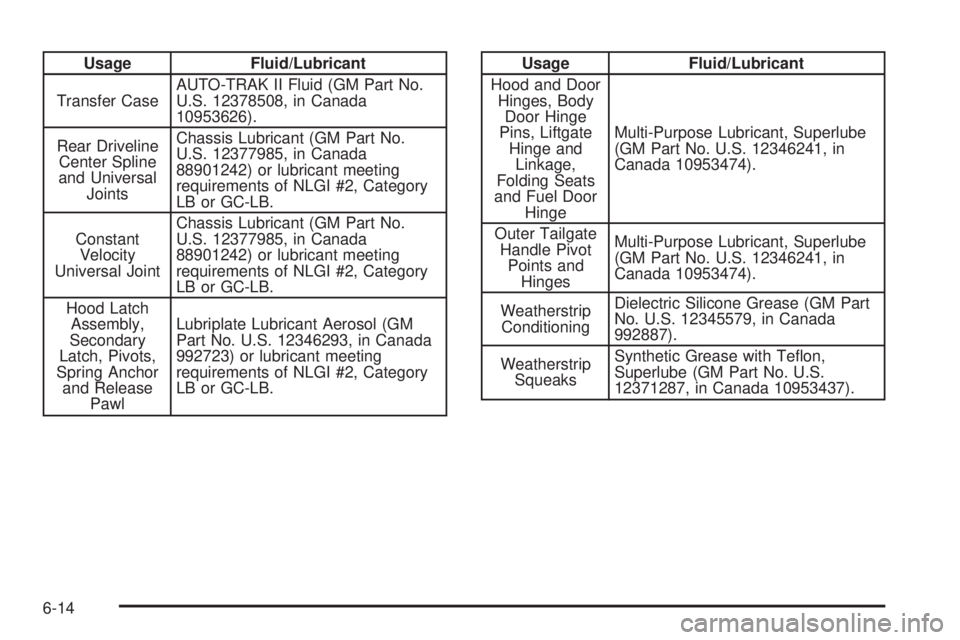
Usage Fluid/Lubricant
Transfer CaseAUTO-TRAK II Fluid (GM Part No.
U.S. 12378508, in Canada
10953626).
Rear Driveline
Center Spline
and Universal
JointsChassis Lubricant (GM Part No.
U.S. 12377985, in Canada
88901242) or lubricant meeting
requirements of NLGI #2, Category
LB or GC-LB.
Constant
Velocity
Universal JointChassis Lubricant (GM Part No.
U.S. 12377985, in Canada
88901242) or lubricant meeting
requirements of NLGI #2, Category
LB or GC-LB.
Hood Latch
Assembly,
Secondary
Latch, Pivots,
Spring Anchor
and Release
PawlLubriplate Lubricant Aerosol (GM
Part No. U.S. 12346293, in Canada
992723) or lubricant meeting
requirements of NLGI #2, Category
LB or GC-LB.Usage Fluid/Lubricant
Hood and Door
Hinges, Body
Door Hinge
Pins, Liftgate
Hinge and
Linkage,
Folding Seats
and Fuel Door
HingeMulti-Purpose Lubricant, Superlube
(GM Part No. U.S. 12346241, in
Canada 10953474).
Outer Tailgate
Handle Pivot
Points and
HingesMulti-Purpose Lubricant, Superlube
(GM Part No. U.S. 12346241, in
Canada 10953474).
Weatherstrip
ConditioningDielectric Silicone Grease (GM Part
No. U.S. 12345579, in Canada
992887).
Weatherstrip
SqueaksSynthetic Grease with Te¯on,
Superlube (GM Part No. U.S.
12371287, in Canada 10953437).
6-14
Page 447 of 460
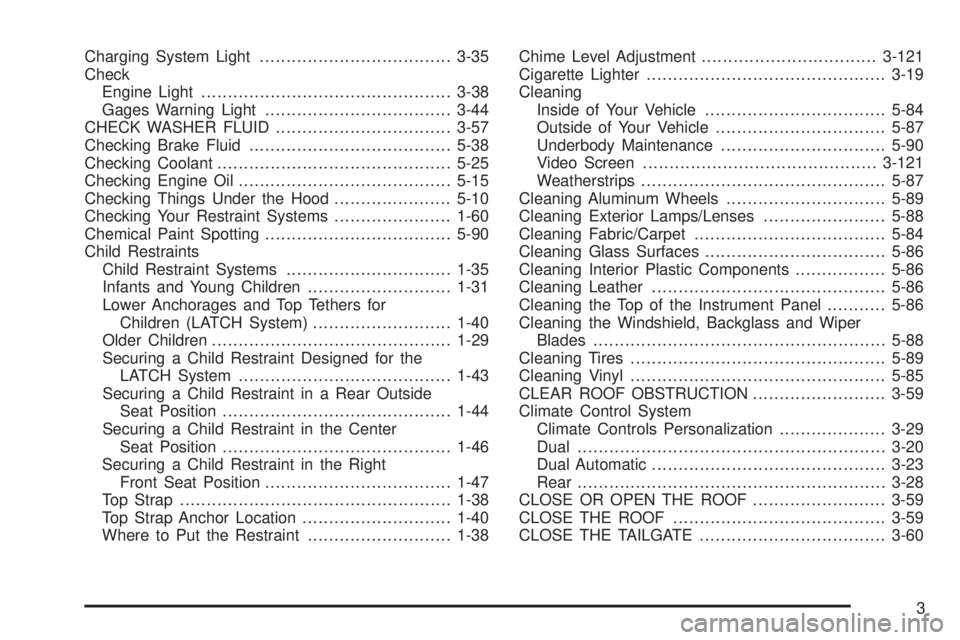
Charging System Light....................................3-35
Check
Engine Light...............................................3-38
Gages Warning Light...................................3-44
CHECK WASHER FLUID.................................3-57
Checking Brake Fluid......................................5-38
Checking Coolant............................................5-25
Checking Engine Oil........................................5-15
Checking Things Under the Hood......................5-10
Checking Your Restraint Systems......................1-60
Chemical Paint Spotting...................................5-90
Child Restraints
Child Restraint Systems...............................1-35
Infants and Young Children...........................1-31
Lower Anchorages and Top Tethers for
Children (LATCH System)..........................1-40
Older Children.............................................1-29
Securing a Child Restraint Designed for the
LATCH System........................................1-43
Securing a Child Restraint in a Rear Outside
Seat Position...........................................1-44
Securing a Child Restraint in the Center
Seat Position...........................................1-46
Securing a Child Restraint in the Right
Front Seat Position...................................1-47
Top Strap...................................................1-38
Top Strap Anchor Location............................1-40
Where to Put the Restraint...........................1-38Chime Level Adjustment.................................3-121
Cigarette Lighter.............................................3-19
Cleaning
Inside of Your Vehicle..................................5-84
Outside of Your Vehicle................................5-87
Underbody Maintenance...............................5-90
Video Screen............................................3-121
Weatherstrips..............................................5-87
Cleaning Aluminum Wheels..............................5-89
Cleaning Exterior Lamps/Lenses.......................5-88
Cleaning Fabric/Carpet....................................5-84
Cleaning Glass Surfaces..................................5-86
Cleaning Interior Plastic Components.................5-86
Cleaning Leather............................................5-86
Cleaning the Top of the Instrument Panel...........5-86
Cleaning the Windshield, Backglass and Wiper
Blades.......................................................5-88
Cleaning Tires................................................5-89
Cleaning Vinyl................................................5-85
CLEAR ROOF OBSTRUCTION.........................3-59
Climate Control System
Climate Controls Personalization....................3-29
Dual..........................................................3-20
Dual Automatic............................................3-23
Rear..........................................................3-28
CLOSE OR OPEN THE ROOF.........................3-59
CLOSE THE ROOF........................................3-59
CLOSE THE TAILGATE...................................3-60
3