ECU GMC JIMMY 2001 Owner's Manual
[x] Cancel search | Manufacturer: GMC, Model Year: 2001, Model line: JIMMY, Model: GMC JIMMY 2001Pages: 443, PDF Size: 2.97 MB
Page 17 of 443
1-10
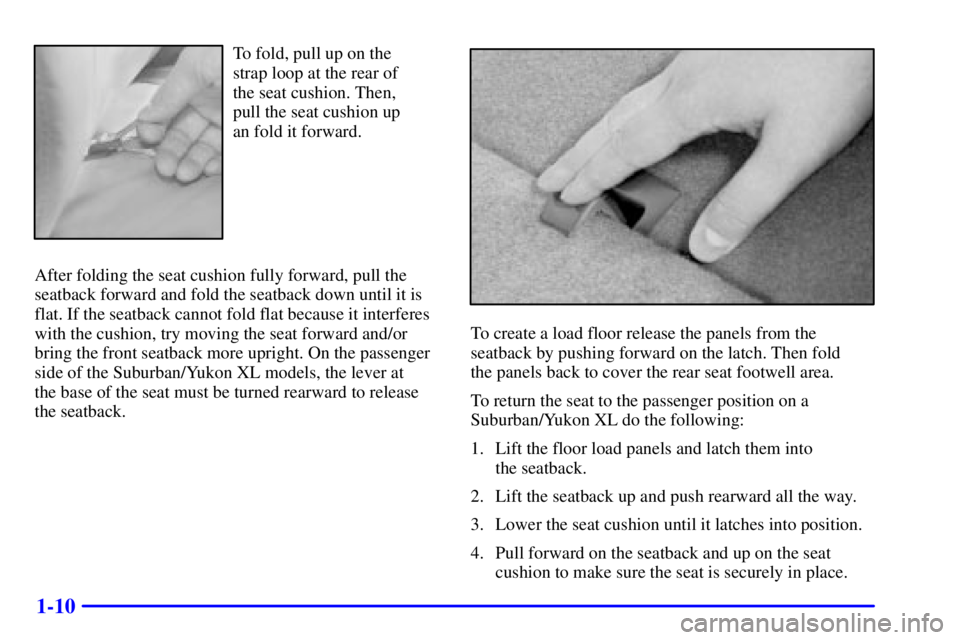
To fold, pull up on the
strap loop at the rear of
the seat cushion. Then,
pull the seat cushion up
an fold it forward.
After folding the seat cushion fully forward, pull the
seatback forward and fold the seatback down until it is
flat. If the seatback cannot fold flat because it interferes
with the cushion, try moving the seat forward and/or
bring the front seatback more upright. On the passenger
side of the Suburban/Yukon XL models, the lever at
the base of the seat must be turned rearward to release
the seatback.
To create a load floor release the panels from the
seatback by pushing forward on the latch. Then fold
the panels back to cover the rear seat footwell area.
To return the seat to the passenger position on a
Suburban/Yukon XL do the following:
1. Lift the floor load panels and latch them into
the seatback.
2. Lift the seatback up and push rearward all the way.
3. Lower the seat cushion until it latches into position.
4. Pull forward on the seatback and up on the seat
cushion to make sure the seat is securely in place.
Page 19 of 443
1-12
CAUTION:
If a head restraint is not installed on the seatback
or stored in the vehicle properly, it could be thrown
about the vehicle in a crash or sudden maneuver.
People in the vehicle could be injured. Remove the
head restraints only when you need to fold the seat,
and be sure that the head restraints are stored
securely in the space provided in the folded up
seat cushion. When the seat is returned to the
passenger position, be sure the head restraints are
installed properly.
On Suburban/Yukon XL models with rear bucket seats,
the head restraints need to be removed in order to fold
the rear seats. To do this follow these directions:
1. Lift the head restraints up until they stop.
2. Press in the button on the side of the head restraint
guide cap and lift up on the head restraint.
3. Do the same for the other cap.
The head restraint can be removed and stored in the
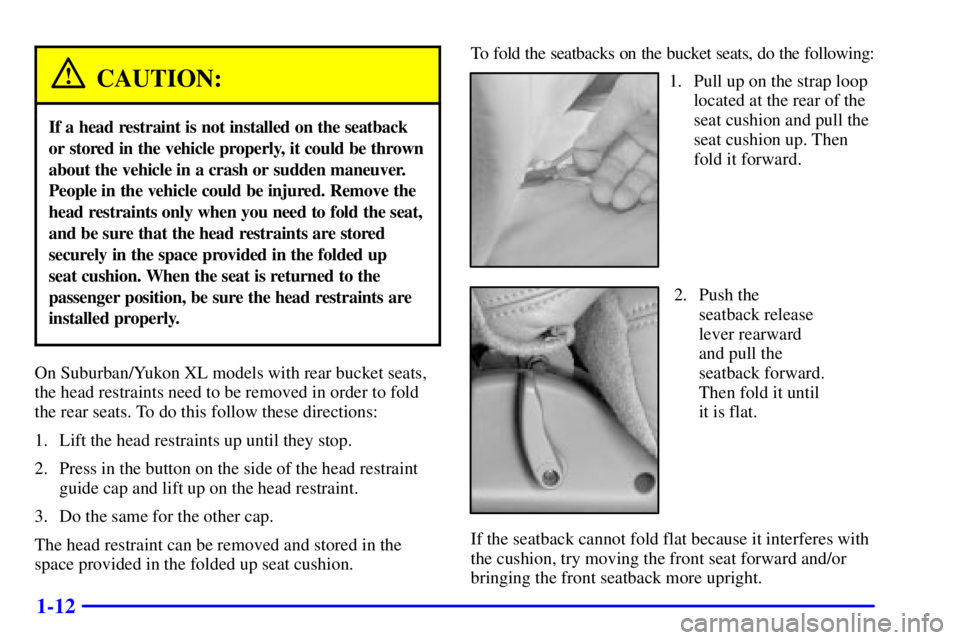
space provided in the folded up seat cushion.To fold the seatbacks on the bucket seats, do the following:
1. Pull up on the strap loop
located at the rear of the
seat cushion and pull the
seat cushion up. Then
fold it forward.
2. Push the
seatback release
lever rearward
and pull the
seatback forward.
Then fold it until
it is flat.
If the seatback cannot fold flat because it interferes with
the cushion, try moving the front seat forward and/or
bringing the front seatback more upright.
Page 21 of 443
1-14
Tilting the 50/50 Split Bench Seat
CAUTION:
If the seatback isn't locked, it could move forward
in a sudden stop or crash. That could cause injury
to the person sitting there. Always press rearward
on the seatback to be sure it is locked.
CAUTION:
If the support rod isn't properly engaged, the
folded third row seat could come loose in a
sudden stop or crash. That could cause injury to
people and damage to your vehicle. Always be
sure the support rod is properly engaged when
the third row seat is folded forward.
Once the third seatback has been folded down, the
entire seat can be tilted forward to create a flat load
floor. To do this, do the following:
1. Enter the rear cargo area of the vehicle.
2. Make sure the head restraints have been
lowered completely.
3. With the seat folded, unlatch the seat from the floor
by pulling up on the lever located under the carrying
handle at the rear of the seat labeled 2.
4. Lift the rear of the seat up, off the floor. You will not
be able to unlatch the seat from the floor unless the
seatback is folded down.
5. Tilt the seat fully forward and secure it in place using
the support rod located on the underside of the seat
on the passenger's side. Make sure the rod pin is
fully engaged in the lock.
6. Push and pull on the seat. Make sure the support rod is
holding it firmly in place. Use the seat in this position
only when necessary for additional cargo space.
Page 22 of 443
1-15
To return the seat to the seating position do the
following:
1. Push forward on the seat and release the support
lock rod.
2. Secure the support rod in its stored position on the
underside of the seat.
3. Lower the seat to the floor and let the seat drop
into place.
4. Lift up on the carrying handle to make sure the seat
is locked in place.
5. Return the seatback to the upright position by pulling
up on the release lever labeled 1 before the back can
be folded upright.
6. Pull the seatback forward to make sure it is locked
in place.
Removing the 50/50 Split Bench Seat
To remove the 50/50 split bench seat, do the following:
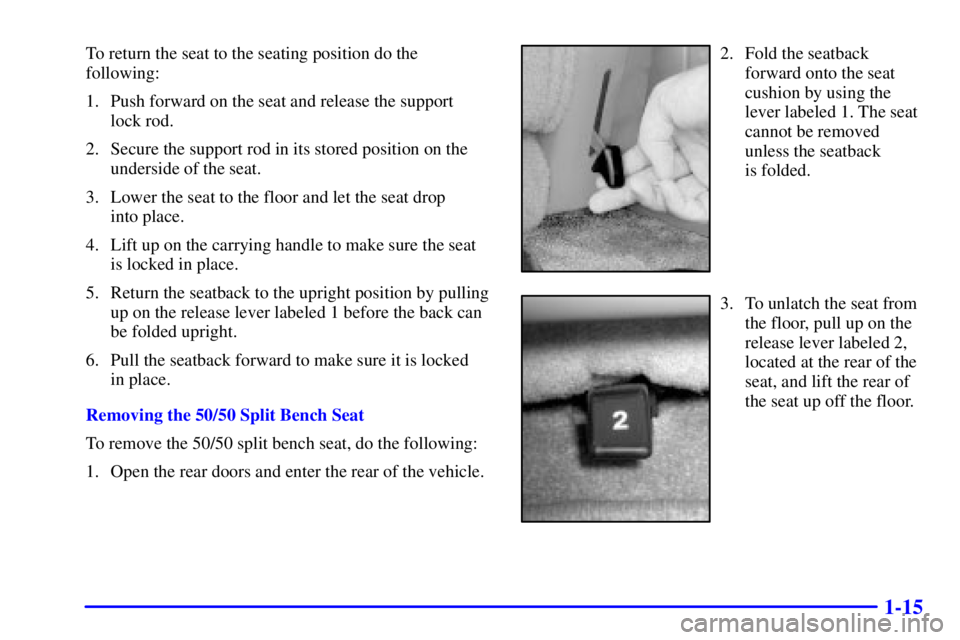
1. Open the rear doors and enter the rear of the vehicle.2. Fold the seatback
forward onto the seat
cushion by using the
lever labeled 1. The seat
cannot be removed
unless the seatback
is folded.
3. To unlatch the seat from
the floor, pull up on the
release lever labeled 2,
located at the rear of the
seat, and lift the rear of
the seat up off the floor.
Page 23 of 443
1-16
4. Squeeze the release lever, located in the lower
middle to unlatch the seat from the floor, while
pulling the seat out.
5. While holding the rear of the seat up, roll the seat out
of the vehicle.
Replacing the 50/50 Split Bench Seat
CAUTION:
If the seatback isn't locked, it could move forward
in a sudden stop or crash. That could cause injury
to the person sitting there. Always press rearward
on the seatback to be sure it is locked.
CAUTION:
A seat that isn't locked into place properly can
move around in a collision or sudden stop. People
in the vehicle could be injured. Be sure to lock
the seat into place properly when installing it.
CAUTION:
A safety belt that is improperly routed, not
properly attached, or twisted won't provide the
protection needed in a crash. The person wearing
the belt could be seriously injured. After
installing the seat, always check to be sure that
the safety belts are properly routed and attached,
and are not twisted.
To reinstall the 50/50 split bench, do the following:
1. While holding the rear of the seat up, slide the front
wheels into the slots on the floor. The front latches
should lock into place. If the latches do not lock, try
tilting the rear of the seats upwards.
2. Once the latches are engaged, let the seat drop into
place. Release the lever labeled 1 to return the seat to
its upright position.
3. Push and pull on the seat to make sure it is
locked into place. The seatback cannot be raised
to the upright position unless the seat is secured
to the floor.
Page 26 of 443
1-19
5. Tilt the seat fully forward and secure it in place using
the support rod located on the underside of the seat
on the passenger's side. Make sure the rod pin is
fully engaged in the lock.
6. Push and pull on the seat. Make sure the support
rod is holding it firmly in place. Use the seat in
this position only when necessary for additional
cargo space.
To return the seat to the seating position do
the following:
1. Push forward on the seat and release the support
lock rod.
2. Secure the support rod in its stored position on the
underside of the seat.
3. Lower the seat to the floor and let the seat drop
into place.
4. Lift up on the carrying handle to make sure the seat
is locked in place.
5. Return the seatback to the upright position by pulling
up on the release lever labeled 1 before the back can
be folded upright.
6. Pull the seatback forward to make sure it is locked
in place.Removing the Full Bench Seat
To remove the full bench seat, do the following:
1. Open the rear doors and enter the rear of the vehicle.
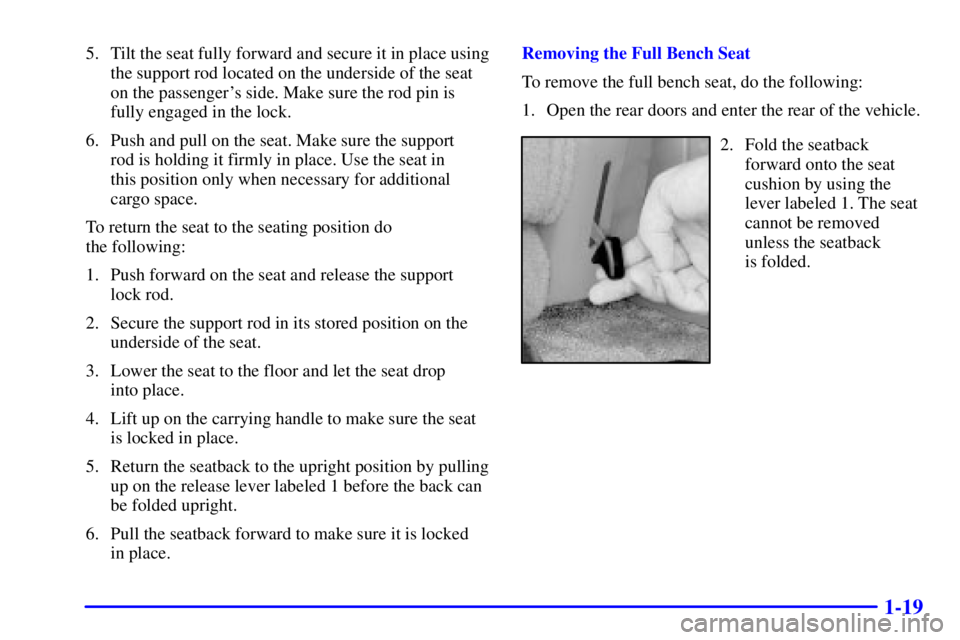
2. Fold the seatback
forward onto the seat
cushion by using the
lever labeled 1. The seat
cannot be removed
unless the seatback
is folded.
Page 28 of 443
1-21
CAUTION:
A safety belt that is improperly routed, not
properly attached, or twisted won't provide
the protection needed in a crash. The person
wearing the belt could be seriously injured. After
installing the seat, always check to be sure that
the safety belts are properly routed and attached,
and are not twisted.
To reinstall the full bench seat, do the following:
1. While holding the rear of the seat up, slide the front
wheels into the slots on the floor. The front latches
should lock into place. If the latches do not lock, try
tilting the rear of the seats upwards.
2. Once the latches are engaged, let the seat drop into
place. Release the lever labeled 1 to return the seat to
its upright position.
3. Push and pull on the seat to make sure it is
locked into place. The seatback cannot be raised
to the upright position unless the seat is secured
to the floor.
Entering or Exiting the Third Row Seats
CAUTION:
If the seatback isn't locked, it could move forward
in a sudden stop or crash. That could cause injury
to the person sitting there. Always press rearward
on the seatback to be sure it is locked.
CAUTION:
If any easy entry seat isn't locked, it can move. In a
sudden stop or crash, the person sitting there could
be injured. And, even if there is no crash or sudden
stop, a driver sitting in an unlocked easy entry seat
could be startled by the sudden movement and hit
the wrong control or pedal, causing an accident.
After you've used it, be sure to push rearward on
any easy entry seat to be sure it is locked.
Page 36 of 443
1-29
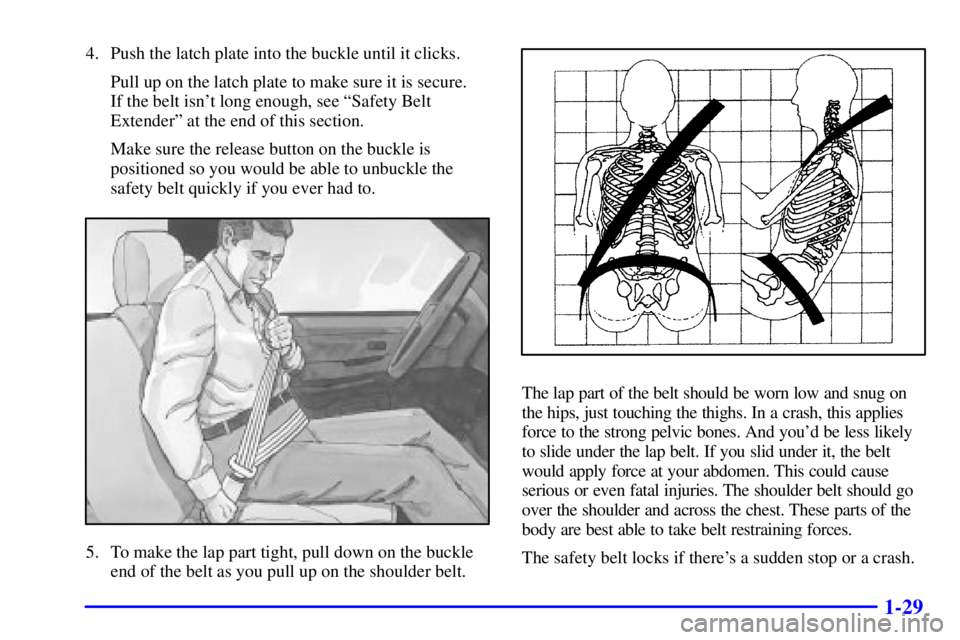
4. Push the latch plate into the buckle until it clicks.
Pull up on the latch plate to make sure it is secure.
If the belt isn't long enough, see ªSafety Belt
Extenderº at the end of this section.
Make sure the release button on the buckle is
positioned so you would be able to unbuckle the
safety belt quickly if you ever had to.
5. To make the lap part tight, pull down on the buckle
end of the belt as you pull up on the shoulder belt.
The lap part of the belt should be worn low and snug on
the hips, just touching the thighs. In a crash, this applies
force to the strong pelvic bones. And you'd be less likely
to slide under the lap belt. If you slid under it, the belt
would apply force at your abdomen. This could cause
serious or even fatal injuries. The shoulder belt should go
over the shoulder and across the chest. These parts of the
body are best able to take belt restraining forces.
The safety belt locks if there's a sudden stop or a crash.
Page 45 of 443
1-38
CAUTION:
Anyone who is up against, or very close to, any
air bag when it inflates can be seriously injured
or killed. Air bags plus lap
-shoulder belts offer
the best protection for adults, but not for young
children and infants. Neither the vehicle's safety
belt system nor its air bag system is designed for
them. Young children and infants need the
protection that a child restraint system can
provide. Always secure children properly in your
vehicle. To read how, see the part of this manual
called ªChildren.º
There is an air bag
readiness light on the
instrument panel,
which shows the air
bag symbol.
The system checks the air bag electrical system for
malfunctions. The light tells you if there is an electrical
problem. See ªAir Bag Readiness Lightº in the Index
for more information.
Page 56 of 443

1-49
2. Push the latch plate into the buckle until it clicks.
Pull up on the latch plate to make sure it is secure.
When the shoulder belt is pulled out all the way, it
will lock. If it does, let it go back all the way and
start again.
If the belt is not long enough, see ªSafety Belt
Extenderº at the end of this section.
Make sure the release button on the buckle is
positioned so you would be able to unbuckle the
safety belt quickly if you ever had to.
3. To make the lap part tight, pull down on the buckle
end of the belt as you pull up on the shoulder part.