maintenance GMC JIMMY 2005 Owner's Guide
[x] Cancel search | Manufacturer: GMC, Model Year: 2005, Model line: JIMMY, Model: GMC JIMMY 2005Pages: 432, PDF Size: 2.65 MB
Page 316 of 432

Four-Wheel Drive
Lubricant checks in this section also apply to these
vehicles. However, there are two additional systems that
need lubrication.
Transfer Case
When to Check Lubricant
Refer to the Maintenance Schedule to determine how
often to check the lubricant. SeePart C: Periodic
Maintenance Inspections on page 6-31.
How to Check Lubricant
To get an accurate reading, the vehicle should be on a
level surface.
If the level is below the bottom of the �ller plug hole,
you’ll need to add some lubricant. Add enough lubricant
to raise the level to the bottom of the �ller plug hole.
Use care not to overtighten the plug.
What to Use
Refer to the Maintenance Schedule to determine what
kind of lubricant to use. SeePart D: Recommended
Fluids and Lubricants on page 6-33.
5-44
Page 317 of 432

Front Axle
When to Check and Change Lubricant
Refer to the Maintenance Schedule to determine how
often to check the lubricant and when to change it. See
Part A: Scheduled Maintenance Services on page 6-4.
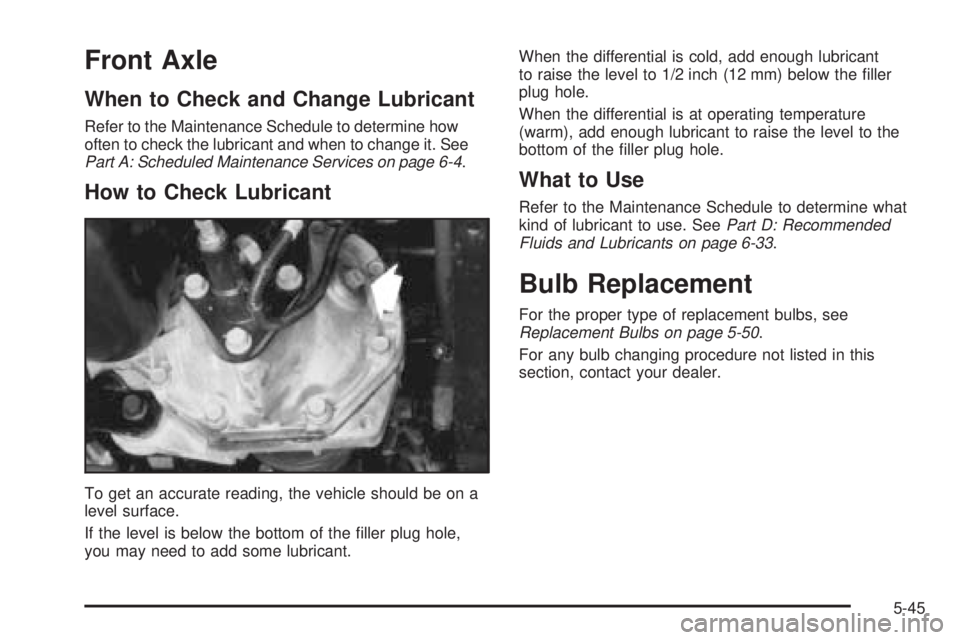
How to Check Lubricant
To get an accurate reading, the vehicle should be on a
level surface.
If the level is below the bottom of the �ller plug hole,
you may need to add some lubricant.When the differential is cold, add enough lubricant
to raise the level to 1/2 inch (12 mm) below the �ller
plug hole.
When the differential is at operating temperature
(warm), add enough lubricant to raise the level to the
bottom of the �ller plug hole.
What to Use
Refer to the Maintenance Schedule to determine what
kind of lubricant to use. SeePart D: Recommended
Fluids and Lubricants on page 6-33.
Bulb Replacement
For the proper type of replacement bulbs, see
Replacement Bulbs on page 5-50.
For any bulb changing procedure not listed in this
section, contact your dealer.
5-45
Page 323 of 432

Windshield Wiper Blade
Replacement
Windshield wiper blades should be inspected at least
twice a year for wear and cracking. See “Wiper
Blade Check” under “Appearance Care” later in this
section, for more information.
Replacement blades come in different types and are
removed in different ways. For proper type and length,
seeNormal Maintenance Replacement Parts on
page 6-35.
Notice:Allowing the wiper blade arm to touch the
windshield when no wiper blade is installed
could damage the windshield. Any damage that
occurs would not be covered by your warranty.
Do not allow the wiper blade arm to touch the
windshield.
1. To remove the old wiper blades, lift the wiper arm
until it locks into a vertical position.A. Blade Assembly
B. Arm Assembly
C. Locking TabD. Blade Pivot
E. Hook Slot
F. Arm Hook
2. Press down on the blade assembly pivot locking
tab. Pull down on the blade assembly to release it
from the wiper arm hook.
3. Remove the insert from the blade assembly. The
insert has two notches at one end that are locked by
bottom claws of the blade assembly. At the notched
end, pull the insert from the blade assembly.
5-51
Page 332 of 432

Remove the valve cap from the tire valve stem. Press
the tire gage �rmly onto the valve to get a pressure
measurement. If the cold tire in�ation pressure matches
the recommended pressure on the Tire and Loading
Information label, no further adjustment is necessary.
If the in�ation pressure is low, add air until you reach the
recommended amount.
If you over�ll the tire, release air by pushing on the
metal stem in the center of the tire valve. Recheck the
tire pressure with the tire gage.
Be sure to put the valve caps back on the valve stems.
They help prevent leaks by keeping out dirt and
moisture.
Tire Inspection and Rotation
Tires should be rotated every 5,000 to 8,000 miles
(8 000 to 13 000 km).
Any time you notice unusual wear, rotate your tires as
soon as possible and check wheel alignment. Also
check for damaged tires or wheels. SeeWhen It Is Time
for New Tires on page 5-61andWheel Replacement
on page 5-64for more information.
Make sure the spare tire is stored securely. Push, pull,
and then try to rotate or turn the tire. If it moves,
use the wheel wrench to tighten the cable. See
Changing a Flat Tire on page 5-67.The purpose of regular rotation is to achieve more
uniform wear for all tires on the vehicle. The �rst rotation
is the most important. SeePart A: Scheduled
Maintenance Services on page 6-4, for scheduled
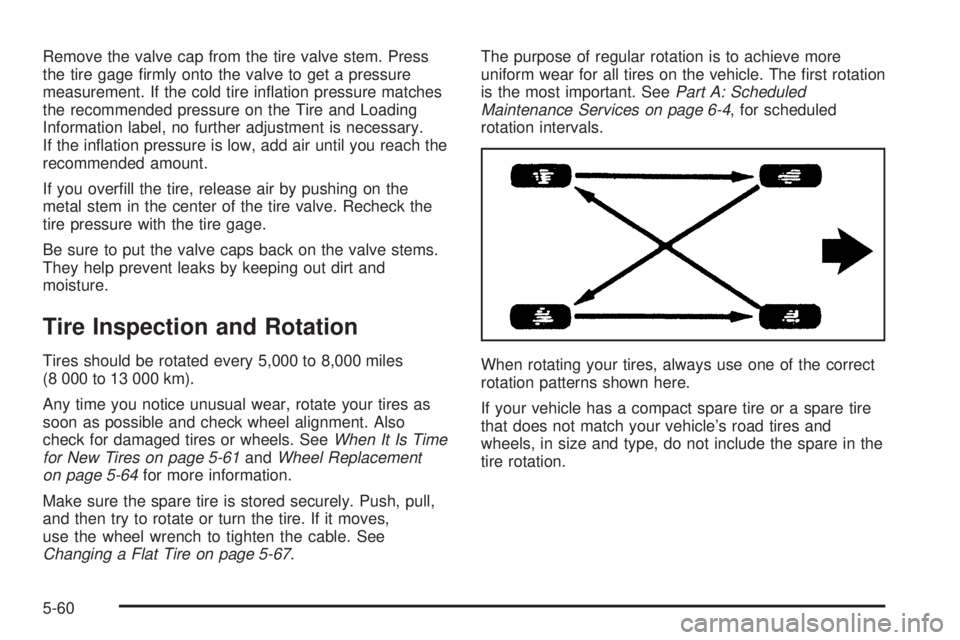
rotation intervals.
When rotating your tires, always use one of the correct
rotation patterns shown here.
If your vehicle has a compact spare tire or a spare tire
that does not match your vehicle’s road tires and
wheels, in size and type, do not include the spare in the
tire rotation.
5-60
Page 339 of 432

{CAUTION:
Lifting a vehicle and getting under it to do
maintenance or repairs is dangerous without
the appropriate safety equipment and training.
The jack provided with your vehicle is
designed only for changing a �at tire. If it is
used for anything else, you or others could be
badly injured or killed if the vehicle slips off
the jack. Use the jack provided with your
vehicle only for changing a �at tire.
If a tire goes �at, the next part shows how to use your
jacking equipment to change a �at tire safely.
Changing a Flat Tire
If a tire goes �at, avoid further tire and wheel damage
by driving slowly to a level place. Turn on your
hazard warning �ashers.
{CAUTION:
Changing a tire can be dangerous. The vehicle
can slip off the jack and roll over or fall on you
or other people. You and they could be badly
injured or even killed. Find a level place to
change your tire. To help prevent the vehicle
from moving:
1. Set the parking brake �rmly.
2. Put an automatic transmission shift lever in
PARK (P), or shift a manual transmission to
FIRST (1) or REVERSE (R).
3. Turn off the engine and do not restart while
the vehicle is raised.
4. Do not allow passengers to remain in the
vehicle.
Put the wheel blocks at the front and rear of the
tire farthest away from the one being changed.
That would be the tire on the other side, at the
opposite end of the vehicle.
5-67
Page 359 of 432

Tires
To clean the tires, use a stiff brush with tire cleaner.
Notice:Using petroleum-based tire dressing
products on your vehicle may damage the paint
�nish and/or tires. When applying a tire dressing,
always wipe off any overspray from all painted
surfaces on your vehicle.
Sheet Metal Damage
If the vehicle is damaged and requires sheet metal
repair or replacement, make sure the body repair shop
applies anti-corrosion material to parts repaired or
replaced to restore corrosion protection.
Original manufacturer replacement parts will provide the
corrosion protection while maintaining the warranty.
Finish Damage
Any stone chips, fractures or deep scratches in the
�nish should be repaired right away. Bare metal
will corrode quickly and may develop into major repair
expense.
Minor chips and scratches can be repaired with touch-up
materials available from your GM dealer. Larger areas of
�nish damage can be corrected in your GM dealer’s body
and paint shop.
Underbody Maintenance
Chemicals used for ice and snow removal and dust
control can collect on the underbody. If these are not
removed, corrosion and rust can develop on the
underbody parts such as fuel lines, frame, �oor pan,
and exhaust system even though they have corrosion
protection.
At least every spring, �ush these materials from the
underbody with plain water. Clean any areas where mud
and debris can collect. Dirt packed in close areas of
the frame should be loosened before being �ushed.
Your GM dealer or an underbody car washing system
can do this for you.
Chemical Paint Spotting
Some weather and atmospheric conditions can create a
chemical fallout. Airborne pollutants can fall upon and
attack painted surfaces on the vehicle. This damage can
take two forms: blotchy, ring-shaped discolorations,
and small, irregular dark spots etched into the
paint surface.
Although no defect in the paint job causes this, GM will
repair, at no charge to the owner, the surfaces of
new vehicles damaged by this fallout condition within
12 months or 12,000 miles (20 000 km) of purchase,
whichever occurs �rst.
5-87
Page 369 of 432

Maintenance Schedule......................................6-2
Introduction...................................................6-2
Maintenance Requirements..............................6-2
Your Vehicle and the Environment....................6-2
How This Section is Organized.........................6-3
Part A: Scheduled Maintenance Services...........6-4
Using Your Maintenance Schedule....................6-4
Selecting the Right Schedule...........................6-5
Short Trip/City Scheduled Maintenance..............6-6
Long Trip/Highway Scheduled Maintenance......6-18
Part B: Owner Checks and Services................6-26
At Each Fuel Fill..........................................6-26
At Least Once a Month.................................6-26
At Least Twice a Year...................................6-27
At Least Once a Year...................................6-28Part C: Periodic Maintenance Inspections.........6-31
Steering, Suspension and Front Drive
Axle Boot and Seal Inspection....................6-31
Exhaust System Inspection............................6-31
Fuel System Inspection..................................6-31
Engine Cooling System Inspection...................6-31
Throttle System Inspection.............................6-32
Transfer Case and Front Axle (Four-Wheel
Drive) Inspection.......................................6-32
Brake System Inspection................................6-32
Part D: Recommended Fluids and Lubricants. . . .6-33
Normal Maintenance Replacement Parts..........6-35
Part E: Maintenance Record...........................6-36
Section 6 Maintenance Schedule
6-1
Page 370 of 432

Maintenance Schedule
Introduction
Important: Keep engine oil at the proper level and
change as recommended.
Have you purchased the GM Protection Plan? The Plan
supplements your new vehicle warranties. See your
Warranty and Owner Assistance booklet or your dealer
for details.
Maintenance Requirements
Maintenance intervals, checks, inspections and
recommended �uids and lubricants as prescribed in this
manual are necessary to keep your vehicle in good
working condition. Any damage caused by failure
to follow scheduled maintenance may not be covered by
warranty.
Your Vehicle and the Environment
Proper vehicle maintenance not only helps to keep your
vehicle in good working condition, but also helps the
environment. Improper vehicle maintenance can
even affect the quality of the air we breathe. Improper
�uid levels or the wrong tire in�ation can increase
the level of emissions from your vehicle. To help protect
our environment, and to keep your vehicle in good
condition, be sure to maintain your vehicle properly.
6-2
Page 371 of 432

How This Section is Organized
This maintenance schedule is divided into �ve parts:
“Part A: Scheduled Maintenance Services”explains
what to have done and how often. Some of these
services can be complex, so unless you are technically
quali�ed and have the necessary equipment, you
should let your GM dealer’s service department do
these jobs.
Your GM dealer has GM-trained and supported service
people that will perform the work using genuine
GM parts.
{CAUTION:
Performing maintenance work on a vehicle can
be dangerous. In trying to do some jobs, you
can be seriously injured. Do your own
maintenance work only if you have the
required know-how and the proper tools and
equipment for the job. If you have any doubt,
have a quali�ed technician do the work.
If you want to purchase service information, seeService
Publications Ordering Information on page 7-11.“Part B: Owner Checks and Services”tells you what
should be checked and when. It also explains what
you can easily do to help keep your vehicle in good
condition.
“Part C: Periodic Maintenance Inspections”explains
important inspections that your dealer’s service
department can perform for you.
“Part D: Recommended Fluids and Lubricants”lists
some recommended products necessary to help
keep your vehicle properly maintained. These products,
or their equivalents, should be used whether you do
the work yourself or have it done.
“Part E: Maintenance Record”is a place for you to
record and keep track of the maintenance performed on
your vehicle. Keep your maintenance receipts. They
may be needed to qualify your vehicle for warranty
repairs.
6-3
Page 372 of 432

Part A: Scheduled Maintenance
Services
In this part are scheduled maintenance services which
are to be performed at the mileage intervals speci�ed.
Using Your Maintenance Schedule
We at General Motors want to help you keep your
vehicle in good working condition. But we do not know
exactly how you will drive it. You may drive very
short distances only a few times a week. Or you may
drive long distances all the time in very hot, dusty
weather. You may use your vehicle in making deliveries.
Or you may drive it to work, to do errands or in many
other ways.
Because of all the different ways people use their
vehicles, maintenance needs vary. You may need more
frequent checks and replacements. So please read
the following and note how you drive. If you have any
questions on how to keep your vehicle in good condition,
see your dealer.
This part tells you the maintenance services you should
have done and when to schedule them.When you go to your dealer for your service needs, you
will know that GM-trained and supported service
people will perform the work using genuine GM parts.
The proper �uids and lubricants to use are listed in
Part D. Make sure whoever services your vehicle uses
these. All parts should be replaced and all necessary
repairs done before you or anyone else drives the
vehicle.
These schedules are for vehicles that:
carry passengers and cargo within recommended
limits. You will �nd these limits on the tire and
loading information label. SeeLoading Your Vehicle
on page 4-44.
are driven on reasonable road surfaces within legal
driving limits.
are driven off-road in the recommended manner.
SeeOff-Road Driving with Your Four-Wheel-Drive
Vehicle on page 4-14.
use the recommended fuel. SeeGasoline Octane
on page 5-5.
6-4