stop start GMC SAVANA 2007 Owner's Manual
[x] Cancel search | Manufacturer: GMC, Model Year: 2007, Model line: SAVANA, Model: GMC SAVANA 2007Pages: 452, PDF Size: 2.68 MB
Page 10 of 452
Power Seat
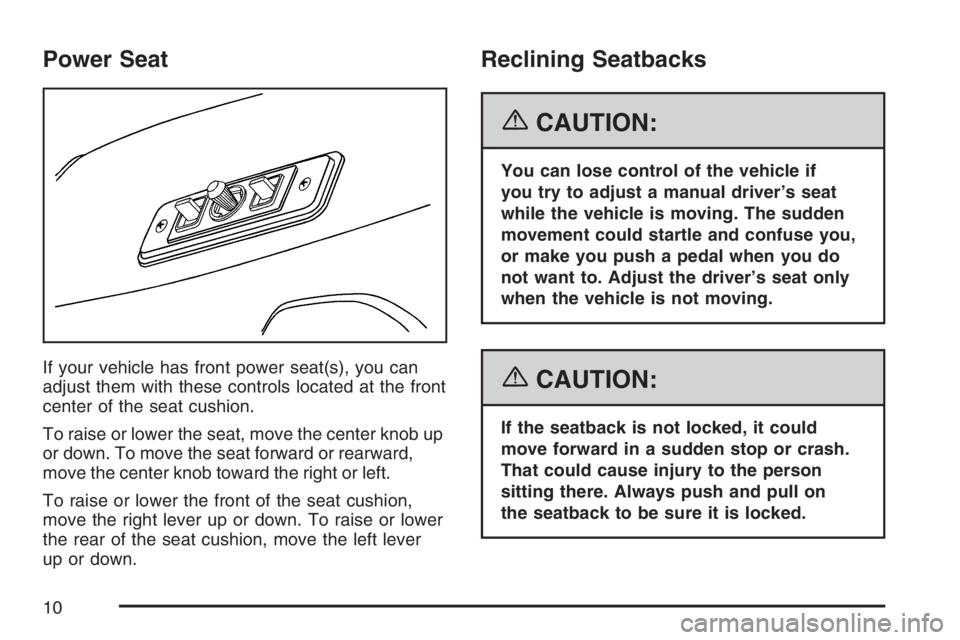
If your vehicle has front power seat(s), you can
adjust them with these controls located at the front
center of the seat cushion.
To raise or lower the seat, move the center knob up
or down. To move the seat forward or rearward,
move the center knob toward the right or left.
To raise or lower the front of the seat cushion,
move the right lever up or down. To raise or lower
the rear of the seat cushion, move the left lever
up or down.
Reclining Seatbacks
{CAUTION:
You can lose control of the vehicle if
you try to adjust a manual driver’s seat
while the vehicle is moving. The sudden
movement could startle and confuse you,
or make you push a pedal when you do
not want to. Adjust the driver’s seat only
when the vehicle is not moving.
{CAUTION:
If the seatback is not locked, it could
move forward in a sudden stop or crash.
That could cause injury to the person
sitting there. Always push and pull on
the seatback to be sure it is locked.
10
Page 105 of 452
Remote Keyless Entry (RKE)
System Operation
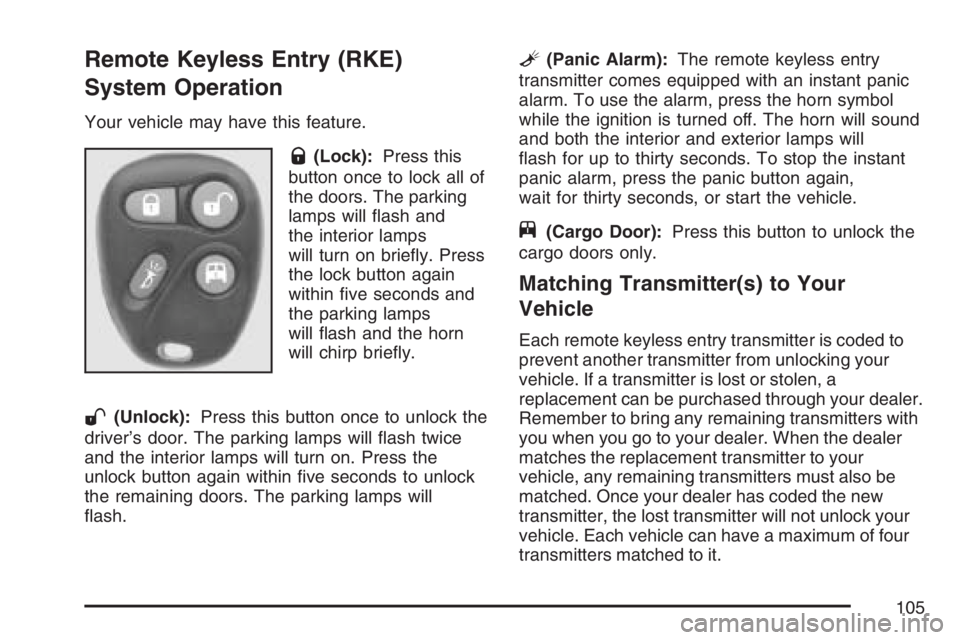
Your vehicle may have this feature.
Q(Lock):Press this
button once to lock all of
the doors. The parking
lamps will flash and
the interior lamps
will turn on briefly. Press
the lock button again
within five seconds and
the parking lamps
will flash and the horn
will chirp briefly.
W(Unlock):Press this button once to unlock the
driver’s door. The parking lamps will flash twice
and the interior lamps will turn on. Press the
unlock button again within five seconds to unlock
the remaining doors. The parking lamps will
flash.
L(Panic Alarm):The remote keyless entry
transmitter comes equipped with an instant panic
alarm. To use the alarm, press the horn symbol
while the ignition is turned off. The horn will sound
and both the interior and exterior lamps will
flash for up to thirty seconds. To stop the instant
panic alarm, press the panic button again,
wait for thirty seconds, or start the vehicle.
j(Cargo Door):Press this button to unlock the
cargo doors only.
Matching Transmitter(s) to Your
Vehicle
Each remote keyless entry transmitter is coded to
prevent another transmitter from unlocking your
vehicle. If a transmitter is lost or stolen, a
replacement can be purchased through your dealer.
Remember to bring any remaining transmitters with
you when you go to your dealer. When the dealer
matches the replacement transmitter to your
vehicle, any remaining transmitters must also be
matched. Once your dealer has coded the new
transmitter, the lost transmitter will not unlock your
vehicle. Each vehicle can have a maximum of four
transmitters matched to it.
105
Page 119 of 452
Sun Visors
To block out glare, swing down the sun visors.
You can also swing them to the side.
Visor Vanity Mirror
You may have visor vanity mirrors, with or without
lamps. Lift the mirror cover to turn the lamps
on, if you have them.
Theft-Deterrent Systems
Vehicle theft is big business, especially in some
cities. Although your vehicle has a number of
theft-deterrent features, we know that nothing we
put on it can make it impossible to steal.
Passlock®
Your vehicle is equipped with the Passlock®
theft-deterrent system.
Passlock
®is a passive theft-deterrent system.
Passlock®enables fuel if the ignition lock cylinder
is turned with a valid key. If a correct key is not
used or the ignition lock cylinder is tampered with,
fuel is disabled.
During normal operation, the SECURITY light will
go off approximately five seconds after the key
is turned to RUN. SeeSecurity Light on page 183.
If the engine stalls and the SECURITY light flashes,
wait until the light stops flashing before trying to
restart the engine. Remember to release the key
from START as soon as the engine starts.
If the engine is running and the SECURITY light
comes on, you will be able to restart the engine if
you turn the engine off. However, your Passlock
®
system is not working properly and must be
serviced by your dealer. Your vehicle is not
protected by Passlock
®at this time. You may also
want to check the fuse. SeeFuses and Circuit
Breakers on page 387. See your dealer for service.
119
Page 120 of 452
Starting and Operating Your
Vehicle
New Vehicle Break-In
Notice:Your vehicle does not need an
elaborate break-in. But it will perform better in
the long run if you follow these guidelines:
Keep your speed at 55 mph (88 km/h)
or less for the �rst 500 miles (805 km).
Do not drive at any one constant speed,
fast or slow, for the �rst 500 miles
(805 km). Do not make full-throttle starts.
Avoid downshifting to brake, or slow,
the vehicle.
Avoid making hard stops for the �rst
200 miles (322 km) or so. During this time
your new brake linings are not yet
broken in. Hard stops with new linings
can mean premature wear and earlier
replacement. Follow this breaking-in
guideline every time you get new brake
linings.
Do not tow a trailer during break-in. See
Towing a Trailer on page 266for the
trailer towing capabilities of your vehicle
and more information.
Following break-in, engine speed and load can
be gradually increased.
120
Page 122 of 452
Key In the Ignition
Never leave your vehicle with the keys inside, as it
is an easy target for joy riders or thieves. If you
leave the key in the ignition and park your vehicle,
a chime will sound, when you open the driver’s
door. Always remember to remove your key from
the ignition and take it with you. This will lock
your ignition and transaxle. Also, always remember
to lock the doors.
The battery could be drained if you leave the key
in the ignition while your vehicle is parked.
You may not be able to start your vehicle after it
has been parked for an extended period of time.
Retained Accessory Power (RAP)
The Retained Accessory Power (RAP) feature will
allow certain features on your vehicle to continue
to work for up to 10 minutes after the ignition key is
turned to LOCK or until one of the doors is
opened.
Starting the Engine
Place the transmission in the proper gear.
Move your shift lever to PARK (P) or
NEUTRAL (N). Your engine will not start in
any other position -- this is a safety feature.
To restart when you are already moving, use
NEUTRAL (N) only.
Notice:Do not try to shift to PARK (P) if your
vehicle is moving. If you do, you could
damage the transmission. Shift to PARK (P)
only when your vehicle is stopped.
Starting Procedure
1. With your foot off the accelerator pedal, turn
the ignition key to START. When the engine
starts, let go of the key. The idle speed will go
down as your engine gets warm. Do not
race the engine immediately after starting it.
Operate the engine and transmission gently to
allow the oil to warm up and lubricate all
moving parts.
122
Page 123 of 452
Your vehicle has a Computer-Controlled
Cranking System. This feature assists in
starting the engine and protects components.
If the ignition key is turned to the START
position, and then released when the engine
begins cranking, the engine will continue
cranking for a few seconds or until the vehicle
starts. If the engine does not start and the
key is held in START for many seconds,
cranking will be stopped after 15 seconds to
prevent cranking motor damage. To prevent
gear damage, this system also prevents
cranking if the engine is already running.
Engine cranking can be stopped by turning the
ignition switch to the ACCESSORY or LOCK
position.
Notice:Cranking the engine for long periods
of time, by returning the key to the START
position immediately after cranking has ended,
can overheat and damage the cranking
motor, and drain the battery. Wait at least
15 seconds between each try, to allow
the cranking motor to cool down.2. If the engine does not start after 5-10 seconds,
especially in very cold weather (below 0°F
or−18°C), it could be flooded with too much
gasoline. Try pushing the accelerator
pedal all the way to the floor and holding it
there as you hold the key in START for up to
a maximum of 15 seconds. Wait at least
15 seconds between each try, to allow the
cranking motor to cool down. When the engine
starts, let go of the key and accelerator.
If the vehicle starts briefly but then stops
again, do the same thing. This clears the extra
gasoline from the engine. Do not race the
engine immediately after starting it. Operate
the engine and transmission gently until the oil
warms up and lubricates all moving parts.
Notice:Your engine is designed to work with
the electronics in your vehicle. If you add
electrical parts or accessories, you could
change the way the engine operates. Before
adding electrical equipment, check with
your dealer. If you do not, your engine might
not perform properly. Any resulting damage
would not be covered by your vehicle’s
warranty.
123
Page 126 of 452
REVERSE (R):Use this gear to back up.
Notice:Shifting to REVERSE (R) while your
vehicle is moving forward could damage
the transmission. The repairs would not be
covered by your warranty. Shift to
REVERSE (R) only after your vehicle is
stopped.
To rock your vehicle back and forth to get out of
snow, ice or sand without damaging your
transmission, seeIf Your Vehicle is Stuck in Sand,
Mud, Ice, or Snow on page 258.
NEUTRAL (N):In this position, your engine does
not connect with the wheels. To restart when
you are already moving, use NEUTRAL (N) only.
Also, use NEUTRAL (N) when your vehicle is
being towed.
{CAUTION:
Shifting into a drive gear while your
engine is running at high speed is
dangerous. Unless your foot is �rmly on
the brake pedal, your vehicle could move
very rapidly. You could lose control and
hit people or objects. Do not shift into a
drive gear while your engine is running at
high speed.
Notice:Shifting out of PARK (P) or
NEUTRAL (N) with the engine running at high
speed may damage the transmission. The
repairs would not be covered by your warranty.
Be sure the engine is not running at high
speed when shifting your vehicle.
126
Page 127 of 452
DRIVE (D):This position is for normal driving.
It provides the best fuel economy for your vehicle.
If you need more power for passing, and you are:
•Going less than about 35 mph (55 km/h), push
your accelerator pedal about halfway down.
•Going about 35 mph (55 km/h) or more, push
the accelerator all the way down.
You will shift down to the next gear and have
more power.
Downshifting the transmission in slippery road
conditions could result in skidding, see “Skidding”
underLoss of Control on page 243.
THIRD (3):This position is also used for normal
driving. However it reduces vehicle speed
more than DRIVE (D) without using your brakes.
You might choose THIRD (3) instead of DRIVE (D)
when driving on hilly, winding roads, when
towing a trailer, so there is less shifting between
gears and when going down a steep hill.
You should use THIRD (3) (or, as you need to, a
lower gear) when towing a trailer to minimize
heat build-up and extend the life of your
transmission.SECOND (2):This position reduces vehicle speed
even more than THIRD (3) without using your
brakes. You can use SECOND (2) on hills. It can
help control your speed as you go down steep
mountain roads, but then you would also want to
use your brakes off and on.
You may use this feature for reducing torque to
the rear wheels when you are trying to start
your vehicle from a stop on slippery road surfaces.
FIRST (1): This position reduces vehicle speed
even more than SECOND (2) without using
your brakes. You can use it on very steep hills, or
in deep snow or mud. If the shift lever is put in
FIRST (1) while the vehicle is moving forward, the
transmission will not shift into first gear until the
vehicle is going slowly enough.
Notice:Spinning the tires or holding the
vehicle in one place on a hill using only the
accelerator pedal may damage the
transmission. The repair will not be covered by
your warranty. If you are stuck, do not spin
the tires. When stopping on a hill, use the
brakes to hold the vehicle in place.
127
Page 134 of 452
Mirrors
Manual Rearview Mirror
Pull the tab under the mirror toward you to reduce
glare from headlamps behind you after dark.
Push the tab away from you to restore the mirror
to the original position.
If you have a cargo van without the rear door
glass, your vehicle may not have an inside
rearview mirror.
Automatic Dimming Rearview
Mirror with Compass and
Temperature Display
Your vehicle may have this mirror. When on, an
automatic dimming mirror will dim to the proper
level to minimize glare from lights behind you
after dark.
The mirror also includes a dual display in the
upper right corner of the mirror with the compass
reading and the outside temperature.
Yb:Briefly press this button to turn the display
on or off.
Temperature Display
The temperature can be displayed by pressing the
compass/temperature button. Pressing the
compass/temperature button once briefly, will
toggle the display reading on and off. To alternate
the temperature reading between Fahrenheit and
Celsius, press and hold the compass/ temperature
button for approximately three seconds until the
display blinks F and C. After approximately
five seconds of inactivity, the display will stop
blinking and display the last selection made.
If an abnormal reading is displayed, see your
dealer.
Automatic Dimming Mirror Operation
O
:Press this button to turn the automatic
dimming feature on or off. The indicator light to
the left of the button will turn on to indicate when
the feature is on. Once the mirror is turned off,
it will remain off until it is turned back on, or until
the vehicle is restarted.
Compass Operation
Press the compass/temperature button once
briefly to turn the display on or off.
134
Page 149 of 452
Headlamp High/Low-Beam Changer
23(Headlamp High/Low-Beam Changer):To
change the headlamps from low to high beam, pull
the multifunction lever all the way toward you. Then
release it.
When the high beams
are on, this light on
the instrument panel
cluster also will be on.
Flash-to-Pass
This feature allows you to use your high-beam
headlamps to signal a driver in front of you
that you want to pass. It works even if your
headlamps are off.
To use it, pull the turn signal lever toward you, but
not so far that you hear it click.If your headlamps are off or on low-beam, your
high-beam headlamps will turn on and stay on as
long as you hold the lever toward you and the
high-beam indicator on the instrument panel will
come on. Release the lever to turn the high-beam
headlamps off.
Windshield Wipers
You control the windshield wipers by turning the
band with the wiper symbol on it.
8(Mist):For a single wiping cycle, turn the
band to mist. Hold it there until the wipers start,
then let go. The wipers will stop after one wipe.
If you want more wipes, hold the band on
mist longer.
Delay:You can set the wiper speed for a long or
short delay between wipes. This can be very
useful in light rain or snow. Turn the band
to choose the delay time. The closer to the top of
the lever, the shorter the delay.
149