wiring GMC SAVANA 2008 Owner's Manual
[x] Cancel search | Manufacturer: GMC, Model Year: 2008, Model line: SAVANA, Model: GMC SAVANA 2008Pages: 402, PDF Size: 2.45 MB
Page 78 of 402
Adding Equipment to Your
Airbag-Equipped Vehicle
Q:Is there anything I might add to or change
about the vehicle that could keep the airbags
from working properly?
A:Yes. If you add things that change your vehicle’s
frame, bumper system, height, front end or side
sheet metal, they may keep the airbag system from
working properly. Changing or moving any parts
of the front seats, safety belts, the airbag sensing
and diagnostic module, steering wheel, instrument
panel, roof-rail airbag modules, ceiling headliner
or pillar garnish trim, front sensors, or airbag wiring
can affect the operation of the airbag system.
In addition, your vehicle may have a passenger
sensing system for the right front passenger’s
position, which includes sensors that are part
of the passenger’s seat. The passenger sensing
system may not operate properly if the original
seat trim is replaced with non-GM covers,
upholstery or trim, or with GM covers, upholstery
or trim designed for a different vehicle. Any object,
such as an aftermarket seat heater or a comfort
enhancing pad or device, installed under or on top
of the seat fabric, could also interfere with the
operation of the passenger sensing system.This could either prevent proper deployment of
the passenger airbag(s) or prevent the passenger
sensing system from properly turning off the
passenger airbag(s). SeePassenger Sensing
System on page 1-69.
If you have any questions about this, you should
contact Customer Assistance before you modify
your vehicle. The phone numbers and addresses
for Customer Assistance are in Step Two of
the Customer Satisfaction Procedure in this manual.
SeeCustomer Satisfaction Procedure on page 7-2.
Q:Because I have a disability, I have to get
my vehicle modi�ed. How can I �nd out whether
this will affect my airbag system?
A:If you have questions, call Customer Assistance.
The phone numbers and addresses for Customer
Assistance are in Step Two of the Customer
Satisfaction Procedure in this manual. See
Customer Satisfaction Procedure on page 7-2.
In addition, your dealer/retailer and the service manual
have information about the location of the airbag sensors,
sensing and diagnostic module and airbag wiring.
1-74
Page 141 of 402
Passenger Safety Belt Reminder Light
Several seconds after the engine is started, a chime will
sound for several seconds to remind the front passenger
to buckle their safety belt. This would only occur if the
passenger airbag is enabled. SeePassenger Sensing
System on page 1-69for more information. The
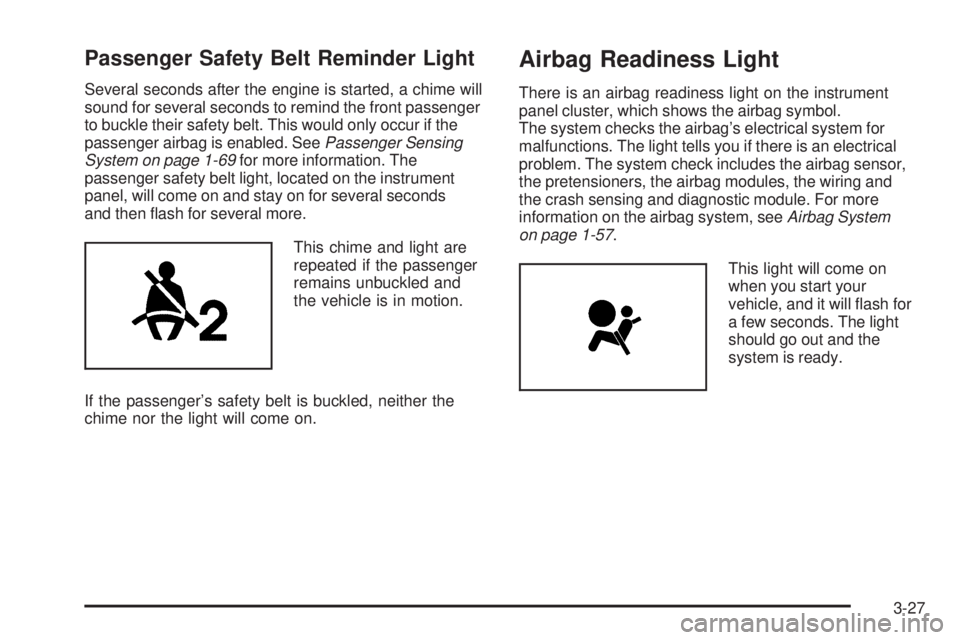
passenger safety belt light, located on the instrument
panel, will come on and stay on for several seconds
and then flash for several more.
This chime and light are
repeated if the passenger
remains unbuckled and
the vehicle is in motion.
If the passenger’s safety belt is buckled, neither the
chime nor the light will come on.
Airbag Readiness Light
There is an airbag readiness light on the instrument
panel cluster, which shows the airbag symbol.
The system checks the airbag’s electrical system for
malfunctions. The light tells you if there is an electrical
problem. The system check includes the airbag sensor,
the pretensioners, the airbag modules, the wiring and
the crash sensing and diagnostic module. For more
information on the airbag system, seeAirbag System
on page 1-57.
This light will come on
when you start your
vehicle, and it will flash for
a few seconds. The light
should go out and the
system is ready.
3-27
Page 177 of 402
EXIT FEATURE SETTINGS
This feature allows you to exit the feature settings menu.
Press the customization button until FEATURE
SETTINGS PRESS
VTO EXIT appears in the DIC
display. Press the set/reset button once to exit the menu.
If you do not exit, pressing the customization button
again will return you to the beginning of the feature
settings menu.
Exiting the Feature Settings Menu
The feature settings menu will be exited when any of
the following occurs:
•The vehicle is no longer in ON/RUN.
•The trip/fuel or vehicle information DIC buttons are
pressed.
•The end of the feature settings menu is reached
and exited.
•A 40 second time period has elapsed with no
selection made.
Audio System(s)
If your vehicle came without a radio, the wiring
provisions for a radio and an antenna were installed at
the assembly plant, so that if you want, a radio can
be installed at the dealer/retailer.
Determine which radio your vehicle has and then read the
pages following to familiarize yourself with its features.
{CAUTION:
This system provides you with far greater
access to audio stations and song listings.
Giving extended attention to entertainment
tasks while driving can cause a crash and you
or others can be injured or killed. Always keep
your eyes on the road and your mind on the
drive — avoid engaging in extended searching
while driving.
Keeping your mind on the drive is important for safe
driving. SeeDefensive Driving on page 4-2. Here are
some ways in which you can help avoid distraction while
driving.
3-63
Page 235 of 402
If you’ll be pulling a trailer that, when loaded, will weigh
more than 5,000 lbs (2 270 kg), be sure to use a
properly mounted weight-distributing hitch and sway
control of the proper size. This equipment is very
important for proper vehicle loading and good handling
when you’re driving. You should always use a sway
control if your trailer will weigh more than these limits.
You can ask a hitch dealer/retailer about sway controls.
Will you have to make any holes in the body of your
vehicle when you install a trailer hitch?
If you’re using the wiring provided with the
factory-installed trailering package, you should not
need to make any holes in the body of your vehicle.
However, if you have an aftermarket hitch installed,
you may need to make holes in the body.
If you do, then be sure to seal the holes later when
you remove the hitch. If you don’t seal them, deadly
carbon monoxide (CO) from your exhaust can get into
your vehicle as well as dirt and water. See “Carbon
Monoxide” underEngine Exhaust on page 2-30.Safety Chains
You should always attach chains between your vehicle
and your trailer. Cross the safety chains under the tongue
of the trailer to help prevent the tongue from contacting
the road if it becomes separated from the hitch.
Instructions about safety chains may be provided by the
hitch manufacturer or by the trailer manufacturer. Follow
the manufacturer’s recommendation for attaching safety
chains and do not attach them to the bumper. Always
leave just enough slack so you can turn with your rig.
Never allow safety chains to drag on the ground.
Trailer Brakes
If your trailer weighs more than 1,000 lbs (450 kg)
loaded, then it needs its own brakes – and they must be
adequate. Be sure to read and follow the instructions
for the trailer brakes so you’ll be able to install,
adjust and maintain them properly.
If your vehicle has StabiliTrak
®, your trailer brake
system cannot tap into the vehicle’s hydraulic brake
system.
4-37
Page 237 of 402
Passing
You’ll need more passing distance up ahead when
you’re towing a trailer. And, because you’re a good deal
longer, you’ll need to go much farther beyond the
passed vehicle before you can return to your lane.
Backing Up
Hold the bottom of the steering wheel with one hand.
Then, to move the trailer to the left, just move that hand
to the left. To move the trailer to the right, move your
hand to the right. Always back up slowly and, if possible,
have someone guide you.
Making Turns
Notice:Making very sharp turns while trailering
could cause the trailer to come in contact with the
vehicle. Your vehicle could be damaged. Avoid
making very sharp turns while trailering.
When you’re turning with a trailer, make wider turns
than normal. Do this so your trailer won’t strike
soft shoulders, curbs, road signs, trees or other objects.
Avoid jerky or sudden maneuvers. Signal well in
advance.
Turn Signals When Towing a Trailer
When you tow a trailer, your vehicle has to have extra
wiring and a heavy-duty turn signal (included in the
optional trailering package).
The arrows on your instrument panel will flash whenever
you signal a turn or lane change. Properly hooked up,
the trailer lamps will also flash, telling other drivers
you’re about to turn, change lanes or stop.
When towing a trailer, the arrows on your instrument
panel will flash for turns even if the bulbs on the trailer
are burned out. Thus, you may think drivers behind
you are seeing your signal when they are not. It’s
important to check occasionally to be sure the trailer
bulbs are still working.
Driving On Grades
Reduce speed and shift to a lower gearbeforeyou start
down a long or steep downgrade. If you don’t shift
down, you might have to use your brakes so much that
they would get hot and no longer work well.
You can tow in DRIVE (D). You may want to shift the
transmission to THIRD (3) or a lower gear under heavy
loads and/or hilly conditions.
4-39
Page 239 of 402
Maintenance When Trailer Towing
Your vehicle will need service more often when you’re
pulling a trailer. See the Maintenance Schedule for more
on this. Things that are especially important in trailer
operation are automatic transmission fluid (don’t overfill),
engine oil, axle lubricant, belt, cooling system and brake
system. Each of these is covered in this manual, and the
Index will help you find them quickly. If you’re trailering,
it’s a good idea to review these sections before you start
your trip.
Check periodically to see that all hitch nuts and bolts
are tight.
Trailer Wiring Harness
The optional heavy-duty trailer wiring package includes
a wiring harness, with a seven-pin connector at the
rear of the vehicle and a four-wire harness assembly
under the driver side of the instrument panel. The
four-wire harness assembly comes without a connector.
If your vehicle does not have a trailer hitch, the
seven-wire harness assembly with connector is taped
together and located in a frame pocket at the driver side
rear left corner of the frame.
If your vehicle has a trailer hitch, the seven-wire
harness assembly with connector is attached to a
bracket on the hitch platform. In both cases, the
seven-wire harness has a connector and includes a
30-amp feed wire.
4-41
Page 242 of 402
Tires..............................................................5-53
Tire Sidewall Labeling...................................5-54
Tire Terminology and Definitions.....................5-57
Inflation - Tire Pressure.................................5-60
Dual Tire Operation.......................................5-61
Tire Pressure Monitor System.........................5-62
Tire Pressure Monitor Operation.....................5-64
Tire Inspection and Rotation...........................5-68
When It Is Time for New Tires.......................5-70
Buying New Tires.........................................5-70
Different Size Tires and Wheels......................5-72
Uniform Tire Quality Grading..........................5-73
Wheel Alignment and Tire Balance..................5-74
Wheel Replacement......................................5-74
Tire Chains..................................................5-76
If a Tire Goes Flat........................................5-77
Changing a Flat Tire.....................................5-78
Removing the Spare Tire and Tools................5-79
Removing the Flat Tire and
Installing the Spare Tire.............................5-82
Secondary Latch System...............................5-90
Storing a Flat or Spare Tire and Tools............5-93
Spare Tire...................................................5-94
Appearance Care............................................5-95
Interior Cleaning...........................................5-95
Fabric/Carpet...............................................5-96Instrument Panel, Vinyl, and Other Plastic
Surfaces..................................................5-97
Care of Safety Belts......................................5-97
Weatherstrips...............................................5-97
Washing Your Vehicle...................................5-98
Cleaning Exterior Lamps/Lenses.....................5-98
Finish Care..................................................5-98
Windshield and Wiper Blades.........................5-99
Aluminum Wheels.......................................5-100
Tires.........................................................5-101
Sheet Metal Damage...................................5-101
Finish Damage...........................................5-101
Underbody Maintenance...............................5-101
Chemical Paint Spotting...............................5-101
Vehicle Care/Appearance Materials................5-102
Vehicle Identi�cation.....................................5-103
Vehicle Identification Number (VIN)................5-103
Service Parts Identification Label...................5-103
Electrical System..........................................5-103
Add-On Electrical Equipment.........................5-103
Headlamp Wiring........................................5-104
Windshield Wiper Fuses...............................5-104
Fuses and Circuit Breakers..........................5-104
Floor Console Fuse Block............................5-104
Engine Compartment Fuse Block...................5-106
Capacities and Speci�cations........................5-110
Section 5 Service and Appearance Care
5-2
Page 344 of 402
Headlamp Wiring
The headlamp wiring is protected by fuses in the engine
compartment fuse block. An electrical overload will
cause the lamps to flicker on and off, or in some cases to
remain off. If this happens, have your headlamp wiring
checked right away.
Windshield Wiper Fuses
The windshield wiper motor is protected by a circuit
breaker and a fuse. If the motor overheats due to heavy
snow, etc., the wiper will stop until the motor cools.
Although the circuit is protected from electrical overload,
overload due to heavy snow, etc., may cause wiper
linkage damage. Always clear ice and heavy snow from
the windshield before using the windshield wipers. If the
overload is caused by some electrical problem and not
snow, etc., be sure to get it fixed.
Fuses and Circuit Breakers
The wiring circuits in your vehicle are protected from
short circuits by a combination of fuses and circuit
breakers. This greatly reduces the chance of fires
caused by electrical problems.
Look at the silver-colored band inside the fuse. If the
band is broken or melted, replace the fuse. Be sure you
replace a bad fuse with a new one of the identical size
and rating.
Floor Console Fuse Block
The floor console fuse block is located under the
driver seat.
5-104
Page 348 of 402
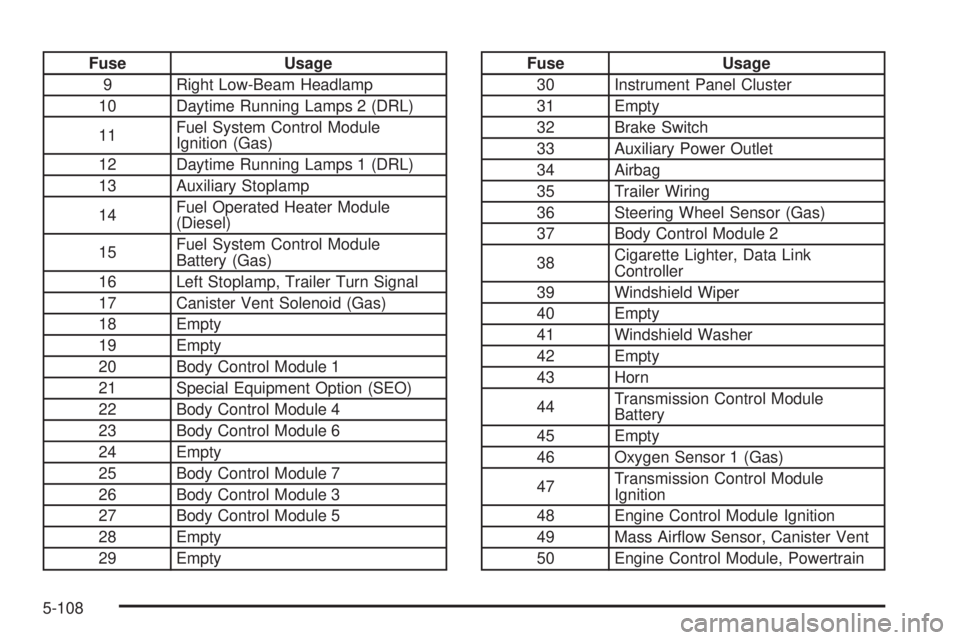
Fuse Usage
9 Right Low-Beam Headlamp
10 Daytime Running Lamps 2 (DRL)
11Fuel System Control Module
Ignition (Gas)
12 Daytime Running Lamps 1 (DRL)
13 Auxiliary Stoplamp
14Fuel Operated Heater Module
(Diesel)
15Fuel System Control Module
Battery (Gas)
16 Left Stoplamp, Trailer Turn Signal
17 Canister Vent Solenoid (Gas)
18 Empty
19 Empty
20 Body Control Module 1
21 Special Equipment Option (SEO)
22 Body Control Module 4
23 Body Control Module 6
24 Empty
25 Body Control Module 7
26 Body Control Module 3
27 Body Control Module 5
28 Empty
29 EmptyFuse Usage
30 Instrument Panel Cluster
31 Empty
32 Brake Switch
33 Auxiliary Power Outlet
34 Airbag
35 Trailer Wiring
36 Steering Wheel Sensor (Gas)
37 Body Control Module 2
38Cigarette Lighter, Data Link
Controller
39 Windshield Wiper
40 Empty
41 Windshield Washer
42 Empty
43 Horn
44Transmission Control Module
Battery
45 Empty
46 Oxygen Sensor 1 (Gas)
47Transmission Control Module
Ignition
48 Engine Control Module Ignition
49 Mass Airflow Sensor, Canister Vent
50 Engine Control Module, Powertrain
5-108
Page 349 of 402
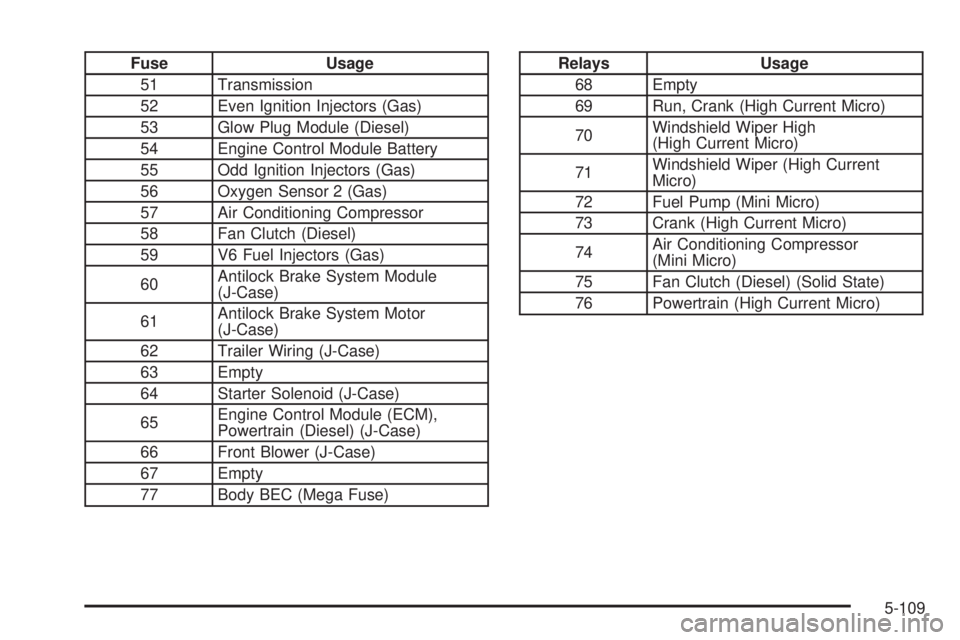
Fuse Usage
51 Transmission
52 Even Ignition Injectors (Gas)
53 Glow Plug Module (Diesel)
54 Engine Control Module Battery
55 Odd Ignition Injectors (Gas)
56 Oxygen Sensor 2 (Gas)
57 Air Conditioning Compressor
58 Fan Clutch (Diesel)
59 V6 Fuel Injectors (Gas)
60Antilock Brake System Module
(J-Case)
61Antilock Brake System Motor
(J-Case)
62 Trailer Wiring (J-Case)
63 Empty
64 Starter Solenoid (J-Case)
65Engine Control Module (ECM),
Powertrain (Diesel) (J-Case)
66 Front Blower (J-Case)
67 Empty
77 Body BEC (Mega Fuse)Relays Usage
68 Empty
69 Run, Crank (High Current Micro)
70Windshield Wiper High
(High Current Micro)
71Windshield Wiper (High Current
Micro)
72 Fuel Pump (Mini Micro)
73 Crank (High Current Micro)
74Air Conditioning Compressor
(Mini Micro)
75 Fan Clutch (Diesel) (Solid State)
76 Powertrain (High Current Micro)
5-109