key GMC SAVANA 2009 Get To Know Guide
[x] Cancel search | Manufacturer: GMC, Model Year: 2009, Model line: SAVANA, Model: GMC SAVANA 2009Pages: 20, PDF Size: 0.93 MB
Page 1 of 20
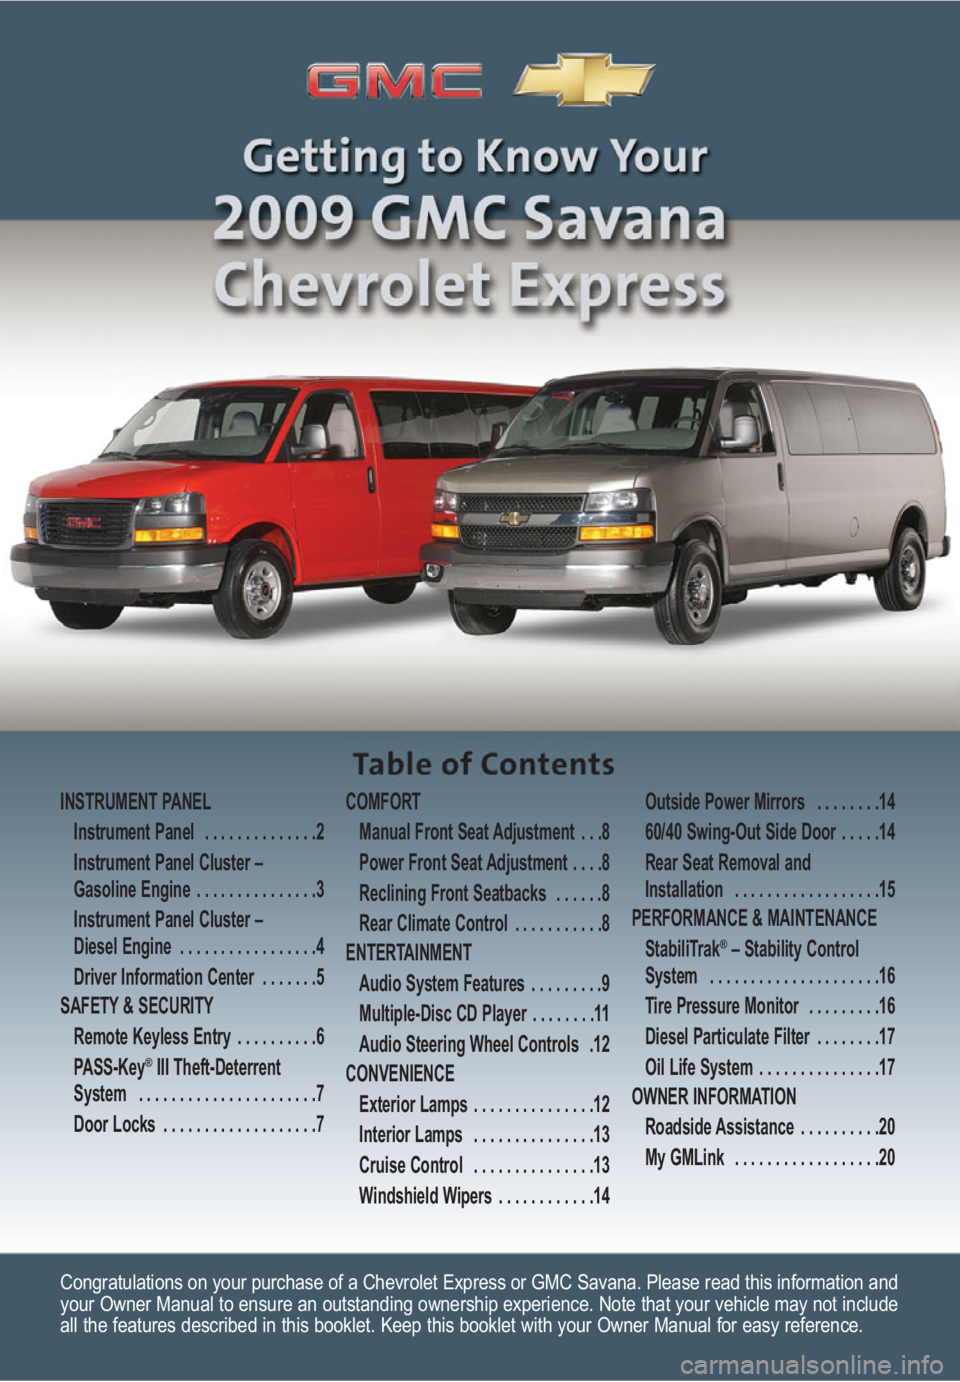
Congratulations on your purchase of a Chevrolet Express or GMC Savana. Please read this information and
your Owner Manual to ensure an outstanding ownership experience. Note that your vehicle may not include
all the features described in this booklet. Keep this booklet with your Owner Manual for easy reference.
INSTRUMENT PANEL
Instrument Panel . . . . . . . . . . . . . .2
Instrument Panel Cluster –
Gasoline Engine . . . . . . . . . . . . . . .3
Instrument Panel Cluster –
Diesel Engine . . . . . . . . . . . . . . . . .4
Driver Information Center . . . . . . .5
SAFETY & SECURITY
Remote Keyless Entry . . . . . . . . . .6
PASS-Key
®III Theft-Deterrent
System . . . . . . . . . . . . . . . . . . . . . .7
Door Locks . . . . . . . . . . . . . . . . . . .7COMFORT
Manual Front Seat Adjustment . . .8
Power Front Seat Adjustment . . . .8
Reclining Front Seatbacks . . . . . .8
Rear Climate Control . . . . . . . . . . .8
ENTERTAINMENT
Audio System Features . . . . . . . . .9
Multiple-Disc CD Player . . . . . . . .11
Audio Steering Wheel Controls .12
CONVENIENCE
Exterior Lamps . . . . . . . . . . . . . . .12
Interior Lamps . . . . . . . . . . . . . . .13
Cruise Control . . . . . . . . . . . . . . .13
Windshield Wipers . . . . . . . . . . . .14Outside Power Mirrors . . . . . . . .14
60/40 Swing-Out Side Door . . . . .14
Rear Seat Removal and
Installation . . . . . . . . . . . . . . . . . .15
PERFORMANCE & MAINTENANCE
StabiliTrak
®– Stability Control
System . . . . . . . . . . . . . . . . . . . . .16
Tire Pressure Monitor . . . . . . . . .16
Diesel Particulate Filter . . . . . . . .17
Oil Life System . . . . . . . . . . . . . . .17
OWNER INFORMATION
Roadside Assistance . . . . . . . . . .20
My GMLink . . . . . . . . . . . . . . . . . .20
Page 3 of 20
3
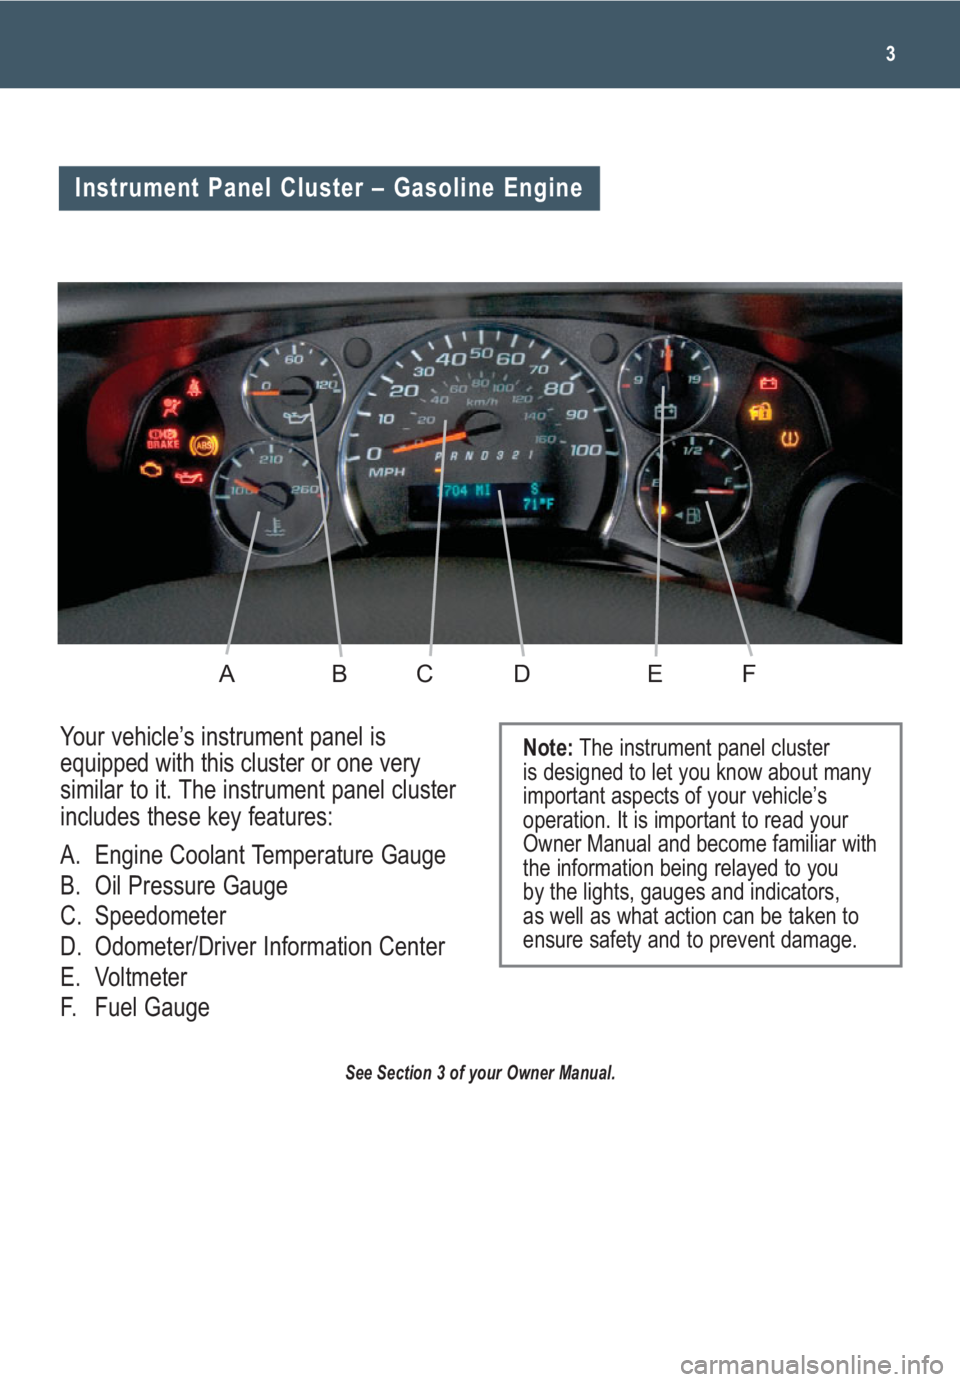
Your vehicle’s instrument panel is
equipped with this cluster or one very
similar to it. The instrument panel cluster
includes these key features:
A. Engine Coolant Temperature Gauge
B. Oil Pressure Gauge
C. Speedometer
D. Odometer/Driver Information Center
E. Voltmeter
F. Fuel Gauge
Instrument Panel Cluster – Gasoline Engine
BCDEFA
Note: The instrument panel cluster
is designed to let you know about many
important aspects of your vehicle’s
operation. It is important to read your
Owner Manual and become familiar with
the information being relayed to you
by the lights, gauges and indicators,
as well as what action can be taken to
ensure safety and to prevent damage.
See Section 3 of your Owner Manual.
Page 4 of 20
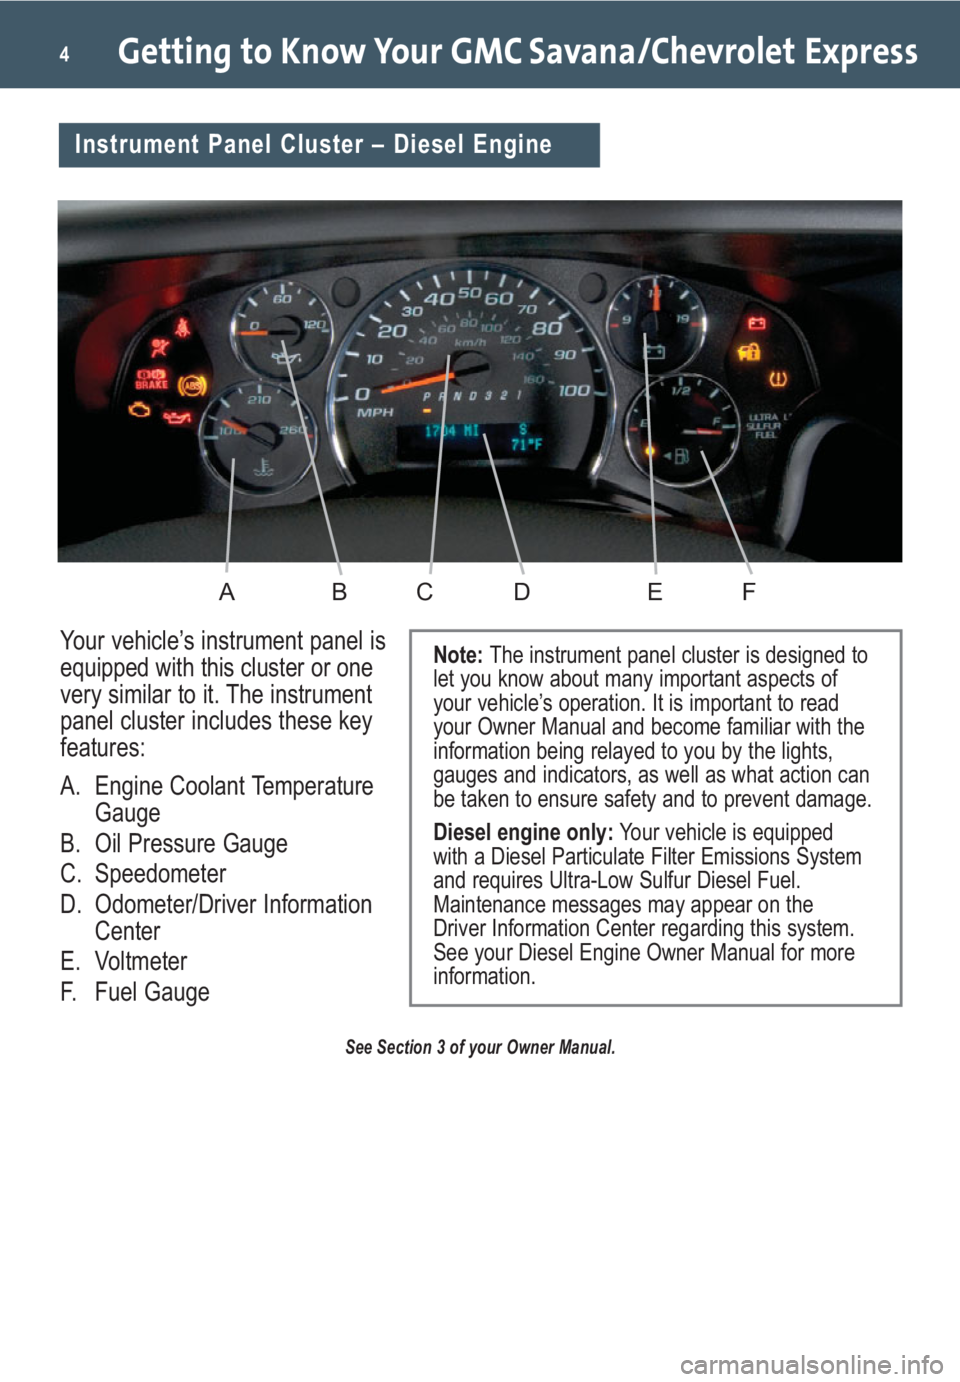
Your vehicle’s instrument panel is
equipped with this cluster or one
very similar to it. The instrument
panel cluster includes these key
features:
A. Engine Coolant Temperature
Gauge
B. Oil Pressure Gauge
C. Speedometer
D. Odometer/Driver Information
Center
E. Voltmeter
F. Fuel Gauge
4
Note: The instrument panel cluster is designed to
let you know about many important aspects of
your vehicle’s operation. It is important to read
your Owner Manual and become familiar with the
information being relayed to you by the lights,
gauges and indicators, as well as what action can
be taken to ensure safety and to prevent damage.
Diesel engine only:Your vehicle is equipped
with a Diesel Particulate Filter Emissions System
and requires Ultra-Low Sulfur Diesel Fuel.
Maintenance messages may appear on the
Driver Information Center regarding this system.
See your Diesel Engine Owner Manual for more
information.
See Section 3 of your Owner Manual.
Instrument Panel Cluster – Diesel Engine
BCDEFA
Getting to Know Your GMC Savana/Chevrolet Express
Page 5 of 20
Your vehicle’s Driver Information Center
(DIC) provides vehicle information, vehi-
cle feature customization, and vehicle
warning messages. The DIC messages
will be shown on the instrument panel
cluster display.
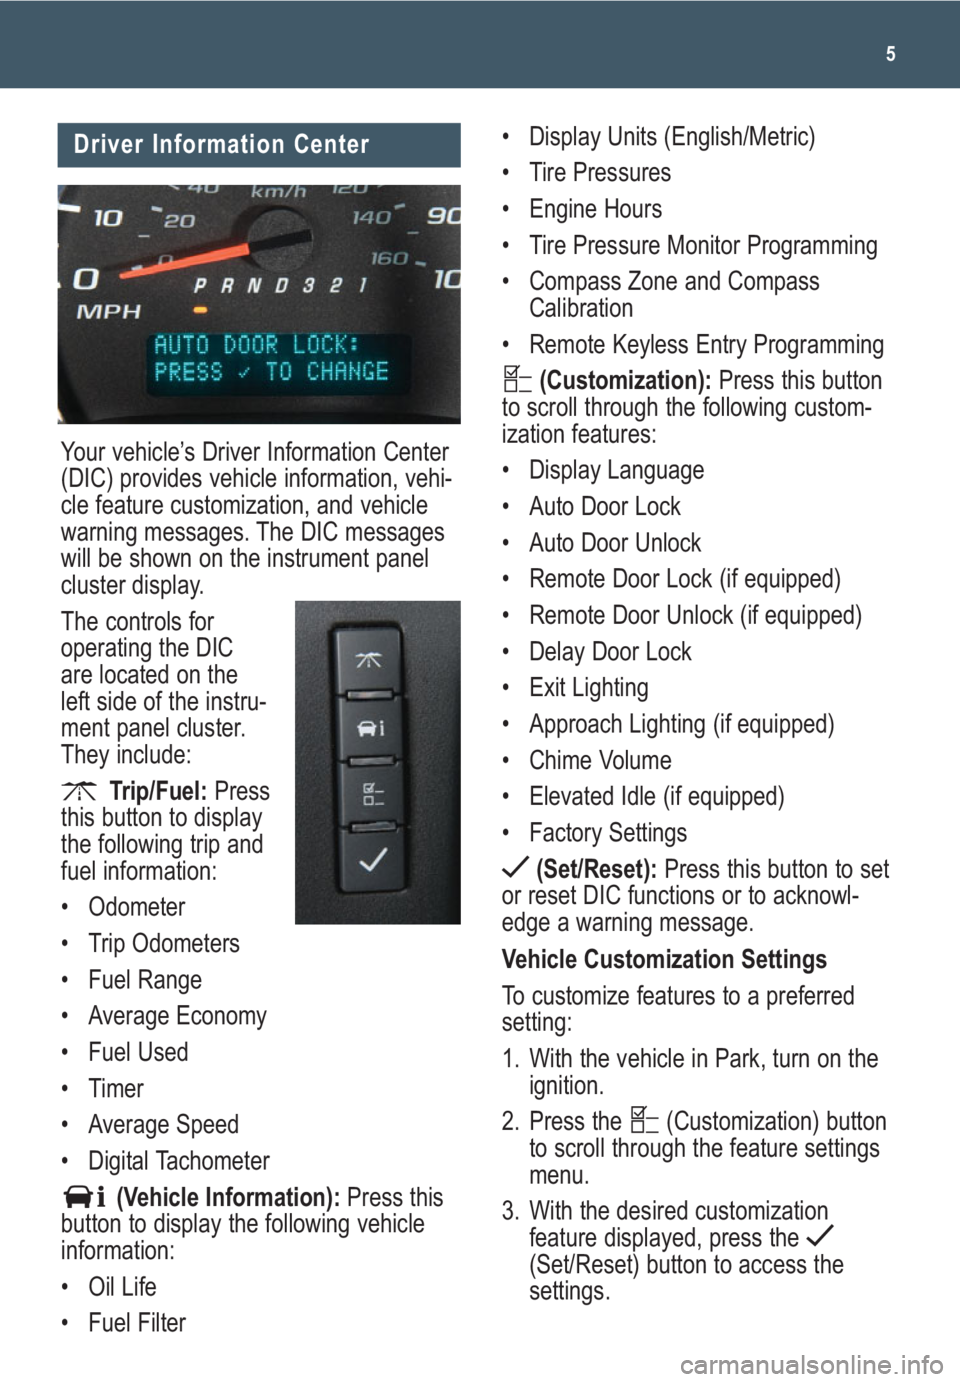
The controls for
operating the DIC
are located on the
left side of the instru-
ment panel cluster.
They include:
Trip/Fuel: Press
this button to display
the following trip and
fuel information:
• Odometer
• Trip Odometers
• Fuel Range
• Average Economy
• Fuel Used
• Timer
• Average Speed
• Digital Tachometer
(Vehicle Information):Press this
button to display the following vehicle
information:
• Oil Life
• Fuel Filter
5
Driver Information Center• Display Units (English/Metric)
• Tire Pressures
• Engine Hours
• Tire Pressure Monitor Programming
• Compass Zone and Compass
Calibration
• Remote Keyless Entry Programming
(Customization): Press this button
to scroll through the following custom-
ization features:
• Display Language
• Auto Door Lock
• Auto Door Unlock
• Remote Door Lock (if equipped)
• Remote Door Unlock (if equipped)
• Delay Door Lock
• Exit Lighting
• Approach Lighting (if equipped)
• Chime Volume
• Elevated Idle (if equipped)
• Factory Settings
(Set/Reset):Press this button to set
or reset DIC functions or to acknowl-
edge a warning message.
Vehicle Customization Settings
To customize features to a preferred
setting:
1. With the vehicle in Park, turn on the
ignition.
2. Press the (Customization) button
to scroll through the feature settings
menu.
3. With the desired customization
feature displayed, press the
(Set/Reset) button to access the
settings.
Page 6 of 20
Getting to Know Your GMC Savana/Chevrolet Express6
4. Press the button to scroll through
the available settings.
5. With the desired setting displayed,
press the button to select it.
6. Press the button to scroll to the
next feature.
7. To exit the Feature Settings menu,
press the button until EXIT
FEATURE SETTINGS is displayed
and then press the button; or
press the button or the
button.
Warnings and Messages
The DIC provides a variety of vehicle
warning messages (depending on
optional equipment) if a problem is
sensed in a vehicle system. To acknowl-
edge a message and clear it from the
display, press the (Set/Reset) button.
Some urgent messages cannot be
cleared from the DIC display.
If you have a current OnStar subscrip-
tion, and a warning message appears,
you can press the OnStar button and
speak to an OnStar Advisor. In many
vehicles, OnStar Advisors can access
certain diagnostic information and can
tell you how serious the problem is and
what you should do about it.
See Section 3 of your Owner Manual.
SAFETY & SECURITY
Remote Keyless Entry
(if equipped)
The Remote Keyless Entry (RKE) trans-
mitter includes the following functions:
(Lock):Press this button once to
lock all the doors. RKE feedback
can be programmed using the Driver
Information Center (DIC).
(Unlock):Press this button once to
unlock the driver’s door. Press the but-
ton again within five seconds to unlock
the remaining doors. RKE feedback can
be programmed using the DIC.
(Cargo Door):Press this button to
unlock the cargo doors only.
(Vehicle Locator/Panic Alarm):
Press this button while the ignition is
turned off to locate your vehicle or acti-
vate the alarm. Briefly press the button
to locate your vehicle. The horn will
chirp three times. Press and hold the
button for three seconds to activate
the alarm. The horn will sound and both
the interior and exterior lamps will flash
for up to 30 seconds. To cancel the
alarm, press the button again or start
the vehicle.
If you notice a decrease in the range of
the RKE transmitter, try this:
• Check the distance. You may be too
far from your vehicle, especially
during rainy or snowy weather.
• Check the location. Other vehicles or
objects may be blocking the signal.
Note:Your vehicle’s warnings and mes-
sages provide critical information that
can prevent damage to your vehicle.
Review your Owner Manual to become
familiar with the information displayed
and the action required.
Page 7 of 20
7
• Check to determine whether battery
replacement or resynchronization is
necessary.
See Section 2 of your Owner Manual.
Note:The RKE system will not operate
if the hood is open or if the key is in the
ignition.
PASS-Key®III Theft-Deterrent
System
Your vehicle is equipped with the
PASS-Key III theft-deterrent system,
which is a passive system that disables
the vehicle’s starter and fuel system if
someone attempts to start the vehicle
without the correct key.
During normal operation, the
(Security) light will turn off approximately
five seconds after the key is turned to
Run.
If the security light turns on while driving
and stays on, there may be a problem
with the PASS-Key III system. You will
be able to restart the engine if you turn
off the engine; however, your vehicle will
not be protected by PASS-Key III and
you should see your GM dealer.
See Section 2 of your Owner Manual.
Door Locks
Lockout Protection
This feature protects you from locking
the vehicle with the key in the ignition.
If the power door lock switch is pressed
when either the driver’s, passenger’s
or rear doors are open, all of the doors
will lock and then the driver’s door will
unlock. This feature does not include the
side cargo door.Cargo Door Relocking
This feature secures the side cargo
door after unloading cargo. If the side
cargo door is open when the Lock button
on the power door lock switch or the
Remote Keyless Entry transmitter is
pressed, all doors will lock and then
relock after the side cargo door is
closed. The side cargo door must be
closed within several minutes for the
relock to occur.
Security Locks (if equipped)
Security locks can be engaged on the
passenger-side rear door, the side
sliding door and the driver-side and
passenger-side 60/40 swing-out side
doors so that passengers can’t open the
doors from the inside.
To engage the security locks, move the
lever on the door to the (Lock) posi-
tion. Move it to the (Unlock) position
to return the doors to normal operation.See Section 2 of your Owner Manual.
Page 15 of 20

15
To install the rear seats:
1. Position the seat into the open slots in
the floor rails and push the seat for-
ward, hooking the seat onto the rails.
2. Install the locking pins into the seat
base on the inboard sides of the seat
floor latch. Move the seat to line up
with the pins in the seat base.
3. Install the pin marked “R” on the pas-
senger’s side and the pin marked “L”
on the driver’s side.
4. Push the pins down into the retaining
clips. Check that the pins are locked
in place.
5. Connect each shoulder belt by insert-
ing the latch plate into the buckle
attached at each outboard position of
the bench seat.
See Section 1 of your Owner Manual.
Rear Seat Removal and
Installation (if equipped)
To remove the rear seats:
1. Disconnect each outboard shoulder
belt on the bench seat by pressing
the tip of a key into the release hole
of the safety belt buckle while pulling
up on the safety belt.
2. Locate the two locking pins on the
inboard sides of the seat floor latch.
If there are floormats, the pins are
under a flap cut into the mat. The
driver-side pin has a gray handle
marked with an “L.” The passenger-
side pin has a black handle marked
with an “R.”
3. Pull each pin handle up to disengage
the pins. Pull out the pins.
4. Pull the seat rearward about two inch-
es and lift the seat from the floor rails.
5. Remove the seat.
Page 17 of 20
off as you start to drive. This could be
an early indicator that your tire pres-
sures are getting low and the tires need
to be inflated to the proper pressure.
See Section 5 of your Owner Manual.
17
Note: The Tire Pressure Monitor can
alert you about low tire pressure, but it
doesn’t replace normal monthly tire
maintenance.
The Duramax Diesel engine is equipped
with a Diesel Particulate Filter (DPF)
that will filter or trap particulates (solid
particles in the exhaust exhibited as
black smoke) before they can be emit-
ted into the atmosphere. The DPF will
occasionally need to be cleaned of
accumulated solids. During a cleaning,
the exhaust gas temperature is warmed
so that the accumulated particulate mat-
ter in the DPF will be safely converted to
harmless gases. This feature has been
designed to operate automatically, with
limited driver involvement.
For effective DPF cleaning, the vehicle
will need to operate continuously for
approximately 20 minutes and at speeds
greater than 30 mph. If the vehicle is
returned to idle during the cleaning
process, the driver may notice a slightly
different sound or a slightly elevated
engine idle speed. This is normal.
If the vehicle is not being operated in a
manner to allow effective automatic DPF
cleaning, the CLN EXH FILTER warning
lamp will illuminate.
See your Duramax Diesel Engine Owner
Manual for more information.
Diesel Particulate Filter
(if equipped)
Oil Life System
The Oil Life System calculates engine
oil life based on vehicle use and
displays the CHANGE ENGINE OIL
SOON message when it’s necessary to
change your engine oil and filter. This is
based on engine operation and driving
conditions, not mileage. The Oil Life
System should be reset to 100% only
following an oil change.
To reset the Oil Life System:
1. Turn the ignition key to Run with the
engine off.
2. Fully press and release the accelera-
tor pedal slowly three times within
five seconds.
3. Turn the key to Lock.
See Section 5 of your Owner Manual.