display GMC SAVANA 2009 Owner's Manual
[x] Cancel search | Manufacturer: GMC, Model Year: 2009, Model line: SAVANA, Model: GMC SAVANA 2009Pages: 404, PDF Size: 2.35 MB
Page 89 of 404
Programming Transmitters to the
Vehicle
Only RKE transmitters programmed to the vehicle will
work. If a transmitter is lost or stolen, a replacement
can be purchased and programmed through your
dealer/retailer. When the replacement transmitter is
programmed to the vehicle, all remaining transmitters
must also be programmed. Any lost or stolen
transmitters no longer work once the new transmitter
is programmed. Each vehicle can have up to four
transmitters programmed to it. See “Relearn Remote
Key” underDIC Operation and Displays on page 3-43for
instructions on how to match RKE transmitters to your
vehicle.
Battery Replacement
Replace the battery if the REPLACE BATTERY IN
REMOTE KEY message displays in the DIC. See
“REPLACE BATTERY IN REMOTE KEY” underDIC
Warnings and Messages on page 3-50for additional
information.
Notice:When replacing the battery, do not touch
any of the circuitry on the transmitter. Static
from your body could damage the transmitter.To replace the battery:
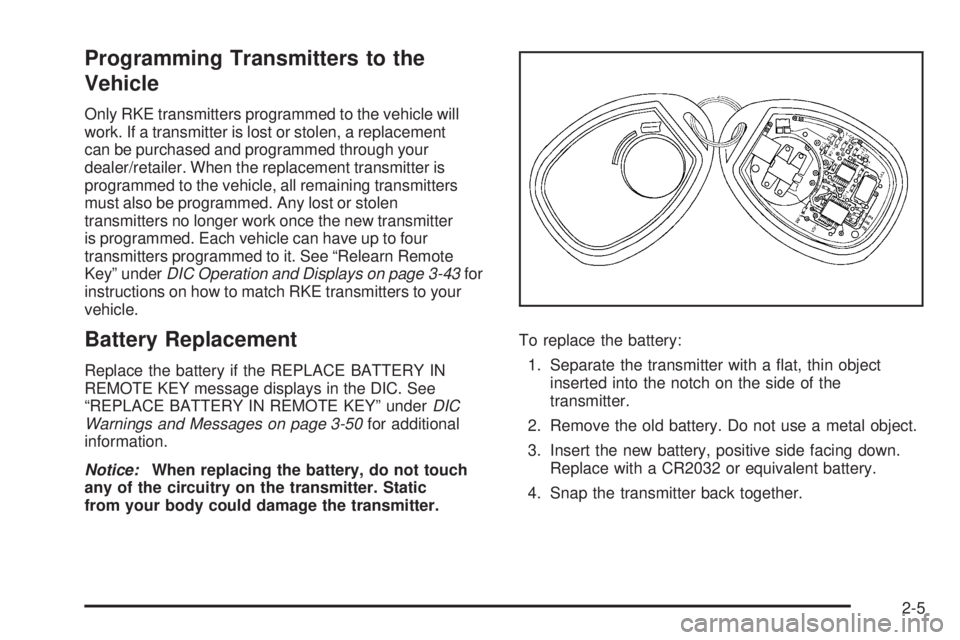
1. Separate the transmitter with a flat, thin object
inserted into the notch on the side of the
transmitter.
2. Remove the old battery. Do not use a metal object.
3. Insert the new battery, positive side facing down.
Replace with a CR2032 or equivalent battery.
4. Snap the transmitter back together.
2-5
Page 104 of 404
B (ACC/ACCESSORY):This is the position in which
you can operate things like the radio and the windshield
wipers when the engine is off.
C (ON/RUN):This position can be used to operate the
electrical accessories and to display some instrument
panel cluster warning and indicator lights. The switch
stays in this position when the engine is running.
If you leave the key in the ACC/ACCESSORY or ON/
RUN position with the engine off, the battery could be
drained. You may not be able to start the vehicle if the
battery is allowed to drain for an extended period of time.
D (START):This is the position that starts the engine.
When the engine starts, release the key. The ignition
switch returns to ON/RUN for driving.
A warning tone will sound when the driver door is
opened, the ignition is in ACC/ACCESSORY or
LOCK/OFF and the key is in the ignition.Retained Accessory Power (RAP)
These vehicle accessories can be used for up to
10 minutes after the engine is turned off:
•Audio System
•Power Windows (if equipped)
These features will work when the ignition key is in
ON/RUN or ACC/ACCESSORY. Once the key is turned
from ON/RUN to LOCK/OFF, power to the radio will
continue to work 10 minutes or until the driver door is
opened. The power windows will continue to work for up
to 10 minutes or until any door is opened.
Starting the Engine
If the vehicle has the DURAMAX®Diesel engine, see
the DURAMAX®Diesel manual for more information.
To place the transmission in the proper gear:
Move the shift lever to P (Park) or N (Neutral). The
engine will not start in any other position. To restart the
engine when the vehicle is already moving, use
N (Neutral) only.
2-20
Page 120 of 404
Oil Pressure Light.........................................3-40
Security Light...............................................3-41
Cruise Control Light......................................3-41
Highbeam On Light.......................................3-41
Tow/Haul Mode Light....................................3-41
Fuel Gage...................................................3-42
Driver Information Center (DIC).......................3-43
DIC Operation and Displays...........................3-43
DIC Compass..............................................3-48
DIC Warnings and Messages.........................3-50
DIC Vehicle Customization.............................3-59Audio System(s).............................................3-65
Setting the Clock..........................................3-66
Radio(s)......................................................3-68
Using an MP3..............................................3-79
Theft-Deterrent Feature..................................3-84
Audio Steering Wheel Controls.......................3-85
Radio Reception...........................................3-86
Fixed Mast Antenna......................................3-86
Section 3 Instrument Panel
3-2
Page 134 of 404
If the vehicle is started in a dark garage, the automatic
headlamp system comes on immediately. Once the
vehicle leaves the garage, it takes approximately
30 seconds for the automatic headlamp system to
change to DRL if it is light outside. During that delay,
the instrument panel cluster may not be as bright
as usual. Make sure the instrument panel brightness
control is in the full bright position. SeeInstrument Panel
Brightness on page 3-16.
Instrument Panel Brightness
The knob for this feature is located next to the exterior
lamps control.
D(Instrument Panel Lights):Push knob to extend
and then turn clockwise or counterclockwise to brighten
or dim the instrument panel lights and the radio display.
This only works if the headlamps or parking lamps are on.
To turn on the dome lamps, with the vehicle doors
closed, turn the knob all the way clockwise.
Dome Lamps
The dome lamps come on when any door is opened.
They turn off after all the doors are closed.
The dome lamps can also be turned on by turning the
instrument panel brightness knob, located on the
instrument panel to the left of the steering column,
clockwise to the farthest position. In this position, the
dome lamps remain on whether a door is opened or
closed.
Dome Lamp Override
The dome lamp override button is located next to the
exterior lamps control.
The dome lamp override sets the dome lamps to remain
off or come on automatically when a door is opened.
E(Dome Lamp Override):Press the button in
and the dome lamps remain off when a door is opened.
Press the button again to return it to the extended
position so that the dome lamps come on when a door
is opened.
3-16
Page 135 of 404
Entry/Exit Lighting
The vehicle has an illuminated entry/exit feature.
The dome lamps come on if the dome override button is
in the out position, when a door is opened or the key
is removed from the ignition.
Reading Lamps
For vehicles with reading lamps, press the button
located next to each lamp to turn it on or off.
The vehicle may also have reading lamps in other
locations. The lamps cannot be adjusted.
Electric Power Management
The vehicle has Electric Power Management (EPM) that
estimates the battery’s temperature and state of charge.
It then adjusts the voltage for best performance and
extended life of the battery.When the battery’s state of charge is low, the voltage is
raised slightly to quickly put the charge back in. When the
state of charge is high, the voltage is lowered slightly to
prevent overcharging. If the vehicle has a voltmeter gage
or voltage display on the Driver Information Center (DIC),
you may see the voltage move up or down. This is
normal. If there is a problem, an alert will be displayed.
The battery can be discharged at idle if the electrical
loads are very high. This is true for all vehicles. This is
because the generator (alternator) may not be spinning
fast enough at idle to produce all the power that is
needed for very high electrical loads.
A high electrical load occurs when several of the
following loads are on: headlamps, high beams, rear
window defogger, climate control fan at high speed,
engine cooling fans, trailer loads, and loads plugged into
accessory power outlets.
EPM works to prevent excessive discharge of the battery.
It does this by balancing the generator’s output and the
vehicle’s electrical needs. It can increase engine idle
speed to generate more power, whenever needed.
3-17
Page 143 of 404
Instrument Panel Cluster
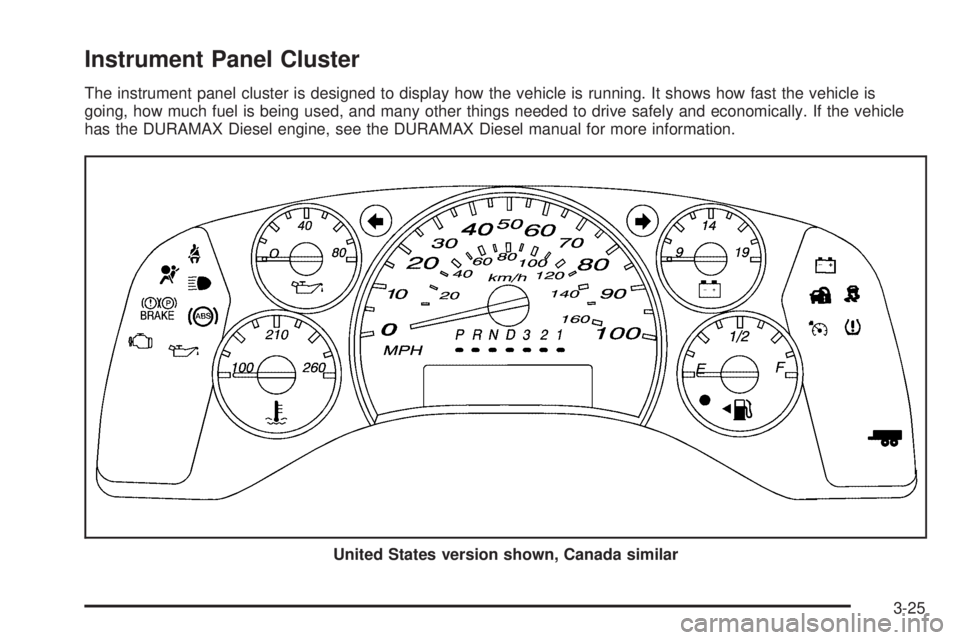
The instrument panel cluster is designed to display how the vehicle is running. It shows how fast the vehicle is
going, how much fuel is being used, and many other things needed to drive safely and economically. If the vehicle
has the DURAMAX Diesel engine, see the DURAMAX Diesel manual for more information.
United States version shown, Canada similar
3-25
Page 144 of 404
Speedometer and Odometer
The speedometer shows the vehicle speed in both
miles per hour (mph) and kilometers per hour (km/h).
The odometer shows how far the vehicle has been
driven, in either miles (used in the United States)
or kilometers (used in Canada).
This vehicle has a tamper resistant odometer.
The digital odometer will read 999,999 if it is
turned back.
If the vehicle needs a new odometer installed, it
must be set to the mileage total of the old odometer.
If that is not possible, then it must be set at zero and
a label must be put on the driver door to show the
old mileage reading when the new odometer was
installed.
Trip Odometer
The trip odometer can show how far the vehicle
has been driven since the trip odometer was last set
to zero.
Press the Trip/Fuel button on the Driver Information
Center (DIC) switch to display the trip odometer and the
regular odometer information.
SeeDIC Operation and Displays on page 3-43for more
information on resetting the trip odometer.
To display the odometer reading with the ignition off,
press the Trip/Fuel button on the Driver Information
Center switch.
3-26
Page 161 of 404
Driver Information Center (DIC)
Your vehicle has a Driver Information Center (DIC).
All messages will appear in the DIC display located at
the bottom of the instrument panel cluster. The DIC
buttons are located on the instrument panel, next to the
instrument panel cluster.
The DIC comes on when the ignition is on. After a short
delay, the DIC will display the information that was
last displayed before the engine was turned off.
The DIC displays trip, fuel, and vehicle system
information, and warning messages if a system problem
is detected.
If your vehicle has these features, the DIC also displays
the compass direction and the outside air temperature
when viewing the trip and fuel information. The compass
direction appears on the top right corner of the DIC
display. The outside air temperature automatically
appears in the bottom right corner of the DIC display.
If there is a problem with the system that controls the
temperature display, the numbers will be replaced with
dashes. If this occurs, have the vehicle serviced by your
dealer/retailer.
The DIC also allows some features to be customized.
SeeDIC Vehicle Customization on page 3-59for
more information.
DIC Operation and Displays
The DIC has different displays which can be accessed
by pressing the DIC buttons located on the instrument
panel, next to the instrument panel cluster.
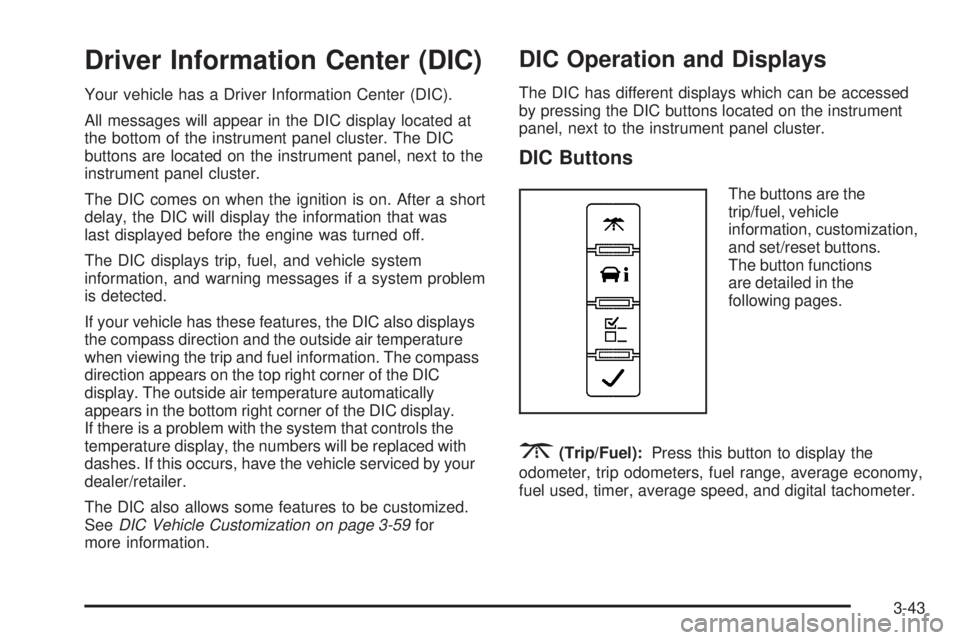
DIC Buttons
The buttons are the
trip/fuel, vehicle
information, customization,
and set/reset buttons.
The button functions
are detailed in the
following pages.
3(Trip/Fuel):Press this button to display the
odometer, trip odometers, fuel range, average economy,
fuel used, timer, average speed, and digital tachometer.
3-43
Page 162 of 404
T(Vehicle Information):Press this button to display
the oil life, units, tire pressure readings for vehicles with
the Tire Pressure Monitor System (TPMS), engine hours,
Tire Pressure Monitor System (TPMS) programming for
vehicles with the TPMS and without a Remote Keyless
Entry (RKE) transmitter, compass zone and compass
calibration on vehicles with this feature, and RKE
transmitter programming.
U(Customization):Press this button to customize the
feature settings on your vehicle. SeeDIC Vehicle
Customization on page 3-59for more information.
V(Set/Reset):Press this button to set or reset certain
functions and to turn off or acknowledge messages
on the DIC.
Trip/Fuel Menu Items
3
(Trip/Fuel):Press this button to scroll through the
following menu items:
Odometer
Press the trip/fuel button until XX mi (Km) displays.
This display shows the distance the vehicle has been
driven in either miles (mi) or kilometers (km).
Trip Odometers
Press the trip/fuel button until A or B displays. This
display shows the current distance traveled in either
miles (mi) or kilometers (km) since the last reset for each
trip odometer. Both trip odometers can be used at the
same time.
Each trip odometer can be reset to zero separately by
pressing the set/reset button while the desired trip
odometer is displayed.
The trip odometer has a feature called the retro-active
reset. This can be used to set the trip odometer to the
number of miles (kilometers) driven since the ignition was
last turned on. This can be used if the trip odometer is not
reset at the beginning of the trip.
To use the retro-active reset feature, press and hold
the set/reset button for at least four seconds. The trip
odometer will display the number of miles (mi) or
kilometers (km) driven since the ignition was last turned
on and the vehicle was moving. Once the vehicle begins
moving, the trip odometer will accumulate mileage. For
example, if the vehicle was driven 5 miles (8 km) before it
is started again, and then the retro-active reset feature is
activated, the display will show 5 miles (8 km). As the
vehicle begins moving, the display will then increase to
5.1 miles (8.2 km), 5.2 miles (8.4 km), etc.
3-44
Page 163 of 404

If the retro-active reset feature is activated after the
vehicle is started, but before it begins moving, the display
will show the number of miles (mi) or kilometers (km) that
were driven during the last ignition cycle.
Fuel Range
Press the trip/fuel button until FUEL RANGE displays.
This display shows the approximate number of remaining
miles (mi) or kilometers (km) the vehicle can be driven
without refueling. The display will show LOW if the fuel
level is low.
The fuel range estimate is based on an average of the
vehicle’s fuel economy over recent driving history and the
amount of fuel remaining in the fuel tank. This estimate
will change if driving conditions change. For example, if
driving in traffic and making frequent stops, this display
may read one number, but if the vehicle is driven on a
freeway, the number may change even though the same
amount of fuel is in the fuel tank. This is because different
driving conditions produce different fuel economies.
Generally, freeway driving produces better fuel economy
than city driving.If your vehicle is low on fuel, the FUEL LEVEL LOW
message will be displayed. See “FUEL LEVEL LOW”
underDIC Warnings and Messages on page 3-50for
more information.
Average Economy
Press the trip/fuel button until AVG ECONOMY displays.
This display shows the approximate average miles per
gallon (mpg) or liters per 100 kilometers (L/100 km).
This number is calculated based on the number of
mpg (L/100 km) recorded since the last time this menu
item was reset. To reset AVG ECONOMY, press and
hold the set/reset button. The display will return to zero.
Fuel Used
Press the trip/fuel button until FUEL USED displays.
This display shows the number of gallons (gal) or
liters (L) of fuel used since the last reset of this menu
item. To reset the fuel used information, press and hold
the set/reset button while FUEL USED is displayed.
3-45