torque GMC SAVANA 2009 Owner's Manual
[x] Cancel search | Manufacturer: GMC, Model Year: 2009, Model line: SAVANA, Model: GMC SAVANA 2009Pages: 404, PDF Size: 2.35 MB
Page 109 of 404
2 (Second):This position reduces vehicle speed even
more than 3 (Third) without using the brakes. You
can use 2 (Second) on hills. It can help control vehicle
speed as you go down steep mountain roads, but
then you would also want to use the brakes off and on.
You may use this feature for reducing torque to the
rear wheels when you are trying to start the vehicle from
a stop on slippery road surfaces.
1 (First):This position reduces vehicle speed even
more than 2 (Second) without using the brakes. You can
use it on very steep hills, or in deep snow or mud. If
the shift lever is put in 1 (First) while the vehicle
is moving forward, the transmission will not shift into
first gear until the vehicle is going slowly enough.
Notice:Spinning the tires or holding the vehicle in
one place on a hill using only the accelerator
pedal may damage the transmission. The repair will
not be covered by the vehicle warranty. If you
are stuck, do not spin the tires. When stopping on a
hill, use the brakes to hold the vehicle in place.Tow/Haul Mode
Tow/haul is designed to assist while the vehicle is
pulling a large or heavy load or trailer. Tow/haul is most
useful while pulling such a load in rolling terrain, in
stop-and-go traffic, or when you need improved
low-speed control, such as when parking. The purpose
of the tow/haul mode is to:
•Reduce the frequency and improve the predictability
of transmission shifts,
•provide the same solid shift feel when pulling a
heavy load as when the vehicle is unloaded,
•improve control of vehicle speed while requiring
less throttle pedal activity.
Press this button located
to the right of the steering
wheel on the instrument
panel to turn tow/haul
mode on and off.
2-25
Page 112 of 404
Leaving the Vehicle With the Engine
Running
{CAUTION:
It can be dangerous to leave the vehicle with the
engine running. The vehicle could move suddenly if
the shift lever is not fully in P (Park) with the parking
brake firmly set. And, if you leave the vehicle with
the engine running, it could overheat and even
catch fire. You or others could be injured. Do not
leave the vehicle with the engine running.
If you have to leave the vehicle with the engine running,
be sure the vehicle is in P (Park) and the parking brake is
firmly set before you leave it. After you move the shift
lever into P (Park), hold the regular brake pedal down.
Then, see if you can move the shift lever away from
P (Park) without first pulling it toward you. If you can, it
means that the shift lever was not fully locked into
P (Park).
Torque Lock
If you are parking on a hill and you do not shift the
vehicle into P (Park) properly, the weight of the vehicle
may put too much force on the parking pawl in the
transmission. You may find it difficult to pull the shift
lever out of P (Park). This is called torque lock. To
prevent torque lock, set the parking brake and then shift
into P (Park) properly before you leave the driver
seat. To find out how, seeShifting Into Park on
page 2-27.
When you are ready to drive, move the shift lever out of
P (Park) before you release the parking brake.
If torque lock does occur, you may need to have another
vehicle push yours a little uphill to take some of the
pressure from the parking pawl in the transmission, so
you can pull the shift lever out of P (Park).
2-28
Page 280 of 404
Brake Wear
This vehicle has disc brakes. Disc brake pads have
built-in wear indicators that make a high-pitched warning
sound when the brake pads are worn and new pads
are needed. The sound can come and go or be heard
all the time the vehicle is moving, except when applying
the brake pedal firmly.
{CAUTION:
The brake wear warning sound means that soon
the brakes will not work well. That could lead to an
accident. When the brake wear warning sound is
heard, have the vehicle serviced.
Notice:Continuing to drive with worn-out brake
pads could result in costly brake repair.Some driving conditions or climates can cause a brake
squeal when the brakes are first applied or lightly applied.
This does not mean something is wrong with the brakes.
Properly torqued wheel nuts are necessary to help
prevent brake pulsation. When tires are rotated, inspect
brake pads for wear and evenly tighten wheel nuts in
the proper sequence to torque specifications in
Capacities and Specifications on page 5-110.
Brake linings should always be replaced as complete
axle sets.Brake Pedal Travel
See your dealer/retailer if the brake pedal does not
return to normal height, or if there is a rapid increase
in pedal travel. This could be a sign that brake service
might be required.
Brake Adjustment
Every brake stop, the brakes adjust for wear.
5-38
Page 305 of 404
How to Check
Use a good quality pocket-type gage to check
tire pressure. You cannot tell if your tires are
properly inflated simply by looking at them. Radial
tires may look properly inflated even when they are
underinflated. Check the tire’s inflation pressure
when the tires are cold. Cold means your vehicle
has been sitting for at least three hours or driven
no more than 1 mile (1.6 km).
Remove the valve cap from the tire valve stem.
Press the tire gage firmly onto the valve to get a
pressure measurement. If the cold tire inflation
pressure matches the recommended pressure on
the Tire and Loading Information label, no further
adjustment is necessary. If the pressure is low, add
air until you reach the recommended amount.
If you overfill the tire, release air by pushing on
the metal stem in the center of the tire valve.
Recheck the tire pressure with the tire gage.
Be sure to put the valve caps back on the valve
stems. They help prevent leaks by keeping out dirt
and moisture.
Dual Tire Operation
When the vehicle is new, or whenever a wheel, wheel
bolt or wheel nut is replaced, check the wheel nut torque
after 100, 1,000 and 6,000 miles (160, 1 600 and
10 000 km) of driving. For proper wheel nut tightening
information, see “Removing the Flat Tire and Installing
the Spare Tire” later in this section, underChanging a
Flat Tire on page 5-80. Also see “Wheel Nut Torque”
underCapacities and Specifications on page 5-110.
The outer tire on a dual wheel setup generally wears
faster than the inner tire. Your tires will wear more
evenly and last longer if you rotate the tires periodically.
SeeTire Inspection and Rotation on page 5-69.
Also seeScheduled Maintenance on page 6-4.
{CAUTION:
If you operate your vehicle with a tire that is badly
underinflated, the tire can overheat. An overheated
tire can lose air suddenly or catch fire. You or
others could be injured. Be sure all tires (including
the spare) are properly inflated.
SeeTires on page 5-54andInflation - Tire Pressure on
page 5-62for more information on proper tire inflation.
5-63
Page 312 of 404
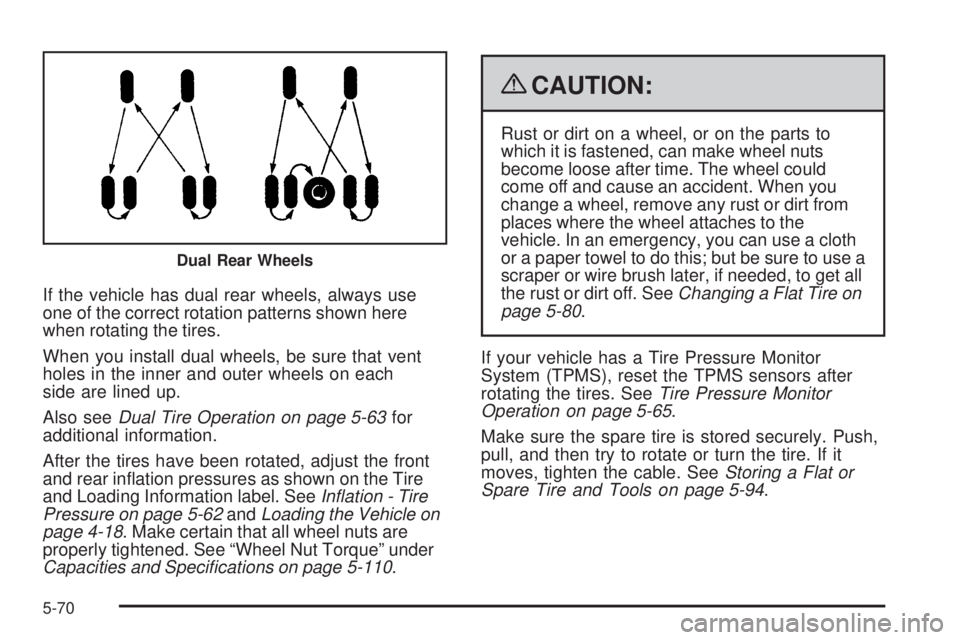
If the vehicle has dual rear wheels, always use
one of the correct rotation patterns shown here
when rotating the tires.
When you install dual wheels, be sure that vent
holes in the inner and outer wheels on each
side are lined up.
Also seeDual Tire Operation on page 5-63for
additional information.
After the tires have been rotated, adjust the front
and rear inflation pressures as shown on the Tire
and Loading Information label. SeeInflation - Tire
Pressure on page 5-62andLoading the Vehicle on
page 4-18. Make certain that all wheel nuts are
properly tightened. See “Wheel Nut Torque” under
Capacities and Specifications on page 5-110.
{CAUTION:
Rust or dirt on a wheel, or on the parts to
which it is fastened, can make wheel nuts
become loose after time. The wheel could
come off and cause an accident. When you
change a wheel, remove any rust or dirt from
places where the wheel attaches to the
vehicle. In an emergency, you can use a cloth
or a paper towel to do this; but be sure to use a
scraper or wire brush later, if needed, to get all
the rust or dirt off. SeeChanging a Flat Tire on
page 5-80.
If your vehicle has a Tire Pressure Monitor
System (TPMS), reset the TPMS sensors after
rotating the tires. SeeTire Pressure Monitor
Operation on page 5-65.
Make sure the spare tire is stored securely. Push,
pull, and then try to rotate or turn the tire. If it
moves, tighten the cable. SeeStoring a Flat or
Spare Tire and Tools on page 5-94.
Dual Rear Wheels
5-70
Page 319 of 404
Notice:The wrong wheel can also cause problems
with bearing life, brake cooling, speedometer or
odometer calibration, headlamp aim, bumper height,
vehicle ground clearance, and tire or tire chain
clearance to the body and chassis.
Whenever a wheel, wheel bolt or wheel nut is replaced
on a dual wheel setup, check the wheel nut torque
after 100, 1,000 and 6,000 miles (160, 1 600 and
10 000 km) of driving. For proper torque, see “Wheel
Nut Torque” underCapacities and Specifications
on page 5-110.
SeeChanging a Flat Tire on page 5-80for more
information.Used Replacement Wheels
{CAUTION:
Putting a used wheel on the vehicle is dangerous.
You cannot know how it has been used or how
far it has been driven. It could fail suddenly and
cause a crash. If you have to replace a wheel,
use a new GM original equipment wheel.
5-77
Page 332 of 404
{CAUTION:
Incorrect or improperly tightened wheel nuts can
cause the wheel to come loose and even come off.
This could lead to a crash. If you have to replace
them, be sure to get new original equipment wheel
nuts. Stop somewhere as soon as you can and
have the nuts tightened with a torque wrench to the
proper torque specification. SeeCapacities and
Specifications on page 5-110for wheel nut torque
specification.
Notice:Improperly tightened wheel nuts can
lead to brake pulsation and rotor damage. To avoid
expensive brake repairs, evenly tighten the wheel
nuts in the proper sequence and to the proper torque
speci�cation. SeeCapacities and Specifications on
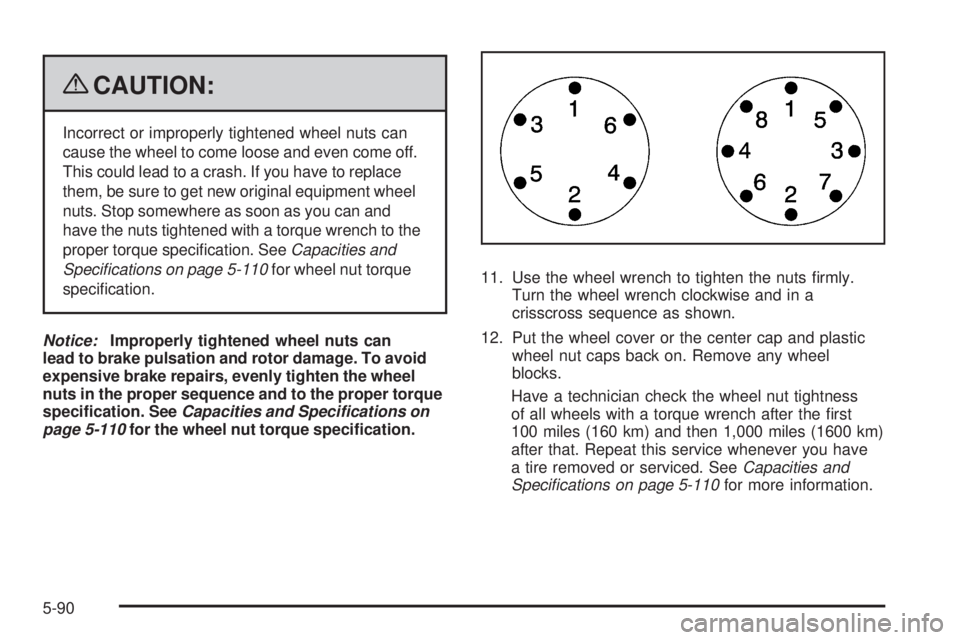
page 5-110for the wheel nut torque speci�cation.11. Use the wheel wrench to tighten the nuts firmly.
Turn the wheel wrench clockwise and in a
crisscross sequence as shown.
12. Put the wheel cover or the center cap and plastic
wheel nut caps back on. Remove any wheel
blocks.
Have a technician check the wheel nut tightness
of all wheels with a torque wrench after the first
100 miles (160 km) and then 1,000 miles (1600 km)
after that. Repeat this service whenever you have
a tire removed or serviced. SeeCapacities and
Specifications on page 5-110for more information.
5-90
Page 353 of 404
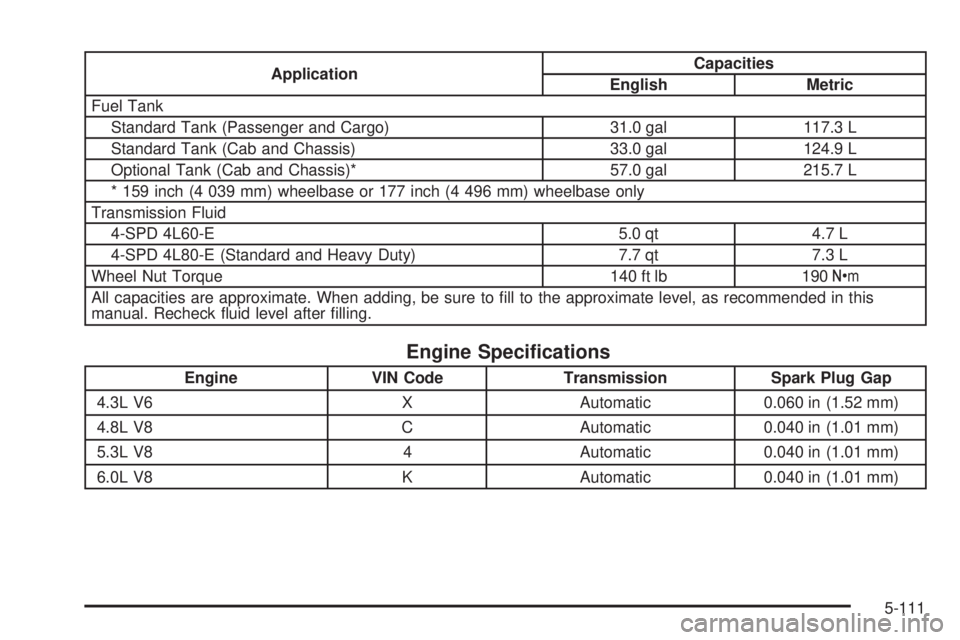
ApplicationCapacities
English Metric
Fuel Tank
Standard Tank (Passenger and Cargo) 31.0 gal 117.3 L
Standard Tank (Cab and Chassis) 33.0 gal 124.9 L
Optional Tank (Cab and Chassis)* 57.0 gal 215.7 L
* 159 inch (4 039 mm) wheelbase or 177 inch (4 496 mm) wheelbase only
Transmission Fluid
4-SPD 4L60-E 5.0 qt 4.7 L
4-SPD 4L80-E (Standard and Heavy Duty) 7.7 qt 7.3 L
Wheel Nut Torque 140 ft lb 190Y
All capacities are approximate. When adding, be sure to fill to the approximate level, as recommended in this
manual. Recheck fluid level after filling.
Engine Speci�cations
Engine VIN Code Transmission Spark Plug Gap
4.3L V6 X Automatic 0.060 in (1.52 mm)
4.8L V8 C Automatic 0.040 in (1.01 mm)
5.3L V8 4 Automatic 0.040 in (1.01 mm)
6.0L V8 K Automatic 0.040 in (1.01 mm)
5-111
Page 364 of 404
At the First 100, 1,000 and
6,000 Miles (160, 1 600 and
10 000 km)
For vehicles with dual wheels, check dual wheel nut
torque. For proper torque, seeCapacities and
Specifications on page 5-110.
At Each Fuel Fill
It is important to perform these underhood checks at
each fuel fill.
Engine Oil Level Check
Notice:It is important to check the engine oil
regularly and keep it at the proper level. Failure to
keep the engine oil at the proper level can cause
damage to the engine not covered by the vehicle
warranty.
Check the engine oil level and add the proper oil if
necessary. SeeEngine Oil on page 5-15.
Engine Coolant Level Check
Check the engine coolant level and add DEX-COOL®
coolant mixture if necessary. SeeEngine Coolant
on page 5-25.
Windshield Washer Fluid Level Check
Check the windshield washer fluid level in the windshield
washer fluid reservoir and add the proper fluid if
necessary.
At Least Once a Month
Tire In�ation Check
Inspect the vehicle’s tires and make sure they are inflated
to the correct pressures. Do not forget to check the spare
tire. SeeInflation - Tire Pressure on page 5-62. Check to
make sure the spare tire is stored securely. See
Changing a Flat Tire on page 5-80.
Tire Wear Inspection
Tire rotation may be required for high mileage highway
drivers prior to the Engine Oil Life System service
notification. Check the tires for wear and, if necessary,
rotate the tires. SeeTire Inspection and Rotation on
page 5-69.
6-10