GMC SAVANA 2014 Owner's Manual
Manufacturer: GMC, Model Year: 2014, Model line: SAVANA, Model: GMC SAVANA 2014Pages: 408, PDF Size: 4.19 MB
Page 101 of 408
Black plate (55,1)GMC Savana Owner Manual (GMNA-Localizing-U.S./Canada-6014682) -
2014 - CRC 2nd Edition - 8/26/13
Seats and Restraints 3-55
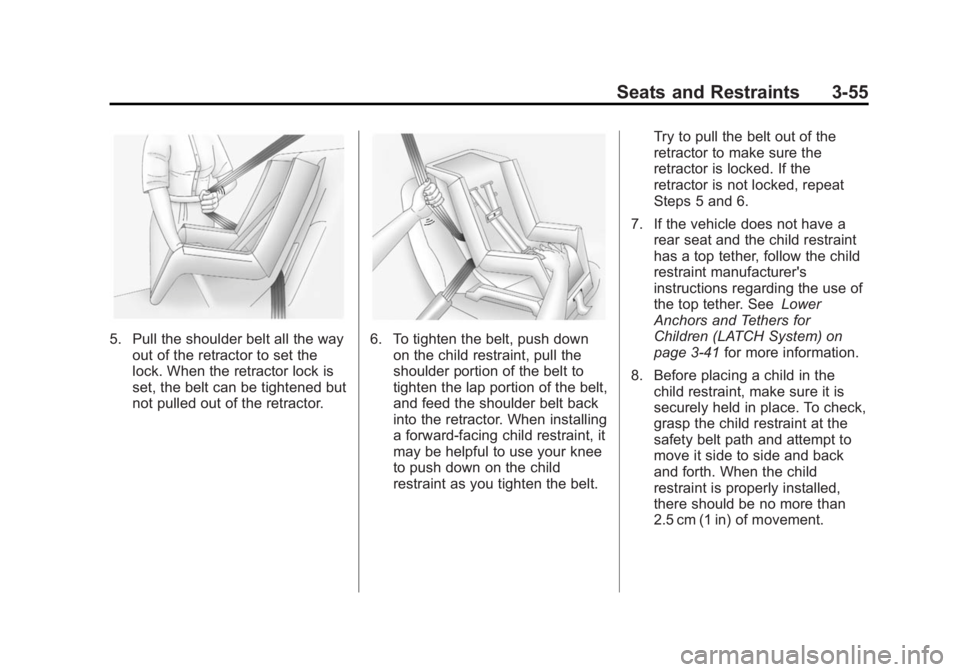
5. Pull the shoulder belt all the wayout of the retractor to set the
lock. When the retractor lock is
set, the belt can be tightened but
not pulled out of the retractor.6. To tighten the belt, push downon the child restraint, pull the
shoulder portion of the belt to
tighten the lap portion of the belt,
and feed the shoulder belt back
into the retractor. When installing
a forward-facing child restraint, it
may be helpful to use your knee
to push down on the child
restraint as you tighten the belt. Try to pull the belt out of the
retractor to make sure the
retractor is locked. If the
retractor is not locked, repeat
Steps 5 and 6.
7. If the vehicle does not have a rear seat and the child restraint
has a top tether, follow the child
restraint manufacturer's
instructions regarding the use of
the top tether. See Lower
Anchors and Tethers for
Children (LATCH System) on
page 3-41 for more information.
8. Before placing a child in the child restraint, make sure it is
securely held in place. To check,
grasp the child restraint at the
safety belt path and attempt to
move it side to side and back
and forth. When the child
restraint is properly installed,
there should be no more than
2.5 cm (1 in) of movement.
Page 102 of 408
Black plate (56,1)GMC Savana Owner Manual (GMNA-Localizing-U.S./Canada-6014682) -
2014 - CRC 2nd Edition - 8/26/13
3-56 Seats and Restraints
To remove the child restraint,
unbuckle the vehicle safety belt and
let it return to the stowed position.
If the top tether is attached to a top
tether anchor, disconnect it.
If you turned the airbag off with the
switch, turn on the right front
passenger airbag when you remove
the child restraint from the vehicle
unless the person who will be sitting
there is a member of a passenger
airbag risk group. SeeAirbag
On-Off Switch on page 3-23 for
more information, including
important safety information.
Page 103 of 408
Black plate (1,1)GMC Savana Owner Manual (GMNA-Localizing-U.S./Canada-6014682) -
2014 - CRC 2nd Edition - 8/26/13
Storage 4-1
Storage
Storage Compartments
Storage Compartments . . . . . . . 4-1
Front Storage . . . . . . . . . . . . . . . . . 4-1
Storage
Compartments
{Warning
Do not store heavy or sharp
objects in storage compartments.
In a crash, these objects may
cause the cover to open and
could result in injury.
Front Storage
This vehicle may have a front
storage compartment. It is located at
the center of the instrument panel
extension, by the floor. To open the
compartment, pull up on the latch.
The compartment will open
automatically.
Storage compartments may also be
included on the inside of each
front door.
Page 104 of 408

Black plate (2,1)GMC Savana Owner Manual (GMNA-Localizing-U.S./Canada-6014682) -
2014 - CRC 2nd Edition - 8/26/13
4-2 Storage
2NOTES
Page 105 of 408
Black plate (1,1)GMC Savana Owner Manual (GMNA-Localizing-U.S./Canada-6014682) -
2014 - CRC 2nd Edition - 8/26/13
Instruments and Controls 5-1
Instruments and
Controls
Controls
Steering Wheel Adjustment . . . 5-2
Steering Wheel Controls . . . . . . 5-2
Horn . . . . . . . . . . . . . . . . . . . . . . . . . . 5-3
Windshield Wiper/Washer . . . . . 5-3
Compass . . . . . . . . . . . . . . . . . . . . . 5-4
Clock . . . . . . . . . . . . . . . . . . . . . . . . . 5-6
Power Outlets . . . . . . . . . . . . . . . . . 5-7
Cigarette Lighter . . . . . . . . . . . . . . 5-8
Ashtrays . . . . . . . . . . . . . . . . . . . . . . 5-8
Warning Lights, Gauges, and
Indicators
Warning Lights, Gauges, andIndicators . . . . . . . . . . . . . . . . . . . . 5-8
Instrument Cluster . . . . . . . . . . . 5-10
Speedometer . . . . . . . . . . . . . . . . 5-11
Odometer . . . . . . . . . . . . . . . . . . . . 5-11
Trip Odometer . . . . . . . . . . . . . . . 5-11
Fuel Gauge . . . . . . . . . . . . . . . . . . 5-11
Engine Oil Pressure Gauge . . . . . . . . . . . . . . . . . . . . . . 5-12
Engine Coolant Temperature Gauge . . . . . . . . . . . . . . . . . . . . . . 5-13 Voltmeter Gauge . . . . . . . . . . . . . 5-14
Safety Belt Reminders . . . . . . . 5-15
Airbag Readiness Light . . . . . . 5-15
Airbag On-Off Light . . . . . . . . . . 5-16
Passenger Airbag Status
Indicator . . . . . . . . . . . . . . . . . . . . 5-17
Charging System Light . . . . . . 5-18
Malfunction Indicator Lamp . . . . . . . . . . . . . 5-18
Brake System Warning Light . . . . . . . . . . . . . . . . . . . . . . . 5-21
Antilock Brake System (ABS) Warning Light . . . . . . . . . . . . . . 5-22
Tow/Haul Mode Light . . . . . . . . 5-22
StabiliTrak
®OFF Light . . . . . . . 5-22
Traction Control System (TCS)/StabiliTrak
®Light . . . . 5-23
Tire Pressure Light . . . . . . . . . . 5-23
Engine Oil Pressure Light . . . . 5-24
Low Fuel Warning Light . . . . . . 5-24
Security Light . . . . . . . . . . . . . . . . 5-25
High-Beam On Light . . . . . . . . . 5-25
Cruise Control Light . . . . . . . . . 5-25
Information Displays
Driver Information Center (DIC) . . . . . . . . . . . . . . . 5-25
Vehicle Messages
Vehicle Messages . . . . . . . . . . . 5-30
Battery Voltage and ChargingMessages . . . . . . . . . . . . . . . . . . 5-31
Brake System Messages . . . . 5-31
Compass Messages . . . . . . . . . 5-31
Door Ajar Messages . . . . . . . . . 5-31
Engine Cooling System Messages . . . . . . . . . . . . . . . . . . 5-32
Engine Oil Messages . . . . . . . . 5-32
Engine Power Messages . . . . 5-33
Fuel System Messages . . . . . . 5-33
Key and Lock Messages . . . . . 5-34
Lamp Messages . . . . . . . . . . . . . 5-34
Object Detection System Messages . . . . . . . . . . . . . . . . . . 5-34
Ride Control System Messages . . . . . . . . . . . . . . . . . . 5-34
Airbag System Messages . . . . 5-36
Security Messages . . . . . . . . . . 5-36
Service Vehicle Messages . . . 5-36
Tire Messages . . . . . . . . . . . . . . . 5-36
Transmission Messages . . . . . 5-37
Vehicle Reminder Messages . . . . . . . . . . . . . . . . . . 5-38
Vehicle Personalization
Vehicle Personalization . . . . . . 5-39
Page 106 of 408
Black plate (2,1)GMC Savana Owner Manual (GMNA-Localizing-U.S./Canada-6014682) -
2014 - CRC 2nd Edition - 8/26/13
5-2 Instruments and Controls
Controls
Steering Wheel
Adjustment
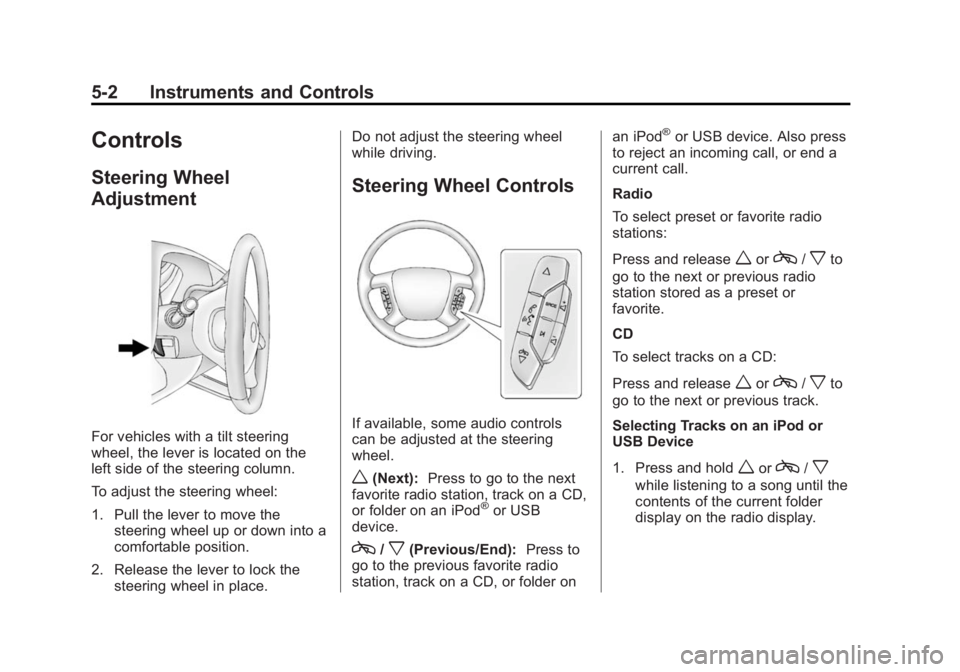
For vehicles with a tilt steering
wheel, the lever is located on the
left side of the steering column.
To adjust the steering wheel:
1. Pull the lever to move thesteering wheel up or down into a
comfortable position.
2. Release the lever to lock the steering wheel in place. Do not adjust the steering wheel
while driving.
Steering Wheel Controls
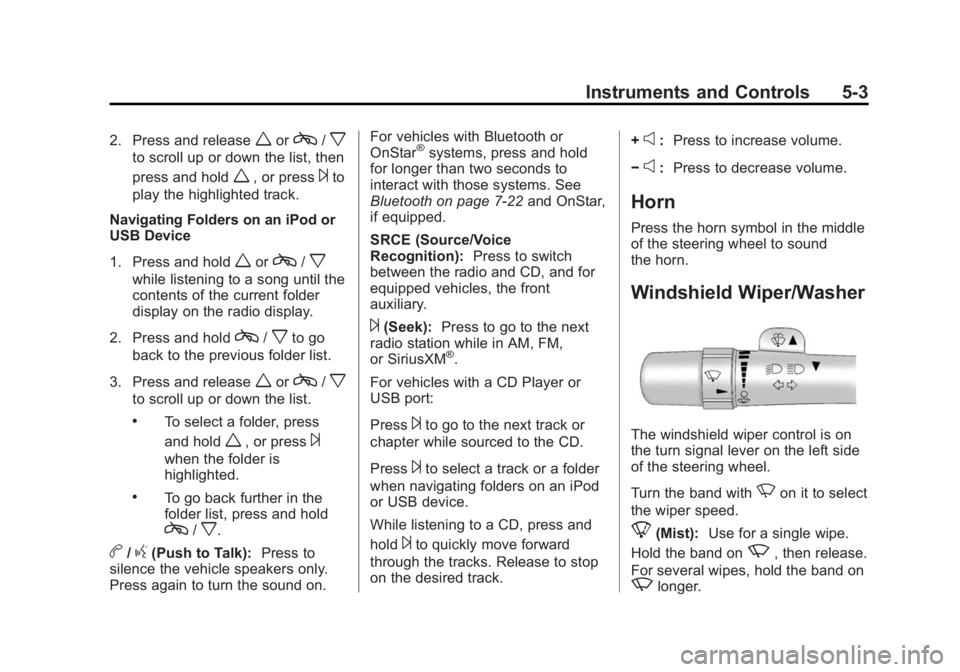
If available, some audio controls
can be adjusted at the steering
wheel.
w(Next):
Press to go to the next
favorite radio station, track on a CD,
or folder on an iPod
®or USB
device.
c/x(Previous/End): Press to
go to the previous favorite radio
station, track on a CD, or folder on an iPod
®or USB device. Also press
to reject an incoming call, or end a
current call.
Radio
To select preset or favorite radio
stations:
Press and release
worc/xto
go to the next or previous radio
station stored as a preset or
favorite.
CD
To select tracks on a CD:
Press and release
worc/xto
go to the next or previous track.
Selecting Tracks on an iPod or
USB Device
1. Press and hold
worc/x
while listening to a song until the
contents of the current folder
display on the radio display.
Page 107 of 408
Black plate (3,1)GMC Savana Owner Manual (GMNA-Localizing-U.S./Canada-6014682) -
2014 - CRC 2nd Edition - 8/26/13
Instruments and Controls 5-3
2. Press and releaseworc/x
to scroll up or down the list, then
press and hold
w, or press¨to
play the highlighted track.
Navigating Folders on an iPod or
USB Device
1. Press and hold
worc/x
while listening to a song until the
contents of the current folder
display on the radio display.
2. Press and hold
c/xto go
back to the previous folder list.
3. Press and release
worc/x
to scroll up or down the list.
.To select a folder, press
and hold
w, or press¨
when the folder is
highlighted.
.To go back further in the
folder list, press and hold
c/x.
b/g(Push to Talk): Press to
silence the vehicle speakers only.
Press again to turn the sound on. For vehicles with Bluetooth or
OnStar
®systems, press and hold
for longer than two seconds to
interact with those systems. See
Bluetooth on page 7-22 and OnStar,
if equipped.
SRCE (Source/Voice
Recognition): Press to switch
between the radio and CD, and for
equipped vehicles, the front
auxiliary.
¨(Seek): Press to go to the next
radio station while in AM, FM,
or SiriusXM
®.
For vehicles with a CD Player or
USB port:
Press
¨to go to the next track or
chapter while sourced to the CD.
Press
¨to select a track or a folder
when navigating folders on an iPod
or USB device.
While listening to a CD, press and
hold
¨to quickly move forward
through the tracks. Release to stop
on the desired track. +
e:
Press to increase volume.
−
e: Press to decrease volume.
Horn
Press the horn symbol in the middle
of the steering wheel to sound
the horn.
Windshield Wiper/Washer
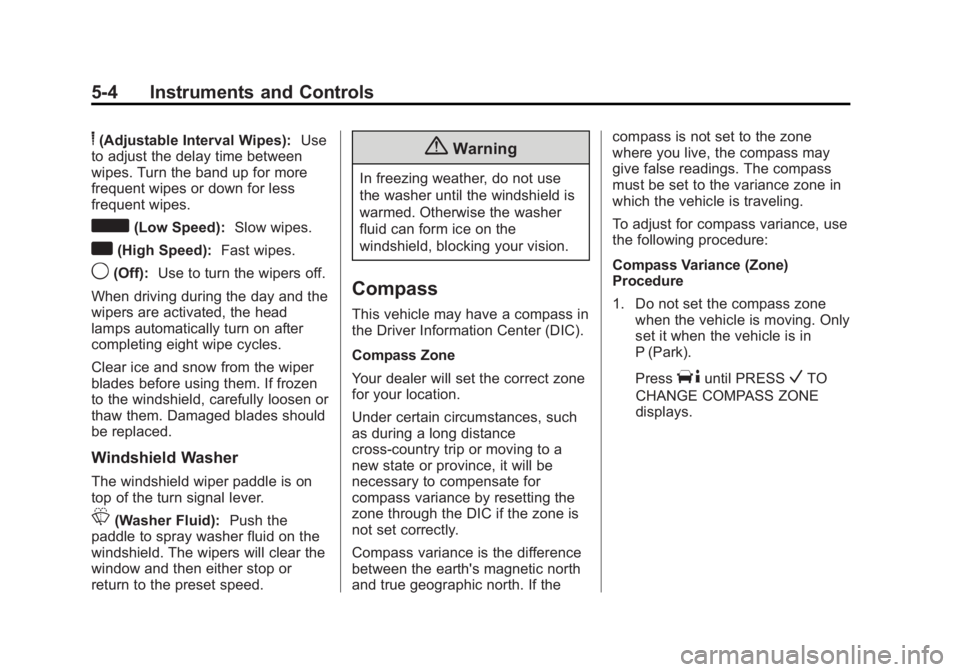
The windshield wiper control is on
the turn signal lever on the left side
of the steering wheel.
Turn the band with
Non it to select
the wiper speed.
8(Mist): Use for a single wipe.
Hold the band on
z, then release.
For several wipes, hold the band on
zlonger.
Page 108 of 408
Black plate (4,1)GMC Savana Owner Manual (GMNA-Localizing-U.S./Canada-6014682) -
2014 - CRC 2nd Edition - 8/26/13
5-4 Instruments and Controls
6(Adjustable Interval Wipes):Use
to adjust the delay time between
wipes. Turn the band up for more
frequent wipes or down for less
frequent wipes.
d(Low Speed): Slow wipes.
a(High Speed): Fast wipes.
9(Off):Use to turn the wipers off.
When driving during the day and the
wipers are activated, the head
lamps automatically turn on after
completing eight wipe cycles.
Clear ice and snow from the wiper
blades before using them. If frozen
to the windshield, carefully loosen or
thaw them. Damaged blades should
be replaced.
Windshield Washer
The windshield wiper paddle is on
top of the turn signal lever.
L(Washer Fluid): Push the
paddle to spray washer fluid on the
windshield. The wipers will clear the
window and then either stop or
return to the preset speed.
{Warning
In freezing weather, do not use
the washer until the windshield is
warmed. Otherwise the washer
fluid can form ice on the
windshield, blocking your vision.
Compass
This vehicle may have a compass in
the Driver Information Center (DIC).
Compass Zone
Your dealer will set the correct zone
for your location.
Under certain circumstances, such
as during a long distance
cross-country trip or moving to a
new state or province, it will be
necessary to compensate for
compass variance by resetting the
zone through the DIC if the zone is
not set correctly.
Compass variance is the difference
between the earth's magnetic north
and true geographic north. If the compass is not set to the zone
where you live, the compass may
give false readings. The compass
must be set to the variance zone in
which the vehicle is traveling.
To adjust for compass variance, use
the following procedure:
Compass Variance (Zone)
Procedure
1. Do not set the compass zone
when the vehicle is moving. Only
set it when the vehicle is in
P (Park).
Press
Tuntil PRESSVTO
CHANGE COMPASS ZONE
displays.
Page 109 of 408
Black plate (5,1)GMC Savana Owner Manual (GMNA-Localizing-U.S./Canada-6014682) -
2014 - CRC 2nd Edition - 8/26/13
Instruments and Controls 5-5
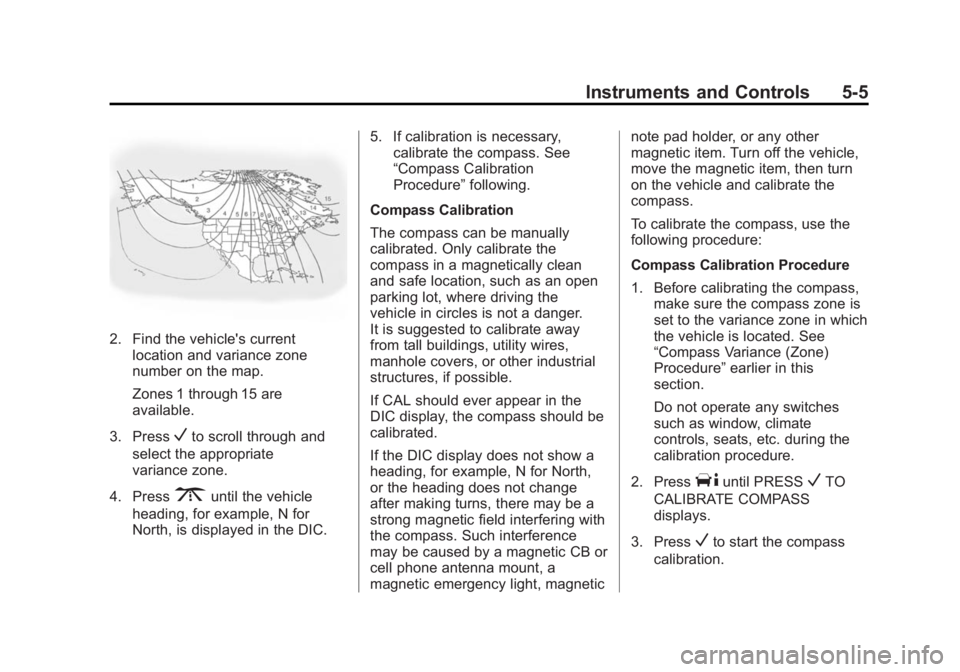
2. Find the vehicle's currentlocation and variance zone
number on the map.
Zones 1 through 15 are
available.
3. Press
Vto scroll through and
select the appropriate
variance zone.
4. Press
3until the vehicle
heading, for example, N for
North, is displayed in the DIC. 5. If calibration is necessary,
calibrate the compass. See
“Compass Calibration
Procedure” following.
Compass Calibration
The compass can be manually
calibrated. Only calibrate the
compass in a magnetically clean
and safe location, such as an open
parking lot, where driving the
vehicle in circles is not a danger.
It is suggested to calibrate away
from tall buildings, utility wires,
manhole covers, or other industrial
structures, if possible.
If CAL should ever appear in the
DIC display, the compass should be
calibrated.
If the DIC display does not show a
heading, for example, N for North,
or the heading does not change
after making turns, there may be a
strong magnetic field interfering with
the compass. Such interference
may be caused by a magnetic CB or
cell phone antenna mount, a
magnetic emergency light, magnetic note pad holder, or any other
magnetic item. Turn off the vehicle,
move the magnetic item, then turn
on the vehicle and calibrate the
compass.
To calibrate the compass, use the
following procedure:
Compass Calibration Procedure
1. Before calibrating the compass,
make sure the compass zone is
set to the variance zone in which
the vehicle is located. See
“Compass Variance (Zone)
Procedure” earlier in this
section.
Do not operate any switches
such as window, climate
controls, seats, etc. during the
calibration procedure.
2. PressTuntil PRESSVTO
CALIBRATE COMPASS
displays.
3. Press
Vto start the compass
calibration.
Page 110 of 408
Black plate (6,1)GMC Savana Owner Manual (GMNA-Localizing-U.S./Canada-6014682) -
2014 - CRC 2nd Edition - 8/26/13
5-6 Instruments and Controls
4. The DIC will displayCALIBRATING: DRIVE IN
CIRCLES. Drive the vehicle in
tight circles at less than 8 km/h
(5 mph) to complete the
calibration. The DIC will display
CALIBRATION COMPLETE for a
few seconds when the
calibration is complete. The DIC
display will then return to
PRESS
VTO CALIBRATE
COMPASS.
Clock
The clock can be set with either the
radio turned on or off.
AM-FM Radio
To set the time:
1. Press
Huntil the hour begins
flashing on the display. Press
this button a second time and
the minutes begin flashing on
display.
Press
Ha third time and the
12HR or 24HR time format
begins flashing.
2. While either the hour or the minutes are flashing, turn the
f
knob, on the upper right side of
the radio, clockwise or
counterclockwise to increase or
decrease the time. While the
12HR or 24HR time format is
flashing, turn the
fknob
clockwise or counterclockwise to
select the default time settings.
3. Press
Hagain until the clock
display stops flashing to set the
currently displayed time;
otherwise, the flashing stops after five seconds and the
current time displayed is
automatically set.
Radio with CD/MP3
To set the time and date:
1. Press
Hand the HR, MIN, MM,
DD, YYYY (hour, minute, month,
day, and year) displays.
2. Press the softkey under any one of the tabs to be changed. Every
time the softkey is pressed
again, the time or the date if
selected, increases by one.
Another way to increase the time
or date, is to press
¨SEEK or
\FWD (forward).
3. To decrease, press
©SEEK or
sREV. Turn thefknob, on
the upper right side of the radio,
to adjust the selected setting.