sensor GMC SAVANA 2014 User Guide
[x] Cancel search | Manufacturer: GMC, Model Year: 2014, Model line: SAVANA, Model: GMC SAVANA 2014Pages: 408, PDF Size: 4.19 MB
Page 150 of 408
Black plate (2,1)GMC Savana Owner Manual (GMNA-Localizing-U.S./Canada-6014682) -
2014 - CRC 2nd Edition - 8/26/13
6-2 Lighting
To change the headlamps from low
beam to high beam, pull the turn
signal lever all the way toward you.
Then release it.
Exterior Lamps Off
Reminder
If a door is open, a reminder chime
sounds when the headlamps or
parking lamps are manually turned
on and the key is out of the ignition.
To turn off the chime, turn the
headlamp switch to
Oor AUTO and
then back on, or close and re‐open
the door. In the auto mode, the
headlamps turn off once the ignition
is in LOCK/OFF or may remain on
until the headlamp delay ends,
if enabled in the Driver Information
Center (DIC). See “Exit Lighting”
under Vehicle Personalization on
page 5-39.
Headlamp High/
Low-Beam Changer
2 3
(Headlamp High/Low-Beam
Changer): Pull the turn signal lever
all the way toward you to change
the headlamps from low to high
beam. Then release it.
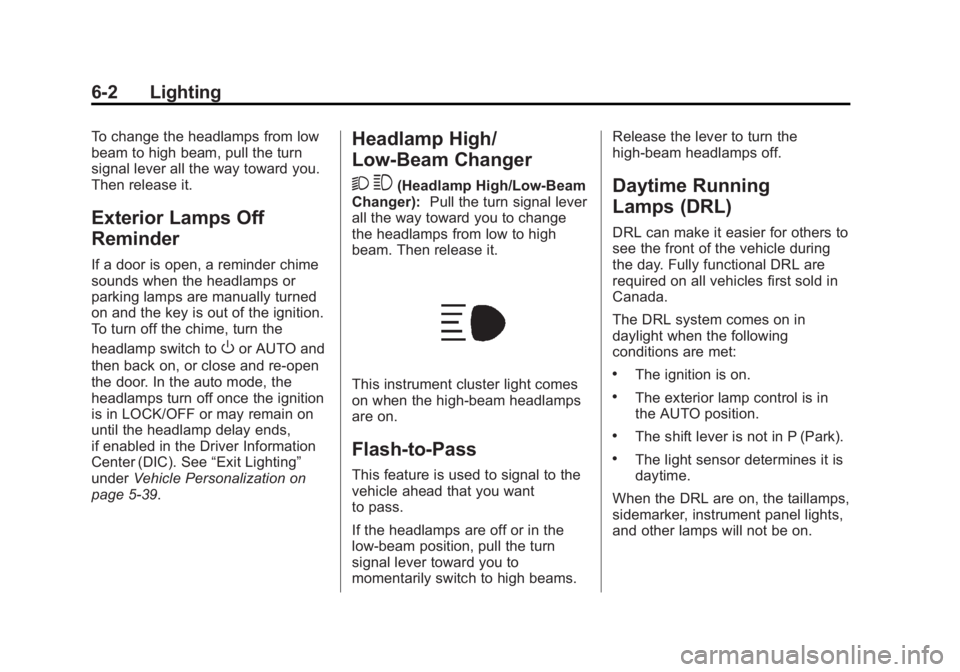
This instrument cluster light comes
on when the high-beam headlamps
are on.
Flash-to-Pass
This feature is used to signal to the
vehicle ahead that you want
to pass.
If the headlamps are off or in the
low‐beam position, pull the turn
signal lever toward you to
momentarily switch to high beams. Release the lever to turn the
high-beam headlamps off.
Daytime Running
Lamps (DRL)
DRL can make it easier for others to
see the front of the vehicle during
the day. Fully functional DRL are
required on all vehicles first sold in
Canada.
The DRL system comes on in
daylight when the following
conditions are met:
.The ignition is on.
.The exterior lamp control is in
the AUTO position.
.The shift lever is not in P (Park).
.The light sensor determines it is
daytime.
When the DRL are on, the taillamps,
sidemarker, instrument panel lights,
and other lamps will not be on.
Page 151 of 408
Black plate (3,1)GMC Savana Owner Manual (GMNA-Localizing-U.S./Canada-6014682) -
2014 - CRC 2nd Edition - 8/26/13
Lighting 6-3
The automatic headlamp system
automatically switches from DRL to
the headlamps depending on the
darkness of the surroundings.
To turn off the DRL, turn the exterior
lamp control to
Oand then release
it. For vehicles first sold in Canada,
the transmission must be in the
P (Park) position, before the DRL
can be turned off.
Automatic Headlamp
System
When it is dark enough outside and
the headlamp switch is in AUTO,
the automatic headlamp system
turns on the headlamps, along with
the taillamps, sidemarker lamps,
parking lamps, and the instrument
panel lights. The radio lights will
also be dim.
To turn off the automatic headlamp
system, turn the exterior lamp
control to the off position and then
release. For vehicles first sold in
Canada, the transmission must be in the P (Park) position, before the
automatic headlamp system can be
turned off.
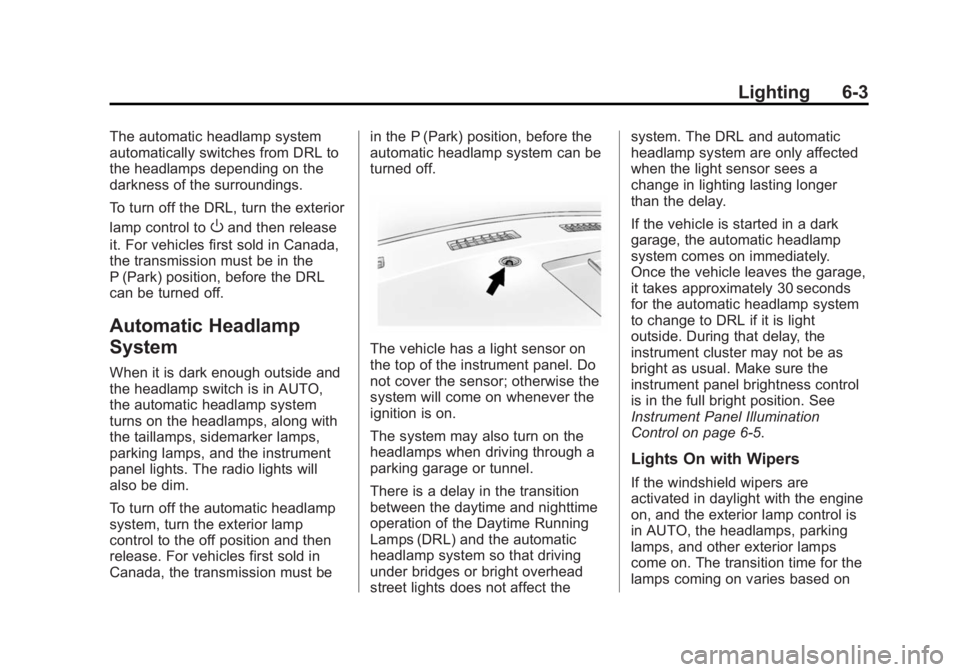
The vehicle has a light sensor on
the top of the instrument panel. Do
not cover the sensor; otherwise the
system will come on whenever the
ignition is on.
The system may also turn on the
headlamps when driving through a
parking garage or tunnel.
There is a delay in the transition
between the daytime and nighttime
operation of the Daytime Running
Lamps (DRL) and the automatic
headlamp system so that driving
under bridges or bright overhead
street lights does not affect thesystem. The DRL and automatic
headlamp system are only affected
when the light sensor sees a
change in lighting lasting longer
than the delay.
If the vehicle is started in a dark
garage, the automatic headlamp
system comes on immediately.
Once the vehicle leaves the garage,
it takes approximately 30 seconds
for the automatic headlamp system
to change to DRL if it is light
outside. During that delay, the
instrument cluster may not be as
bright as usual. Make sure the
instrument panel brightness control
is in the full bright position. See
Instrument Panel Illumination
Control on page 6-5.
Lights On with Wipers
If the windshield wipers are
activated in daylight with the engine
on, and the exterior lamp control is
in AUTO, the headlamps, parking
lamps, and other exterior lamps
come on. The transition time for the
lamps coming on varies based on
Page 231 of 408
Black plate (37,1)GMC Savana Owner Manual (GMNA-Localizing-U.S./Canada-6014682) -
2014 - CRC 2nd Edition - 8/26/13
Driving and Operating 9-37
Ending Cruise Control
There are three ways to end cruise
control:
.To disengage cruise control,
step lightly on the brake pedal.
.Press the[on the steering
wheel.
.To turn off the cruise control,
press
Ion the steering wheel.
Erasing Speed Memory
The cruise control set speed is
erased from memory if
Iis
pressed or if the vehicle is
turned off.
Driver Assistance
Systems
Ultrasonic Parking Assist
If available, the Ultrasonic Rear
Parking Assist (URPA) system uses
sensors on the rear bumper to
assist with parking and avoiding
objects while in R (Reverse).
{Warning
The URPA system does not
detect children, pedestrians,
bicyclists, animals, or objects
below the bumper or that are too
close or too far from the vehicle.
It is not available at speeds
greater than 8 km/h (5 mph). To
prevent injury, death, or vehicle
damage, even with URPA, always
check the area around the vehicle
and check all mirrors before
backing.
How the System Works
URPA comes on automatically when
the shift lever is moved into
R (Reverse). A single beep sounds
to indicate the system is working.
URPA operates only at speeds less
than 8 km/h (5 mph).
An obstacle detection is indicated
by beeps. The time between beeps
gets shorter as the vehicle
approaches the obstacle. Repeated
beeps are heard when the distance
is less than 30 cm (12 in).
To be detected, objects must be at
least 25 cm (10 in) off the ground
and below rear door level. Objects
must also be within 2.5 m (8 ft) from
the rear bumper. This distance may
be less during warmer or humid
weather.
Turning the System On and Off
The system can be disabled through
the Driver Information Center (DIC).
See “Park Assist” underDriver
Information Center (DIC) on
page 5-25.
Page 232 of 408
Black plate (38,1)GMC Savana Owner Manual (GMNA-Localizing-U.S./Canada-6014682) -
2014 - CRC 2nd Edition - 8/26/13
9-38 Driving and Operating
URPA defaults to the on setting
each time the vehicle is started.
Turn URPA off when towing a trailer.
When the System Does Not
Seem to Work Properly
The following messages may be
displayed on the DIC:
SERVICE PARK ASSIST:If this
message occurs, take the vehicle to
your dealer for repair.
PARK ASSIST OFF: This message
occurs if the driver disables the
system or if the vehicle is driven
above 8 km/h (5 mph) in
R (Reverse).
PARK ASST BLOCKED SEE
OWNERS MANUAL: This
message can occur under the
following conditions:
.The ultrasonic sensors are not
clean. Keep the rear bumper
free of mud, dirt, snow, ice,
slush, and frost. The message may not clear until frost or ice
has melted all around and inside
the sensor.
.A trailer is attached to the
vehicle, or a bicycle or an object
hanging out of the rear door
during the current or last drive
cycle. URPA will return to normal
operation after it is determined
the object is removed. This
could take a few drive cycles.
.A tow bar is attached to the
vehicle.
Other conditions may affect system
performance, such as vibrations
from a jackhammer or the
compression of air brakes on a very
large truck.
Rear Vision
Camera (RVC)
If available, the Rear Vision Camera
(RVC) system is designed to help
the driver when backing up by
displaying a view of the area behind
the vehicle.
{Warning
The RVC system does not display
children, pedestrians, bicyclists,
animals, or any other object
located outside the camera's field
of view, below the bumper,
or under the vehicle. Perceived
distances may be different from
actual distances. Do not back the
vehicle using only the RVC
screen, during longer, higher
speed backing maneuvers,
or where there could be cross
traffic. Failure to use proper care
before backing may result in
injury, death, or vehicle damage.
Always check behind and around
the vehicle before backing.
Vehicles without Navigation
System
When the vehicle is on and shifted
into R (Reverse), the video image
appears on the inside rearview
Page 294 of 408
Black plate (42,1)GMC Savana Owner Manual (GMNA-Localizing-U.S./Canada-6014682) -
2014 - CRC 2nd Edition - 8/26/13
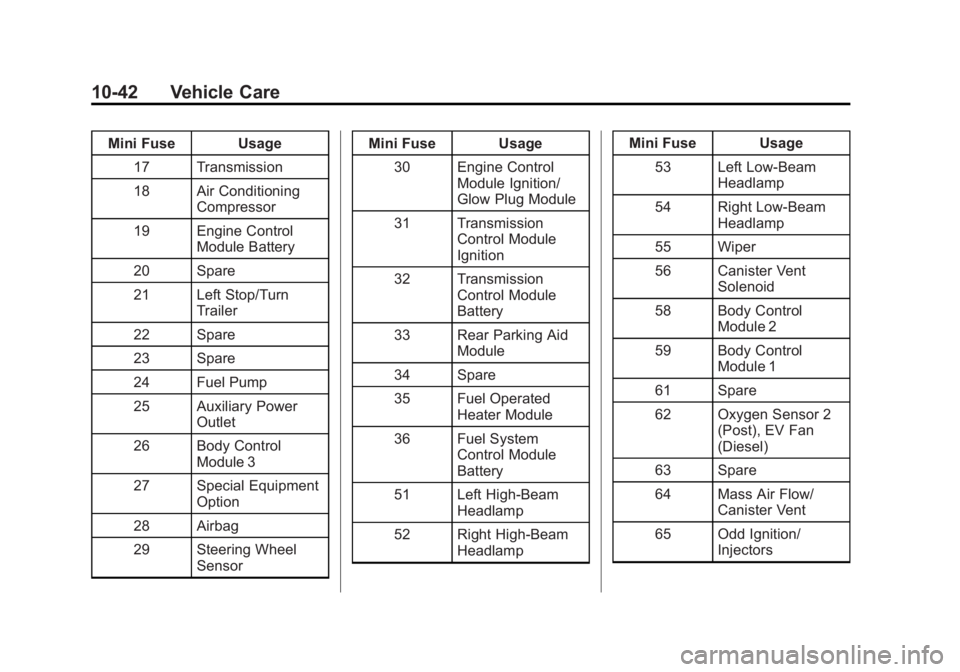
10-42 Vehicle Care
Mini Fuse Usage17 Transmission
18 Air Conditioning Compressor
19 Engine Control Module Battery
20 Spare
21 Left Stop/Turn Trailer
22 Spare
23 Spare
24 Fuel Pump
25 Auxiliary Power Outlet
26 Body Control Module 3
27 Special Equipment Option
28 Airbag
29 Steering Wheel Sensor Mini Fuse Usage
30 Engine Control Module Ignition/
Glow Plug Module
31 Transmission Control Module
Ignition
32 Transmission Control Module
Battery
33 Rear Parking Aid Module
34 Spare
35 Fuel Operated Heater Module
36 Fuel System Control Module
Battery
51 Left High-Beam Headlamp
52 Right High-Beam Headlamp Mini Fuse Usage
53 Left Low-Beam Headlamp
54 Right Low-Beam Headlamp
55 Wiper
56 Canister Vent Solenoid
58 Body Control Module 2
59 Body Control Module 1
61 Spare
62 Oxygen Sensor 2 (Post), EV Fan
(Diesel)
63 Spare
64 Mass Air Flow/ Canister Vent
65 Odd Ignition/ Injectors
Page 295 of 408
Black plate (43,1)GMC Savana Owner Manual (GMNA-Localizing-U.S./Canada-6014682) -
2014 - CRC 2nd Edition - 8/26/13
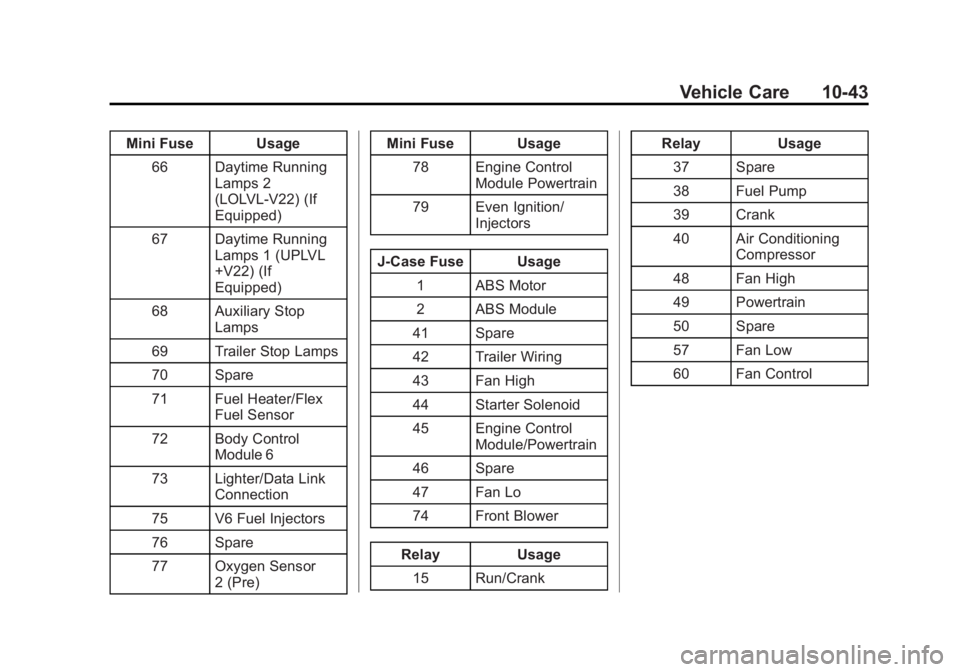
Vehicle Care 10-43
Mini Fuse Usage66 Daytime Running Lamps 2
(LOLVL-V22) (If
Equipped)
67 Daytime Running Lamps 1 (UPLVL
+V22) (If
Equipped)
68 Auxiliary Stop Lamps
69 Trailer Stop Lamps
70 Spare
71 Fuel Heater/Flex Fuel Sensor
72 Body Control Module 6
73 Lighter/Data Link Connection
75 V6 Fuel Injectors
76 Spare
77 Oxygen Sensor 2 (Pre) Mini Fuse Usage
78 Engine Control Module Powertrain
79 Even Ignition/ Injectors
J-Case Fuse Usage 1 ABS Motor
2 ABS Module
41 Spare
42 Trailer Wiring
43 Fan High
44 Starter Solenoid
45 Engine Control Module/Powertrain
46 Spare
47 Fan Lo
74 Front Blower
Relay Usage 15 Run/Crank Relay Usage
37 Spare
38 Fuel Pump
39 Crank
40 Air Conditioning Compressor
48 Fan High
49 Powertrain
50 Spare
57 Fan Low
60 Fan Control
Page 296 of 408
Black plate (44,1)GMC Savana Owner Manual (GMNA-Localizing-U.S./Canada-6014682) -
2014 - CRC 2nd Edition - 8/26/13
10-44 Vehicle Care
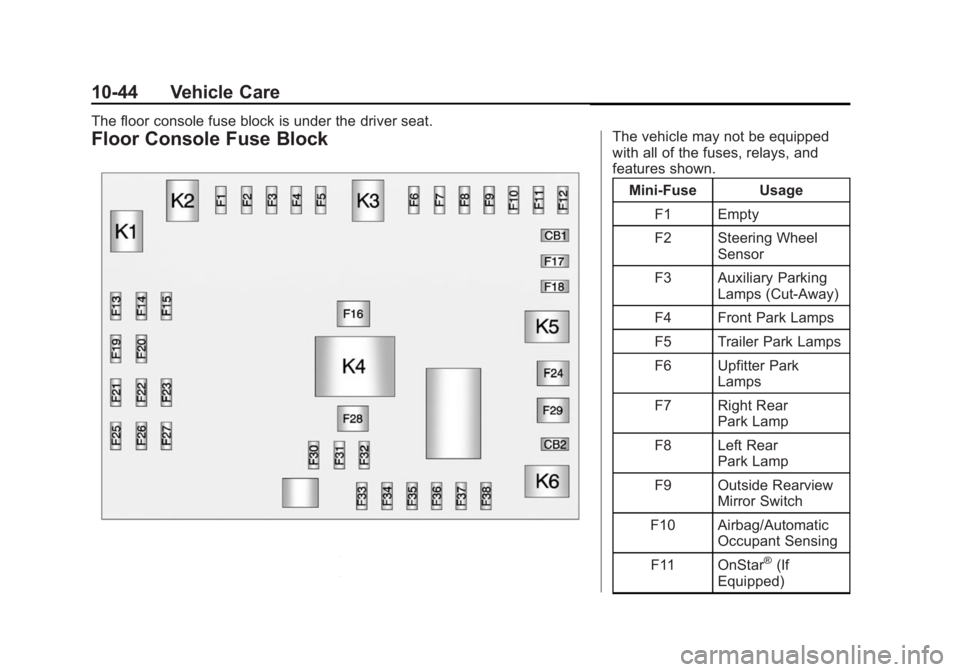
Floor Console Fuse Block
The floor console fuse block is under the driver seat.The vehicle may not be equipped
with all of the fuses, relays, and
features shown.Mini-Fuse Usage
F1 Empty
F2 Steering Wheel Sensor
F3 Auxiliary Parking Lamps (Cut-Away)
F4 Front Park Lamps
F5 Trailer Park Lamps
F6 Upfitter Park Lamps
F7 Right Rear Park Lamp
F8 Left Rear Park Lamp
F9 Outside Rearview Mirror Switch
F10 Airbag/Automatic Occupant Sensing
F11 OnStar
®(If
Equipped)
Page 297 of 408
Black plate (45,1)GMC Savana Owner Manual (GMNA-Localizing-U.S./Canada-6014682) -
2014 - CRC 2nd Edition - 8/26/13
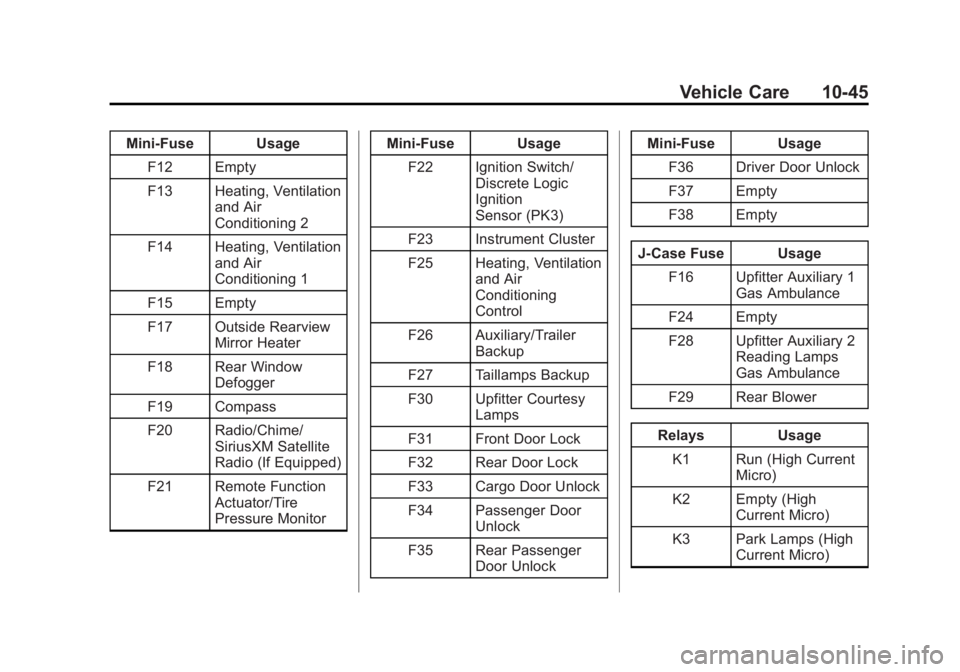
Vehicle Care 10-45
Mini-Fuse UsageF12 Empty
F13 Heating, Ventilation and Air
Conditioning 2
F14 Heating, Ventilation and Air
Conditioning 1
F15 Empty
F17 Outside Rearview Mirror Heater
F18 Rear Window Defogger
F19 Compass
F20 Radio/Chime/ SiriusXM Satellite
Radio (If Equipped)
F21 Remote Function Actuator/Tire
Pressure Monitor Mini-Fuse Usage
F22 Ignition Switch/ Discrete Logic
Ignition
Sensor (PK3)
F23 Instrument Cluster
F25 Heating, Ventilation and Air
Conditioning
Control
F26 Auxiliary/Trailer Backup
F27 Taillamps Backup
F30 Upfitter Courtesy Lamps
F31 Front Door Lock
F32 Rear Door Lock
F33 Cargo Door Unlock
F34 Passenger Door Unlock
F35 Rear Passenger Door Unlock Mini-Fuse Usage
F36 Driver Door Unlock
F37 Empty
F38 Empty
J-Case Fuse Usage F16 Upfitter Auxiliary 1 Gas Ambulance
F24 Empty
F28 Upfitter Auxiliary 2 Reading Lamps
Gas Ambulance
F29 Rear Blower
Relays Usage K1 Run (High Current Micro)
K2 Empty (High Current Micro)
K3 Park Lamps (High Current Micro)
Page 308 of 408
Black plate (56,1)GMC Savana Owner Manual (GMNA-Localizing-U.S./Canada-6014682) -
2014 - CRC 2nd Edition - 8/26/13
10-56 Vehicle Care
Do not forget the spare tire,
if the vehicle has one. See
Full-Size Spare Tire on
page 10-78for additional
information.
How to Check
Use a good quality pocket-type
gauge to check tire pressure.
Proper tire inflation cannot be
determined by looking at the tire.
Check the tire inflation pressure
when the tires are cold, meaning
the vehicle has not been driven
for at least three hours or no
more than 1.6 km (1 mi).
Remove the valve cap from the
tire valve stem. Press the tire
gauge firmly onto the valve to
get a pressure measurement.
If the cold tire inflation pressure
matches the recommended
pressure on the Tire and
Loading Information label, no
further adjustment is necessary.
If the inflation pressure is low, add air until the recommended
pressure is reached. If the
inflation pressure is high, press
on the metal stem in the center
of the tire valve to release air.
Re-check the tire pressure with
the tire gauge.
Return the valve caps on the
valve stems to prevent leaks
and keep out dirt and moisture.
Tire Pressure Monitor
System
The Tire Pressure Monitor System
(TPMS) uses radio and sensor
technology to check tire pressure
levels. The TPMS sensors monitor
the air pressure in your tires and
transmit tire pressure readings to a
receiver located in the vehicle.
Each tire, including the spare (if
provided), should be checked
monthly when cold and inflated to
the inflation pressure recommended
by the vehicle manufacturer on the vehicle placard or tire inflation
pressure label. (If your vehicle has
tires of a different size than the size
indicated on the vehicle placard or
tire inflation pressure label, you
should determine the proper tire
inflation pressure for those tires.)
As an added safety feature, your
vehicle has been equipped with a
tire pressure monitoring system
(TPMS) that illuminates a low tire
pressure telltale when one or more
of your tires is significantly
under-inflated.
Accordingly, when the low tire
pressure telltale illuminates, you
should stop and check your tires as
soon as possible, and inflate them
to the proper pressure. Driving on a
significantly under-inflated tire
causes the tire to overheat and can
lead to tire failure. Under-inflation
also reduces fuel efficiency and tire
tread life, and may affect the
vehicle's handling and stopping
ability.
Page 309 of 408
Black plate (57,1)GMC Savana Owner Manual (GMNA-Localizing-U.S./Canada-6014682) -
2014 - CRC 2nd Edition - 8/26/13
Vehicle Care 10-57
Please note that the TPMS is not a
substitute for proper tire
maintenance, and it is the driver's
responsibility to maintain correct tire
pressure, even if under-inflation has
not reached the level to trigger
illumination of the TPMS low tire
pressure telltale.
Your vehicle has also been
equipped with a TPMS malfunction
indicator to indicate when the
system is not operating properly.
The TPMS malfunction indicator is
combined with the low tire pressure
telltale. When the system detects a
malfunction, the telltale will flash for
approximately one minute and then
remain continuously illuminated.
This sequence will continue upon
subsequent vehicle start-ups as
long as the malfunction exists.
When the malfunction indicator is
illuminated, the system may not be
able to detect or signal low tire
pressure as intended. TPMS
malfunctions may occur for a variety
of reasons, including the installation
of replacement or alternate tires orwheels on the vehicle that prevent
the TPMS from functioning properly.
Always check the TPMS malfunction
telltale after replacing one or more
tires or wheels on your vehicle to
ensure that the replacement or
alternate tires and wheels allow the
TPMS to continue to function
properly.
See
Tire Pressure Monitor
Operation on page 10-57.
See Radio Frequency Statement on
page 13-15.
Tire Pressure Monitor
Operation
This vehicle may have a Tire
Pressure Monitor System (TPMS).
The TPMS is designed to warn the
driver when a low tire pressure
condition exists. TPMS sensors are
mounted onto each tire and wheel
assembly, excluding the spare tire
and wheel assembly. The TPMS
sensors monitor the air pressure in the tires and transmit the tire
pressure readings to a receiver
located in the vehicle.
When a low tire pressure condition
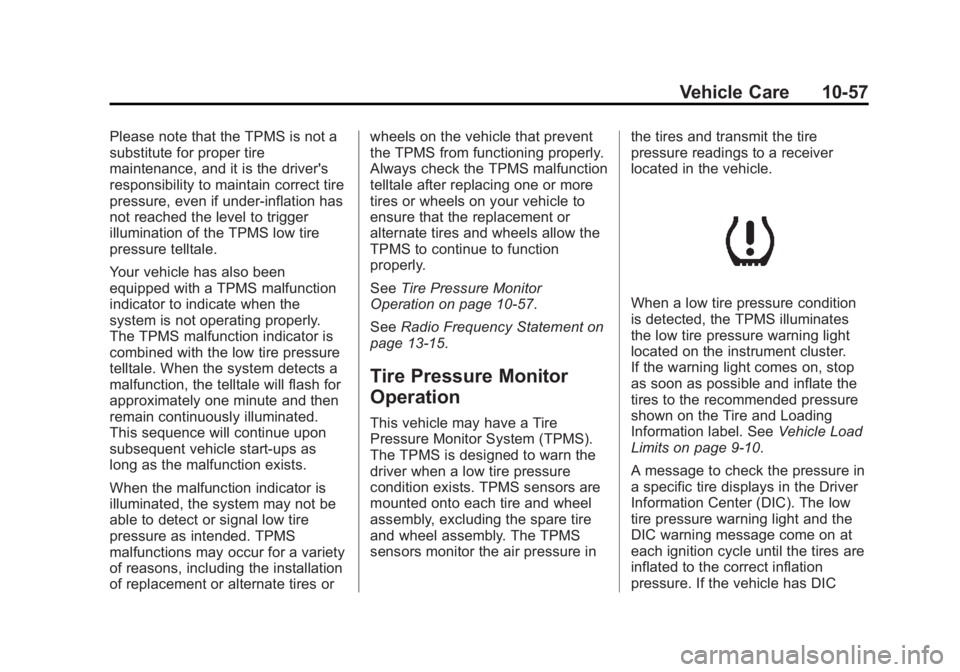
is detected, the TPMS illuminates
the low tire pressure warning light
located on the instrument cluster.
If the warning light comes on, stop
as soon as possible and inflate the
tires to the recommended pressure
shown on the Tire and Loading
Information label. See
Vehicle Load
Limits on page 9-10.
A message to check the pressure in
a specific tire displays in the Driver
Information Center (DIC). The low
tire pressure warning light and the
DIC warning message come on at
each ignition cycle until the tires are
inflated to the correct inflation
pressure. If the vehicle has DIC