rear GMC SAVANA 2018 Repair Manual
[x] Cancel search | Manufacturer: GMC, Model Year: 2018, Model line: SAVANA, Model: GMC SAVANA 2018Pages: 354, PDF Size: 5.09 MB
Page 196 of 354
GMC Savana Owner Manual (GMNA-Localizing-U.S./Canada-11374214) -
2018 - CRC - 2/2/18
Driving and Operating 195
SBZA can be disabled through the
Driver Information Center (DIC).
SeeDriver Information Center (DIC)
0 109. If SBZA is disabled by the
driver, the SBZA mirror displays will
not light up.
When the System Does Not
Seem to Work Properly
SBZA displays may not come on
when passing a vehicle quickly, for
a stopped vehicle, or when towing a
trailer. The SBZA detection zones
that extend back from the side of
the vehicle do not move further back
when a trailer is towed. Use caution
while changing lanes when towing a
trailer. SBZA may alert to objects
attached to the vehicle, such as a
trailer, bicycle, or object extending
out to either side of the vehicle. This
is normal system operation; the
vehicle does not need service.
SBZA may not always alert the
driver to vehicles in the side blind
zone, especially in wet conditions.
The system does not need to be
serviced. The system may light up
due to guardrails, signs, trees, shrubs, and other non-moving
objects. This is normal system
operation; the vehicle does not need
service.
SBZA may not operate when the
SBZA sensors in the left or right
corners of the rear bumper are
covered with mud, dirt, snow, ice,
or slush, or in heavy rainstorms. For
cleaning instructions, see "Washing
the Vehicle" under
Exterior Care
0 290. If the DIC displays the
system unavailable message after
cleaning both sides of the vehicle
toward the rear corners of the
vehicle, see your dealer.
If the SBZA displays do not light up
when vehicles are in the blind zone
and the system is clean, the system
may need service. Take the vehicle
to your dealer.
Radio Frequency Information
See Radio Frequency Statement
0 326.
Fuel
For diesel engine vehicles, see
“Fuel for Diesel Engines” in the
Duramax diesel supplement.
GM recommends the use of TOP
TIER
®detergent gasoline to keep
the engine cleaner and reduce
engine deposits. See
www.toptiergas.com for a list of TOP
TIER detergent gasoline marketers
and applicable countries.
If the vehicle has a yellow fuel cap
or a yellow sticker on the fuel door,
E85 or FlexFuel can be used. See
E85 or FlexFuel 0197.
Page 201 of 354
GMC Savana Owner Manual (GMNA-Localizing-U.S./Canada-11374214) -
2018 - CRC - 2/2/18
200 Driving and Operating
Trailer Towing
General Towing
Information
Only use towing equipment that has
been designed for the vehicle.
Contact your dealer or trailering
dealer for assistance with preparing
the vehicle for towing a trailer. Read
the entire section before towing a
trailer.
For towing a disabled vehicle, see
Towing the Vehicle0287. For
towing the vehicle behind another
vehicle such as a motor home, see
Recreational Vehicle Towing 0288.
Driving Characteristics
and Towing Tips
Driving with a Trailer
When towing a trailer:
.
Become familiar with the state
and local laws that apply to
trailer towing. .
The trailer must be equipped
with brakes adequate for the
intended use. A loaded trailer
weighing more than 680 kg
(1,500 lb) must be equipped with
its own brake system, with
brakes working on all axles.
Trailer braking equipment
conforming to Canadian
Standards Association (CSA)
requirement CAN3-D313, or its
equivalent, is recommended.
. Do not tow a trailer during the
first 800 km (500 mi) to prevent
damage to the engine, axle,
or other parts.
. Then during the first 800 km
(500 mi) of trailer towing, do not
drive over 80 km/h (50 mph) and
do not make starts at full throttle.
. Vehicles can tow in D (Drive).
The Tow/Haul Mode may be
used if the transmission shifts
too often. See Tow/Haul Mode
0 184.
. Turn off Park Assist when
towing.
{Warning
When towing a trailer, exhaust
gases may collect at the rear of
the vehicle and enter if the
liftgate, trunk/hatch, or rear-most
window is open.
When towing a trailer:
. Do not drive with the
liftgate, trunk/hatch,
or rear-most window open.
. Fully open the air outlets on
or under the instrument
panel.
. Also adjust the climate
control system to a setting
that brings in only outside
air. See “Climate Control
Systems” in the Index.
For more information about
carbon monoxide, see Engine
Exhaust 0179.
Towing a trailer requires a certain
amount of experience. The
combination you are driving is
Page 207 of 354
GMC Savana Owner Manual (GMNA-Localizing-U.S./Canada-11374214) -
2018 - CRC - 2/2/18
206 Driving and Operating
Ask your dealer for trailering
information or advice.
Weight of the Trailer Tongue
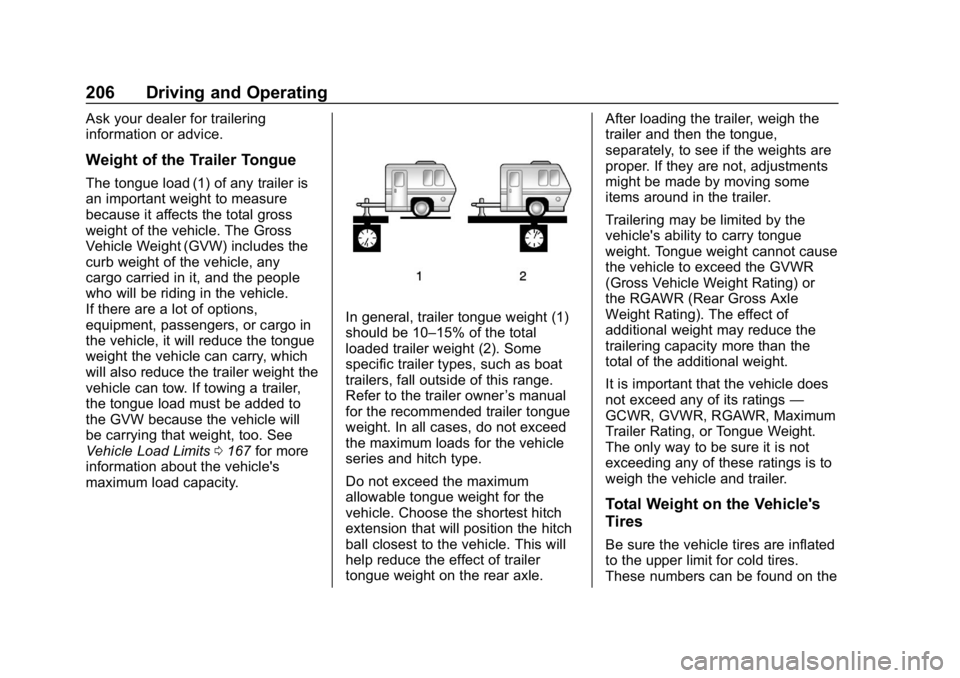
The tongue load (1) of any trailer is
an important weight to measure
because it affects the total gross
weight of the vehicle. The Gross
Vehicle Weight (GVW) includes the
curb weight of the vehicle, any
cargo carried in it, and the people
who will be riding in the vehicle.
If there are a lot of options,
equipment, passengers, or cargo in
the vehicle, it will reduce the tongue
weight the vehicle can carry, which
will also reduce the trailer weight the
vehicle can tow. If towing a trailer,
the tongue load must be added to
the GVW because the vehicle will
be carrying that weight, too. See
Vehicle Load Limits0167 for more
information about the vehicle's
maximum load capacity.
In general, trailer tongue weight (1)
should be 10–15% of the total
loaded trailer weight (2). Some
specific trailer types, such as boat
trailers, fall outside of this range.
Refer to the trailer owner ’s manual
for the recommended trailer tongue
weight. In all cases, do not exceed
the maximum loads for the vehicle
series and hitch type.
Do not exceed the maximum
allowable tongue weight for the
vehicle. Choose the shortest hitch
extension that will position the hitch
ball closest to the vehicle. This will
help reduce the effect of trailer
tongue weight on the rear axle. After loading the trailer, weigh the
trailer and then the tongue,
separately, to see if the weights are
proper. If they are not, adjustments
might be made by moving some
items around in the trailer.
Trailering may be limited by the
vehicle's ability to carry tongue
weight. Tongue weight cannot cause
the vehicle to exceed the GVWR
(Gross Vehicle Weight Rating) or
the RGAWR (Rear Gross Axle
Weight Rating). The effect of
additional weight may reduce the
trailering capacity more than the
total of the additional weight.
It is important that the vehicle does
not exceed any of its ratings
—
GCWR, GVWR, RGAWR, Maximum
Trailer Rating, or Tongue Weight.
The only way to be sure it is not
exceeding any of these ratings is to
weigh the vehicle and trailer.
Total Weight on the Vehicle's
Tires
Be sure the vehicle tires are inflated
to the upper limit for cold tires.
These numbers can be found on the
Page 208 of 354
GMC Savana Owner Manual (GMNA-Localizing-U.S./Canada-11374214) -
2018 - CRC - 2/2/18
Driving and Operating 207
Certification label at the rear edge of
the driver door, or seeVehicle Load
Limits 0167. Make sure not to go
over the GVW limit for the vehicle,
or the GAWR, including the weight
of the trailer tongue. If using a
weight distributing hitch, make sure
not to go over the rear axle limit
before applying the weight
distribution spring bars.
Towing Equipment
Hitches
The correct hitch equipment helps
maintain combination control. Many
trailers can be towed with a
weight-carrying hitch which simply
features a coupler latched to the
hitch ball, or a tow eye latched to a
pintle hook. Other trailers may
require a weight-distributing hitch
that uses spring bars to distribute
the trailer tongue weight among the
two vehicle and trailer axles. See
“Weight of the Trailer Tongue” under
Trailer Towing 0202 for rating limits
with various hitch types. Consider using sway controls with
any trailer. Ask a trailering
professional about sway controls or
refer to the trailer manufacturer's
recommendations and instructions.
Weight-Distributing Hitches
and Weight Carrying Hitches
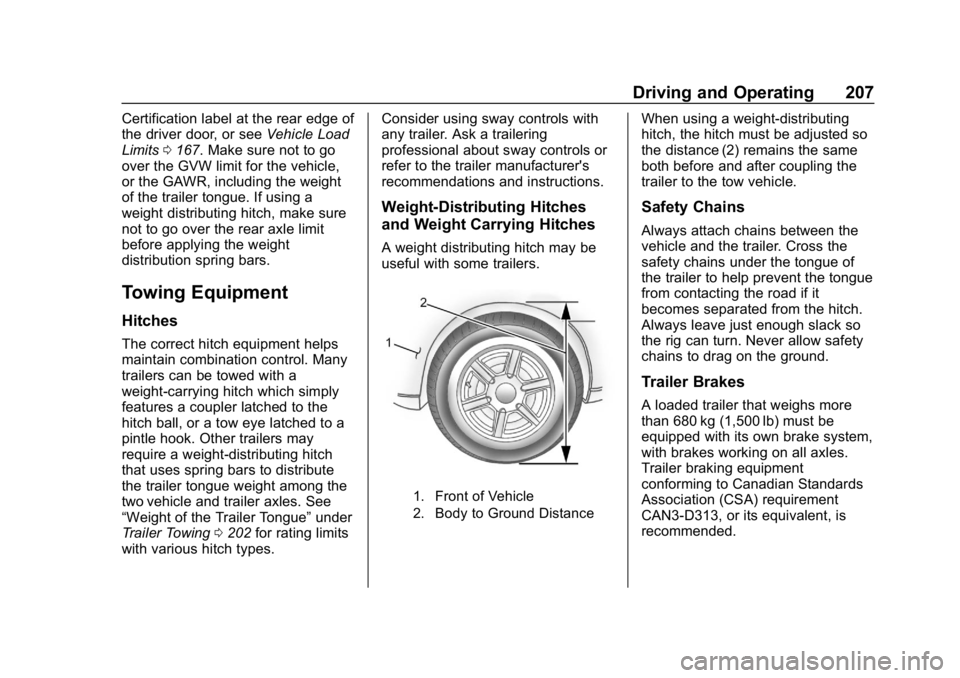
A weight distributing hitch may be
useful with some trailers.
1. Front of Vehicle
2. Body to Ground Distance
When using a weight-distributing
hitch, the hitch must be adjusted so
the distance (2) remains the same
both before and after coupling the
trailer to the tow vehicle.
Safety Chains
Always attach chains between the
vehicle and the trailer. Cross the
safety chains under the tongue of
the trailer to help prevent the tongue
from contacting the road if it
becomes separated from the hitch.
Always leave just enough slack so
the rig can turn. Never allow safety
chains to drag on the ground.
Trailer Brakes
A loaded trailer that weighs more
than 680 kg (1,500 lb) must be
equipped with its own brake system,
with brakes working on all axles.
Trailer braking equipment
conforming to Canadian Standards
Association (CSA) requirement
CAN3-D313, or its equivalent, is
recommended.
Page 209 of 354
GMC Savana Owner Manual (GMNA-Localizing-U.S./Canada-11374214) -
2018 - CRC - 2/2/18
208 Driving and Operating
State and local regulations may also
require the trailer to have its own
braking system if loaded above a
certain threshold. These
requirements vary from state to
state.
Be sure to read and follow the
instructions for the trailer brakes so
they are installed, adjusted, and
maintained properly.
Do not tap into the vehicle's
hydraulic brake system.
Trailer Wiring Harness
The optional heavy-duty trailer
wiring package includes a wiring
harness, with a seven-pin connector
at the rear of the vehicle and a
four-wire harness assembly under
the driver side of the instrument
panel. The four-wire harness
assembly comes without a
connector.
If the vehicle does not have a trailer
hitch, the seven-wire harness
assembly with connector is taped
together and located in a frame
pocket at the driver side rear left
corner of the frame.If the vehicle has a trailer hitch, the
seven-wire harness assembly with
connector is attached to a bracket
on the hitch platform. In both cases,
the seven-wire harness has a
connector and includes a 30-amp
feed wire.
Use only a round, seven-wire
connector with flat blade terminals
meeting SAE J2863 specifications
for proper electrical connectivity.
The seven-wire harness connector
contains the following trailer circuits:
.
Light Green: Back-up Lamps
(10A fuse)**
. White: Ground
. Dark Blue: Trailer Brake Signal
. Dark Green: Right Rear Stop
and Turn Signal*
. Red/Black Stripe: Battery Feed
(30A Fuse)
. Brown: Trailer Park Lamp
Supply Voltage (15A fuse)**
. Yellow: Left Rear Stop and Turn
Signal * The four-wire harness (without
connector) contains the following
circuits:
.
Black: Ground
. Red/White: Battery Feed
. Dark Blue: Trailer Brake Signal
. Light Blue: CHMSL/Stoplamp
Supply Voltage
* If the vehicle is a cutaway with
trailer provisions, a 15 amp fuse will
be shared for both left/stop trailer
turn and right/stop trailer turn
signals. However, the cutaway
lighting connector will have a
10 amp fuse for each signal.
** If the vehicle is a cutaway with
trailer provisions, a 15 amp fuse will
be shared for trailer park lamps and
cutaway rear lighting connector park
lamps. Also, a 10 amp fuse will be
shared for trailer back-up lamps and
cutaway rear lighting connector
back-up lamps.
Page 212 of 354
GMC Savana Owner Manual (GMNA-Localizing-U.S./Canada-11374214) -
2018 - CRC - 2/2/18
Vehicle Care 211
Vehicle Care
General Information
General Information . . . . . . . . . . 212
California Proposition65 Warning . . . . . . . . . . . . . . . . . 212
California Perchlorate Materials Requirements . . . . . 213
Accessories and Modifications . . . . . . . . . . . . . . . . 213
Vehicle Checks
Doing Your OwnService Work . . . . . . . . . . . . . . . 213
Hood . . . . . . . . . . . . . . . . . . . . . . . . . 214
Engine Compartment Overview . . . . . . . . . . . . . . . . . . . . 215
Engine Oil . . . . . . . . . . . . . . . . . . . . 218
Engine Oil Life System . . . . . . . 220
Automatic Transmission Fluid (6-Speed Transmission) . . . . . 221
Automatic Transmission Fluid (8-Speed Transmission) . . . . . 224
Engine Air Cleaner/Filter . . . . . . 225
Cooling System . . . . . . . . . . . . . . 226
Engine Overheating . . . . . . . . . . 231
Engine Fan . . . . . . . . . . . . . . . . . . . 232
Power Steering Fluid . . . . . . . . . 233
Washer Fluid . . . . . . . . . . . . . . . . . 233 Brakes . . . . . . . . . . . . . . . . . . . . . . . 234
Brake Fluid . . . . . . . . . . . . . . . . . . . 235
Battery - North America . . . . . . 236
Rear Axle . . . . . . . . . . . . . . . . . . . . 237
Noise Control System . . . . . . . . 238
Starter Switch Check . . . . . . . . . 239
Automatic Transmission Shift
Lock Control Function
Check . . . . . . . . . . . . . . . . . . . . . . . 239
Ignition Transmission Lock Check . . . . . . . . . . . . . . . . . . . . . . . 240
Park Brake and P (Park) Mechanism Check . . . . . . . . . . 240
Wiper Blade Replacement . . . . 240
Windshield Replacement . . . . . 241
Gas Strut(s) . . . . . . . . . . . . . . . . . . 241
Headlamp Aiming
Headlamp Aiming . . . . . . . . . . . . 242
Bulb Replacement
Bulb Replacement . . . . . . . . . . . . 243
Halogen Bulbs . . . . . . . . . . . . . . . . 243
Front Turn Signal, Sidemarker, and Parking Lamps . . . . . . . . . 243
Taillamps . . . . . . . . . . . . . . . . . . . . . 243
Center High-Mounted Stoplamp (CHMSL) . . . . . . . . . 245
License Plate Lamp . . . . . . . . . . 245
Electrical System
Electrical System Overload . . . 246
Fuses and Circuit Breakers . . . 246
Engine Compartment Fuse
Block . . . . . . . . . . . . . . . . . . . . . . . . 247
Floor Console Fuse Block . . . . 251
Wheels and Tires
Tires . . . . . . . . . . . . . . . . . . . . . . . . . . 253
All-Season Tires . . . . . . . . . . . . . . 253
Winter Tires . . . . . . . . . . . . . . . . . . 254
All-Terrain Tires . . . . . . . . . . . . . . . 254
Tire Sidewall Labeling . . . . . . . . 254
Tire Designations . . . . . . . . . . . . . 257
Tire Terminology and
Definitions . . . . . . . . . . . . . . . . . . 258
Tire Pressure . . . . . . . . . . . . . . . . . 261
Tire Pressure Monitor System . . . . . . . . . . . . . . . . . . . . . . 262
Tire Pressure Monitor Operation . . . . . . . . . . . . . . . . . . . 263
Tire Inspection . . . . . . . . . . . . . . . . 266
Tire Rotation . . . . . . . . . . . . . . . . . 266
Dual Tire Rotation . . . . . . . . . . . . 268
When It Is Time for New Tires . . . . . . . . . . . . . . . . . . . . . . . . 268
Buying New Tires . . . . . . . . . . . . . 269
Different Size Tires and Wheels . . . . . . . . . . . . . . . . . . . . . . 271
Page 238 of 354
GMC Savana Owner Manual (GMNA-Localizing-U.S./Canada-11374214) -
2018 - CRC - 2/2/18
Vehicle Care 237
Warning (Continued)
cancer and birth defects or other
reproductive harm. Batteries also
contain other chemicals known to
the State of California to cause
cancer.WASH HANDS AFTER
HANDLING. For more information
go to www.P65Warnings.ca.gov/
passenger-vehicle.
See California Proposition
65 Warning 0212 and the back
cover.
Vehicle Storage
{Warning
Batteries have acid that can burn
you and gas that can explode.
You can be badly hurt if you are
not careful. See Jump Starting -
North America 0284 for tips on
working around a battery without
getting hurt. Infrequent Usage: Remove the
black, negative (−) cable from the
battery to keep the battery from
running down.
Extended Storage: Remove the
black, negative (−) cable from the
battery or use a battery trickle
charger.
Rear Axle
When to Check Lubricant
It is not necessary to regularly
check rear axle fluid unless you
suspect there is a leak or you hear
an unusual noise. A fluid loss could
indicate a problem. Have it
inspected and repaired.
How to Check Lubricant
To get an accurate reading, the
vehicle should be on a level
surface.
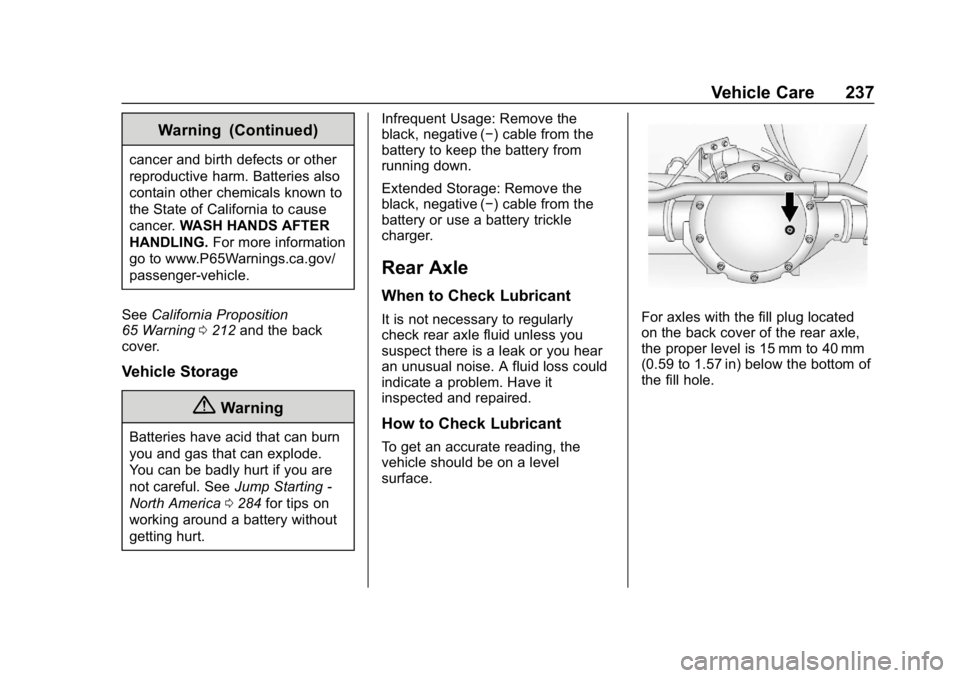
For axles with the fill plug located
on the back cover of the rear axle,
the proper level is 15 mm to 40 mm
(0.59 to 1.57 in) below the bottom of
the fill hole.
Page 239 of 354
GMC Savana Owner Manual (GMNA-Localizing-U.S./Canada-11374214) -
2018 - CRC - 2/2/18
238 Vehicle Care
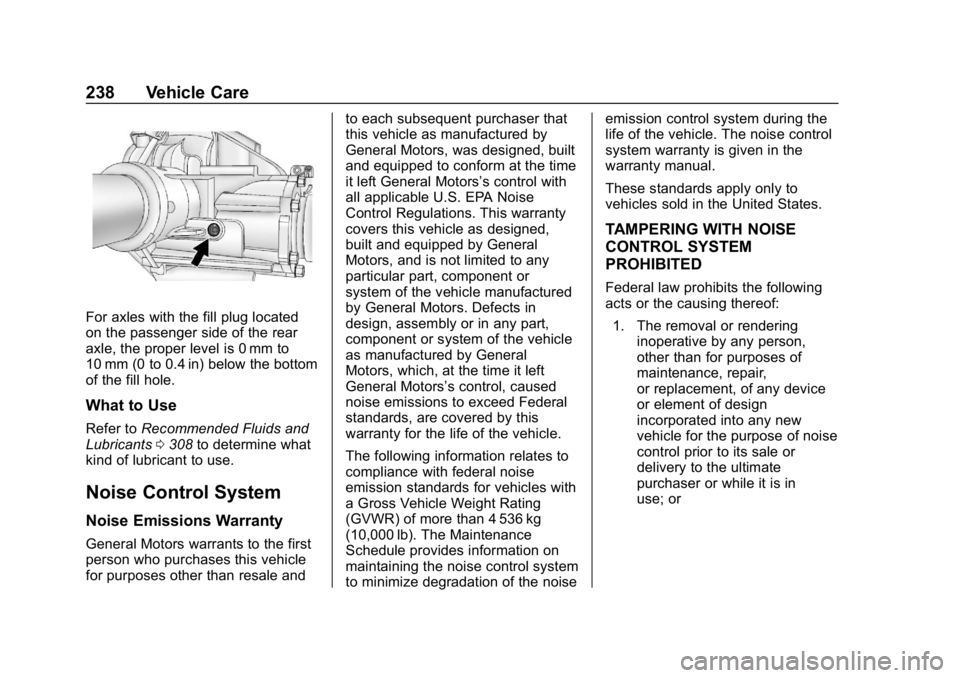
For axles with the fill plug located
on the passenger side of the rear
axle, the proper level is 0 mm to
10 mm (0 to 0.4 in) below the bottom
of the fill hole.
What to Use
Refer toRecommended Fluids and
Lubricants 0308 to determine what
kind of lubricant to use.
Noise Control System
Noise Emissions Warranty
General Motors warrants to the first
person who purchases this vehicle
for purposes other than resale and to each subsequent purchaser that
this vehicle as manufactured by
General Motors, was designed, built
and equipped to conform at the time
it left General Motors’
s control with
all applicable U.S. EPA Noise
Control Regulations. This warranty
covers this vehicle as designed,
built and equipped by General
Motors, and is not limited to any
particular part, component or
system of the vehicle manufactured
by General Motors. Defects in
design, assembly or in any part,
component or system of the vehicle
as manufactured by General
Motors, which, at the time it left
General Motors’s control, caused
noise emissions to exceed Federal
standards, are covered by this
warranty for the life of the vehicle.
The following information relates to
compliance with federal noise
emission standards for vehicles with
a Gross Vehicle Weight Rating
(GVWR) of more than 4 536 kg
(10,000 lb). The Maintenance
Schedule provides information on
maintaining the noise control system
to minimize degradation of the noise emission control system during the
life of the vehicle. The noise control
system warranty is given in the
warranty manual.
These standards apply only to
vehicles sold in the United States.
TAMPERING WITH NOISE
CONTROL SYSTEM
PROHIBITED
Federal law prohibits the following
acts or the causing thereof:
1. The removal or rendering inoperative by any person,
other than for purposes of
maintenance, repair,
or replacement, of any device
or element of design
incorporated into any new
vehicle for the purpose of noise
control prior to its sale or
delivery to the ultimate
purchaser or while it is in
use; or
Page 245 of 354
GMC Savana Owner Manual (GMNA-Localizing-U.S./Canada-11374214) -
2018 - CRC - 2/2/18
244 Vehicle Care
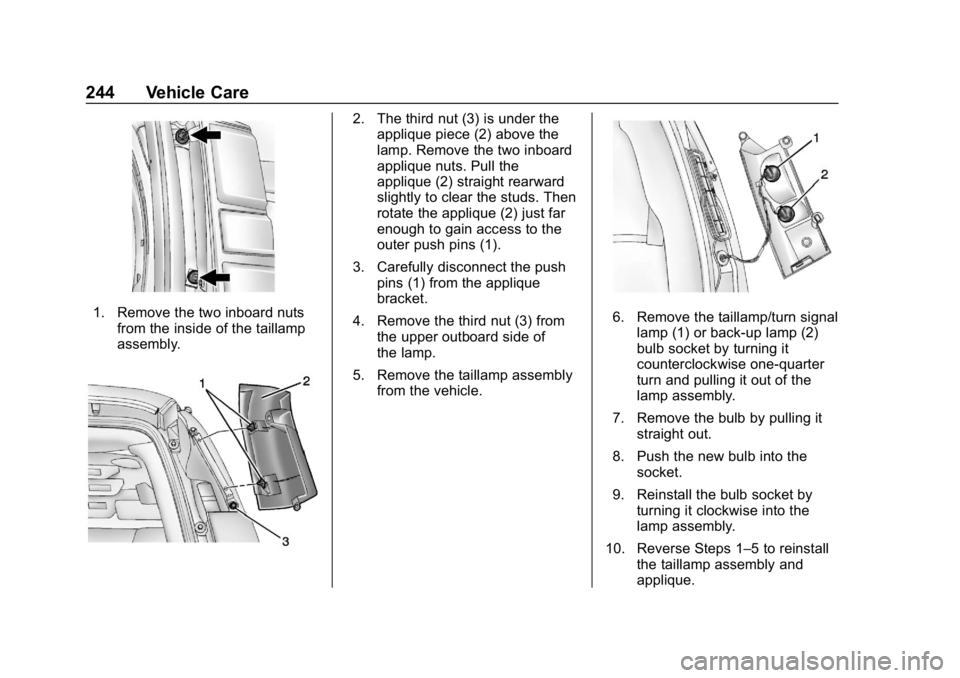
1. Remove the two inboard nutsfrom the inside of the taillamp
assembly.
2. The third nut (3) is under theapplique piece (2) above the
lamp. Remove the two inboard
applique nuts. Pull the
applique (2) straight rearward
slightly to clear the studs. Then
rotate the applique (2) just far
enough to gain access to the
outer push pins (1).
3. Carefully disconnect the push pins (1) from the applique
bracket.
4. Remove the third nut (3) from the upper outboard side of
the lamp.
5. Remove the taillamp assembly from the vehicle.
6. Remove the taillamp/turn signal
lamp (1) or back-up lamp (2)
bulb socket by turning it
counterclockwise one-quarter
turn and pulling it out of the
lamp assembly.
7. Remove the bulb by pulling it straight out.
8. Push the new bulb into the socket.
9. Reinstall the bulb socket by turning it clockwise into the
lamp assembly.
10. Reverse Steps 1–5 to reinstall the taillamp assembly and
applique.
Page 246 of 354
GMC Savana Owner Manual (GMNA-Localizing-U.S./Canada-11374214) -
2018 - CRC - 2/2/18
Vehicle Care 245
Center High-Mounted
Stoplamp (CHMSL)
The Center High-Mounted Stoplamp
(CHMSL) is above the rear doors at
the center of the vehicle.
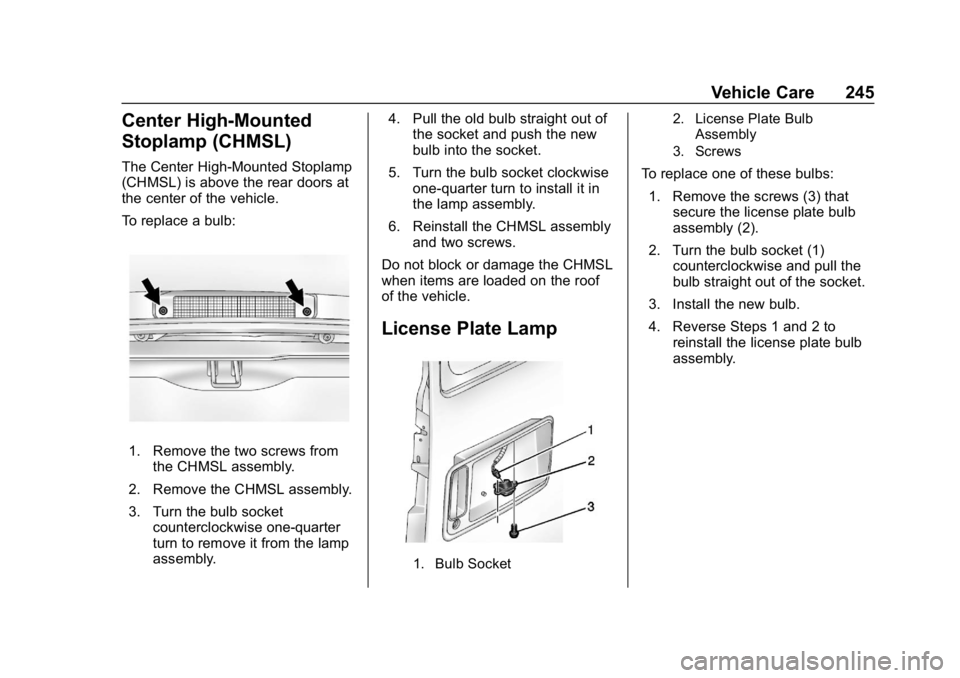
To replace a bulb:
1. Remove the two screws fromthe CHMSL assembly.
2. Remove the CHMSL assembly.
3. Turn the bulb socket counterclockwise one-quarter
turn to remove it from the lamp
assembly. 4. Pull the old bulb straight out of
the socket and push the new
bulb into the socket.
5. Turn the bulb socket clockwise one-quarter turn to install it in
the lamp assembly.
6. Reinstall the CHMSL assembly and two screws.
Do not block or damage the CHMSL
when items are loaded on the roof
of the vehicle.
License Plate Lamp
1. Bulb Socket 2. License Plate Bulb
Assembly
3. Screws
To replace one of these bulbs:
1. Remove the screws (3) that secure the license plate bulb
assembly (2).
2. Turn the bulb socket (1) counterclockwise and pull the
bulb straight out of the socket.
3. Install the new bulb.
4. Reverse Steps 1 and 2 to reinstall the license plate bulb
assembly.