horn GMC SAVANA PASSENGER 2008 Owners Manual
[x] Cancel search | Manufacturer: GMC, Model Year: 2008, Model line: SAVANA PASSENGER, Model: GMC SAVANA PASSENGER 2008Pages: 402, PDF Size: 2.34 MB
Page 84 of 402
Remote Keyless Entry (RKE)
System Operation
The vehicle’s doors can be locked and unlocked from
about 3 feet (1 m) up to 65 feet (20 m) away with the
Remote Keyless Entry (RKE) transmitter.
There are other conditions which can affect the
performance of the transmitter. SeeRemote Keyless
Entry (RKE) System on page 2-3.
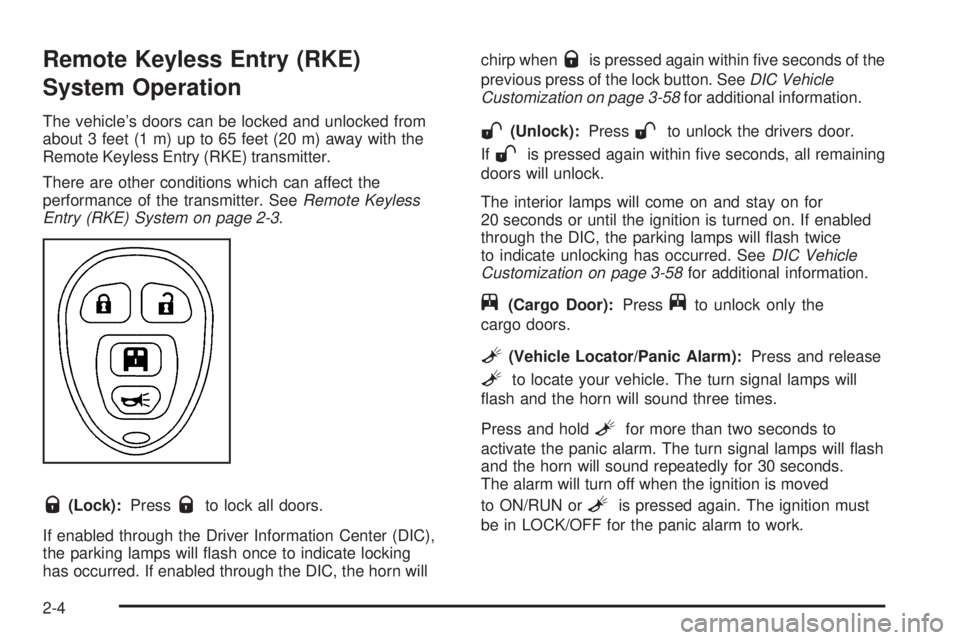
Q(Lock):PressQto lock all doors.
If enabled through the Driver Information Center (DIC),
the parking lamps will flash once to indicate locking
has occurred. If enabled through the DIC, the horn willchirp when
Qis pressed again within five seconds of the
previous press of the lock button. SeeDIC Vehicle
Customization on page 3-58for additional information.
W(Unlock):PressWto unlock the drivers door.
If
Wis pressed again within five seconds, all remaining
doors will unlock.
The interior lamps will come on and stay on for
20 seconds or until the ignition is turned on. If enabled
through the DIC, the parking lamps will flash twice
to indicate unlocking has occurred. SeeDIC Vehicle
Customization on page 3-58for additional information.
j(Cargo Door):Pressjto unlock only the
cargo doors.
L(Vehicle Locator/Panic Alarm):Press and release
Lto locate your vehicle. The turn signal lamps will
flash and the horn will sound three times.
Press and hold
Lfor more than two seconds to
activate the panic alarm. The turn signal lamps will flash
and the horn will sound repeatedly for 30 seconds.
The alarm will turn off when the ignition is moved
to ON/RUN or
Lis pressed again. The ignition must
be in LOCK/OFF for the panic alarm to work.
2-4
Page 115 of 402
Instrument Panel Overview...............................3-4
Hazard Warning Flashers................................3-6
Other Warning Devices...................................3-6
Horn.............................................................3-6
Tilt Wheel.....................................................3-7
Turn Signal/Multifunction Lever.........................3-7
Turn and Lane-Change Signals........................3-8
Headlamp High/Low-Beam Changer..................3-9
Flash-to-Pass.................................................3-9
Windshield Wipers..........................................3-9
Windshield Washer.......................................3-10
Cruise Control..............................................3-10
Exterior Lamps.............................................3-13
Headlamps on Reminder................................3-14
Daytime Running Lamps (DRL).......................3-15
Automatic Headlamp System..........................3-15
Instrument Panel Brightness...........................3-16
Dome Lamps...............................................3-16
Dome Lamp Override....................................3-16
Entry/Exit Lighting.........................................3-17
Reading Lamps............................................3-17
Electric Power Management...........................3-17
Battery Run-Down Protection..........................3-17
Accessory Power Outlet(s).............................3-18
Ashtray(s) and Cigarette Lighter......................3-18Climate Controls............................................3-19
Climate Control System.................................3-19
Outlet Adjustment.........................................3-21
Rear Heating System....................................3-22
Rear Air Conditioning and Heating System.......3-23
Warning Lights, Gages, and Indicators............3-24
Instrument Panel Cluster................................3-25
Speedometer and Odometer...........................3-26
Trip Odometer..............................................3-26
Safety Belt Reminders...................................3-26
Airbag Readiness Light..................................3-27
Airbag Off Light............................................3-28
Passenger Airbag Status Indicator...................3-30
Charging System Light..................................3-32
Voltmeter Gage............................................3-32
Brake System Warning Light..........................3-33
Antilock Brake System Warning Light...............3-34
StabiliTrak
®Indicator Light..............................3-34
Engine Coolant Temperature Gage..................3-35
Tire Pressure Light.......................................3-35
Malfunction Indicator Lamp.............................3-36
Oil Pressure Gage........................................3-38
Oil Pressure Light.........................................3-39
Security Light...............................................3-40
Cruise Control Light......................................3-40
Section 3 Instrument Panel
3-1
Page 119 of 402
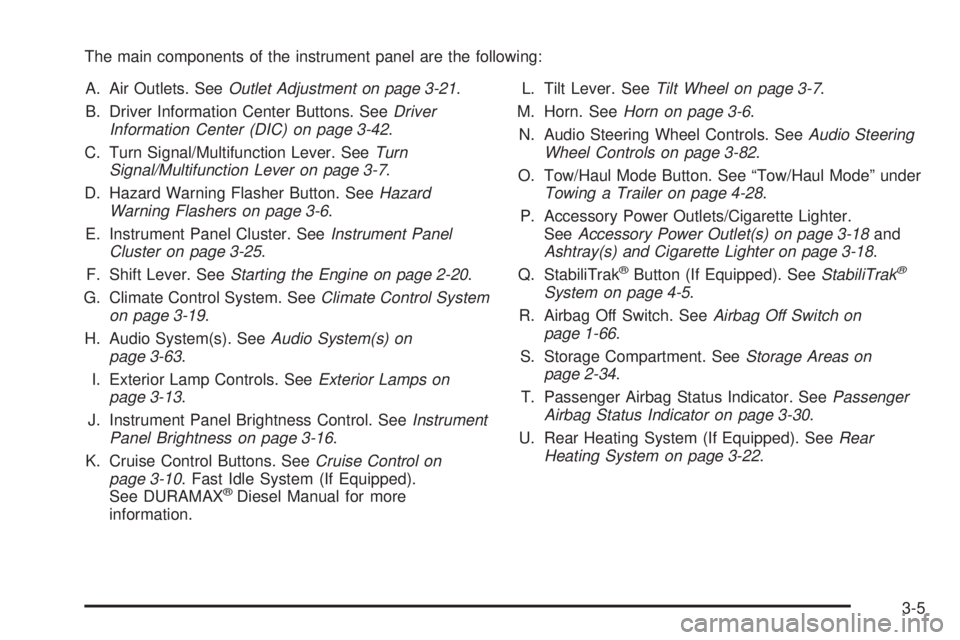
The main components of the instrument panel are the following:
A. Air Outlets. SeeOutlet Adjustment on page 3-21.
B. Driver Information Center Buttons. SeeDriver
Information Center (DIC) on page 3-42.
C. Turn Signal/Multifunction Lever. SeeTurn
Signal/Multifunction Lever on page 3-7.
D. Hazard Warning Flasher Button. SeeHazard
Warning Flashers on page 3-6.
E. Instrument Panel Cluster. SeeInstrument Panel
Cluster on page 3-25.
F. Shift Lever. SeeStarting the Engine on page 2-20.
G. Climate Control System. SeeClimate Control System
on page 3-19.
H. Audio System(s). SeeAudio System(s) on
page 3-63.
I. Exterior Lamp Controls. SeeExterior Lamps on
page 3-13.
J. Instrument Panel Brightness Control. SeeInstrument
Panel Brightness on page 3-16.
K. Cruise Control Buttons. SeeCruise Control on
page 3-10. Fast Idle System (If Equipped).
See DURAMAX
®Diesel Manual for more
information.L. Tilt Lever. SeeTilt Wheel on page 3-7.
M. Horn. SeeHorn on page 3-6.
N. Audio Steering Wheel Controls. SeeAudio Steering
Wheel Controls on page 3-82.
O. Tow/Haul Mode Button. See “Tow/Haul Mode” under
Towing a Trailer on page 4-28.
P. Accessory Power Outlets/Cigarette Lighter.
SeeAccessory Power Outlet(s) on page 3-18and
Ashtray(s) and Cigarette Lighter on page 3-18.
Q. StabiliTrak
®Button (If Equipped). SeeStabiliTrak®
System on page 4-5.
R. Airbag Off Switch. SeeAirbag Off Switch on
page 1-66.
S. Storage Compartment. SeeStorage Areas on
page 2-34.
T. Passenger Airbag Status Indicator. SeePassenger
Airbag Status Indicator on page 3-30.
U. Rear Heating System (If Equipped). SeeRear
Heating System on page 3-22.
3-5
Page 120 of 402
Hazard Warning Flashers
The hazard warning flashers warn others. They also let
the police and other emergency vehicles know you
have a problem.
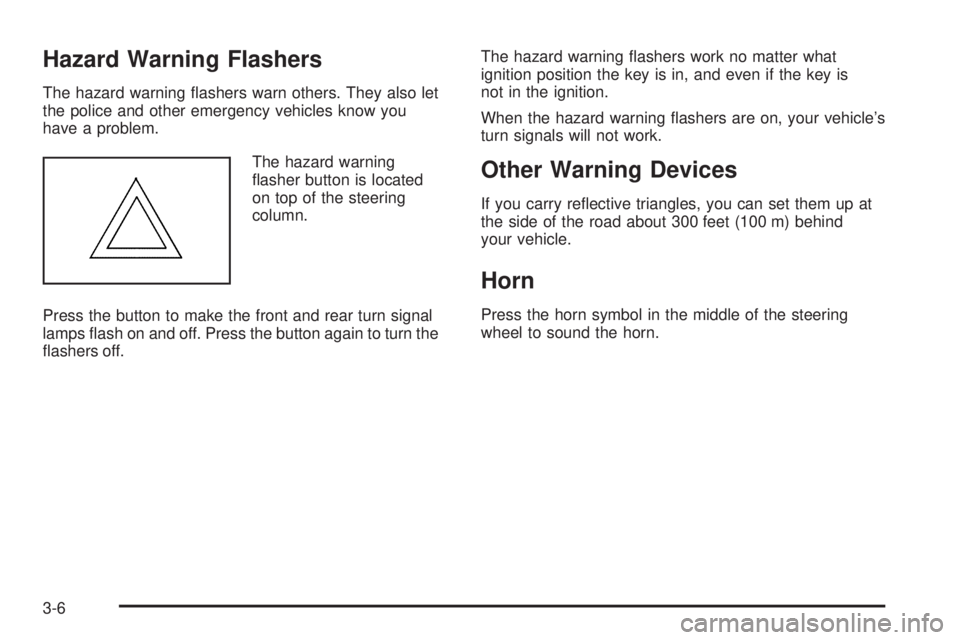
The hazard warning
flasher button is located
on top of the steering
column.
Press the button to make the front and rear turn signal
lamps flash on and off. Press the button again to turn the
flashers off.The hazard warning flashers work no matter what
ignition position the key is in, and even if the key is
not in the ignition.
When the hazard warning flashers are on, your vehicle’s
turn signals will not work.
Other Warning Devices
If you carry reflective triangles, you can set them up at
the side of the road about 300 feet (100 m) behind
your vehicle.
Horn
Press the horn symbol in the middle of the steering
wheel to sound the horn.
3-6
Page 174 of 402
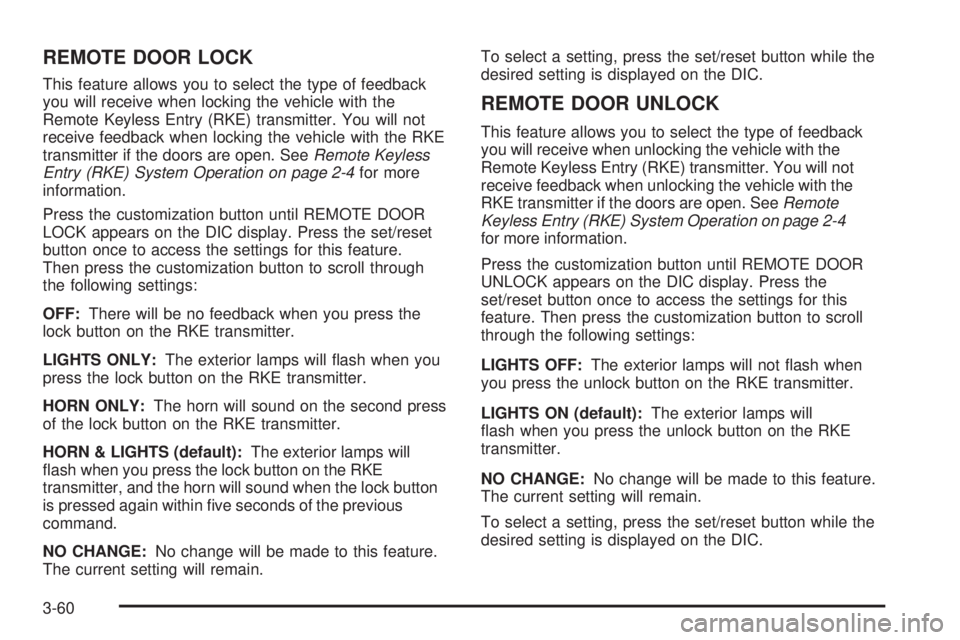
REMOTE DOOR LOCK
This feature allows you to select the type of feedback
you will receive when locking the vehicle with the
Remote Keyless Entry (RKE) transmitter. You will not
receive feedback when locking the vehicle with the RKE
transmitter if the doors are open. SeeRemote Keyless
Entry (RKE) System Operation on page 2-4for more
information.
Press the customization button until REMOTE DOOR
LOCK appears on the DIC display. Press the set/reset
button once to access the settings for this feature.
Then press the customization button to scroll through
the following settings:
OFF:There will be no feedback when you press the
lock button on the RKE transmitter.
LIGHTS ONLY:The exterior lamps will flash when you
press the lock button on the RKE transmitter.
HORN ONLY:The horn will sound on the second press
of the lock button on the RKE transmitter.
HORN & LIGHTS (default):The exterior lamps will
flash when you press the lock button on the RKE
transmitter, and the horn will sound when the lock button
is pressed again within five seconds of the previous
command.
NO CHANGE:No change will be made to this feature.
The current setting will remain.To select a setting, press the set/reset button while the
desired setting is displayed on the DIC.
REMOTE DOOR UNLOCK
This feature allows you to select the type of feedback
you will receive when unlocking the vehicle with the
Remote Keyless Entry (RKE) transmitter. You will not
receive feedback when unlocking the vehicle with the
RKE transmitter if the doors are open. SeeRemote
Keyless Entry (RKE) System Operation on page 2-4
for more information.
Press the customization button until REMOTE DOOR
UNLOCK appears on the DIC display. Press the
set/reset button once to access the settings for this
feature. Then press the customization button to scroll
through the following settings:
LIGHTS OFF:The exterior lamps will not flash when
you press the unlock button on the RKE transmitter.
LIGHTS ON (default):The exterior lamps will
flash when you press the unlock button on the RKE
transmitter.
NO CHANGE:No change will be made to this feature.
The current setting will remain.
To select a setting, press the set/reset button while the
desired setting is displayed on the DIC.
3-60
Page 306 of 402
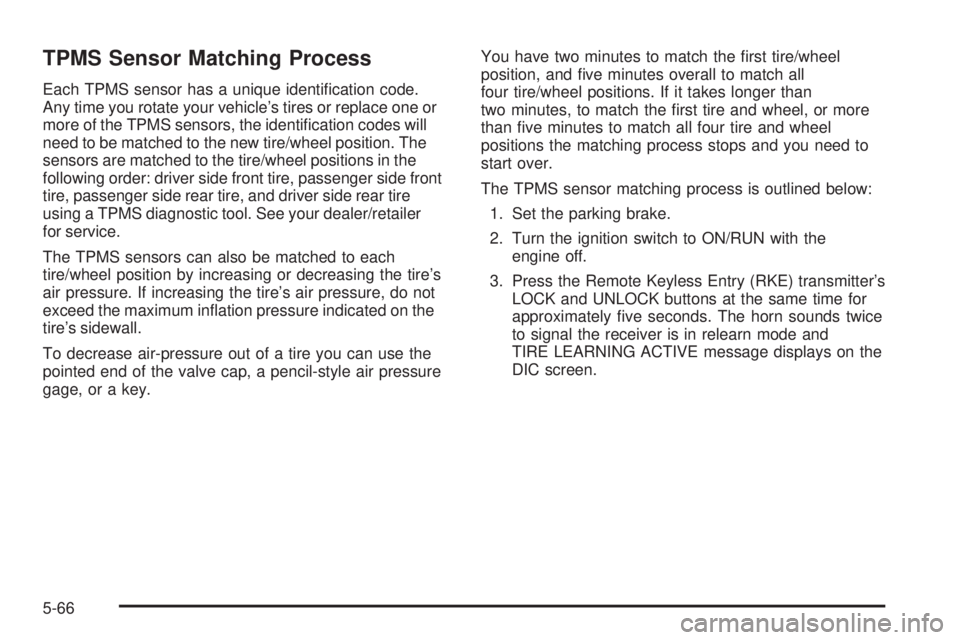
TPMS Sensor Matching Process
Each TPMS sensor has a unique identification code.
Any time you rotate your vehicle’s tires or replace one or
more of the TPMS sensors, the identification codes will
need to be matched to the new tire/wheel position. The
sensors are matched to the tire/wheel positions in the
following order: driver side front tire, passenger side front
tire, passenger side rear tire, and driver side rear tire
using a TPMS diagnostic tool. See your dealer/retailer
for service.
The TPMS sensors can also be matched to each
tire/wheel position by increasing or decreasing the tire’s
air pressure. If increasing the tire’s air pressure, do not
exceed the maximum inflation pressure indicated on the
tire’s sidewall.
To decrease air-pressure out of a tire you can use the
pointed end of the valve cap, a pencil-style air pressure
gage, or a key.You have two minutes to match the first tire/wheel
position, and five minutes overall to match all
four tire/wheel positions. If it takes longer than
two minutes, to match the first tire and wheel, or more
than five minutes to match all four tire and wheel
positions the matching process stops and you need to
start over.
The TPMS sensor matching process is outlined below:
1. Set the parking brake.
2. Turn the ignition switch to ON/RUN with the
engine off.
3. Press the Remote Keyless Entry (RKE) transmitter’s
LOCK and UNLOCK buttons at the same time for
approximately five seconds. The horn sounds twice
to signal the receiver is in relearn mode and
TIRE LEARNING ACTIVE message displays on the
DIC screen.
5-66
Page 307 of 402
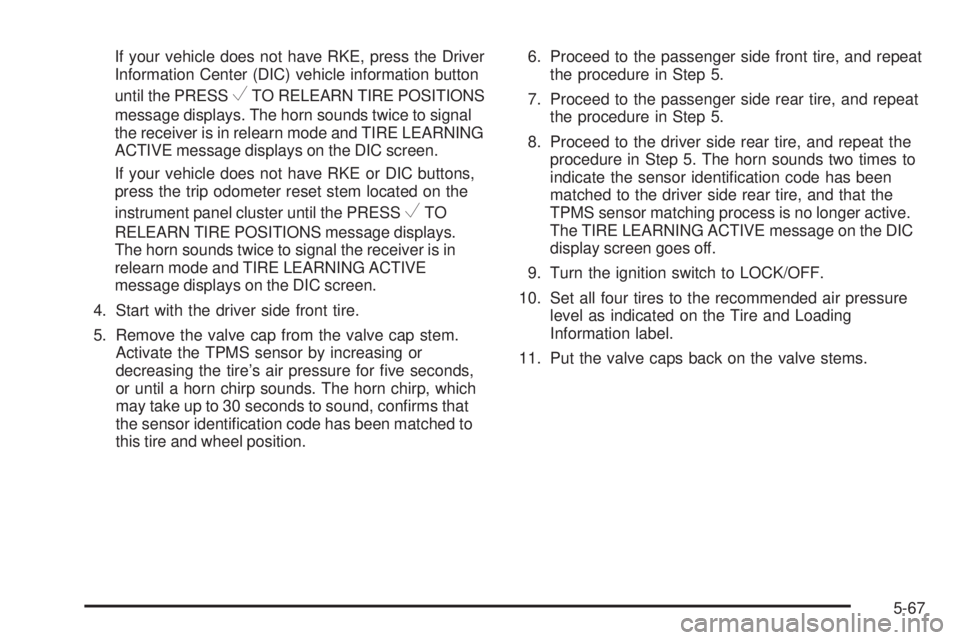
If your vehicle does not have RKE, press the Driver
Information Center (DIC) vehicle information button
until the PRESS
VTO RELEARN TIRE POSITIONS
message displays. The horn sounds twice to signal
the receiver is in relearn mode and TIRE LEARNING
ACTIVE message displays on the DIC screen.
If your vehicle does not have RKE or DIC buttons,
press the trip odometer reset stem located on the
instrument panel cluster until the PRESS
VTO
RELEARN TIRE POSITIONS message displays.
The horn sounds twice to signal the receiver is in
relearn mode and TIRE LEARNING ACTIVE
message displays on the DIC screen.
4. Start with the driver side front tire.
5. Remove the valve cap from the valve cap stem.
Activate the TPMS sensor by increasing or
decreasing the tire’s air pressure for five seconds,
or until a horn chirp sounds. The horn chirp, which
may take up to 30 seconds to sound, confirms that
the sensor identification code has been matched to
this tire and wheel position.6. Proceed to the passenger side front tire, and repeat
the procedure in Step 5.
7. Proceed to the passenger side rear tire, and repeat
the procedure in Step 5.
8. Proceed to the driver side rear tire, and repeat the
procedure in Step 5. The horn sounds two times to
indicate the sensor identification code has been
matched to the driver side rear tire, and that the
TPMS sensor matching process is no longer active.
The TIRE LEARNING ACTIVE message on the DIC
display screen goes off.
9. Turn the ignition switch to LOCK/OFF.
10. Set all four tires to the recommended air pressure
level as indicated on the Tire and Loading
Information label.
11. Put the valve caps back on the valve stems.
5-67
Page 348 of 402
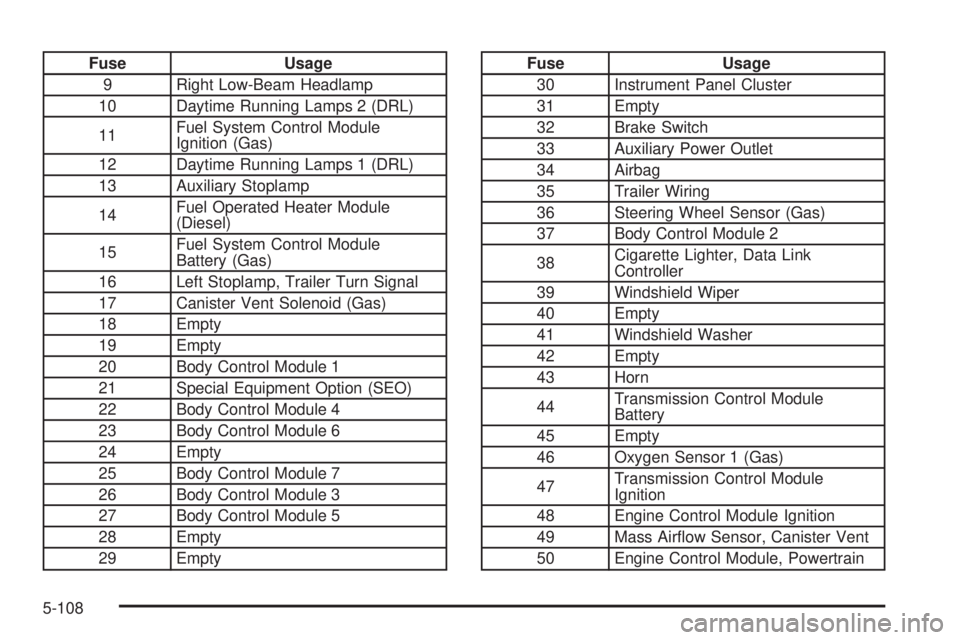
Fuse Usage
9 Right Low-Beam Headlamp
10 Daytime Running Lamps 2 (DRL)
11Fuel System Control Module
Ignition (Gas)
12 Daytime Running Lamps 1 (DRL)
13 Auxiliary Stoplamp
14Fuel Operated Heater Module
(Diesel)
15Fuel System Control Module
Battery (Gas)
16 Left Stoplamp, Trailer Turn Signal
17 Canister Vent Solenoid (Gas)
18 Empty
19 Empty
20 Body Control Module 1
21 Special Equipment Option (SEO)
22 Body Control Module 4
23 Body Control Module 6
24 Empty
25 Body Control Module 7
26 Body Control Module 3
27 Body Control Module 5
28 Empty
29 EmptyFuse Usage
30 Instrument Panel Cluster
31 Empty
32 Brake Switch
33 Auxiliary Power Outlet
34 Airbag
35 Trailer Wiring
36 Steering Wheel Sensor (Gas)
37 Body Control Module 2
38Cigarette Lighter, Data Link
Controller
39 Windshield Wiper
40 Empty
41 Windshield Washer
42 Empty
43 Horn
44Transmission Control Module
Battery
45 Empty
46 Oxygen Sensor 1 (Gas)
47Transmission Control Module
Ignition
48 Engine Control Module Ignition
49 Mass Airflow Sensor, Canister Vent
50 Engine Control Module, Powertrain
5-108
Page 396 of 402
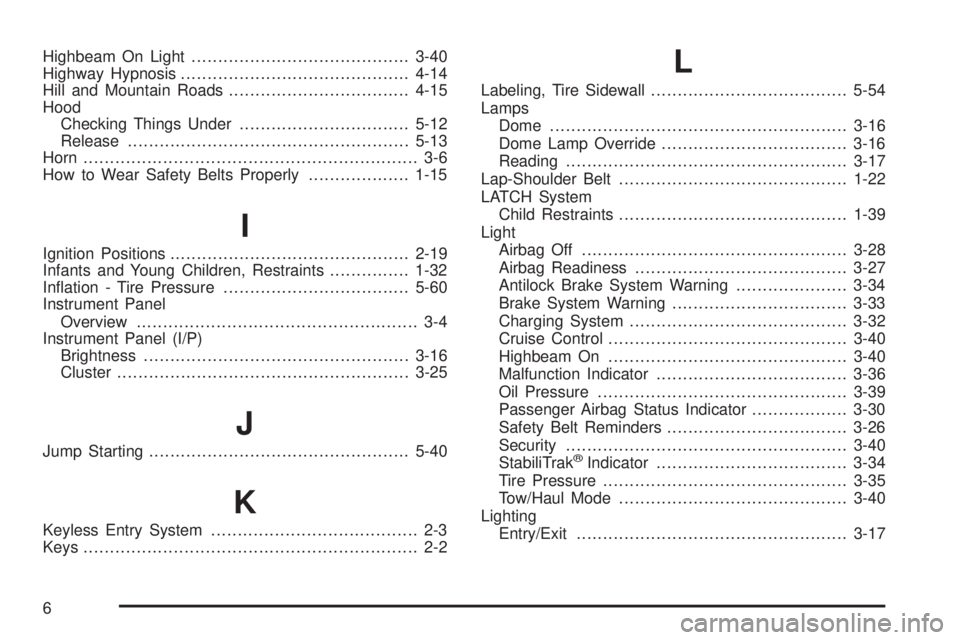
Highbeam On Light.........................................3-40
Highway Hypnosis...........................................4-14
Hill and Mountain Roads..................................4-15
Hood
Checking Things Under................................5-12
Release.....................................................5-13
Horn............................................................... 3-6
How to Wear Safety Belts Properly...................1-15
I
Ignition Positions.............................................2-19
Infants and Young Children, Restraints...............1-32
Inflation - Tire Pressure...................................5-60
Instrument Panel
Overview..................................................... 3-4
Instrument Panel (I/P)
Brightness..................................................3-16
Cluster.......................................................3-25
J
Jump Starting.................................................5-40
K
Keyless Entry System....................................... 2-3
Keys............................................................... 2-2
L
Labeling, Tire Sidewall.....................................5-54
Lamps
Dome........................................................3-16
Dome Lamp Override...................................3-16
Reading.....................................................3-17
Lap-Shoulder Belt...........................................1-22
LATCH System
Child Restraints...........................................1-39
Light
Airbag Off..................................................3-28
Airbag Readiness........................................3-27
Antilock Brake System Warning.....................3-34
Brake System Warning.................................3-33
Charging System.........................................3-32
Cruise Control.............................................3-40
Highbeam On.............................................3-40
Malfunction Indicator....................................3-36
Oil Pressure...............................................3-39
Passenger Airbag Status Indicator..................3-30
Safety Belt Reminders..................................3-26
Security.....................................................3-40
StabiliTrak
®Indicator....................................3-34
Tire Pressure..............................................3-35
Tow/Haul Mode...........................................3-40
Lighting
Entry/Exit...................................................3-17
6