turn signal GMC SAVANA PASSENGER 2008 Owners Manual
[x] Cancel search | Manufacturer: GMC, Model Year: 2008, Model line: SAVANA PASSENGER, Model: GMC SAVANA PASSENGER 2008Pages: 402, PDF Size: 2.34 MB
Page 84 of 402
Remote Keyless Entry (RKE)
System Operation
The vehicle’s doors can be locked and unlocked from
about 3 feet (1 m) up to 65 feet (20 m) away with the
Remote Keyless Entry (RKE) transmitter.
There are other conditions which can affect the
performance of the transmitter. SeeRemote Keyless
Entry (RKE) System on page 2-3.
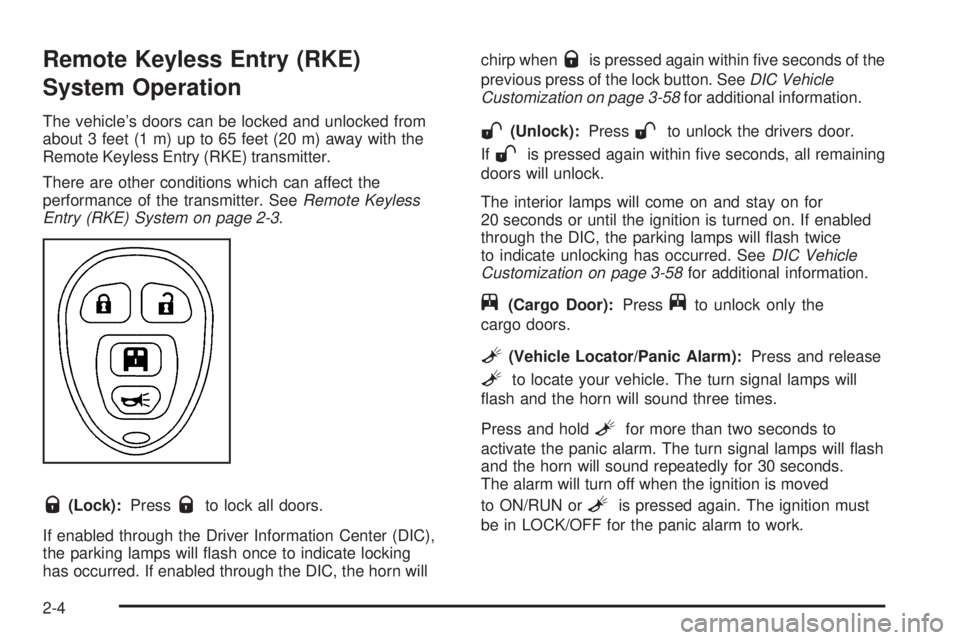
Q(Lock):PressQto lock all doors.
If enabled through the Driver Information Center (DIC),
the parking lamps will flash once to indicate locking
has occurred. If enabled through the DIC, the horn willchirp when
Qis pressed again within five seconds of the
previous press of the lock button. SeeDIC Vehicle
Customization on page 3-58for additional information.
W(Unlock):PressWto unlock the drivers door.
If
Wis pressed again within five seconds, all remaining
doors will unlock.
The interior lamps will come on and stay on for
20 seconds or until the ignition is turned on. If enabled
through the DIC, the parking lamps will flash twice
to indicate unlocking has occurred. SeeDIC Vehicle
Customization on page 3-58for additional information.
j(Cargo Door):Pressjto unlock only the
cargo doors.
L(Vehicle Locator/Panic Alarm):Press and release
Lto locate your vehicle. The turn signal lamps will
flash and the horn will sound three times.
Press and hold
Lfor more than two seconds to
activate the panic alarm. The turn signal lamps will flash
and the horn will sound repeatedly for 30 seconds.
The alarm will turn off when the ignition is moved
to ON/RUN or
Lis pressed again. The ignition must
be in LOCK/OFF for the panic alarm to work.
2-4
Page 115 of 402
Instrument Panel Overview...............................3-4
Hazard Warning Flashers................................3-6
Other Warning Devices...................................3-6
Horn.............................................................3-6
Tilt Wheel.....................................................3-7
Turn Signal/Multifunction Lever.........................3-7
Turn and Lane-Change Signals........................3-8
Headlamp High/Low-Beam Changer..................3-9
Flash-to-Pass.................................................3-9
Windshield Wipers..........................................3-9
Windshield Washer.......................................3-10
Cruise Control..............................................3-10
Exterior Lamps.............................................3-13
Headlamps on Reminder................................3-14
Daytime Running Lamps (DRL).......................3-15
Automatic Headlamp System..........................3-15
Instrument Panel Brightness...........................3-16
Dome Lamps...............................................3-16
Dome Lamp Override....................................3-16
Entry/Exit Lighting.........................................3-17
Reading Lamps............................................3-17
Electric Power Management...........................3-17
Battery Run-Down Protection..........................3-17
Accessory Power Outlet(s).............................3-18
Ashtray(s) and Cigarette Lighter......................3-18Climate Controls............................................3-19
Climate Control System.................................3-19
Outlet Adjustment.........................................3-21
Rear Heating System....................................3-22
Rear Air Conditioning and Heating System.......3-23
Warning Lights, Gages, and Indicators............3-24
Instrument Panel Cluster................................3-25
Speedometer and Odometer...........................3-26
Trip Odometer..............................................3-26
Safety Belt Reminders...................................3-26
Airbag Readiness Light..................................3-27
Airbag Off Light............................................3-28
Passenger Airbag Status Indicator...................3-30
Charging System Light..................................3-32
Voltmeter Gage............................................3-32
Brake System Warning Light..........................3-33
Antilock Brake System Warning Light...............3-34
StabiliTrak
®Indicator Light..............................3-34
Engine Coolant Temperature Gage..................3-35
Tire Pressure Light.......................................3-35
Malfunction Indicator Lamp.............................3-36
Oil Pressure Gage........................................3-38
Oil Pressure Light.........................................3-39
Security Light...............................................3-40
Cruise Control Light......................................3-40
Section 3 Instrument Panel
3-1
Page 119 of 402
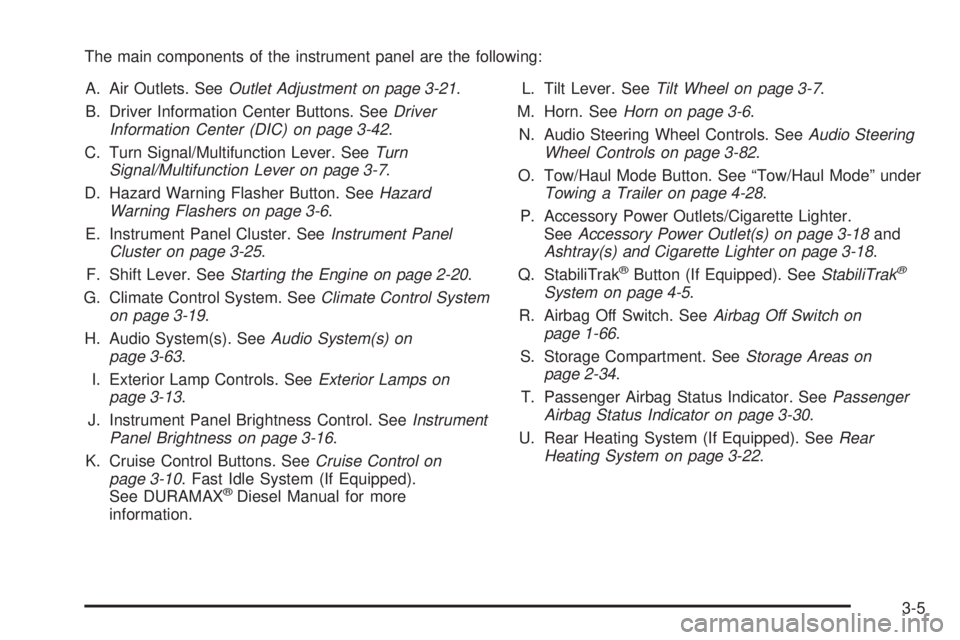
The main components of the instrument panel are the following:
A. Air Outlets. SeeOutlet Adjustment on page 3-21.
B. Driver Information Center Buttons. SeeDriver
Information Center (DIC) on page 3-42.
C. Turn Signal/Multifunction Lever. SeeTurn
Signal/Multifunction Lever on page 3-7.
D. Hazard Warning Flasher Button. SeeHazard
Warning Flashers on page 3-6.
E. Instrument Panel Cluster. SeeInstrument Panel
Cluster on page 3-25.
F. Shift Lever. SeeStarting the Engine on page 2-20.
G. Climate Control System. SeeClimate Control System
on page 3-19.
H. Audio System(s). SeeAudio System(s) on
page 3-63.
I. Exterior Lamp Controls. SeeExterior Lamps on
page 3-13.
J. Instrument Panel Brightness Control. SeeInstrument
Panel Brightness on page 3-16.
K. Cruise Control Buttons. SeeCruise Control on
page 3-10. Fast Idle System (If Equipped).
See DURAMAX
®Diesel Manual for more
information.L. Tilt Lever. SeeTilt Wheel on page 3-7.
M. Horn. SeeHorn on page 3-6.
N. Audio Steering Wheel Controls. SeeAudio Steering
Wheel Controls on page 3-82.
O. Tow/Haul Mode Button. See “Tow/Haul Mode” under
Towing a Trailer on page 4-28.
P. Accessory Power Outlets/Cigarette Lighter.
SeeAccessory Power Outlet(s) on page 3-18and
Ashtray(s) and Cigarette Lighter on page 3-18.
Q. StabiliTrak
®Button (If Equipped). SeeStabiliTrak®
System on page 4-5.
R. Airbag Off Switch. SeeAirbag Off Switch on
page 1-66.
S. Storage Compartment. SeeStorage Areas on
page 2-34.
T. Passenger Airbag Status Indicator. SeePassenger
Airbag Status Indicator on page 3-30.
U. Rear Heating System (If Equipped). SeeRear
Heating System on page 3-22.
3-5
Page 120 of 402
Hazard Warning Flashers
The hazard warning flashers warn others. They also let
the police and other emergency vehicles know you
have a problem.
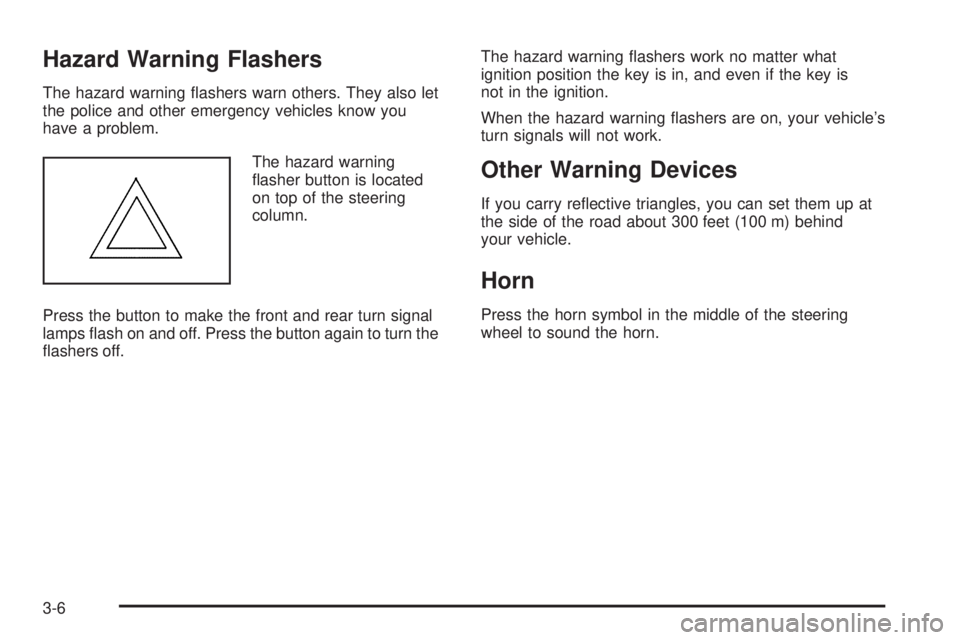
The hazard warning
flasher button is located
on top of the steering
column.
Press the button to make the front and rear turn signal
lamps flash on and off. Press the button again to turn the
flashers off.The hazard warning flashers work no matter what
ignition position the key is in, and even if the key is
not in the ignition.
When the hazard warning flashers are on, your vehicle’s
turn signals will not work.
Other Warning Devices
If you carry reflective triangles, you can set them up at
the side of the road about 300 feet (100 m) behind
your vehicle.
Horn
Press the horn symbol in the middle of the steering
wheel to sound the horn.
3-6
Page 121 of 402
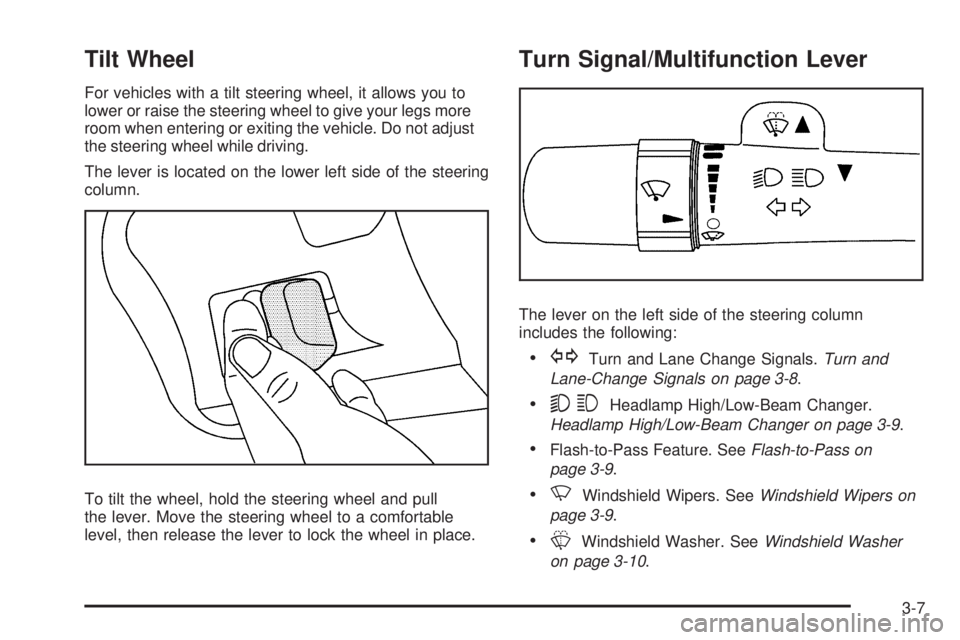
Tilt Wheel
For vehicles with a tilt steering wheel, it allows you to
lower or raise the steering wheel to give your legs more
room when entering or exiting the vehicle. Do not adjust
the steering wheel while driving.
The lever is located on the lower left side of the steering
column.
To tilt the wheel, hold the steering wheel and pull
the lever. Move the steering wheel to a comfortable
level, then release the lever to lock the wheel in place.
Turn Signal/Multifunction Lever
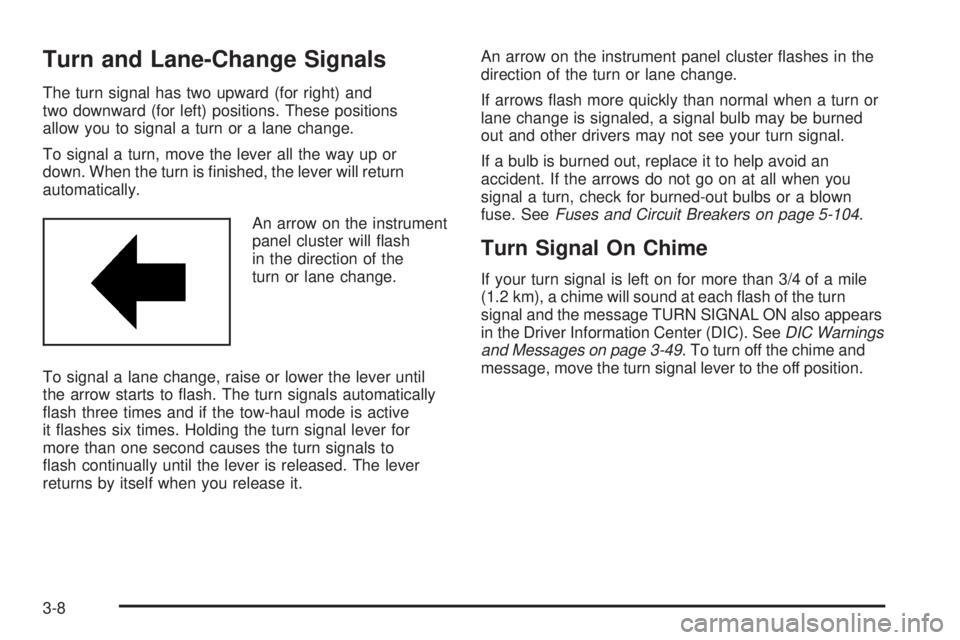
The lever on the left side of the steering column
includes the following:
•GTurn and Lane Change Signals.Turn and
Lane-Change Signals on page 3-8.
•53Headlamp High/Low-Beam Changer.
Headlamp High/Low-Beam Changer on page 3-9.
•Flash-to-Pass Feature. SeeFlash-to-Pass on
page 3-9.
•NWindshield Wipers. SeeWindshield Wipers on
page 3-9.
•LWindshield Washer. SeeWindshield Washer
on page 3-10.
3-7
Page 122 of 402
Turn and Lane-Change Signals
The turn signal has two upward (for right) and
two downward (for left) positions. These positions
allow you to signal a turn or a lane change.
To signal a turn, move the lever all the way up or
down. When the turn is finished, the lever will return
automatically.
An arrow on the instrument
panel cluster will flash
in the direction of the
turn or lane change.
To signal a lane change, raise or lower the lever until
the arrow starts to flash. The turn signals automatically
flash three times and if the tow-haul mode is active
it flashes six times. Holding the turn signal lever for
more than one second causes the turn signals to
flash continually until the lever is released. The lever
returns by itself when you release it.An arrow on the instrument panel cluster flashes in the
direction of the turn or lane change.
If arrows flash more quickly than normal when a turn or
lane change is signaled, a signal bulb may be burned
out and other drivers may not see your turn signal.
If a bulb is burned out, replace it to help avoid an
accident. If the arrows do not go on at all when you
signal a turn, check for burned-out bulbs or a blown
fuse. SeeFuses and Circuit Breakers on page 5-104.
Turn Signal On Chime
If your turn signal is left on for more than 3/4 of a mile
(1.2 km), a chime will sound at each flash of the turn
signal and the message TURN SIGNAL ON also appears
in the Driver Information Center (DIC). SeeDIC Warnings
and Messages on page 3-49. To turn off the chime and
message, move the turn signal lever to the off position.
3-8
Page 123 of 402
Headlamp High/Low-Beam Changer
23(Headlamp High/Low-Beam Changer):
To change the headlamps from low to high beam,
pull the multifunction lever all the way toward you.
Then release it.
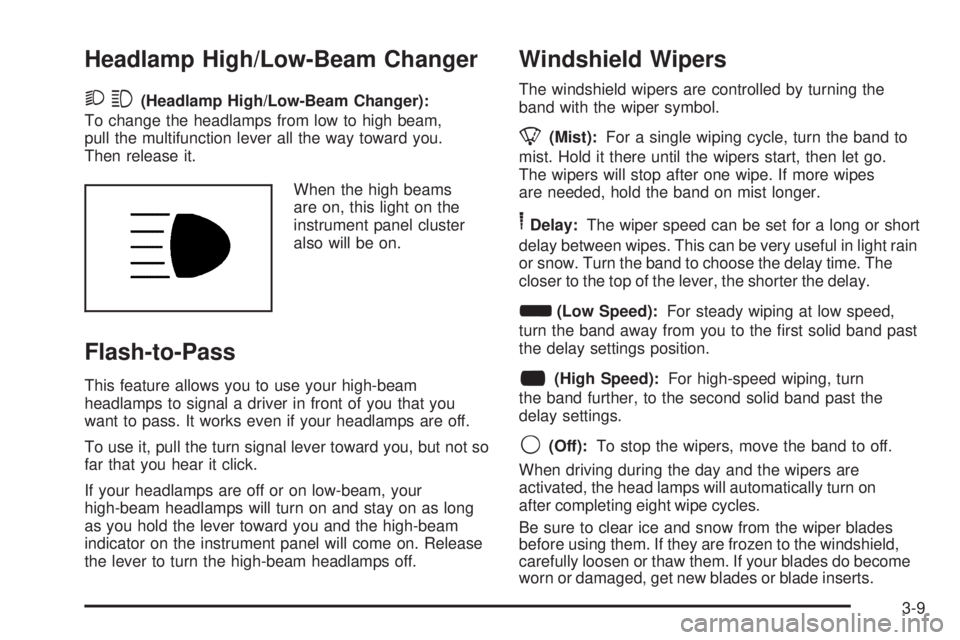
When the high beams
are on, this light on the
instrument panel cluster
also will be on.
Flash-to-Pass
This feature allows you to use your high-beam
headlamps to signal a driver in front of you that you
want to pass. It works even if your headlamps are off.
To use it, pull the turn signal lever toward you, but not so
far that you hear it click.
If your headlamps are off or on low-beam, your
high-beam headlamps will turn on and stay on as long
as you hold the lever toward you and the high-beam
indicator on the instrument panel will come on. Release
the lever to turn the high-beam headlamps off.
Windshield Wipers
The windshield wipers are controlled by turning the
band with the wiper symbol.
8(Mist):For a single wiping cycle, turn the band to
mist. Hold it there until the wipers start, then let go.
The wipers will stop after one wipe. If more wipes
are needed, hold the band on mist longer.
6Delay:The wiper speed can be set for a long or short
delay between wipes. This can be very useful in light rain
or snow. Turn the band to choose the delay time. The
closer to the top of the lever, the shorter the delay.
d(Low Speed):For steady wiping at low speed,
turn the band away from you to the first solid band past
the delay settings position.
a(High Speed):For high-speed wiping, turn
the band further, to the second solid band past the
delay settings.
9(Off):To stop the wipers, move the band to off.
When driving during the day and the wipers are
activated, the head lamps will automatically turn on
after completing eight wipe cycles.
Be sure to clear ice and snow from the wiper blades
before using them. If they are frozen to the windshield,
carefully loosen or thaw them. If your blades do become
worn or damaged, get new blades or blade inserts.
3-9
Page 128 of 402
AUTO (Automatic):Turn the control to this position
to automatically turn on the headlamps at normal
brightness, together with the following:
•Parking Lamps
•Instrument Panel Lights
•Taillamps
•License Plate Lamps
;(Parking Lamps):Turn the control to this position
to turn on the parking lamps together with the
following:
•Instrument Panel Lights
•Taillamps
•License Plate Lamps
2(Headlamps):Turn the control to this position to
turn on the headlamps together with the following lamps
listed below.
•Parking Lamps
•Instrument Panel Lights
•Taillamps
•License Plate LampsWhen the headlamps are turned on while the vehicle is
on, the headlamps will turn off automatically 10 minutes
after the ignition is turned off. When the headlamps are
turned on while the vehicle is off, the headlamps will
continue to stay on. To prevent the battery from being
drained, turn the control to the off position.
A warning chime sounds if the driver’s door is opened
while the ignition switch is off and the headlamps are on.
To change the headlamps from low beam to high
beam, push the turn signal/multifunction lever toward
the instrument panel.
Headlamps on Reminder
If a door is open, a reminder chime sounds when the
headlamps or parking lamps are manually turned on
and the key is out of the ignition. To turn off the chime,
turn the headlamp switch to off or auto and then
back on, or close and re-open the door. In the auto
mode, the headlamps turn off once the ignition is
in LOCK/OFF or may remain on until the headlamp
delay ends, if enabled in the Driver Information
Center (DIC). See “Exit Lighting” underDIC Vehicle
Customization on page 3-58.
3-14
Page 138 of 402
Mode Control:Turn the center knob clockwise or
counterclockwise to change the direction of the airflow
in the rear seating area.
To change the current mode, select one of the following:
H(Vent):This mode directs air to the upper outlets,
with a little air directed to the floor outlets.
2(Floor):This mode directs most of the air to the
floor outlets.
Temperature Control:Turn the right knob clockwise
or counterclockwise to increase or decrease the
temperature in the rear-seating area.
The air-conditioning system on the main climate control
panel must be turned on to direct cooled air to the
rear of the vehicle. If it is not on, then the temperature
in the rear of the vehicle remains at cabin temperature.
Be sure to keep the area under the front seats clear
of any objects so that the air inside of your vehicle can
circulate effectively.
For information on how to use the main climate control
system, seeClimate Control System on page 3-19.
For information on ventilation, seeOutlet Adjustment
on page 3-21.
Warning Lights, Gages, and
Indicators
This part describes the warning lights and gages that
may be on your vehicle. The pictures will help you
locate them.
Warning lights and gages can signal that something
is wrong before it becomes serious enough to cause an
expensive repair or replacement. Paying attention to
your warning lights and gages could also save you
or others from injury.
Warning lights come on when there may be or is a
problem with one of your vehicle’s functions. As you
will see in the details on the next few pages, some
warning lights come on briefly when you start the engine
just to let you know they’re working. If you are familiar
with this section, you should not be alarmed when
this happens.
Gages can indicate when there may be or is a problem
with one of your vehicle’s functions. Often gages and
warning lights work together to let you know when
there’s a problem with your vehicle.
When one of the warning lights comes on and stays
on when you are driving, or when one of the gages shows
there may be a problem, check the section that tells you
what to do about it. Please follow this manual’s advice.
Waiting to do repairs can be costly – and even
dangerous. So please get to know your warning lights
and gages. They’re a big help.
3-24
Page 171 of 402
TIRE LEARNING ACTIVE
If your vehicle has the Tire Pressure Monitor
System (TPMS), this message displays when the
system is re-learning the tire positions on your vehicle.
SeeDIC Operation and Displays on page 3-42for more
information. The tire positions must be re-learned after
rotating the tires or after replacing a tire or sensor. See
Tire Inspection and Rotation on page 5-68,Tire Pressure
Monitor System on page 5-62, andInflation - Tire
Pressure on page 5-60for more information.
TRACTION CONTROL OFF
If your vehicle has StabiliTrak®, this message displays
when the Traction Control System (TCS) is turned
off. Adjust your driving accordingly. SeeStabiliTrak
®
System on page 4-5for more information.
TRANSMISSION HOT IDLE ENGINE
Notice:If you drive your vehicle while the
transmission �uid is overheating and the
transmission temperature warning is displayed
on the instrument panel cluster and/or DIC, you
can damage the transmission. This could lead
to costly repairs that would not be covered by
your warranty. Do not drive your vehicle with
overheated transmission �uid or while the
transmission temperature warning is displayed.This message displays along with a chime if the
transmission fluid in the vehicle gets hot. Driving with the
transmission fluid temperature high can cause damage
to the vehicle. Stop the vehicle and let it idle to allow the
transmission to cool. This message clears and the chime
stops when the fluid temperature reaches a safe level.
TURN SIGNAL ON
This message displays and a chime sounds if a turn
signal is left on for 3/4 of a mile (1.2 km). Move the turn
signal/multifunction lever to the off position.
WAIT TO START
This message displays briefly when the theft-deterrent
system has initially found incorrect conditions within
the vehicle and is making a double check. If your vehicle
does not start soon after, try to start it again. If it still
does not start, have your vehicle serviced by your
dealer/retailer.
3-57