radiator GMC SAVANA PASSENGER 2009 Owners Manual
[x] Cancel search | Manufacturer: GMC, Model Year: 2009, Model line: SAVANA PASSENGER, Model: GMC SAVANA PASSENGER 2009Pages: 406, PDF Size: 2.34 MB
Page 243 of 406
Service............................................................5-3
Accessories and Modifications..........................5-3
California Proposition 65 Warning.....................5-4
California Perchlorate Materials Requirements.....5-4
Doing Your Own Service Work.........................5-4
Adding Equipment to the Outside of the
Vehicle......................................................5-5
Fuel................................................................5-5
Gasoline Octane............................................5-6
Gasoline Specifications....................................5-6
California Fuel...............................................5-6
Additives.......................................................5-7
Fuel E85 (85% Ethanol)..................................5-8
Fuels in Foreign Countries...............................5-9
Filling the Tank............................................5-10
Filling a Portable Fuel Container.....................5-12
Checking Things Under the Hood....................5-12
Hood Release..............................................5-13
Engine Compartment Overview.......................5-14
Engine Oil...................................................5-15
Engine Oil Life System..................................5-18
Engine Air Cleaner/Filter................................5-20
Automatic Transmission Fluid.........................5-21
Cooling System............................................5-24
Engine Coolant.............................................5-25Radiator Pressure Cap..................................5-31
Engine Overheating.......................................5-31
Engine Fan Noise.........................................5-33
Power Steering Fluid.....................................5-34
Windshield Washer Fluid................................5-35
Brakes........................................................5-36
Battery........................................................5-39
Jump Starting...............................................5-40
All-Wheel Drive..............................................5-45
Rear Axle
.......................................................5-46
Front Axle......................................................5-46
Noise Control System.....................................5-47
Tampering with Noise Control System
Prohibited.................................................5-47
Bulb Replacement..........................................5-49
Halogen Bulbs..............................................5-49
Headlamps..................................................5-49
Front Turn Signal, Sidemarker and
Parking Lamps..........................................5-51
Center High-Mounted Stoplamp (CHMSL).........5-52
Taillamps.....................................................5-52
Replacement Bulbs.......................................5-53
Windshield Wiper Blade Replacement..............5-54
Section 5 Service and Appearance Care
5-1
Page 257 of 406
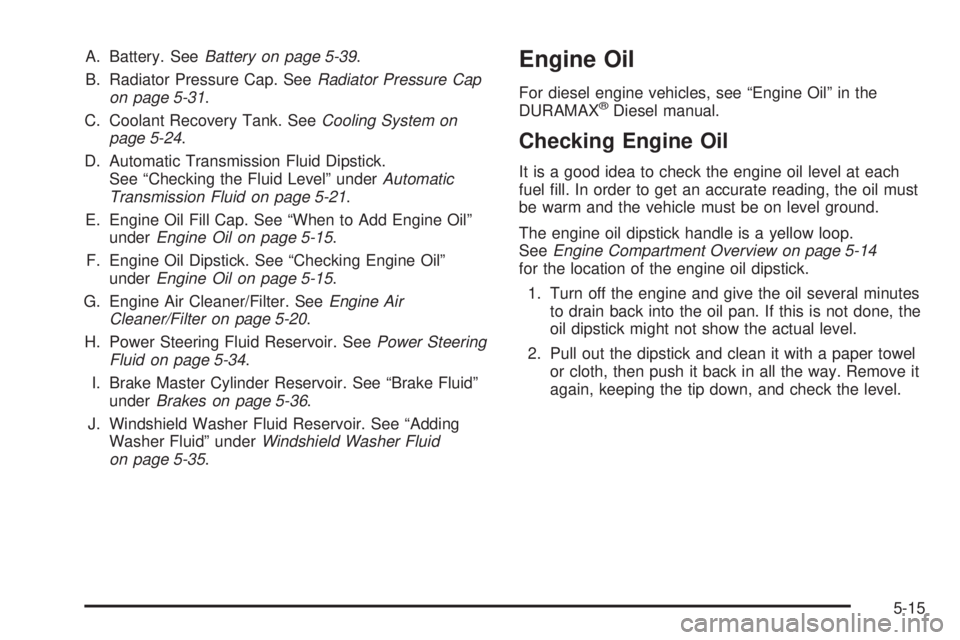
A. Battery. SeeBattery on page 5-39.
B. Radiator Pressure Cap. SeeRadiator Pressure Cap
on page 5-31.
C. Coolant Recovery Tank. SeeCooling System on
page 5-24.
D. Automatic Transmission Fluid Dipstick.
See “Checking the Fluid Level” underAutomatic
Transmission Fluid on page 5-21.
E. Engine Oil Fill Cap. See “When to Add Engine Oil”
underEngine Oil on page 5-15.
F. Engine Oil Dipstick. See “Checking Engine Oil”
underEngine Oil on page 5-15.
G. Engine Air Cleaner/Filter. SeeEngine Air
Cleaner/Filter on page 5-20.
H. Power Steering Fluid Reservoir. SeePower Steering
Fluid on page 5-34.
I. Brake Master Cylinder Reservoir. See “Brake Fluid”
underBrakes on page 5-36.
J. Windshield Washer Fluid Reservoir. See “Adding
Washer Fluid” underWindshield Washer Fluid
on page 5-35.Engine Oil
For diesel engine vehicles, see “Engine Oil” in the
DURAMAX®Diesel manual.
Checking Engine Oil
It is a good idea to check the engine oil level at each
fuel fill. In order to get an accurate reading, the oil must
be warm and the vehicle must be on level ground.
The engine oil dipstick handle is a yellow loop.
SeeEngine Compartment Overview on page 5-14
for the location of the engine oil dipstick.
1. Turn off the engine and give the oil several minutes
to drain back into the oil pan. If this is not done, the
oil dipstick might not show the actual level.
2. Pull out the dipstick and clean it with a paper towel
or cloth, then push it back in all the way. Remove it
again, keeping the tip down, and check the level.
5-15
Page 266 of 406
How to Add Automatic
Transmission Fluid
Refer to the Maintenance Schedule to determine what
kind of transmission fluid to use. SeeRecommended
Fluids and Lubricants on page 6-14.
Using a funnel, add fluid down the transmission dipstick
tube only after checking the transmission fluid while it is
hot. A cold check is used only as a reference. If the fluid
level is low, add only enough of the proper fluid to bring
the level up to the HOT area for a hot check. It does not
take much fluid, generally less than one pint (0.5 L).
Do not overfill.
Notice:Use of the incorrect automatic transmission
�uid may damage the vehicle, and the damages may
not be covered by the vehicle’s warranty. Always
use the automatic transmission �uid listed in
Recommended Fluids and Lubricants on page 6-14.
•After adding fluid, recheck the fluid level as described
under “How to Check Automatic Transmission Fluid,”
earlier in this section.
•When the correct fluid level is obtained, push the
dipstick back in all the way; then flip the handle down
to lock the dipstick in place.
Cooling System
If your vehicle has a diesel engine, see “Van Models”
under “Cooling System” in the DURAMAX®Diesel
Supplement.
The Cooling System allows the engine to maintain the
correct working temperature.
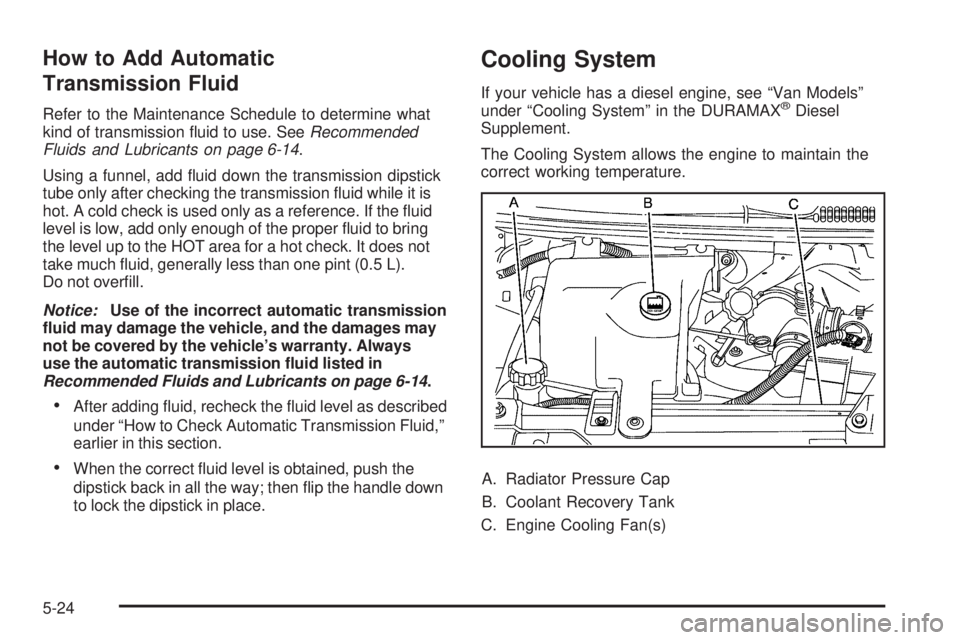
A. Radiator Pressure Cap
B. Coolant Recovery Tank
C. Engine Cooling Fan(s)
5-24
Page 267 of 406
{CAUTION:
An electric engine cooling fan under the hood can
start up even when the engine is not running and
can cause injury. Keep hands, clothing, and tools
away from any underhood electric fan.
{CAUTION:
Heater, fuel operated heater (FOH), radiator
hoses, and other engine parts, can be very hot.
Do not touch them. If you do, you can be burned.
Do not run the engine if there is a leak. If you run
the engine, it could lose all coolant. That could
cause an engine fire, and you could be burned.
Get any leak fixed before you drive the vehicle.Notice:Using coolant other than DEX-COOL may
cause premature engine, heater core, radiator and
fuel operated heater (FOH) corrosion. In addition,
the engine coolant may require changing sooner, at
30,000 miles (50 000 km) or 24 months, whichever
occurs �rst. Any repairs would not be covered by
your warranty. Always use DEX-COOL (silicate-free)
coolant in your vehicle.
Engine Coolant
The cooling system in the vehicle is filled with
DEX-COOL®engine coolant. This coolant is designed
to remain in the vehicle for five years or 150,000 miles
(240 000 km), whichever occurs first.
The following explains the cooling system and how to
check and add coolant when it is low. If there is a
problem with engine overheating, seeEngine
Overheating on page 5-31.
5-25
Page 268 of 406
What to Use
{CAUTION:
Adding only plain water to the cooling system can
be dangerous. Plain water, or some other liquid
such as alcohol, can boil before the proper coolant
mixture will. The vehicle’s coolant warning system
is set for the proper coolant mixture. With plain
water or the wrong mixture, the engine could get
too hot but you would not get the overheat
warning. The engine could catch fire and you or
others could be burned. Use a 50/50 mixture of
clean, drinkable water and DEX-COOL
®coolant.
Use a 50/50 mixture of clean, drinkable water and
DEX-COOL
®coolant. If using this mixture, nothing else
needs to be added. This mixture:
•Gives freezing protection down to−34°F (−37°C),
outside temperature.
•Gives boiling protection up to 265°F (129°C),
engine temperature.
•Protects against rust and corrosion.
•Will not damage aluminum parts.
•Helps keep the proper engine temperature.
Notice:If an improper coolant mixture is used,
the engine could overheat and be badly damaged.
The repair cost would not be covered by the vehicle
warranty. Too much water in the mixture can freeze
and crack the engine, radiator, heater core, and
other parts.
Notice:If extra inhibitors and/or additives are used
in the vehicle’s cooling system, the vehicle could
be damaged. Use only the proper mixture of
the engine coolant listed in this manual for the
cooling system. SeeRecommended Fluids and
Lubricants on page 6-14for more information.
5-26
Page 270 of 406
How to Add Coolant to the Radiator
If your vehicle has a diesel engine, see “How to
Add Coolant to the Radiator” under “Van Models” in
the Cooling System section of the DURAMAX
®Diesel
Supplement for the proper radiator fill procedure.
{CAUTION:
An electric engine cooling fan under the hood can
start up even when the engine is not running and
can cause injury. Keep hands, clothing, and tools
away from any underhood electric fan.
{CAUTION:
Steam and scalding liquids from a hot cooling
system can blow out and burn you badly. They are
under pressure, and if you turn the surge tank
pressure cap — even a little — they can come out
at high speed. Never turn the cap when the cooling
system, including the surge tank pressure cap, is
hot. Wait for the cooling system and surge tank
pressure cap to cool if you ever have to turn the
pressure cap.
If coolant is needed, add the proper mixture directly to
the radiator, but be sure the cooling system is cool
before this is done.
5-28
Page 271 of 406
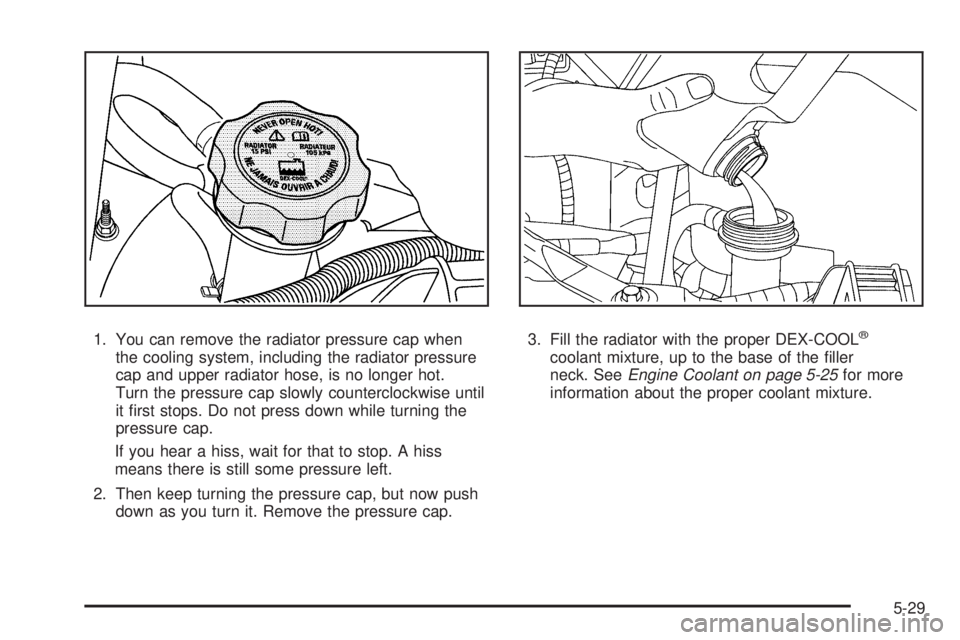
1. You can remove the radiator pressure cap when
the cooling system, including the radiator pressure
cap and upper radiator hose, is no longer hot.
Turn the pressure cap slowly counterclockwise until
it first stops. Do not press down while turning the
pressure cap.
If you hear a hiss, wait for that to stop. A hiss
means there is still some pressure left.
2. Then keep turning the pressure cap, but now push
down as you turn it. Remove the pressure cap.3. Fill the radiator with the proper DEX-COOL®
coolant mixture, up to the base of the filler
neck. SeeEngine Coolant on page 5-25for more
information about the proper coolant mixture.
5-29
Page 272 of 406
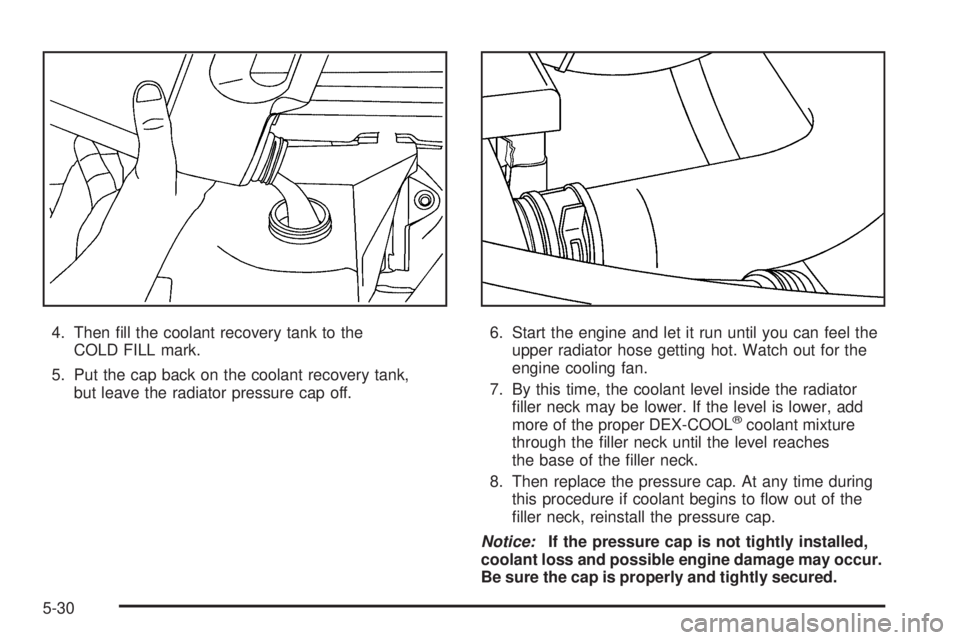
4. Then fill the coolant recovery tank to the
COLD FILL mark.
5. Put the cap back on the coolant recovery tank,
but leave the radiator pressure cap off.6. Start the engine and let it run until you can feel the
upper radiator hose getting hot. Watch out for the
engine cooling fan.
7. By this time, the coolant level inside the radiator
filler neck may be lower. If the level is lower, add
more of the proper DEX-COOL
®coolant mixture
through the filler neck until the level reaches
the base of the filler neck.
8. Then replace the pressure cap. At any time during
this procedure if coolant begins to flow out of the
filler neck, reinstall the pressure cap.
Notice:If the pressure cap is not tightly installed,
coolant loss and possible engine damage may occur.
Be sure the cap is properly and tightly secured.
5-30
Page 273 of 406
Radiator Pressure Cap
The radiator pressure cap is located near the center of
the engine compartment. SeeEngine Compartment
Overview on page 5-14for more information on location.
Notice:If the pressure cap is not tightly installed,
coolant loss and possible engine damage may
occur. Be sure the cap is properly and tightly
secured.
Engine Overheating
If your vehicle has the DURAMAX Diesel engine, see
the DURAMAX Diesel manual for more information.
The vehicle has an indicator to warn of engine
overheating.
You will find an engine coolant temperature gage on
your vehicle’s instrument panel. SeeEngine Coolant
Temperature Gage on page 3-33for more information.You may decide not to lift the hood when this warning
appears, but instead get service help right away.
SeeRoadside Assistance Program on page 7-7.
If you do decide to lift the hood, make sure the vehicle
is parked on a level surface.
Then check to see if the engine cooling fans are
running. If the engine is overheating, both fans should
be running. If they are not, do not continue to run
the engine and have the vehicle serviced.
See if the engine cooling fan speed increases when idle
speed is doubled by pushing the accelerator pedal down.
If it does not, your vehicle needs service. Turn off the
engine.
Notice:Engine damage from running the engine
without coolant is not covered by the warranty.
Notice:If the engine catches �re because of being
driven with no coolant, your vehicle can be badly
damaged. The costly repairs would not be covered
by the vehicle warranty.
5-31
Page 292 of 406
4. Lift the inboard side of the headlamp to release the
inboard tab from the radiator support.
5. Lift the outboard side of the headlamp to release
the outboard tab from the radiator support.
6. Lower the headlamp to allow the vertical adjustor to
clear the tie bar.
7. Turn the headlamp forward and upward to remove
it from the grille.
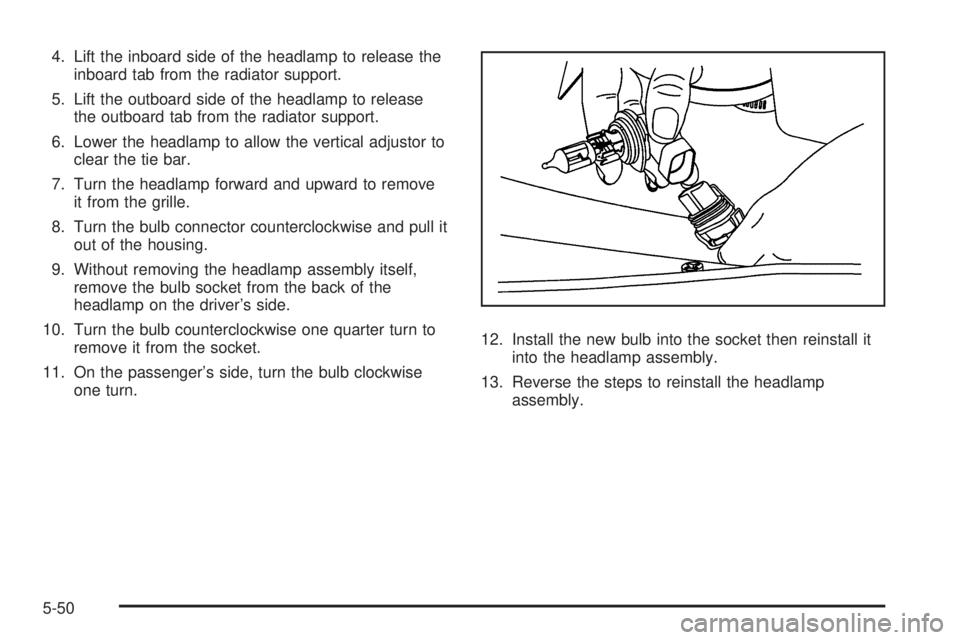
8. Turn the bulb connector counterclockwise and pull it
out of the housing.
9. Without removing the headlamp assembly itself,
remove the bulb socket from the back of the
headlamp on the driver’s side.
10. Turn the bulb counterclockwise one quarter turn to
remove it from the socket.
11. On the passenger’s side, turn the bulb clockwise
one turn.12. Install the new bulb into the socket then reinstall it
into the headlamp assembly.
13. Reverse the steps to reinstall the headlamp
assembly.
5-50