radio GMC SAVANA PASSENGER 2012 User Guide
[x] Cancel search | Manufacturer: GMC, Model Year: 2012, Model line: SAVANA PASSENGER, Model: GMC SAVANA PASSENGER 2012Pages: 424, PDF Size: 6.28 MB
Page 121 of 424
Black plate (7,1)GMC Savana Owner Manual - 2012 - 2nd - 11/11/11
Instruments and Controls 5-7
Clock
AM/FM Radio with Optional
CD Player
If the vehicle has an AM/FM radio
with an optional CD player, it has a
Hbutton for setting the time. With
these types of radios, the clock can
be set with either the radio turned
on or off.
Set the time by following these
steps:
1. Press
Huntil the hour begins
flashing on display. Press this
button a second time and the
minutes begin flashing on
display.
Press
Ha third time and the
12HR or 24HR time format
begins flashing. 2. While either the hour or the
minutes are flashing, turn the
fknob, located on the upper
right side of the radio, clockwise
or counterclockwise to increase
or decrease the time. While the
12HR or 24HR time format is
flashing, turn the
fknob
clockwise or counterclockwise to
select the default time settings.
3. Press
Hagain until the clock
display stops flashing to set the
currently displayed time;
otherwise, the flashing stops
after five seconds and the
current time displayed is
automatically set.
MP3 Radio with a Single CD
Player
If the vehicle has a radio with a
single CD (MP3) player, the radio
has a
Hbutton for setting the time
and date. To set the time and date, follow the
instructions:
1. Press
Hand the HR, MIN, MM,
DD, YYYY (hour, minute, month,
day, and year) displays.
2. Press the softkey located under any one of the tabs that you
want to change. Every time the
softkey is pressed again, the
time or the date if selected,
increases by one.
Another way to increase the time
or date, is to press
¨SEEK or
\FWD (forward).
3. To decrease, press
©SEEK or
sREV. You can also turn thefknob, located on the upper
right side of the radio, to adjust
the selected setting.
Page 122 of 424
Black plate (8,1)GMC Savana Owner Manual - 2012 - 2nd - 11/11/11
5-8 Instruments and Controls
Changing the Time and Date
Default Settings
You can change the time default
setting from 12 hours to 24 hours or
change the date default setting from
month/day/year to day/month/year.
To change the time or date default
settings, follow these instructions:
1. Press
Hand then the softkey
located under the forward arrow
that is currently displayed on the
radio screen until the time
12H (hour) and 24H (hour), and
the date MM/DD (month and
day) and DD/MM (day and
month) are displayed.
2. Press the softkey located under the desired option.
3. Press
Hagain to apply the
selected default, or let the
screen time out.
MP3 Radio with a Six-Disc CD
Player
If the vehicle has a radio with a
six-disc CD player, the radio has a
MENU button instead of
Hto set
the time and date.
To set the time and date, follow
these instructions:
1. Press the MENU button. Once
the
Hoption displays, press the
softkey located under that tab.
The HR, MIN, MM, DD, YYYY
(hour, minute, month, day, and
year) displays.
2. Press the softkey located under any one of the tabs to change.
Every time the softkey is
pressed again, the time or the
date if selected, increases
by one.
Another way to increase the time
or date, is to press
¨SEEK or
\FWD (forward). 3. To decrease, press
©SEEK or
sREV, or turn thefknob,
located on the upper right side of
the radio, to adjust the selected
setting.
Changing the Time and Date
Default Settings
To change the time default setting
from 12 hours to 24 hours or change
the date default setting from month/
day/year to day/month/year.
To change the time or date default
settings, follow these instructions:
1. Press the MENU button. Once
the
Hoption displays, press the
softkey located under the
forward arrow that is currently
displayed on the radio screen
until the 12H (hour) and 24H
(hour), and the date MM/DD
(month and day) and DD/MM
(day and month) displays.
2. Press the softkey located under the desired option.
Page 134 of 424
Black plate (20,1)GMC Savana Owner Manual - 2012 - 2nd - 11/11/11
5-20 Instruments and Controls
Charging System Light
This light comes on briefly when the
ignition key is turned to START, but
the engine is not running, as a
check to show it is working.
If it does not, have the vehicle
serviced by your dealer.
The light should go out once the
engine starts. If it stays on,
or comes on while driving, there
could be a problem with the
charging system. A charging system
message in the Driver Information
Center (DIC) can also appear. See
Battery Voltage and Charging
Messages on page 5‑34for more
information. This light could indicate
that there are problems with a
generator drive belt, or that there is
an electrical problem. Have it checked right away. If the
vehicle must be driven a short
distance with the light on, turn off
accessories, such as the radio and
air conditioner.
Malfunction
Indicator Lamp
A computer system called OBD II
(On-Board Diagnostics-Second
Generation) monitors the operation
of the vehicle to ensure emissions
are at acceptable levels, to produce
a cleaner environment. This light
comes on when the vehicle is
placed in ON/RUN, as a check to
show it is working. If it does not,
have the vehicle serviced by your
dealer. See
Ignition Positions on
page 9‑16.
If the malfunction indicator lamp
comes on and stays on while the
engine is running, this indicates that
there is an OBD II problem and
service is required.
Malfunctions often are indicated by
the system before any problem is
apparent. Being aware of the light
can prevent more serious damage
to the vehicle. This system assists
the service technician in correctly
diagnosing any malfunction.
Notice: If the vehicle is
continually driven with this light
on, the emission controls might
not work as well, the vehicle fuel
economy might not be as good,
and the engine might not run as
smoothly. This could lead to
costly repairs that might not be
covered by the vehicle warranty.
Page 165 of 424
Black plate (3,1)GMC Savana Owner Manual - 2012 - 2nd - 11/11/11
Lighting 6-3
Flash-to-Pass
This feature is used to signal to the
vehicle ahead that you want
to pass.
If the headlamps are off or in the
low‐beam position, pull the turn
signal lever toward you to
momentarily switch to high beams.
Release the lever to turn the
high-beam headlamps off.
Daytime Running
Lamps (DRL)
DRL can make it easier for others to
see the front of the vehicle during
the day. Fully functional daytime
running lamps are required on all
vehicles first sold in Canada.The DRL system comes on in
daylight when the following
conditions are met:
.The ignition is on.
.The exterior lamp control is in
the AUTO position.
.The shift lever is not in P (Park).
.The light sensor determines it is
daytime.
When the DRL are on, the taillamps,
sidemarker, instrument panel lights,
and other lamps will not be on.
The automatic headlamp system
automatically switches from DRL to
the headlamps depending on the
darkness of the surroundings.
To turn off the DRL, turn the exterior
lamp control to
Oand then release
it. For vehicles first sold in Canada,
the transmission must be in the
P (Park) position, before the DRL
can be turned off.
Automatic Headlamp
System
When it is dark enough outside and
the headlamp switch is in AUTO,
the automatic headlamp system
turns on the headlamps, along with
the taillamps, sidemarker lamps,
parking lamps, and the instrument
panel lights. The radio lights will
also be dim.
To turn off the automatic headlamp
system, turn the exterior lamp
control to the off position and then
release. For vehicles first sold in
Canada, the transmission must be
in the P (Park) position, before the
automatic headlamp system can be
turned off.
Page 167 of 424
Black plate (5,1)GMC Savana Owner Manual - 2012 - 2nd - 11/11/11
Lighting 6-5
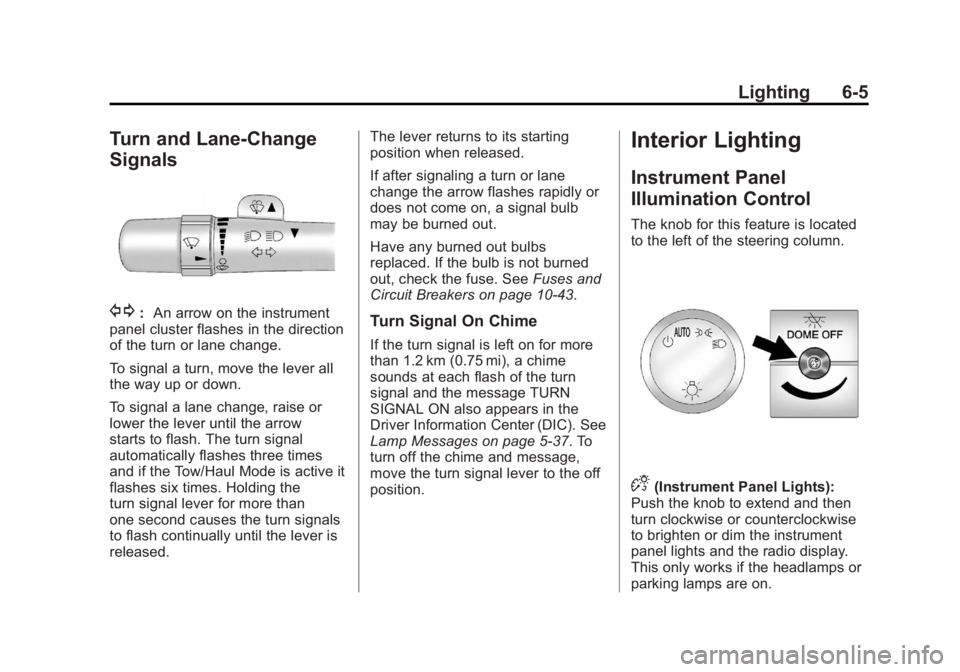
Turn and Lane-Change
Signals
G:An arrow on the instrument
panel cluster flashes in the direction
of the turn or lane change.
To signal a turn, move the lever all
the way up or down.
To signal a lane change, raise or
lower the lever until the arrow
starts to flash. The turn signal
automatically flashes three times
and if the Tow/Haul Mode is active it
flashes six times. Holding the
turn signal lever for more than
one second causes the turn signals
to flash continually until the lever is
released. The lever returns to its starting
position when released.
If after signaling a turn or lane
change the arrow flashes rapidly or
does not come on, a signal bulb
may be burned out.
Have any burned out bulbs
replaced. If the bulb is not burned
out, check the fuse. See
Fuses and
Circuit Breakers on page 10‑43.Turn Signal On Chime
If the turn signal is left on for more
than 1.2 km (0.75 mi), a chime
sounds at each flash of the turn
signal and the message TURN
SIGNAL ON also appears in the
Driver Information Center (DIC). See
Lamp Messages on page 5‑37. To
turn off the chime and message,
move the turn signal lever to the off
position.
Interior Lighting
Instrument Panel
Illumination Control
The knob for this feature is located
to the left of the steering column.
D(Instrument Panel Lights):
Push the knob to extend and then
turn clockwise or counterclockwise
to brighten or dim the instrument
panel lights and the radio display.
This only works if the headlamps or
parking lamps are on.
Page 171 of 424
Black plate (1,1)GMC Savana Owner Manual - 2012 - 2nd - 11/15/11
Infotainment System 7-1
Infotainment
System
Introduction
Infotainment . . . . . . . . . . . . . . . . . . . 7-1
Theft-Deterrent Feature . . . . . . . 7-2
Operation . . . . . . . . . . . . . . . . . . . . . 7-3
Radio
AM-FM Radio . . . . . . . . . . . . . . . . . 7-7
Satellite Radio . . . . . . . . . . . . . . . . 7-9
Radio Reception . . . . . . . . . . . . . 7-10
Fixed Mast Antenna(Multi-Band) . . . . . . . . . . . . . . . . 7-11
Fixed Mast Antenna (Care) . . . . . . . . . . . . . 7-11
Audio Players
CD Player . . . . . . . . . . . . . . . . . . . 7-12
Auxiliary Devices . . . . . . . . . . . . 7-17
Phone
Bluetooth . . . . . . . . . . . . . . . . . . . . 7-22
Introduction
Infotainment
If the vehicle came without a radio,
the wiring provisions for a radio and
an antenna were installed at the
assembly plant, so that if you want,
a radio can be installed at the
dealer. Determine which radio the vehicle
has and read the following pages to
become familiar with its features.{WARNING
Taking your eyes off the road for
extended periods could cause a
crash resulting in injury or death
to you or others. Do not give
extended attention to infotainment
tasks while driving.
This system provides access to
many audio and non‐audio listings.
Page 172 of 424
Black plate (2,1)GMC Savana Owner Manual - 2012 - 2nd - 11/15/11
7-2 Infotainment System
To minimize taking your eyes off the
road while driving, do the following
while the vehicle is parked:
.Become familiar with the
operation and controls of the
audio system.
.Set up the tone, speaker
adjustments, and preset radio
stations.
For more information, see Defensive
Driving on page 9‑3.
Notice: Contact your dealer
before adding any equipment.
Adding audio or communication
equipment could interfere with
the operation of the engine, radio,
or other systems, and could
damage them. Follow federal
rules covering mobile radio and
telephone equipment. Notice:
The chime signals related
to safety belts, parking brake, and
other functions of the vehicle
operate through the radio/
entertainment system. If that
equipment is replaced or
additional equipment is added to
the vehicle, the chimes may not
work. Make sure that replacement
or additional equipment is
compatible with the vehicle
before installing it. See
Accessories and Modifications on
page 10‑3.
The vehicle has Retained
Accessory Power (RAP). With RAP,
the audio system can be played
even after the ignition is turned off.
See Retained Accessory Power
(RAP) on page 9‑21 for more
information.
Theft-Deterrent Feature
The theft-deterrent feature works by
learning a portion of the Vehicle
Identification Number (VIN) to
the infotainment system. The
infotainment system does not
operate if it is stolen or moved to a
different vehicle.
Page 173 of 424
Black plate (3,1)GMC Savana Owner Manual - 2012 - 2nd - 11/15/11
Infotainment System 7-3
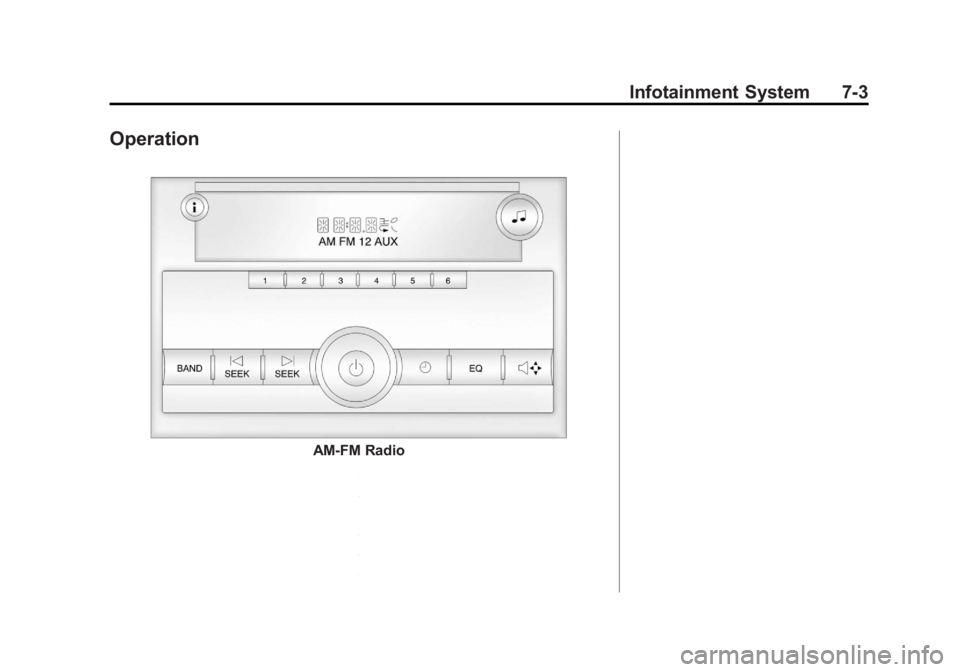
Operation
AM-FM Radio
Page 174 of 424
Black plate (4,1)GMC Savana Owner Manual - 2012 - 2nd - 11/15/11
7-4 Infotainment System
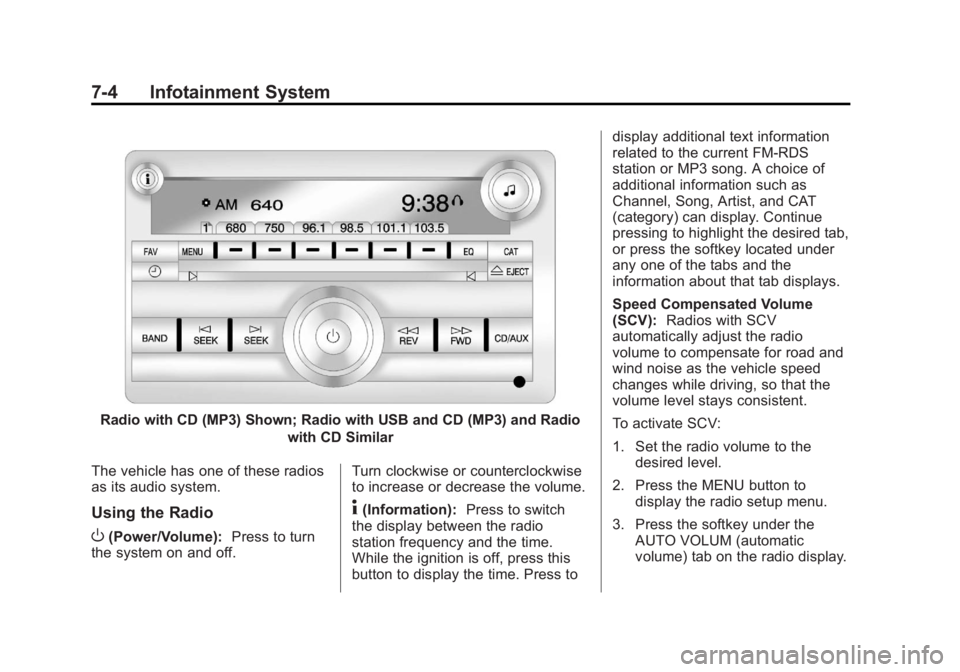
Radio with CD (MP3) Shown; Radio with USB and CD (MP3) and Radiowith CD Similar
The vehicle has one of these radios
as its audio system.
Using the Radio
O(Power/Volume): Press to turn
the system on and off. Turn clockwise or counterclockwise
to increase or decrease the volume.
4(Information):
Press to switch
the display between the radio
station frequency and the time.
While the ignition is off, press this
button to display the time. Press to display additional text information
related to the current FM-RDS
station or MP3 song. A choice of
additional information such as
Channel, Song, Artist, and CAT
(category) can display. Continue
pressing to highlight the desired tab,
or press the softkey located under
any one of the tabs and the
information about that tab displays.
Speed Compensated Volume
(SCV):
Radios with SCV
automatically adjust the radio
volume to compensate for road and
wind noise as the vehicle speed
changes while driving, so that the
volume level stays consistent.
To activate SCV:
1. Set the radio volume to the desired level.
2. Press the MENU button to display the radio setup menu.
3. Press the softkey under the AUTO VOLUM (automatic
volume) tab on the radio display.
Page 175 of 424
Black plate (5,1)GMC Savana Owner Manual - 2012 - 2nd - 11/15/11
Infotainment System 7-5
4. Press the softkey under thedesired Speed Compensated
Volume setting (OFF, Low, Med,
or High) to select the level of
radio volume compensation.
The display times out after
approximately 10 seconds. Each
higher setting allows for more
radio volume compensation at
faster vehicle speeds.
Setting the Tone (Bass/Treble)
(AM-FM Radio and AM-FM
Radio with CD)
To adjust the bass or treble:
1. Press the
fknob until Bass or
Treble displays.
2. To adjust the setting, do one of the following:
.Turn thefknob.
.Press either¨SEEK,
or
©SEEK. EQ (Equalization):
Press this
button to choose bass and treble
equalization settings designed for
different types of music. Selecting
MANUAL, or changing bass or
treble, returns the EQ to the manual
bass and treble settings.
Unique EQ settings can be saved
for each source.
Setting the Tone (Bass/
Midrange/Treble) (All Except
AM-FM Radio and AM-FM
Radio with CD)
BASS/MID/TREB (Bass, Midrange,
or Treble): To adjust the bass,
midrange, or treble:
1. Press the
fknob until the tone
control tabs display.
2. Highlight the desired tone control tab by doing one of the
following:
.Press thefknob.
.Press the softkey under the
desired tab. 3. Adjust the setting by doing one
of the following:
.Turn thefknob clockwise
or counterclockwise.
.Press¨SEEK or©SEEK.
.Press\FWD orsREV.
If a station's frequency is weak or if
there is static, decrease the treble.
To quickly adjust bass, midrange,
or treble to the middle position,
press the softkey positioned under
the BASS, MID, or TREB tab for
more than two seconds. A beep
sounds and the level adjusts to the
middle position.
To quickly adjust all tone and
speaker controls to the middle
position, press the
fknob for more
than two seconds until a beep
sounds.