ECU GMC SIERRA 1500 2011 Owners Manual
[x] Cancel search | Manufacturer: GMC, Model Year: 2011, Model line: SIERRA 1500, Model: GMC SIERRA 1500 2011Pages: 594, PDF Size: 7.88 MB
Page 1 of 594
Black plate (1,1)GMC Sierra Owner Manual - 2011
2011 GMC Sierra Owner ManualM
In Brief. . . . . . . . . . . . . . . . . . . . . . . . 1-1
Instrument Panel . . . . . . . . . . . . . . 1-2
Initial Drive Information . . . . . . . . 1-8
Vehicle Features . . . . . . . . . . . . . 1-26
Performance and Maintenance . . . . . . . . . . . . . . . . 1-33
Keys, Doors and Windows . . . 2-1
Keys and Locks . . . . . . . . . . . . . . . 2-2
Doors . . . . . . . . . . . . . . . . . . . . . . . . 2-10
Vehicle Security . . . . . . . . . . . . . . 2-12
Exterior Mirrors . . . . . . . . . . . . . . . 2-15
Interior Mirrors . . . . . . . . . . . . . . . . 2-18
Windows . . . . . . . . . . . . . . . . . . . . . 2-18
Roof . . . . . . . . . . . . . . . . . . . . . . . . . . 2-21
Seats and Restraints . . . . . . . . . 3-1
Head Restraints . . . . . . . . . . . . . . . 3-2
Front Seats . . . . . . . . . . . . . . . . . . . . 3-3
Rear Seats . . . . . . . . . . . . . . . . . . . 3-10
Safety Belts . . . . . . . . . . . . . . . . . . 3-11
Airbag System . . . . . . . . . . . . . . . . 3-29
Child Restraints . . . . . . . . . . . . . . 3-49 Storage
. . . . . . . . . . . . . . . . . . . . . . . 4-1
Storage Compartments . . . . . . . . 4-1
Instruments and Controls . . . . 5-1
Controls . . . . . . . . . . . . . . . . . . . . . . . 5-2
Warning Lights, Gauges, and Indicators . . . . . . . . . . . . . . . . . . . 5-12
Information Displays . . . . . . . . . . 5-33
Vehicle Messages . . . . . . . . . . . . 5-41
Vehicle Personalization . . . . . . . 5-52
Universal Remote System . . . . 5-61
Lighting . . . . . . . . . . . . . . . . . . . . . . . 6-1
Exterior Lighting . . . . . . . . . . . . . . . 6-1
Interior Lighting . . . . . . . . . . . . . . . . 6-7
Lighting Features . . . . . . . . . . . . . . 6-9
Infotainment System . . . . . . . . . 7-1
Introduction . . . . . . . . . . . . . . . . . . . . 7-1
Radio . . . . . . . . . . . . . . . . . . . . . . . . . . 7-8
Audio Players . . . . . . . . . . . . . . . . 7-15
Rear Seat Infotainment . . . . . . . 7-39
Phone . . . . . . . . . . . . . . . . . . . . . . . . 7-50 Climate Controls
. . . . . . . . . . . . . 8-1
Climate Control Systems . . . . . . 8-1
Air Vents . . . . . . . . . . . . . . . . . . . . . 8-11
Driving and Operating . . . . . . . . 9-1
Driving Information . . . . . . . . . . . . . 9-2
Starting and Operating . . . . . . . 9-34
Engine Exhaust . . . . . . . . . . . . . . 9-44
Automatic Transmission . . . . . . 9-46
Drive Systems . . . . . . . . . . . . . . . . 9-54
Brakes . . . . . . . . . . . . . . . . . . . . . . . 9-68
Ride Control Systems . . . . . . . . 9-70
Cruise Control . . . . . . . . . . . . . . . . 9-73
Object Detection Systems . . . . 9-76
Fuel . . . . . . . . . . . . . . . . . . . . . . . . . . 9-84
Towing . . . . . . . . . . . . . . . . . . . . . . . 9-90
Conversions and
Add-Ons . . . . . . . . . . . . . . . . . . . 9-125
Page 38 of 594
Black plate (32,1)GMC Sierra Owner Manual - 2011
1-32 In Brief
Power Outlets
Accessory power outlets can be
used to plug in electrical equipment,
such as a cell phone, MP3
player, etc.
The vehicle may have two
accessory power outlets located
below the climate control system,
or may have one accessory power
outlet and one cigarette lighter.
The cigarette lighter is designed
to fit only in the receptacle closest
to the driver.
There may be another accessory
power outlet in the rear cargo area.
If the vehicle has a floor console,
there is an accessory power outlet
inside the storage bin and one on
the rear of the floor console.
The accessory power outlets are
powered, even when the ignition is
in LOCK/OFF. Continuing to use
power outlets while the ignition is in
LOCK/OFF may cause the vehicle's
battery to run down.
SeePower Outlets on page 5‑10.
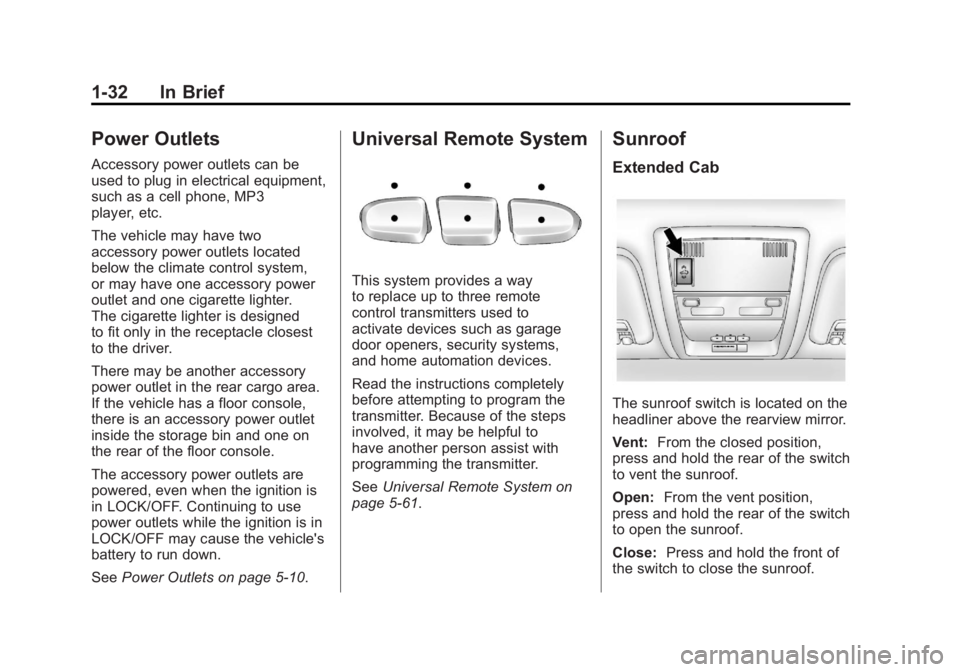
Universal Remote System
This system provides a way
to replace up to three remote
control transmitters used to
activate devices such as garage
door openers, security systems,
and home automation devices.
Read the instructions completely
before attempting to program the
transmitter. Because of the steps
involved, it may be helpful to
have another person assist with
programming the transmitter.
SeeUniversal Remote System on
page 5‑61.
Sunroof
Extended Cab
The sunroof switch is located on the
headliner above the rearview mirror.
Vent: From the closed position,
press and hold the rear of the switch
to vent the sunroof.
Open: From the vent position,
press and hold the rear of the switch
to open the sunroof.
Close: Press and hold the front of
the switch to close the sunroof.
Page 42 of 594
Black plate (36,1)GMC Sierra Owner Manual - 2011
1-36 In Brief
Roadside Assistance
Program
U.S.:1-800-GMC-8782
(1‐800‐462-8782)
TTY Users (U.S.): 1-888-889-2438
Canada: 1-800-268-6800
Mexico: 01-800-466-0801
As the owner of a new GMC, you
are automatically enrolled in the
Roadside Assistance program.
See Roadside Assistance Program
(U.S. and Canada) on page 13‑8
or Roadside Assistance Program
(Mexico) on page 13‑10 for more
information. Roadside Assistance and OnStar
(U.S. and Canada)
If you have an active OnStar
subscription, press theQbutton
and the current GPS location will
be sent to an OnStar advisor who
will assess your problem, contact
Roadside Assistance, and relay
your exact location to get the help
you need.
Online Owner Center
(U.S. and Canada)
The Online Owner Center is a
complimentary service that includes
online service reminders, vehicle
maintenance tips, online owner
manual, special privileges,
and more.
Sign up today at:
www.gmcownercenter.com (U.S.)
or www.gm.ca (Canada).
OnStar®
For vehicles with an active OnStar
subscription, OnStar uses several
innovative technologies and live
Advisors to provide a wide range
of safety, security, navigation,
diagnostics, and calling services.
Automatic Crash Response
In a crash, built‐in sensors can
automatically alert an OnStar
Advisor who is immediately
connected to the vehicle to
see if you need help.
Page 45 of 594
Black plate (1,1)GMC Sierra Owner Manual - 2011
Keys, Doors and Windows 2-1
Keys, Doors and
Windows
Keys and Locks
Keys . . . . . . . . . . . . . . . . . . . . . . . . . . 2-2
Remote Keyless Entry (RKE)System . . . . . . . . . . . . . . . . . . . . . . 2-3
Remote Keyless Entry (RKE) System Operation . . . . . . . . . . . 2-3
Remote Vehicle Start . . . . . . . . . 2-5
Door Locks . . . . . . . . . . . . . . . . . . . 2-8
Power Door Locks . . . . . . . . . . . . 2-8
Delayed Locking . . . . . . . . . . . . . . 2-8
Automatic Door Locks . . . . . . . . . 2-9
Lockout Protection . . . . . . . . . . . . 2-9
Safety Locks . . . . . . . . . . . . . . . . . . 2-9
Doors
Rear Doors (Extended Cab) . . . . . . . . . . . . 2-10
Tailgate . . . . . . . . . . . . . . . . . . . . . . 2-10
Vehicle Security
Vehicle Security . . . . . . . . . . . . . . 2-12
Anti-Theft Alarm System . . . . . 2-12
Immobilizer . . . . . . . . . . . . . . . . . . 2-13
Immobilizer Operation . . . . . . . 2-13
Exterior Mirrors
Convex Mirrors . . . . . . . . . . . . . . 2-15
Manual Mirrors . . . . . . . . . . . . . . . 2-15
Trailer-Tow Mirrors . . . . . . . . . . . 2-15
Power Mirrors . . . . . . . . . . . . . . . . 2-16
Folding Mirrors . . . . . . . . . . . . . . . 2-16
Heated Mirrors . . . . . . . . . . . . . . . 2-17
Park Tilt Mirrors . . . . . . . . . . . . . . 2-17
Interior Mirrors
Manual Rearview Mirror . . . . . . 2-18
Automatic Dimming Rearview Mirror . . . . . . . . . . . . . . . . . . . . . . . 2-18
Windows
Windows . . . . . . . . . . . . . . . . . . . . . 2-18
Manual Windows . . . . . . . . . . . . 2-19
Power Windows . . . . . . . . . . . . . 2-19
Rear Windows . . . . . . . . . . . . . . . 2-20
Sun Visors . . . . . . . . . . . . . . . . . . . 2-20
Roof
Sunroof (Extended Cab) . . . . . 2-21
Sunroof (Crew Cab) . . . . . . . . . 2-22
Page 53 of 594
Black plate (9,1)GMC Sierra Owner Manual - 2011
Keys, Doors and Windows 2-9
Pressing the power lock switch
twice will override the delayed
locking feature and immediately
lock all the doors.
This feature will not operate if the
key is in the ignition.
This feature can be programmed
using the Driver Information
Center (DIC). See“Delay Door
Lock” under Vehicle Personalization
(with DIC Buttons) on page 5‑52.
Automatic Door Locks
The vehicle may have an automatic
lock/unlock feature. This feature
can be programmed using the
Driver Information Center (DIC).
See Vehicle Personalization (with
DIC Buttons) on page 5‑52 for more
information on DIC programming.
Lockout Protection
If the driver side power door lock
switch is pressed when the driver
door is open and the key is in the
ignition, all of the doors will lock and
then the driver door will unlock.
If the passenger side power door
lock switch is pressed when the
front passenger door is open and
the key is in the ignition, all of the
doors will lock and then the front
passenger door will unlock.
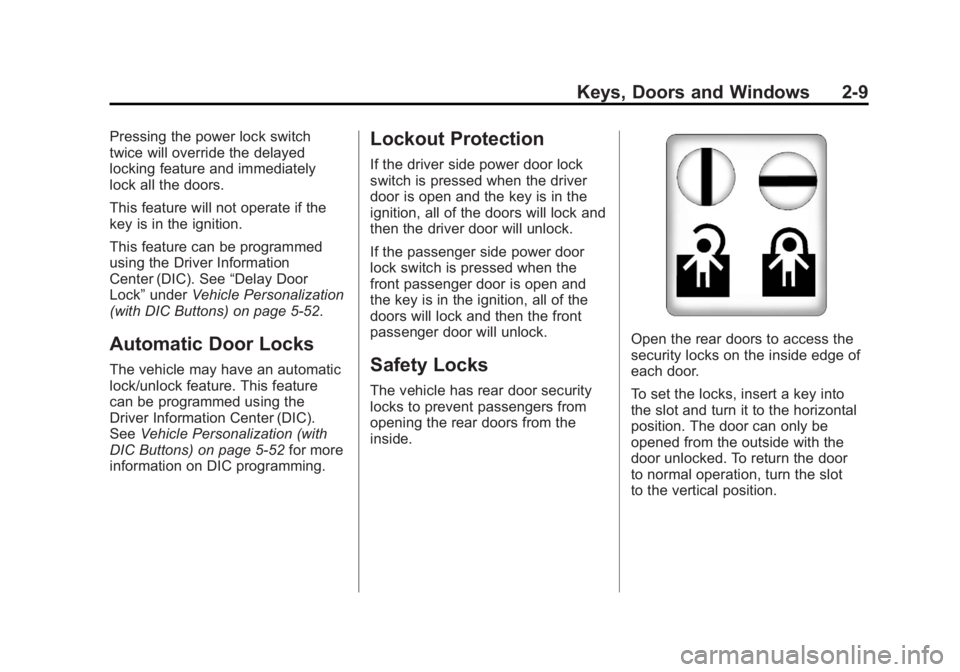
Safety Locks
The vehicle has rear door security
locks to prevent passengers from
opening the rear doors from the
inside.
Open the rear doors to access the
security locks on the inside edge of
each door.
To set the locks, insert a key into
the slot and turn it to the horizontal
position. The door can only be
opened from the outside with the
door unlocked. To return the door
to normal operation, turn the slot
to the vertical position.
Page 55 of 594
Black plate (11,1)GMC Sierra Owner Manual - 2011
Keys, Doors and Windows 2-11
Open the tailgate by lifting up on
its handle while pulling the tailgate
toward you.
To shut the tailgate, firmly push it
upward until it latches.
After you put the tailgate back up,
pull it back towards you to be sure it
latches securely.
Tailgate Removal
The tailgate can be removed to
allow for different loading situations.
Someone may need to assist with
removal to avoid damage to the
vehicle.
On vehicles with a Rear Vision
Camera, it must be disconnected
before removing the tailgate.
SeeRear Vision Camera (RVC) on
page 9‑78 for more information. To remove the tailgate:
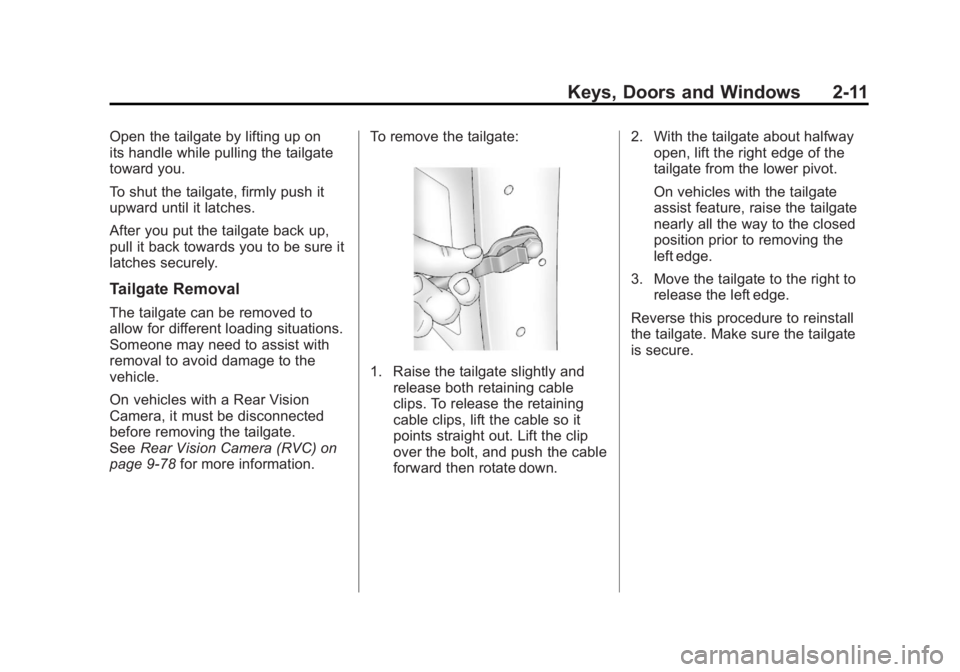
1. Raise the tailgate slightly and
release both retaining cable
clips. To release the retaining
cable clips, lift the cable so it
points straight out. Lift the clip
over the bolt, and push the cable
forward then rotate down. 2. With the tailgate about halfway
open, lift the right edge of the
tailgate from the lower pivot.
On vehicles with the tailgate
assist feature, raise the tailgate
nearly all the way to the closed
position prior to removing the
left edge.
3. Move the tailgate to the right to release the left edge.
Reverse this procedure to reinstall
the tailgate. Make sure the tailgate
is secure.
Page 56 of 594
Black plate (12,1)GMC Sierra Owner Manual - 2011
2-12 Keys, Doors and Windows
Vehicle Security
This vehicle has theft-deterrent
features; however, they do not make
it impossible to steal.
Anti-Theft Alarm System
This vehicle may have a content
theft-deterrent alarm system.
This is the security light.
To arm the theft-deterrent system:
1. Open the door.
2. Lock the door with the RemoteKeyless Entry (RKE) transmitter.
The security light should flash. If the delayed locking feature
is active, the alarm will not be
activated until all doors are
closed and the security light
goes off.
3. Close all doors. The security light will stop flashing and go off
after approximately 30 seconds.
The system is armed when the
security light goes off.
If a locked driver door is opened
without using the RKE transmitter,
a 10 second pre-alarm will occur.
The horn will chirp and the lights
will flash. If the key is not placed
in the ignition and turned to START
or the door is not unlocked by
pressing the unlock button on
the RKE transmitter during the
10 second pre-alarm, the alarm
will go off. The vehicle's headlamps
will flash and the horn will sound
for about 30 seconds, then will turn
off to save the battery power. The theft-deterrent system will not
activate if the doors are locked
with the key or the manual door
lock. It activates only if you use
the power door lock switch or the
RKE transmitter. The vehicle can
be started with the correct key if
the alarm is set off.
To avoid setting off the alarm by
accident:
.If you do not want to activate
the theft-deterrent system, the
vehicle should be locked with
the door key after the doors are
closed.
.Always unlock a door with the
RKE transmitter.
If the alarm is set off, press unlock
on the RKE transmitter or place
the key in the ignition and turn it
to START.
Page 57 of 594
Black plate (13,1)GMC Sierra Owner Manual - 2011
Keys, Doors and Windows 2-13
Testing the Alarm
To test the alarm:
1. Lower the driver window andopen the driver door.
2. Press lock on the RKE transmitter.
3. Close the door and wait for the security light to go out.
4. Reach in through the window, unlock the door with the manual
door lock, and open the door.
This should set off the alarm.
If the alarm does not sound when
it should but the headlamps flash,
check to see if the horn works. The
horn fuse may be blown. To replace
the fuse, see Fuses and Circuit
Breakers on page 10‑50.
If the alarm does not sound or the
headlamps do not flash, see your
dealer for service.
Immobilizer
See Radio Frequency Statement on
page 13‑19 for information
regarding Part 15 of the Federal
Communications Commission
(FCC) rules and Industry Canada
Standards RSS-210/220/310.
Immobilizer Operation
This vehicle has PASS-Key®III+
(Personalized Automotive Security
System) theft-deterrent system.
PASS-Key III+ is a passive
theft-deterrent system.
The system is automatically armed
when the key is removed from the
ignition.
The system is automatically
disarmed when the key is turned
to ON/RUN, ACC/ACCESSORY,
or START from the LOCK/OFF
position. You do not have to manually arm or
disarm the system.
The security light will come on if
there is a problem with arming or
disarming the theft-deterrent
system.
When the PASS-Key III+ system
senses that someone is using the
wrong key, it prevents the vehicle
from starting. Anyone using a
trial-and-error method to start the
vehicle will be discouraged because
of the high number of electrical key
codes.
If the engine does not start and
the security light on the instrument
panel cluster comes on when trying
to start the vehicle, there may be
a problem with the theft-deterrent
system. Turn the ignition off and
try again.
Page 58 of 594
Black plate (14,1)GMC Sierra Owner Manual - 2011
2-14 Keys, Doors and Windows
If the engine still does not start, and
the key appears to be undamaged,
try another ignition key. At this
time, you may also want to check
the fuse. SeeFuses and Circuit
Breakers on page 10‑50. If the
engine still does not start with the
other key, the vehicle needs service.
If the vehicle does start, the first key
may be faulty. See your dealer who
can service the PASS-Key III+ to
have a new key made.
It is possible for the PASS-Key III+
decoder to learn the transponder
value of a new or replacement key.
Up to 10 keys may be programmed
for the vehicle. The following
procedure is for programming
additional keys only. If all the
currently programmed keys are
lost or do not operate, you must
see your dealer or a locksmith who
can service PASS-Key III+ to have
keys made and programmed to the
system. See your dealer or a locksmith who
can service PASS-Key III+ to get a
new key blank cut exactly as the
ignition key that operates the
system.
To program the new additional key:
1. Verify that the new key has
a
1stamped on it.
2. Insert the original, already programmed key in the ignition
and start the engine. If the
engine will not start, see your
dealer for service.
3. After the engine has started, turn the key to LOCK/OFF, and
remove the key. 4. Insert the new key to be
programmed and turn it to
the ON/RUN position within
five seconds of turning the
ignition to the LOCK/OFF
position in Step 3.
The security light will turn
off once the key has been
programmed.
5. Repeat Steps 1 through 4 if additional keys are to be
programmed.
If you lose or damage your
PASS-Key III+ key, see your dealer
or a locksmith who can service
PASS-Key III+ to have a new
key made.
Do not leave the key or device
that disarms or deactivates the
theft-deterrent system in the vehicle.
Page 69 of 594
Black plate (1,1)GMC Sierra Owner Manual - 2011
Seats and Restraints 3-1
Seats and
Restraints
Head Restraints
Head Restraints . . . . . . . . . . . . . . . 3-2
Front Seats
Seat Adjustment . . . . . . . . . . . . . . 3-3
Center Seat . . . . . . . . . . . . . . . . . . . 3-3
Power Seat Adjustment . . . . . . . 3-4
Lumbar Adjustment . . . . . . . . . . . 3-6
Reclining Seatbacks . . . . . . . . . . 3-6
Heated Front Seats . . . . . . . . . . . 3-8
Rear Seats
Rear Seats (Extended CabFull Bench) . . . . . . . . . . . . . . . . . 3-10
Rear Seats (All Split Bench and Hybrid Full Bench) . . . . . 3-11
Safety Belts
Safety Belts . . . . . . . . . . . . . . . . . . 3-11
How to Wear Safety BeltsProperly . . . . . . . . . . . . . . . . . . . . 3-15
Lap-Shoulder Belt . . . . . . . . . . . 3-21
Safety Belt Use During Pregnancy . . . . . . . . . . . . . . . . . . 3-26 Lap Belt (Crew and
Extended Cab) . . . . . . . . . . . . . 3-26
Safety Belt Extender . . . . . . . . . 3-27
Safety System Check . . . . . . . . 3-27
Safety Belt Care . . . . . . . . . . . . . 3-28
Replacing Safety Belt System Parts After a Crash . . . . . . . . . 3-28
Airbag System
Airbag System . . . . . . . . . . . . . . . 3-29
Where Are the Airbags? . . . . . 3-31
When Should an AirbagInflate? . . . . . . . . . . . . . . . . . . . . . 3-32
What Makes an Airbag Inflate? . . . . . . . . . . . . . . . . . . . . . 3-34
How Does an Airbag Restrain? . . . . . . . . . . . . . . . . . . . 3-35
What Will You See After an Airbag Inflates? . . . . . . . . . . . . 3-35
Airbag On-Off Switch . . . . . . . . 3-37
Passenger Sensing System . . . . . . . . . . . . . . . . . . . . . 3-40
Servicing the Airbag-Equipped Vehicle . . . . . . . . . . . . . . . . . . . . . 3-46
Adding Equipment to the Airbag-Equipped Vehicle . . . 3-46
Airbag System Check . . . . . . . . 3-48
Replacing Airbag System Parts After a Crash . . . . . . . . . 3-48
Child Restraints
Older Children . . . . . . . . . . . . . . . 3-49
Infants and YoungChildren . . . . . . . . . . . . . . . . . . . . 3-51
Child Restraint Systems . . . . . 3-54
Where to Put the Restraint . . . 3-56
Lower Anchors and Tethers for Children (LATCH
System) . . . . . . . . . . . . . . . . . . . . 3-57
Replacing LATCH System Parts After a Crash . . . . . . . . . 3-66
Securing Child Restraints (Rear Seat Position) . . . . . . . . 3-66
Securing Child Restraints (Right Front Seat
Position) . . . . . . . . . . . . . . . . . . . 3-69
Securing Child Restraints (Center Front Seat
Position) . . . . . . . . . . . . . . . . . . . 3-78