GMC SIERRA 1500 2014 Owners Manual
Manufacturer: GMC, Model Year: 2014, Model line: SIERRA 1500, Model: GMC SIERRA 1500 2014Pages: 542, PDF Size: 6.77 MB
Page 451 of 542
Black plate (79,1)GMC Sierra Owner Manual (GMNA-Localizing-U.S./Canada/Mexico-
5853626) - 2014 - 3rd crc - 8/15/13
Vehicle Care 10-79
For regular cab models, the
equipment you will need is behind
the passenger seat. For double and
crew cab models, the equipment is
on the shelf behind the passenger
side second row seat.
1. Turn the knob on the jackcounterclockwise to lower the
jack head to release the jack
from its holder.
2. Turn the wing nut counterclockwise to remove the
wheel blocks and the wheel
block retainer.
3. Turn the wing nut used to retain the storage bag and tools
counterclockwise to remove it.
Use the jack handle extensions and
the wheel wrench to remove the
underbody-mounted spare tire.
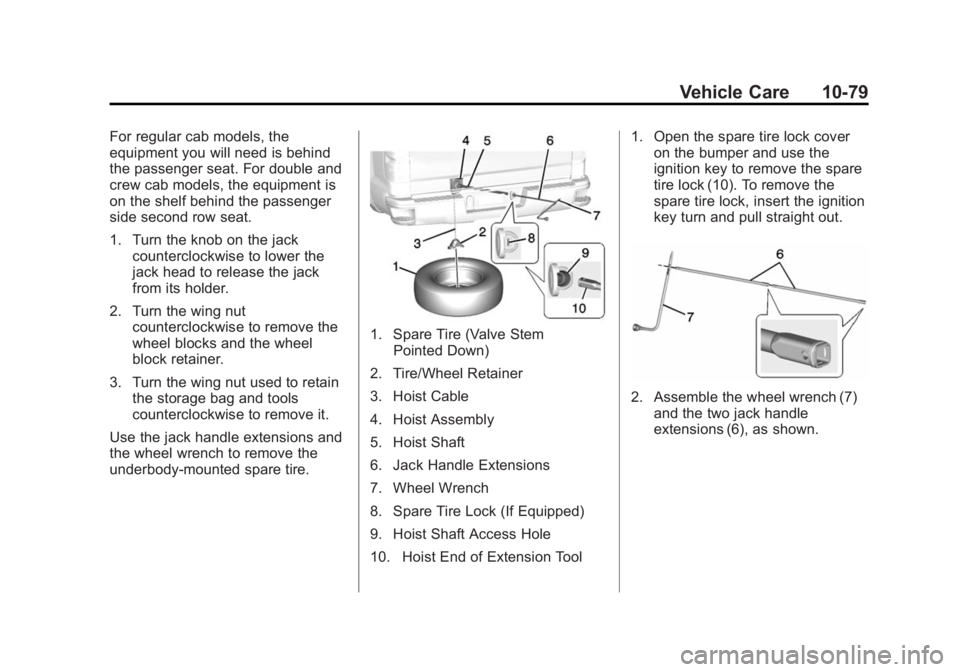
1. Spare Tire (Valve Stem Pointed Down)
2. Tire/Wheel Retainer
3. Hoist Cable
4. Hoist Assembly
5. Hoist Shaft
6. Jack Handle Extensions
7. Wheel Wrench
8. Spare Tire Lock (If Equipped)
9. Hoist Shaft Access Hole
10. Hoist End of Extension Tool 1. Open the spare tire lock cover
on the bumper and use the
ignition key to remove the spare
tire lock (10). To remove the
spare tire lock, insert the ignition
key turn and pull straight out.
2. Assemble the wheel wrench (7)and the two jack handle
extensions (6), as shown.
Page 452 of 542
Black plate (80,1)GMC Sierra Owner Manual (GMNA-Localizing-U.S./Canada/Mexico-
5853626) - 2014 - 3rd crc - 8/15/13
10-80 Vehicle Care
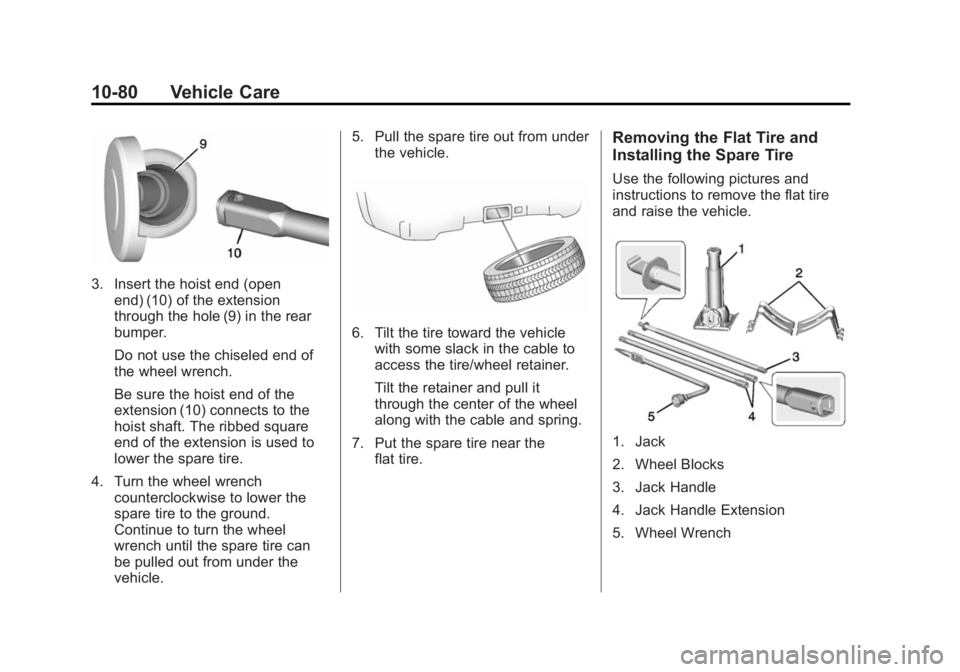
3. Insert the hoist end (openend) (10) of the extension
through the hole (9) in the rear
bumper.
Do not use the chiseled end of
the wheel wrench.
Be sure the hoist end of the
extension (10) connects to the
hoist shaft. The ribbed square
end of the extension is used to
lower the spare tire.
4. Turn the wheel wrench counterclockwise to lower the
spare tire to the ground.
Continue to turn the wheel
wrench until the spare tire can
be pulled out from under the
vehicle. 5. Pull the spare tire out from under
the vehicle.
6. Tilt the tire toward the vehiclewith some slack in the cable to
access the tire/wheel retainer.
Tilt the retainer and pull it
through the center of the wheel
along with the cable and spring.
7. Put the spare tire near the flat tire.
Removing the Flat Tire and
Installing the Spare Tire
Use the following pictures and
instructions to remove the flat tire
and raise the vehicle.
1. Jack
2. Wheel Blocks
3. Jack Handle
4. Jack Handle Extension
5. Wheel Wrench
Page 453 of 542
Black plate (81,1)GMC Sierra Owner Manual (GMNA-Localizing-U.S./Canada/Mexico-
5853626) - 2014 - 3rd crc - 8/15/13
Vehicle Care 10-81
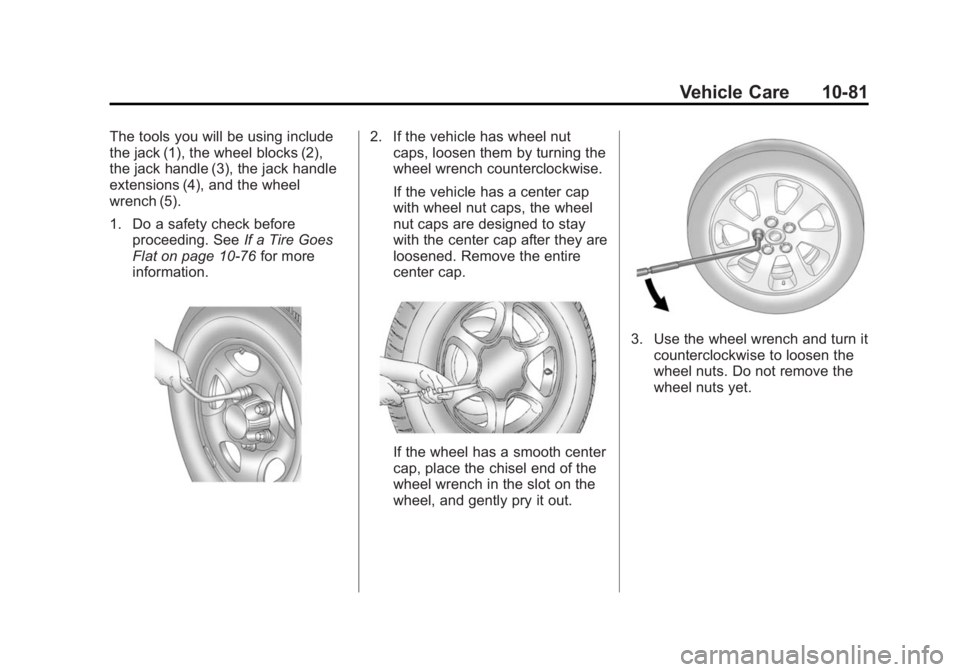
The tools you will be using include
the jack (1), the wheel blocks (2),
the jack handle (3), the jack handle
extensions (4), and the wheel
wrench (5).
1. Do a safety check beforeproceeding. See If a Tire Goes
Flat on page 10-76 for more
information.2. If the vehicle has wheel nut caps, loosen them by turning the
wheel wrench counterclockwise.
If the vehicle has a center cap
with wheel nut caps, the wheel
nut caps are designed to stay
with the center cap after they are
loosened. Remove the entire
center cap.
If the wheel has a smooth center
cap, place the chisel end of the
wheel wrench in the slot on the
wheel, and gently pry it out.
3. Use the wheel wrench and turn it
counterclockwise to loosen the
wheel nuts. Do not remove the
wheel nuts yet.
Page 454 of 542
Black plate (82,1)GMC Sierra Owner Manual (GMNA-Localizing-U.S./Canada/Mexico-
5853626) - 2014 - 3rd crc - 8/15/13
10-82 Vehicle Care
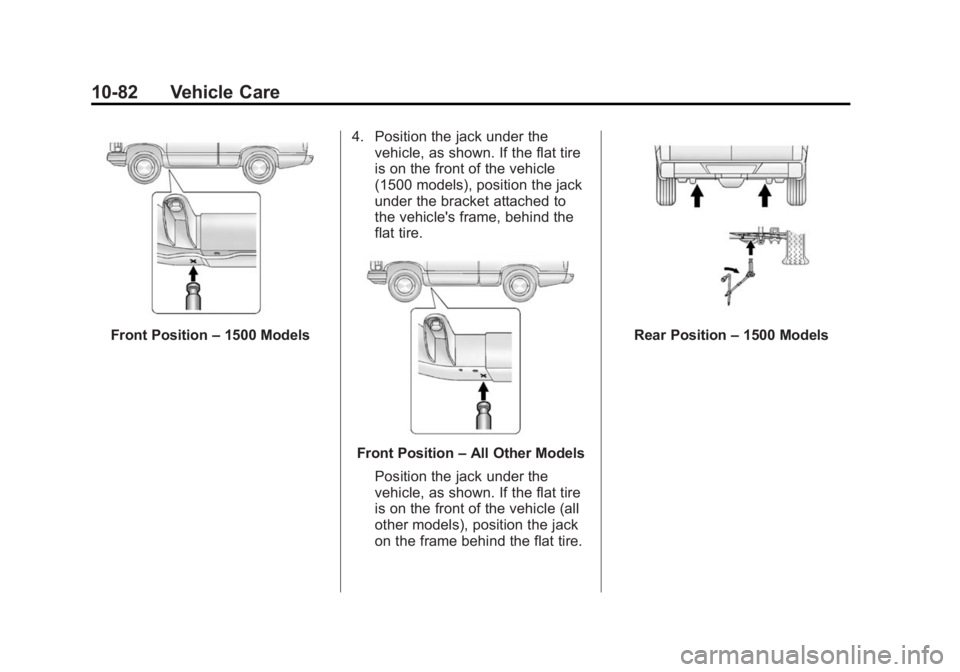
Front Position–1500 Models 4. Position the jack under the
vehicle, as shown. If the flat tire
is on the front of the vehicle
(1500 models), position the jack
under the bracket attached to
the vehicle's frame, behind the
flat tire.
Front Position –All Other Models
Position the jack under the
vehicle, as shown. If the flat tire
is on the front of the vehicle (all
other models), position the jack
on the frame behind the flat tire.
Rear Position –1500 Models
Page 455 of 542
Black plate (83,1)GMC Sierra Owner Manual (GMNA-Localizing-U.S./Canada/Mexico-
5853626) - 2014 - 3rd crc - 8/15/13
Vehicle Care 10-83
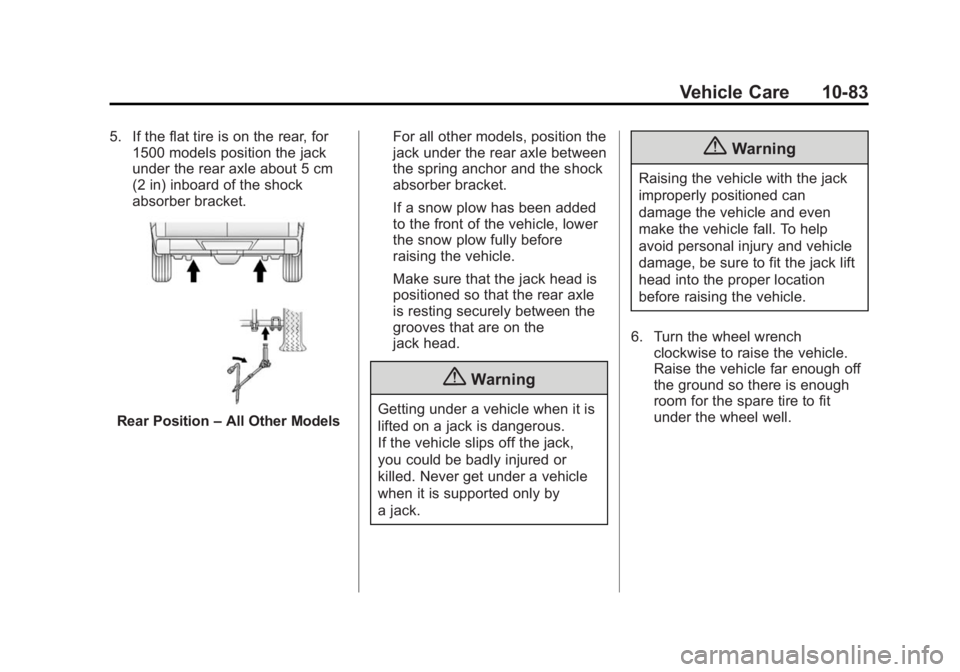
5. If the flat tire is on the rear, for1500 models position the jack
under the rear axle about 5 cm
(2 in) inboard of the shock
absorber bracket.
Rear Position –All Other Models For all other models, position the
jack under the rear axle between
the spring anchor and the shock
absorber bracket.
If a snow plow has been added
to the front of the vehicle, lower
the snow plow fully before
raising the vehicle.
Make sure that the jack head is
positioned so that the rear axle
is resting securely between the
grooves that are on the
jack head.
{Warning
Getting under a vehicle when it is
lifted on a jack is dangerous.
If the vehicle slips off the jack,
you could be badly injured or
killed. Never get under a vehicle
when it is supported only by
a jack.
{Warning
Raising the vehicle with the jack
improperly positioned can
damage the vehicle and even
make the vehicle fall. To help
avoid personal injury and vehicle
damage, be sure to fit the jack lift
head into the proper location
before raising the vehicle.
6. Turn the wheel wrench clockwise to raise the vehicle.
Raise the vehicle far enough off
the ground so there is enough
room for the spare tire to fit
under the wheel well.
Page 456 of 542
Black plate (84,1)GMC Sierra Owner Manual (GMNA-Localizing-U.S./Canada/Mexico-
5853626) - 2014 - 3rd crc - 8/15/13
10-84 Vehicle Care
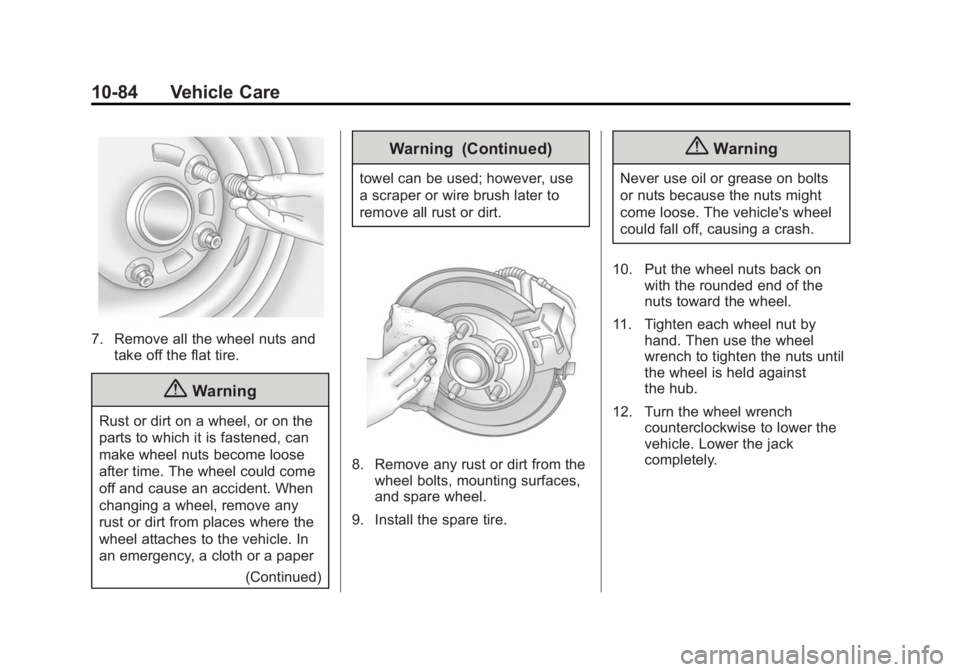
7. Remove all the wheel nuts andtake off the flat tire.
{Warning
Rust or dirt on a wheel, or on the
parts to which it is fastened, can
make wheel nuts become loose
after time. The wheel could come
off and cause an accident. When
changing a wheel, remove any
rust or dirt from places where the
wheel attaches to the vehicle. In
an emergency, a cloth or a paper
(Continued)
Warning (Continued)
towel can be used; however, use
a scraper or wire brush later to
remove all rust or dirt.
8. Remove any rust or dirt from thewheel bolts, mounting surfaces,
and spare wheel.
9. Install the spare tire.
{Warning
Never use oil or grease on bolts
or nuts because the nuts might
come loose. The vehicle's wheel
could fall off, causing a crash.
10. Put the wheel nuts back on with the rounded end of the
nuts toward the wheel.
11. Tighten each wheel nut by hand. Then use the wheel
wrench to tighten the nuts until
the wheel is held against
the hub.
12. Turn the wheel wrench counterclockwise to lower the
vehicle. Lower the jack
completely.
Page 457 of 542
Black plate (85,1)GMC Sierra Owner Manual (GMNA-Localizing-U.S./Canada/Mexico-
5853626) - 2014 - 3rd crc - 8/15/13
Vehicle Care 10-85
{Warning
If wheel studs are damaged, they
can break. If all the studs on a
wheel broke, the wheel could
come off and cause a crash.
If any stud is damaged because
of a loose-running wheel, it could
be that all of the studs are
damaged. To be sure, replace all
studs on the wheel. If the stud
holes in a wheel have become
larger, the wheel could collapse in
operation. Replace any wheel if
its stud holes have become larger
or distorted in any way. Inspect
hubs and hub‐piloted wheels for
damage. Because of loose
running wheels, piloting pad
damage may occur and require
replacement of the entire hub, for
proper centering of the wheels.
When replacing studs, hubs,
wheel nuts or wheels, be sure to
use GM original equipment parts.
{Warning
Wheel nuts that are improperly or
incorrectly tightened can cause
the wheels to become loose or
come off. The wheel nuts should
be tightened with a torque wrench
to the proper torque specification
after replacing. Follow the torque
specification supplied by the
aftermarket manufacturer when
using accessory locking wheel
nuts. SeeCapacities and
Specifications on page 12-2 for
original equipment wheel nut
torque specifications.
{Caution
Improperly tightened wheel nuts
can lead to brake pulsation and
rotor damage. To avoid expensive
brake repairs, evenly tighten the
wheel nuts in the proper
(Continued)
Caution (Continued)
sequence and to the proper
torque specification. See
Capacities and Specifications for
the wheel nut torque specification.
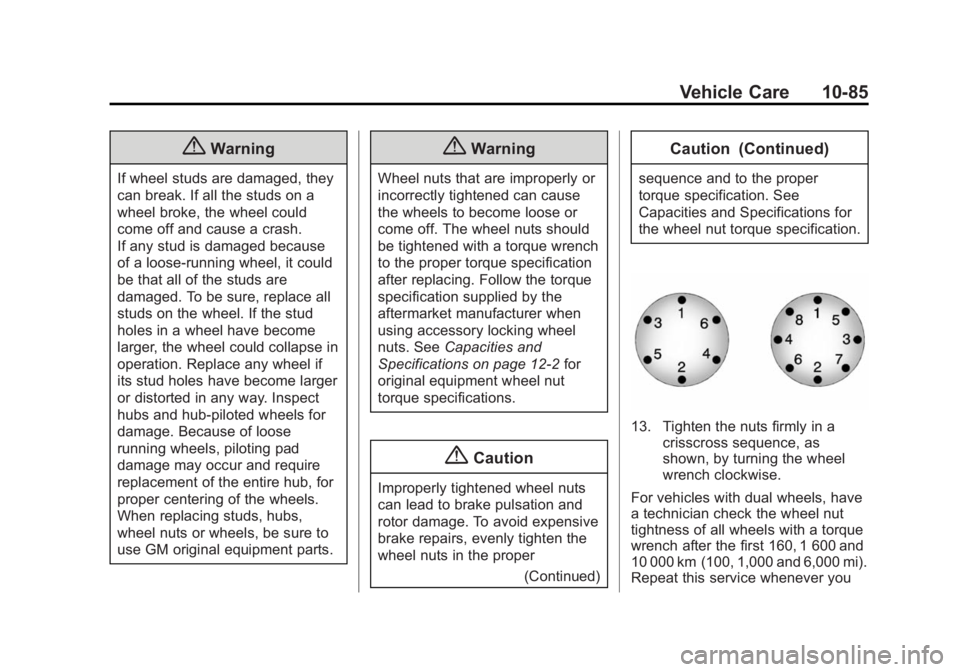
13. Tighten the nuts firmly in acrisscross sequence, as
shown, by turning the wheel
wrench clockwise.
For vehicles with dual wheels, have
a technician check the wheel nut
tightness of all wheels with a torque
wrench after the first 160, 1 600 and
10 000 km (100, 1,000 and 6,000 mi).
Repeat this service whenever you
Page 458 of 542
Black plate (86,1)GMC Sierra Owner Manual (GMNA-Localizing-U.S./Canada/Mexico-
5853626) - 2014 - 3rd crc - 8/15/13
10-86 Vehicle Care
have a tire removed or serviced.
SeeCapacities and Specifications
on page 12-2.
When reinstalling the regular wheel
and tire, also reinstall either the
center cap, or bolt-on hub cap,
depending on what the vehicle is
equipped with. For center caps,
place the cap on the wheel and tap
it into place until it seats flush with
the wheel. The cap only goes on
one way. Be sure to line up the tab
on the center cap with the
indentation on the wheel. For
bolt-on hub caps, align the plastic
nut caps with the wheel nuts and
then tighten by hand. Then use the
wheel wrench to tighten.Storing a Flat or Spare Tire
and Tools
{Warning
Storing a jack, a tire, or other
equipment in the passenger
compartment of the vehicle could
cause injury. In a sudden stop or
collision, loose equipment could
strike someone. Store all these in
the proper place.
{Caution
Storing an aluminum wheel with a
flat tire under your vehicle for an
extended period of time or with
the valve stem pointing up can
damage the wheel. Always stow
the wheel with the valve stem
pointing down and have the
wheel/tire repaired as soon as
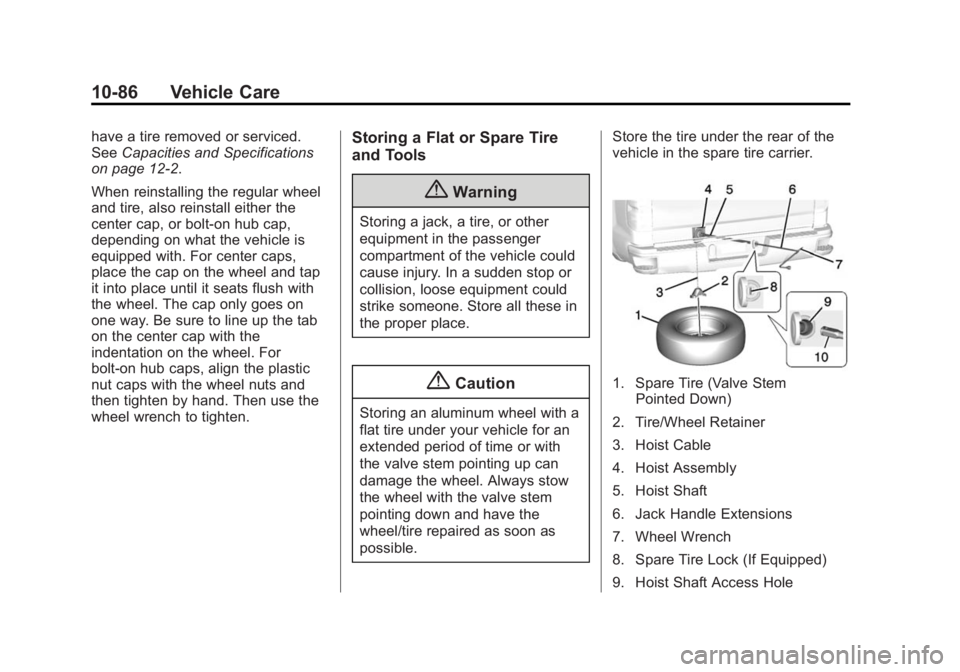
possible. Store the tire under the rear of the
vehicle in the spare tire carrier.
1. Spare Tire (Valve Stem
Pointed Down)
2. Tire/Wheel Retainer
3. Hoist Cable
4. Hoist Assembly
5. Hoist Shaft
6. Jack Handle Extensions
7. Wheel Wrench
8. Spare Tire Lock (If Equipped)
9. Hoist Shaft Access Hole
Page 459 of 542
Black plate (87,1)GMC Sierra Owner Manual (GMNA-Localizing-U.S./Canada/Mexico-
5853626) - 2014 - 3rd crc - 8/15/13
Vehicle Care 10-87
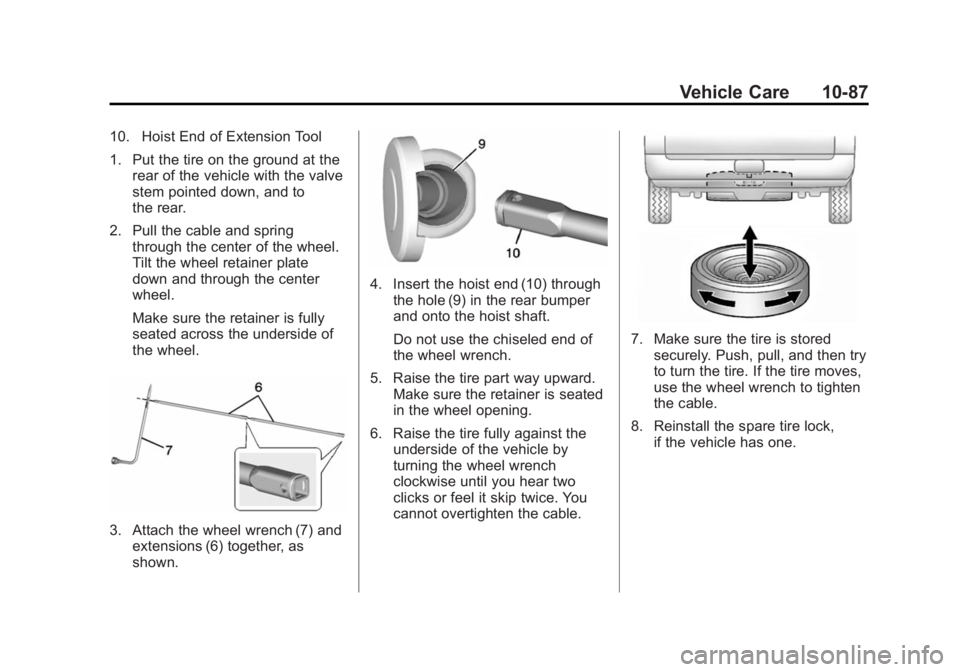
10. Hoist End of Extension Tool
1. Put the tire on the ground at therear of the vehicle with the valve
stem pointed down, and to
the rear.
2. Pull the cable and spring through the center of the wheel.
Tilt the wheel retainer plate
down and through the center
wheel.
Make sure the retainer is fully
seated across the underside of
the wheel.
3. Attach the wheel wrench (7) andextensions (6) together, as
shown.
4. Insert the hoist end (10) through
the hole (9) in the rear bumper
and onto the hoist shaft.
Do not use the chiseled end of
the wheel wrench.
5. Raise the tire part way upward. Make sure the retainer is seated
in the wheel opening.
6. Raise the tire fully against the underside of the vehicle by
turning the wheel wrench
clockwise until you hear two
clicks or feel it skip twice. You
cannot overtighten the cable.
7. Make sure the tire is stored
securely. Push, pull, and then try
to turn the tire. If the tire moves,
use the wheel wrench to tighten
the cable.
8. Reinstall the spare tire lock, if the vehicle has one.
Page 460 of 542
Black plate (88,1)GMC Sierra Owner Manual (GMNA-Localizing-U.S./Canada/Mexico-
5853626) - 2014 - 3rd crc - 8/15/13
10-88 Vehicle Care
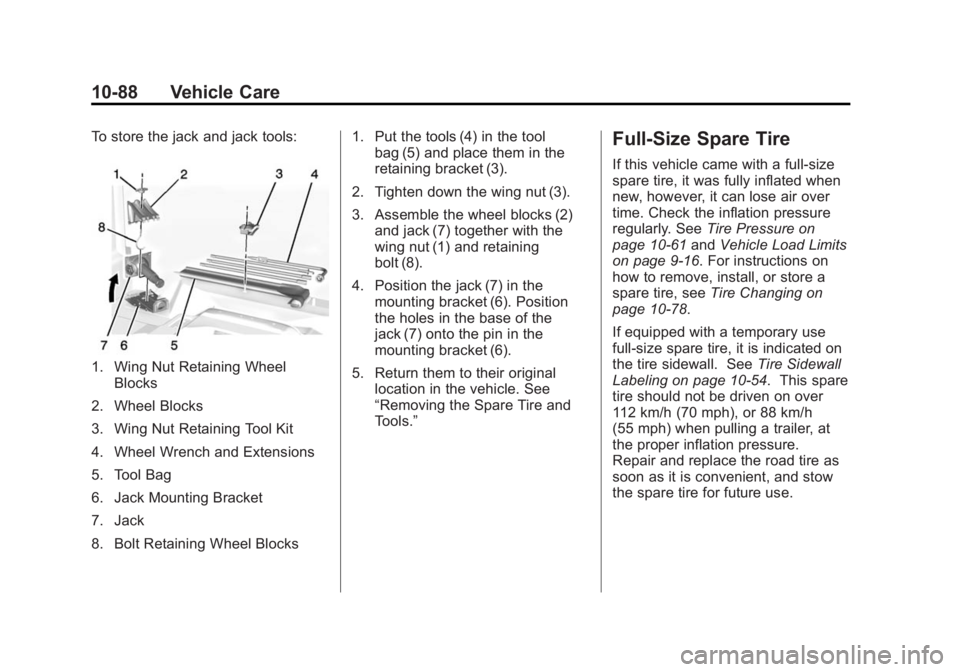
To store the jack and jack tools:
1. Wing Nut Retaining WheelBlocks
2. Wheel Blocks
3. Wing Nut Retaining Tool Kit
4. Wheel Wrench and Extensions
5. Tool Bag
6. Jack Mounting Bracket
7. Jack
8. Bolt Retaining Wheel Blocks 1. Put the tools (4) in the tool
bag (5) and place them in the
retaining bracket (3).
2. Tighten down the wing nut (3).
3. Assemble the wheel blocks (2) and jack (7) together with the
wing nut (1) and retaining
bolt (8).
4. Position the jack (7) in the mounting bracket (6). Position
the holes in the base of the
jack (7) onto the pin in the
mounting bracket (6).
5. Return them to their original location in the vehicle. See
“Removing the Spare Tire and
Tools.”
Full-Size Spare Tire
If this vehicle came with a full-size
spare tire, it was fully inflated when
new, however, it can lose air over
time. Check the inflation pressure
regularly. See Tire Pressure on
page 10-61 andVehicle Load Limits
on page 9-16. For instructions on
how to remove, install, or store a
spare tire, see Tire Changing on
page 10-78.
If equipped with a temporary use
full-size spare tire, it is indicated on
the tire sidewall. See Tire Sidewall
Labeling on page 10-54. This spare
tire should not be driven on over
112 km/h (70 mph), or 88 km/h
(55 mph) when pulling a trailer, at
the proper inflation pressure.
Repair and replace the road tire as
soon as it is convenient, and stow
the spare tire for future use.