engine GMC SIERRA 1998 Workshop Manual
[x] Cancel search | Manufacturer: GMC, Model Year: 1998, Model line: SIERRA, Model: GMC SIERRA 1998Pages: 452, PDF Size: 23.65 MB
Page 240 of 452
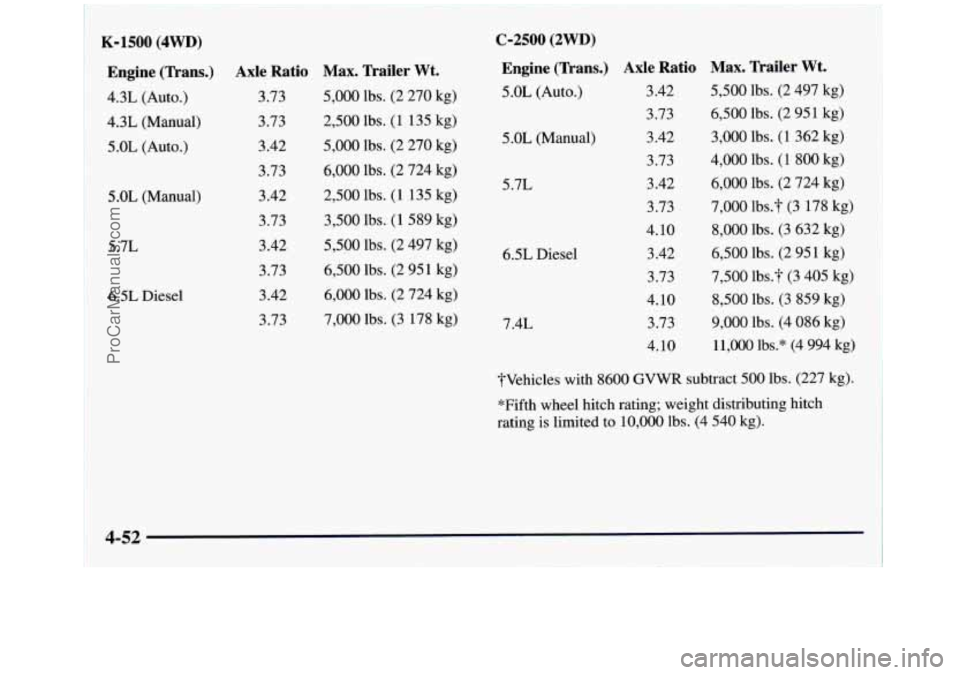
1 K-1500 (4WD)
~ Engine (Trans.) Axle Ratio 4.3L
(Auto.) 3.73
1 4.3L
(Manual)
i 5.0L (Auto.)
5
.OL (Manual)
5.7L 6.5L Diesel 3.73
3.42
3.73
3.42 3.73
3.42
3.73
3.42
3.73
Max. Trailer Wt.
5,000 lbs. (2 270 kg)
2,500 lbs. (1 135 kg)
5,000 lbs. (2 270 kg)
6,000 lbs. (2 724 kg)
2,500 lbs. (1 135 kg)
3,500 lbs. (1 589 kg)
5,500 lbs. (2 497 kg)
6,500 lbs. (2 951 kg)
6,000 lbs. (2 724 kg)
7,000 lbs. (3 178 kg) 5 .OL (Manual)
5.7L
6.5L Diesel
7.4L
C-2500 (2WD) Engine (Trans.) Axle Ratio
5.0L (Auto.) 3.42
3.73
3.42
3.73
3.42
3.73
4.10
3.42 3.73
4.10 3.73
4.10
Max. Trailer Wt.
5,500 lbs. (2 497 kg)
6,500 lbs. (2 951 kg)
3,000 lbs. (1 362 kg)
4,000 lbs. (1 800 kg)
6,000 lbs.
(2 724 kg)
7,000 lbs.3' (3 178 kg)
8,000 lbs. (3 632 kg)
6,500 lbs. (2 951 kg)
7,500 1bs.T (3
405 kg)
8,500 lbs. (3 859 kg)
9,000 lbs. (4 086 kg)
11,OOO lbs.* (4 994 kg)
?Vehicles with
8600 GVWR subtract 500 lbs. (227 kg).
*Fifth wheel hitch rating; weight distributing hitch
rating is limited to 10,000 lbs. (4 540 kg).
ProCarManuals.com
Page 241 of 452
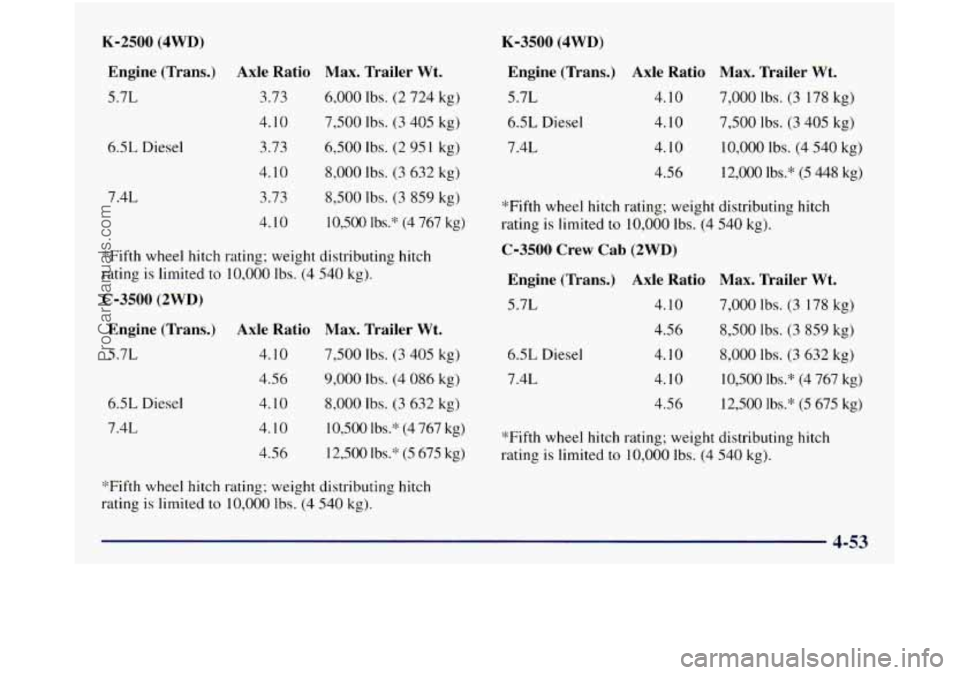
K-2500 (4WD)
Engine (Trans.) Axle Ratio Max. Trailer Wt.
5.7L 3.73 6,000 lbs. (2 724 kg)
3.73 6,500 Ibs.
(2 95 1 kg)
3.73
8,500 lbs. (3 859 kg)
4.10 10,500 lbs.* (4 767 kg)
4.10 7,500
lbs. (3 405 kg)
4.10 8,000 Ibs. (3 632 kg)
6.5L
Diesel
7.4L
*'Fifth wheel hitch rating; weight distributing hitch
rating is limited to 10,000 Ibs. (4 540 kg).
C-3500 (2WD)
6.5L Diesel
7.4L
Engine (Trans.) Axle Ratio Max. Trailer Wt.
5.7L 4.10 7,500 lbs. (3 405 kg)
4.56 9,000 lbs. (4 086 kg)
4.10
8,000 lbs. (3 632 kg)
4.10 10,500 lbs." (4 767 kg)
4.56 12,500 Ibs."
(5 675 kg)
"Fifth wheel hitch rating; weight distributing hitch
rating is limited
to 10,000 lbs. (4 540 kg).
K-3500 (4WD)
Engine (Trans.) Axle Ratio Max. Trailer Wt.
5.7L 4.10 7,000 lbs. (3 178 kg)
7.4L 4.10 10,000 lbs. (4 540 kg)
6.5L
Diesel 4.10 7,500 lbs. (3 405 kg)
4.56 12,000 lbs.* (5
448 kg)
*Fifth wheel hitch rating; weight distributing hitch
rating is limited to 10,000 Ibs. (4 540 kg).
C-3500 Crew Cab (2WD)
6.5L Diesel
7.4L
Engine (Trans.) Axle Ratio Max. Trailer Wt.
5.7L 4.10 7,000 lbs. (3 178 kg)
4.56 8,500 lbs.
(3 859 kg)
4.10 8,000 lbs.
(3 632 kg)
4.10 10,500
lbs." (4 767 kg)
4.56 12,500 lbs."
(5 675 kg)
*Fifth wheel hitch rating; weight distributing hitch
rating is limited to 10,000 Ibs. (4 540
kg).
4-53
ProCarManuals.com
Page 242 of 452
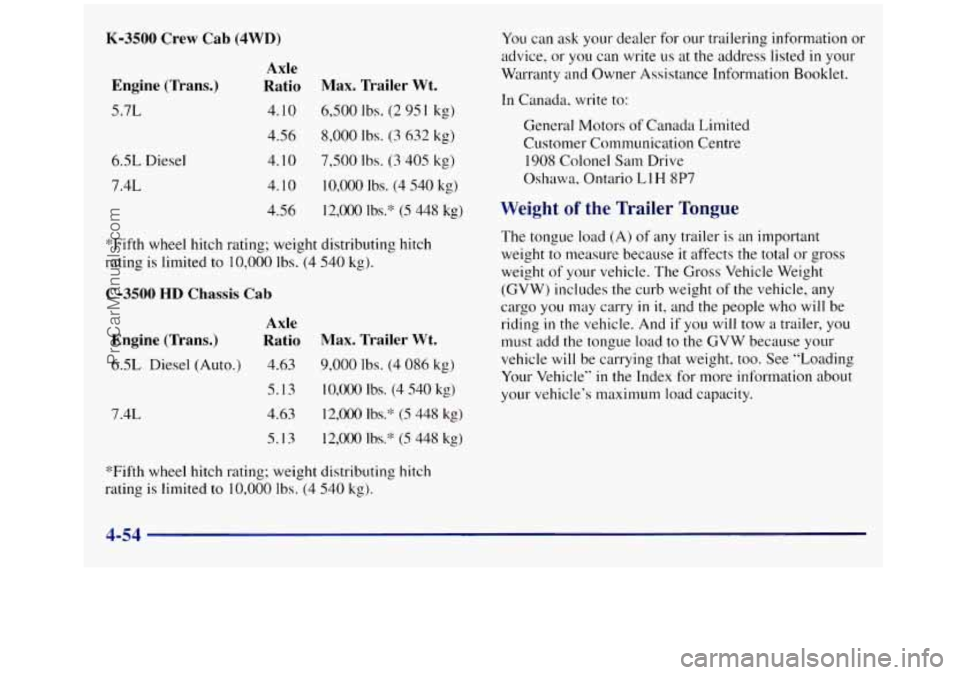
K-3500 Crew Cab (4WD)
Engine (Trans.)
5.7L
6.5L Diesel
7.4L
Axle
Ratio Max. Trailer Wt.
4.10 6,500 Ibs. (2 95 I kg)
4.56 8,000 lbs.
(3 ti32 kg)
4.10 7,500 Ibs.
(3 405 kg)
4.10
10,000 Ibs. (4 540 kg)
4.56 12,000
Ibs.'% (5 448 kg)
*Fifth wheel hitch rating; weight distributing hitch
rating is limited to
10,000 lbs. (4 540 kg).
C-3500 HD Chassis Cab
Engine (Trans.)
6.5L Diesel (Auto.)
7.4L
Axle
Ratio Max. Trailer Wt.
4.63 9,000 lbs. (4 084 kg)
5.1
3 10,OOO Ibs. (4 540 kg)
4.63
12,000 Ibs.'': (5 448 kg)
5.1
3 12,000 Ibs." (5 448 kg) You
can ask your dealer for
our trailering information or
advice, or you can write us at the address listed
in your
Warranty and Owner Assistance Information Booklet.
In Canada, write to:
General Motors of Canada Limited
Customer Communication Centre
1908 Colonel Sam Drive
Oshawa, Ontario
L1 H 8P7
Weight of the Trailer Tongue
The tongue load (A) of any trailer is an important
weight
to measure because it affects the total or gross
weight of your vehicle. The Gross Vehicle Weight
(GVW) includes the curb weight
of the vehicle, any
cargo you may carry
in it, and the people who will be
riding
in the vehicle. And if you will tow a trailer, you
must add the tongue load to
the GVW because your
vehicle will be carrying that weight, too. See "Loading
Your Vehicle"
in the Index for mot-e information about
your vehicle's maximum load capacity.
"Fifth wheel hitch rating; weight distributing hitch
rating is limited
to 10,000 lbs. (4 540 kg).
ProCarManuals.com
Page 246 of 452
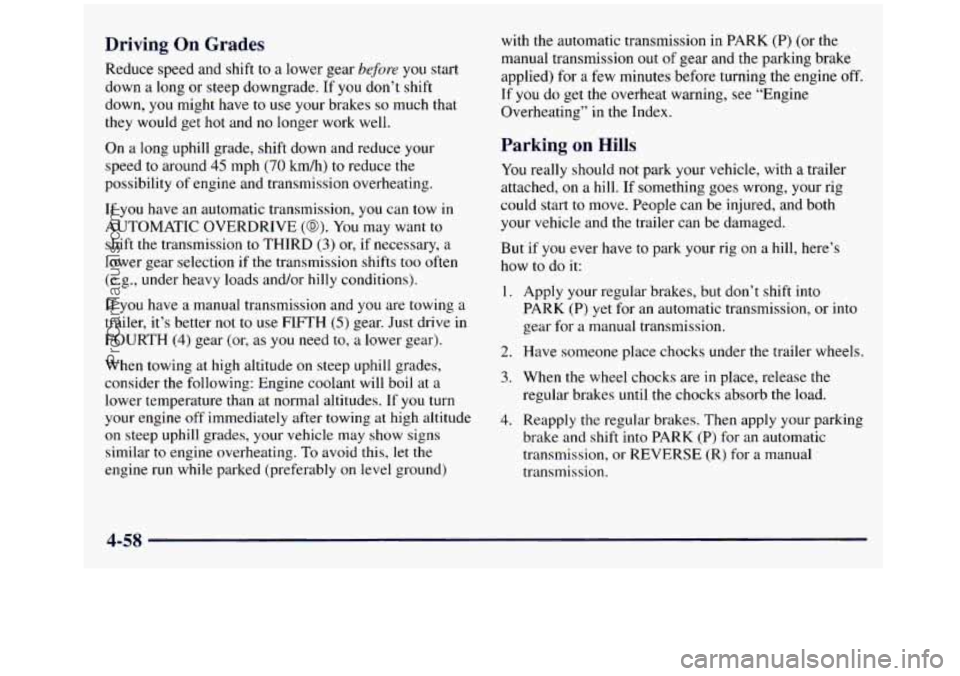
Driving On Grades
Reduce speed and shift to a lower gear before you start
down a long or steep downgrade. If
you don’t shift
down,
you might have to use your brakes so much that
they would
get hot and no longer work well.
On a long uphill grade, shift down and reduce your
speed
to around 45 mph (70 kdh) to reduce the
possibility
of engine and transmission overheating.
If you have an automatic transmission, you can tow in
AUTOMATIC OVERDRIVE
(@). You may want to
shift the transmission
to THIRD (3) or, if necessary, a
lower gear selection
if the transmission shifts too often
(e.g., under heavy loads and/or hilly conditions).
If
you have a manual transmission and you are towing a
trailer, it’s better not to
use FIFTH (5) gear. Just drive in
FOURTH
(4) gear (or, as you need to, a lower gear).
When towing at high altitude
on steep uphill grades,
consider the following: Engine coolant
will boil at a
lower temperature than at normal altitudes. If you turn
your engine off immediately after towing
at high altitude
on steep uphill grades, your vehicle may show signs
similar to engine overheating. To avoid this, let the
engine run while parked (preferably on level ground) with
the automatic transmission in
PARK (P) (or the
manual transmission out of gear and the parking brake
applied) for a few minutes before turning the engine
off.
If you do get the overheat warning, see “Engine
Overheating’’ in
the Index.
Parking on Hills
You really should not park your vehicle, with a trailer
attached, on a
hill. If something goes wrong, your rig
could start to move. People can be injured, and both
your vehicle and the trailer can be damaged.
But
if you ever have to park your rig on a hill, here’s
how to do it:
1.
2.
3.
4.
Apply your regular brakes, but don’t shift into
PARK
(P) yet for an automatic transmission, or into
gear for a manual transmission.
Have someone place chocks under the trailer wheels.
When the wheel chocks are
in place, release the
regular brakes until the chocks absorb the load.
Reapply the regular brakes. Then apply your parking brake and
shift into PARK (P) for an automatic
transmission, or REVERSE (R)
for a manual
transmission.
4-58
ProCarManuals.com
Page 247 of 452
5. If you have a four-wheel-drive vehicle,
be sure the transfer case is in
a drive gear and not
in
NEUTRAL (N).
6. Release the regular brakes.
-
/r CAUTIOIA:
It can be dangerous to get out of your vehicle if
the shift lever is not fully in
PARK (P) with the
parking brake firmly set. Your vehicle can roll.
If you have left the engine running, the vehicle
can move suddenly. You or others could be
injured.
To be sure your vehicle won’t move, even
when you’re on fairly level ground, use the steps
that follow.
If you have four-wheel drive and your transfer
case is in
NEUTRAL (N), your vehicle will be free
to
roll, even if your shift lever is in PARK (P). So,
be sure the transfer case is in a drive gear -- not
in
NEUTRAL (N).
When You Are Ready to Leave After
Parking
on a Hill
1. Apply your regular brakes and hold the pedal down
while you:
Start your engine;
Shift into a gear; and
Release the parking brake.
2. Let up on the brake pedal.
3. Drive slowly
until the trailer is clear of the chocks.
4. Stop and have someone pick up and store the chocks.
Maintenance When Trailer Towing
Your vehicle will need service more often when you’re
pulling
a trailer. See the Maintenance Schedule for more
on this. Things that are especially important
in trailer
operation are automatic transmission fluid (don’t
overfill), engine
oil, axle lubricant, belt, cooling system
and brake adjustment. Each of these is covered in this
manual, and the Index will help you find them quickly.
If you’re trailering, it’s a good idea to review these
sections before
you start your trip.
Check periodically
to see that all hitch nuts and bolts
are tight.
ProCarManuals.com
Page 251 of 452
Using a Transfer Case Mounted Power
Take-Off (Automatic Transmission)
1.
2.
3.
4.
5.
6.
7.
Set the parking brake.
Turn the ignition off.
Shift the transfer case into NEUTRAL
(N).
Shift the transmission into NEUTRAL (N).
Engage the PTO.
If you are going to drive the vehicle. shift the
transfer case into the range you want. Turn
the
ignition to START. Then apply the regular brakes
and release the. parking brake.
Shift the transmission to THIRD
(3) to start the PTO.
Release the regular brakes to drive the vehicle.
Disengaging a Power Take-OFF
1. Turn the ignition off.
2. Put the transmission in PARK (P).
3. Release the PTO
4. Restart the engine.
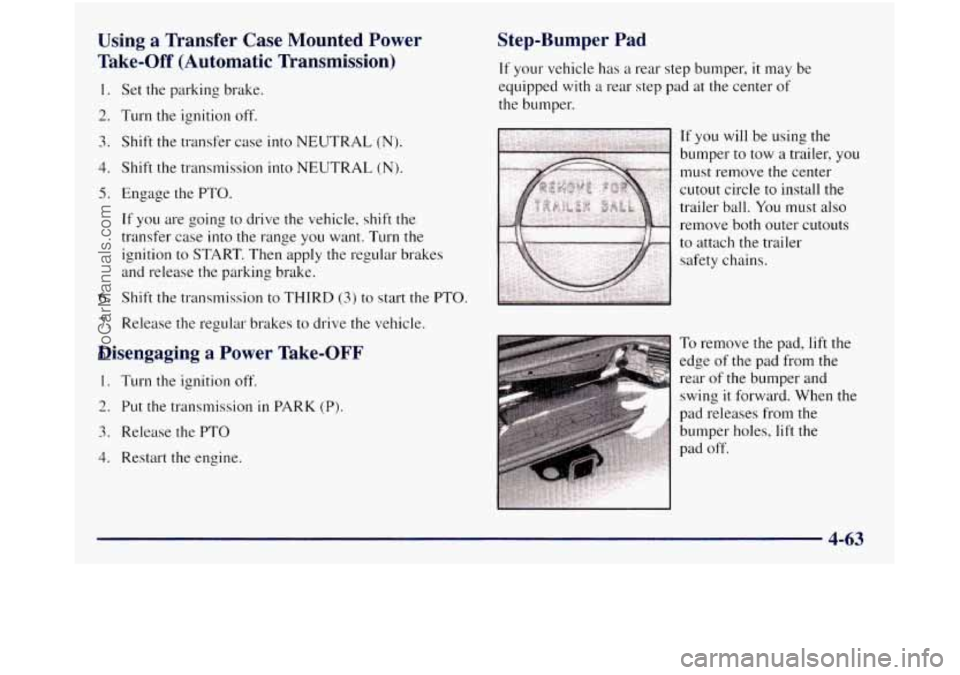
Step-Bumper Pad
If your vehicle has a rear step bumper, it may be
equipped with
a rear step pad at the center of
the bumper.
If you will be using the
bumper to tow a trailer,
you
must remove the center
cutout circle to install the
trailer ball.
You must also
remove both outer cutouts
to attach the trailer safety chains.
To remove the pad,
lift the
edge of the pad from the
rear of the bumper and
swing it forward. When the
pad releases from the
bumper holes,
lift the
pad off.
4-63
ProCarManuals.com
Page 253 of 452
SI ;tion 5 Problems on the Road
Here you’ll find what to do about some problems that can occur on the road.
5-2
5-3
5-3
5-8
5- 13
Hazard Warning Flashers
Other Warning Devices
Jump Starting
Towing Your Vehicle
Engine Overheating (Gasoline Engine) 5- 15
5-23
5-23
5-24
5-36
Cooling System -- Gasoline Engines
Engine Fan Noise
If a Tire Goes Flat
Changing a
Flat Tire
If You’re Stuck: In Sand, Mud, Ice or Snow
5-1
ProCarManuals.com
Page 256 of 452
2. Get the vehicles close enough so the jumper cables
can reach, but be sure the vehicles aren’t touching
each other. If they are, it could cause a ground
connection
you don’t want. You wouldn’t be able
to start your vehicle, and the bad grounding could
damage the electrical systems.
To avoid the possibility
of the vehicles rolling, set
the parking brake firmly on both vehicles involved
in the jump start procedure. Put an automatic
transmission in
PARK (P) or a manual transmission
in NEUTRAL (N).
If you have a four-wheel-drive
vehicle, be sure the transfer case is not in
NEUTRAL
(N).
3. Turn off the ignition on both vehicles. Unplug
unnecessary accessories plugged into the cigarette
lighter or accessory power outlets. Turn
off all lamps
that aren’t needed as well as radios. This will avoid
sparks and help save both batteries. In addition, it
could save your radio!
I NOTICE:
If you leave your radio on, it could be badly
damaged. The repairs wouldn’t be covered by
your warranty.
4. Open the hoods and locate the batteries. Find the
positive
(+) and negative (-) terminals on each battery.
If your vehicle has air conditioning, the auxiliary
electric fan under the hood can start up even
when the engine is not running and can injure
you. Keep hands, clothing and tools
away from
any underhood electric fan.
5-4
t
ProCarManuals.com
Page 257 of 452
I
Using a match near a battery can cause battery
gas to explode. People have been hurt doing this,
and some have been blinded. Use a flashlight
if
you need more light.
Be sure the batteries have enough water. You
don’t need to add water to the ACDelco
Freedom@ battery (or batteries) installed in
every new
GM vehicle. But if a battery has filler
caps, be sure the right amount of fluid is there.
If
it is low, add water to take care of that first. If
you don’t, explosive gas could be present.
Battery fluid contains acid that can burn you.
Don’t get it on you.
If you accidentally get it in
your eyes or on your skin, flush the place with
water and get medical help immediately.
5. Check that the jumper cables don’t have loose or
missing insulation.
If they do, you could get a shock.
The vehicles could be damaged too.
Before you connect the cables, here are some
basic things
you should know. Positive (+) will
go to positive
(+) and negative (-) will go to a
metal engine part. Don’t connect positive
(+) to
negative
(-) or you’ll get a short that would
damage the battery and maybe other parts
too.
On vehicles equipped with dual batteries, make any
battery connections
to the primary battery located on
the passenger’s side of the vehicle.
Fans or other moving engine parts can injure you
badly. Keep your hands
away from moving parts
once the engine is running.
5-5
ProCarManuals.com
Page 259 of 452
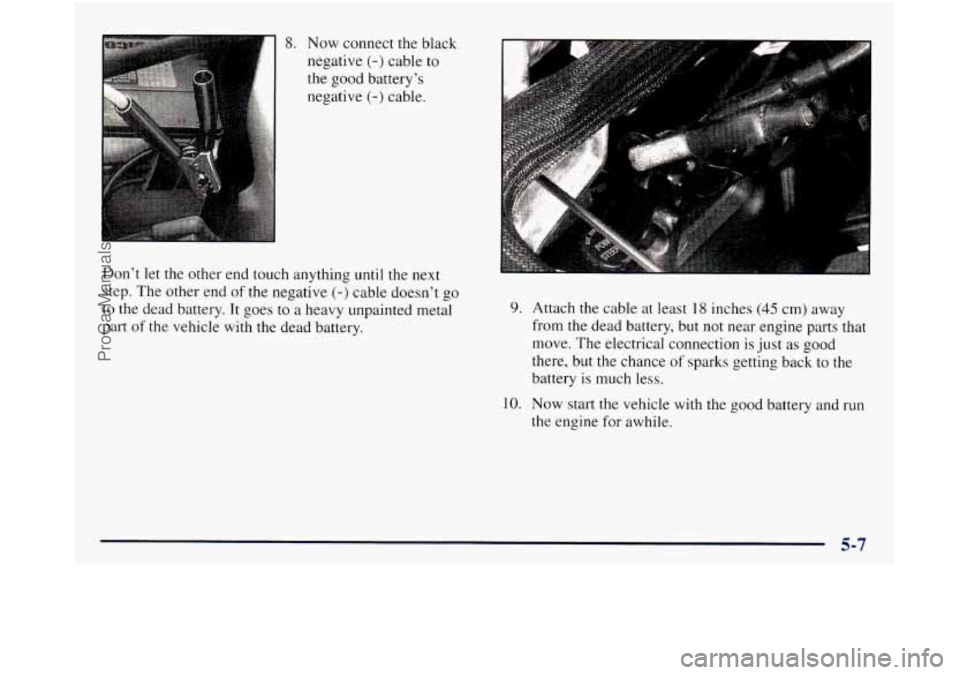
8. Now connect the black
negative
(-) cable to
the good battery’s negative
(-) cable.
Don’t
let the other end touch anything until the next
step. The other end
of the negative (-) cable doesn’t go
to the dead battery. It goes to
a heavy unpainted metal
part
of the vehicle with the dead battery.
9. Attach the cable at least 18 inches (45 cm) away
from the dead battery, but not near engine parts that
move. The electrical connection is just
as good
there, but the chance
of sparks getting back to the
battery is much less.
10. Now start the vehicle with the good battery and run
the engine
for awhile.
5-7
ProCarManuals.com