ignition GMC SIERRA 2004 Get To Know Guide
[x] Cancel search | Manufacturer: GMC, Model Year: 2004, Model line: SIERRA, Model: GMC SIERRA 2004Pages: 16, PDF Size: 0.4 MB
Page 4 of 16

If the ignition key is turned to RUN or
START and the driver and/or front out-
board passenger seatbelt is not buckled
within five seconds, a chime will sound
and the message “Buckle Seatbelt” (if
the driver or driver and passenger are
not buckled) or “Buckle Passenger” (if
the passenger only is not buckled) will
flash in the Driver Information Center.
The safety belt light ( ) will also
appear for several seconds and flash for
several more seconds. If at any time
while the vehicle is running the front-
seat belts are not buckled, the mes-
sage(s) and chimes will repeat.
See Section 3 of your Owner Manual.
Getting to Know YourSierra/Sierra Denali4
Heated Front Seats (if equipped)
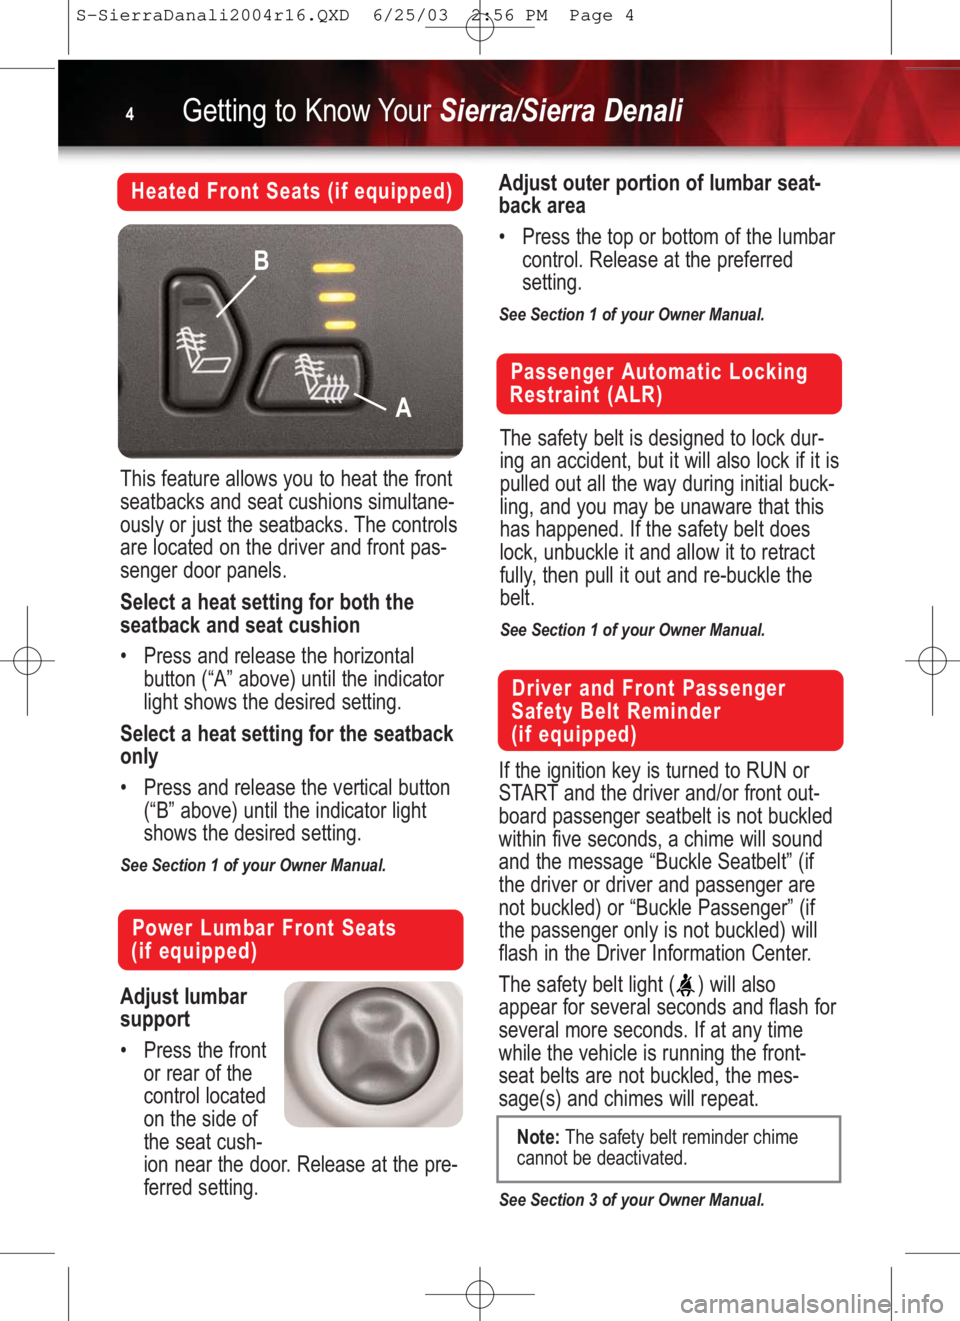
This feature allows you to heat the front
seatbacks and seat cushions simultane-
ously or just the seatbacks. The controls
are located on the driver and front pas-
senger door panels.
Select a heat setting for both the
seatback and seat cushion
•Press and release the horizontal
button (“A” above) until the indicator
light shows the desired setting.
Select a heat setting for the seatback
only
•Press and release the vertical button
(“B” above) until the indicator light
shows the desired setting.
See Section 1 of your Owner Manual.
Passenger Automatic Locking
Restraint (ALR)
Power Lumbar Front Seats
(if equipped)
A B
Adjust lumbar
support
•Press the front
or rear of the
control located
on the side of
the seat cush-
ion near the door. Release at the pre-
ferred setting.
Adjust outer portion of lumbar seat-
back area
•Press the top or bottom of the lumbar
control. Release at the preferred
setting.
See Section 1 of your Owner Manual.
Note:The safety belt reminder chime
cannot be deactivated.
The safety belt is designed to lock dur-
ing an accident, but it will also lock if it is
pulled out all the way during initial buck-
ling, and you may be unaware that this
has happened. If the safety belt does
lock, unbuckle it and allow it to retract
fully, then pull it out and re-buckle the
belt.
See Section 1 of your Owner Manual.
Driver and Front Passenger
Safety Belt Reminder
(if equipped)
S-SierraDanali2004r16.QXD 6/25/03 2:56 PM Page 4
Page 6 of 16

Getting to Know YourSierra/Sierra Denali6
Manual Climate Control System
(if equipped)
Adjust settings for operation
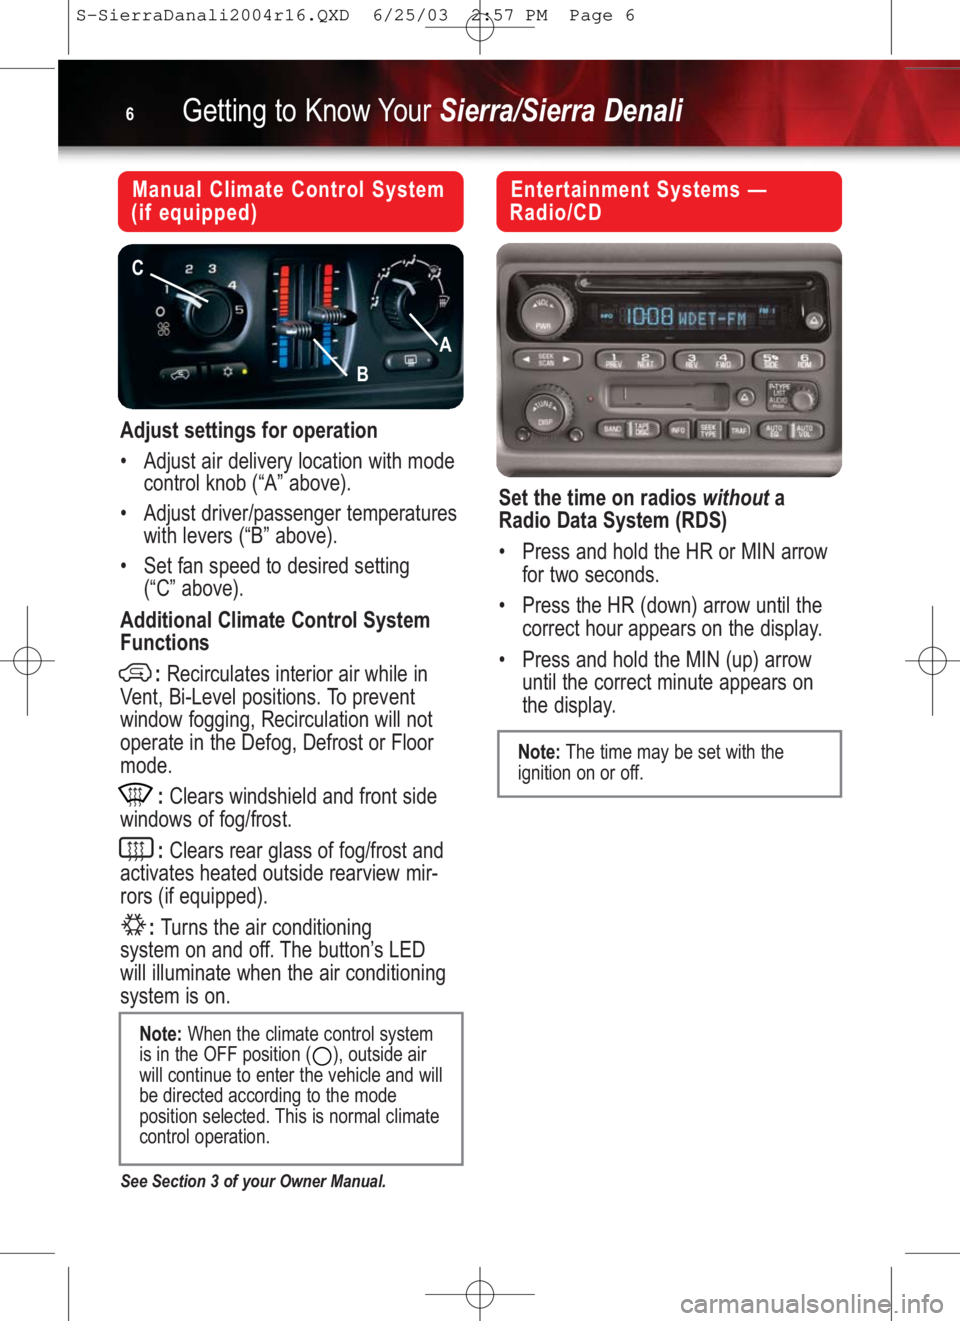
•Adjust air delivery location with mode
control knob (“A” above).
•Adjust driver/passenger temperatures
with levers (“B” above).
•Set fan speed to desired setting
(“C” above).
Additional Climate Control System
Functions
:Recirculates interior air while in
Vent, Bi-Level positions. To prevent
window fogging, Recirculation will not
operate in the Defog, Defrost or Floor
mode.
:Clears windshield and front side
windows of fog/frost.
:Clears rear glass of fog/frost and
activates heated outside rearview mir-
rors (if equipped).
:Turns the air conditioning
system on and off. The button’s LED
will illuminate when the air conditioning
system is on.
See Section 3 of your Owner Manual.
Note:When the climate control system
is in the OFF position ( ), outside air
will continue to enter the vehicle and will
be directed according to the mode
position selected. This is normal climate
control operation.
Entertainment Systems —
Radio/CD
Set the time on radios withouta
Radio Data System (RDS)
•Press and hold the HR or MIN arrow
for two seconds.
•Press the HR (down) arrow until the
correct hour appears on the display.
•Press and hold the MIN (up) arrow
until the correct minute appears on
the display.
Note:The time may be set with the
ignition on or off.
A
B
C
S-SierraDanali2004r16.QXD 6/25/03 2:57 PM Page 6
Page 12 of 16

Getting to Know YourSierra/Sierra Denali12
Your vehicle may be programmed with
the features shown below. To cycle
through them, use the
Personalization/Menu button ( )
located on your steering wheel.
•Alarm Warning Type
•Automatic Locking/Unlocking
•Perimeter Lighting
•Delayed Locking
•Remote Lock/Unlock Feedback
•Seat Position Recall
•Headlamps On at Exit
•Easy Exit Driver Seat
•Display Units
•Display Language
•Curb View Assist (if equipped)
Selection Options
Use the Select button ( ) to choose
your desired setting. The last setting
remaining on the display will be
the selection of choice. Continue cycling
through the menu with the
Personalization/Menu button ( ) to
set other preferences.Alarm W
arning Type
1. Alarm Warning: Both (default)
2. Alarm Warning: Off
3. Alarm Warning: Horn
4. Alarm Warning: Lamps
Automatic Door Locking/Unlocking
Options
Locking:
1. Lock Doors Out of Park
2. Lock Doors Manually
3. Lock Doors with Speed
(approx. 8 mph)
Unlocking:
1. Unlock All in Park
2. Unlock All at Key Out of Ignition
3. Unlock Manually
4. Unlock Driver Only in Park
Remote Lock/Unlock Options
1. Flash Lamps
2. Sound Horn
3. Both Lamps and Horn
4. Off
Memory Settings for Your
Vehicle (Driver Information
Center) (if equipped)
Note:The RKE transmitter
LOCK/UNLOCK button must be pressed
twiceto receive horn feedback.
S-SierraDanali2004r16.QXD 6/25/03 2:57 PM Page 12
Page 13 of 16

13
Perimeter Lighting Options
1. Perimeter Lighting On — Headlights
and backup lights will come on for 40
seconds when unlocked with remote
2. Perimeter Lighting Off
Delayed Locking
1. On
2. Off
Seat Position Recall Options
1. Seat Position Recall Off — Memory
Seat position will only be recalled
when you press memory button
1 or 2 on the driver’s door
2. Seat Position Recall at Key In
3. Seat Position Recall On Remote
Easy Exit Driver Seat
1. Adjust the seat to the desired
position.
2. Press and hold the exit button ( )
on the driver’s door until two chimes
sound. (Note: Seat Exit must be “On”
in your programmed settings.)
Headlamp On at Exit
1. Headlamp Delay: 10 sec (default)
2. Headlamp Delay: 20 sec
3. Headlamp Delay: 40 sec
4. Headlamp Delay: 60 sec
5. Headlamp Delay: Off
Curb View Assist Option(requires
Streering Wheel Controls)
1. Curb View Off
2. Curb View Passenger
3. Curb View Driver
4. Curb View Both
The Curb View Assist feature automati-
cally tilts your outside mirrors downward
to allow you to see curbs when
backing up.
Set Curb View Assist position
•Enable one of the four selections
above.
•Adjust the mirrors while the vehicle is
in reverse. When the vehicle is shift-
ed out of reverse, your selection is
saved in Memory 1 or 2.
See Section 2 of your Owner Manual.
Note:Memory 1 or 2 is dependent on
the RKE transmitter being used and the
key being in the ignition during
programming.
S-SierraDanali2004r16.QXD 6/25/03 2:57 PM Page 13