steering GMC SIERRA 2004 Get To Know Guide
[x] Cancel search | Manufacturer: GMC, Model Year: 2004, Model line: SIERRA, Model: GMC SIERRA 2004Pages: 16, PDF Size: 0.4 MB
Page 1 of 16
INSIDEYOURVEHICLEInstrument Panel . . . . . . . . . . . . . . . . . . . . . . . . . .2
Instrument Panel Cluster . . . . . . . . . . . . . . . . . . .3
Heated Front Seats . . . . . . . . . . . . . . . . . . . . . . . .4
Power Lumbar Front Seats . . . . . . . . . . . . . . . . .4
Passenger Automatic Locking Restraint (ALR) .4
Driver and Front Passenger
Safety Belt Reminder . . . . . . . . . . . . . . . . . . . . . .4
Automatic Dimming Rearview Mirror with
OnStar
®, Compass and Temperature Display . . .5
Automatic Climate Control System . . . . . . . . . . .5
Manual Climate Control System . . . . . . . . . . . . .6
Entertainment Systems — Radio/CD . . . . . . . . .6
HomeLink
®Transmitter . . . . . . . . . . . . . . . . . . . . .8
Steering Wheel Controls (OnStar®/Radio) . . . . . .9O
UTSIDEYOURVEHICLEPower Folding Mirrors . . . . . . . . . . . . . . . . . . . . .9
Power Camper-Type Mirrors . . . . . . . . . . . . . . .10
Automatic Headlamp Controls . . . . . . . . . . . . . .10
Daytime Running Lamps (DRL) . . . . . . . . . . . . .11
Content Theft-Deterrent System . . . . . . . . . . . .11
P
ERSONALIZINGYOURVEHICLEMemory Positions for Driver’s Seat, Mirrors,
Pedals, Radio and Climate Controls . . . . . . . . .11
Memory Settings for Your Vehicle . . . . . . . . . . .12
Odometer/Trip Settings . . . . . . . . . . . . . . . . . . .14
V
EHICLESYMBOLSGLOSSARY . . . . . . . . . . . . . . . .15
R
OADSIDEASSISTANCEPROGRAM, My GMLink . .16
Congratulations on your purchase of a GMC Sierra or Sierra Denali. Please read this information
and your Owner Manual to ensure an outstanding ownership experience. Note that your vehicle
may not include all the features described in this booklet. Place this booklet in your Owner
Manual portfolio for easy reference.
S-SierraDanali2004r16.QXD 6/25/03 2:56 PM Page 1
Page 2 of 16
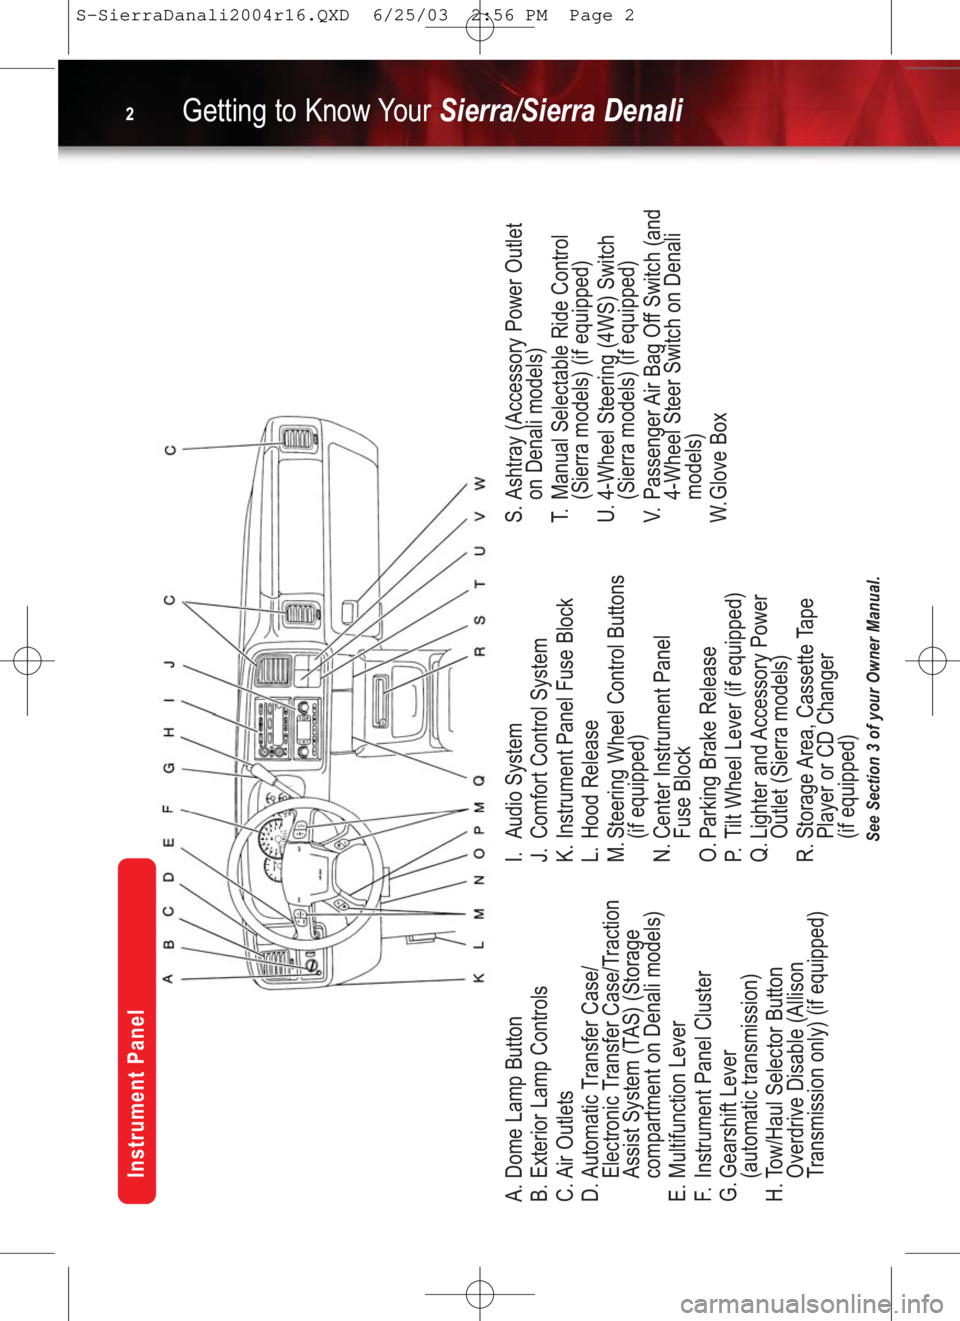
See Section 3 of your Owner Manual.
A. Dome Lamp Button
B. Exterior Lamp Controls
C. Air Outlets
D. Automatic Transfer Case/
Electronic Transfer Case/Traction
Assist System (TAS) (Storage
compartment on Denali models)
E. Multifunction Lever
F.Instrument Panel Cluster
G. Gearshift Lever
(automatic transmission)
H. Tow/Haul Selector Button
Overdrive Disable (Allison
Transmission only) (if equipped)I. Audio System
J. Comfort Control System
K. Instrument Panel Fuse Block
L. Hood Release
M. Steering Wheel Control Buttons
(if equipped)
N. Center Instrument Panel
Fuse Block
O. Parking Brake Release
P.Tilt Wheel Lever (if equipped)
Q. Lighter and Accessory Power
Outlet (Sierra models)
R. Storage Area, Cassette Tape
Player or CD Changer
(if equipped)S. Ashtray (Accessory Power Outlet
on Denali models)
T.Manual Selectable Ride Control
(Sierra models) (if equipped)
U. 4-Wheel Steering (4WS) Switch
(Sierra models) (if equipped)
V.Passenger Air Bag Off Switch (and
4-Wheel Steer Switch on Denali
models)
W.Glove Box
Getting to Know YourSierra/Sierra Denali2
Instrument Panel
S-SierraDanali2004r16.QXD 6/25/03 2:56 PM Page 2
Page 8 of 16
Getting to Know YourSierra/Sierra Denali8
HomeLink®Transmitter
(if equipped)
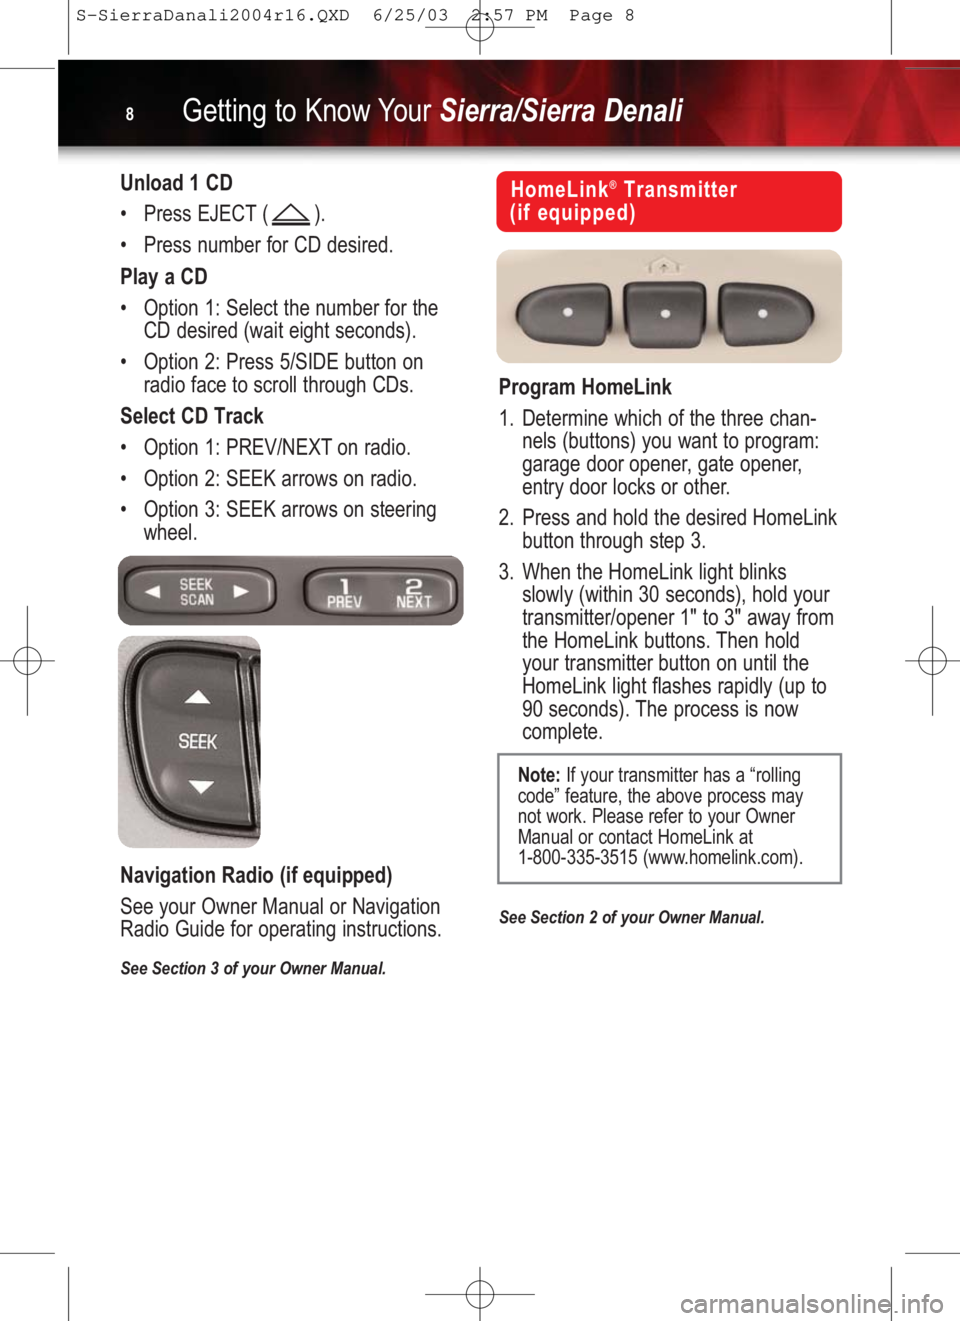
Program HomeLink
1. Determine which of the three chan-
nels (buttons) you want to program:
garage door opener, gate opener,
entry door locks or other.
2. Press and hold the desired HomeLink
button through step 3.
3. When the HomeLink light blinks
slowly (within 30 seconds), hold your
transmitter/opener 1" to 3" away from
the HomeLink buttons. Then hold
your transmitter button on until the
HomeLink light flashes rapidly (up to
90 seconds). The process is now
complete.
See Section 2 of your Owner Manual.
Note:If your transmitter has a “rolling
code” feature, the above process may
not work. Please refer to your Owner
Manual or contact HomeLink at
1-800-335-3515 (www.homelink.com).
Unload 1 CD
•Press EJECT ( ).
•Press number for CD desired.
Play a CD
•Option 1: Select the number for the
CD desired (wait eight seconds).
•Option 2: Press 5/SIDE button on
radio face to scroll through CDs.
Select CD Track
•Option 1: PREV/NEXT on radio.
•Option 2: SEEK arrows on radio.
•Option 3: SEEK arrows on steering
wheel.
Navigation Radio (if equipped)
See your Owner Manual or Navigation
Radio Guide for operating instructions.
See Section 3 of your Owner Manual.
S-SierraDanali2004r16.QXD 6/25/03 2:57 PM Page 8
Page 9 of 16
9
Steering Wheel Controls
(OnStar®/Radio) (if equipped)
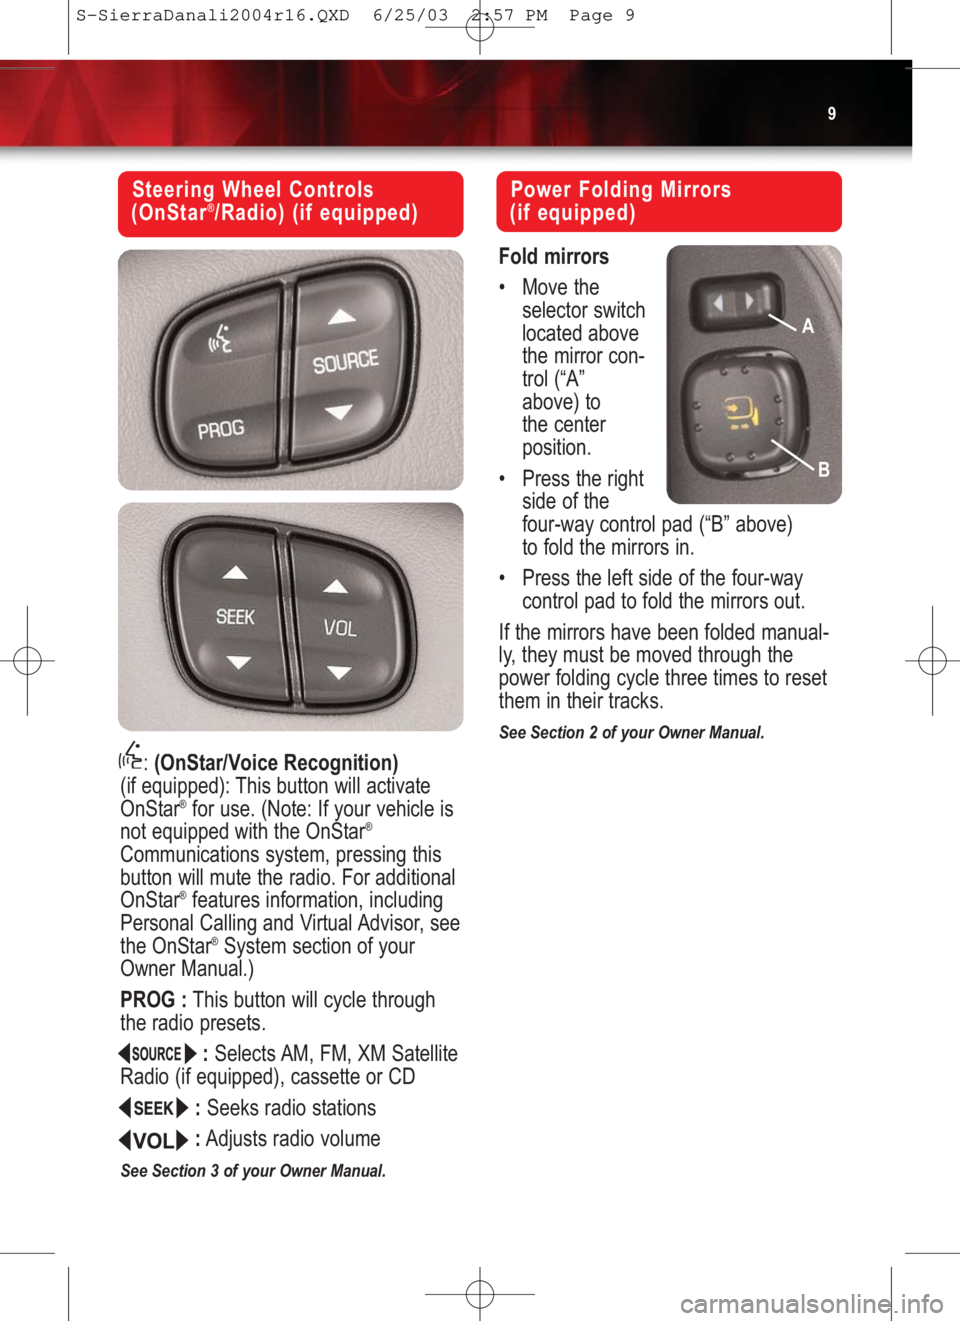
: (OnStar/Voice Recognition)
(if equipped): This button will activate
OnStar
®for use. (Note: If your vehicle is
not equipped with the OnStar®
Communications system, pressing this
button will mute the radio. For additional
OnStar
®features information, including
Personal Calling and Virtual Advisor, see
the OnStar
®System section of your
Owner Manual.)
PROG :This button will cycle through
the radio presets.
:Selects AM, FM, XM Satellite
Radio (if equipped), cassette or CD
:Seeks radio stations
:Adjusts radio volume
See Section 3 of your Owner Manual.
Power Folding Mirrors
(if equipped)
Fold mirrors
•Move the
selector switch
located above
the mirror con-
trol (“A”
above) to
the center
position.
•Press the right
side of the
four-way control pad (“B” above)
to fold the mirrors in.
•Press the left side of the four-way
control pad to fold the mirrors out.
If the mirrors have been folded manual-
ly, they must be moved through the
power folding cycle three times to reset
them in their tracks.
See Section 2 of your Owner Manual.
A
B
S-SierraDanali2004r16.QXD 6/25/03 2:57 PM Page 9
Page 10 of 16
Getting to Know YourSierra/Sierra Denali10
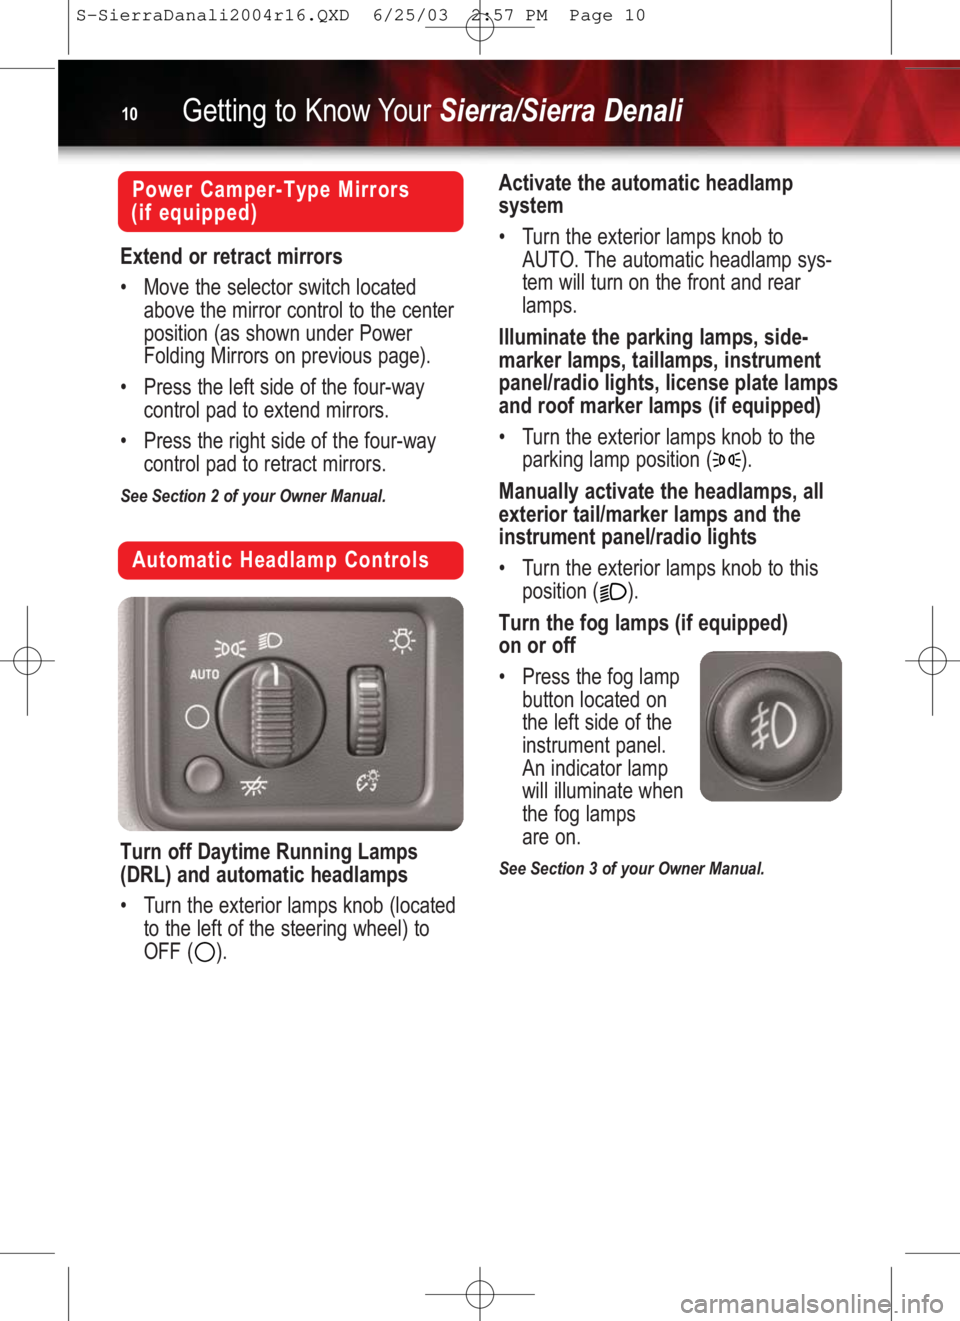
Automatic Headlamp Controls
Turn off Daytime Running Lamps
(DRL) and automatic headlamps
•Turn the exterior lamps knob (located
to the left of the steering wheel) to
OFF ( ).
Power Camper-Type Mirrors
(if equipped)
Extend or retract mirrors
•Move the selector switch located
above the mirror control to the center
position (as shown under Power
Folding Mirrors on previous page).
•Press the left side of the four-way
control pad to extend mirrors.
•Press the right side of the four-way
control pad to retract mirrors.
See Section 2 of your Owner Manual.
Activate the automatic headlamp
system
•Turn the exterior lamps knob to
AUTO. The automatic headlamp sys-
tem will turn on the front and rear
lamps.
Illuminate the parking lamps, side-
marker lamps, taillamps, instrument
panel/radio lights, license plate lamps
and roof marker lamps (if equipped)
•Turn the exterior lamps knob to the
parking lamp position ( ).
Manually activate the headlamps, all
exterior tail/marker lamps and the
instrument panel/radio lights
•Turn the exterior lamps knob to this
position ( ).
Turn the fog lamps (if equipped)
on or off
•Press the fog lamp
button located on
the left side of the
instrument panel.
An indicator lamp
will illuminate when
the fog lamps
are on.
See Section 3 of your Owner Manual.
S-SierraDanali2004r16.QXD 6/25/03 2:57 PM Page 10
Page 12 of 16

Getting to Know YourSierra/Sierra Denali12
Your vehicle may be programmed with
the features shown below. To cycle
through them, use the
Personalization/Menu button ( )
located on your steering wheel.
•Alarm Warning Type
•Automatic Locking/Unlocking
•Perimeter Lighting
•Delayed Locking
•Remote Lock/Unlock Feedback
•Seat Position Recall
•Headlamps On at Exit
•Easy Exit Driver Seat
•Display Units
•Display Language
•Curb View Assist (if equipped)
Selection Options
Use the Select button ( ) to choose
your desired setting. The last setting
remaining on the display will be
the selection of choice. Continue cycling
through the menu with the
Personalization/Menu button ( ) to
set other preferences.Alarm W
arning Type
1. Alarm Warning: Both (default)
2. Alarm Warning: Off
3. Alarm Warning: Horn
4. Alarm Warning: Lamps
Automatic Door Locking/Unlocking
Options
Locking:
1. Lock Doors Out of Park
2. Lock Doors Manually
3. Lock Doors with Speed
(approx. 8 mph)
Unlocking:
1. Unlock All in Park
2. Unlock All at Key Out of Ignition
3. Unlock Manually
4. Unlock Driver Only in Park
Remote Lock/Unlock Options
1. Flash Lamps
2. Sound Horn
3. Both Lamps and Horn
4. Off
Memory Settings for Your
Vehicle (Driver Information
Center) (if equipped)
Note:The RKE transmitter
LOCK/UNLOCK button must be pressed
twiceto receive horn feedback.
S-SierraDanali2004r16.QXD 6/25/03 2:57 PM Page 12
Page 14 of 16

Getting to Know YourSierra/Sierra Denali14
Odometer/Trip Settings
(if equipped)
Your vehicle’s personal trip and busi-
ness trip odometers operate only when
they are turned on. The controls are
located on the steering wheel.
Enable the system
•Press the Trip button ( ) until the
words “Personal Trip” appear. Then
press to denote Personal Trip
ON. Press the Trip button again to
monitor your mileage. (Note:
Continue to press the Trip button to
monitor the features shown in the
next column.)Use the above procedure to monitor the
following settings:
•Personal/Business: Miles
•Personal/Business: Gal.
•Personal/Business: Avg. MPG
•Personal/Business: MPH
•Personal/Business: Annual % Usage
•Business: Hourmeter (Total Engine
Run Time)
•Business: Annual Log
•Business: Timer
Reset trip information
•Press and hold the Select button
( ) for two seconds while viewing
any of the trip modes on the Driver
Information Center.
See Section 2 of your Owner Manual.
Note:Whether your vehicle is equipped
with a Driver Information Center or not,
you can select and reset trip features by
using the Trip Odometer Reset Stem
located on the instrument panel cluster.
S-SierraDanali2004r16.QXD 6/25/03 2:57 PM Page 14
Page 15 of 16

15
Vehicle Symbols Glossary
Air Bag Readiness Light
Air Conditioning (A/C)
Antilock Brake System
Warning Light
Auxiliary Roof-Mounted Lamp
Switch (if equipped)
Battery Warning Light
Brake System Warning Light
Cargo Lamp Button
Content Theft Deterrent
Cruise Control Set
Dome Lamps Override Button
Driver Information Center Trip
Information Button (on steering
wheel)
Driver Information Center Fuel
Information Button (on steering
wheel)
Driver Information Center
Personalization/Menu Button
(on steering wheel)
Driver Information Center Select
Button (on steering wheel)
Fog Lamps
Four-Wheel Drive Light
Four-Wheel Steer (if equipped)Front and Side Window Defrost
Headlamps
Instrument Panel Brightness
Control
Malfunction Indicator Lamp
(Check Engine Light)
Off (for example, headlamp and
climate controls)
Off/On (for example, inside
rearview mirror)
On (for example, cruise control
lever)
Overdrive Disabled (Shown on
shift lever, if equipped with
Allison transmission)
Parking Lamps
Driver and Front Passenger
Safety Belt Reminder Light
(if equipped)
Rear Door Security Locks
(if equipped)
Rear Window Defogger
(if equipped)
Tow/Haul Mode Light
Traction Off Light
Up-Shift Light
(vehicles with manual transmission)
Following are examples of symbols you may find on your vehicle. It is important to
become familiar with them, as they alert you to various vehicle operating conditions.
S-SierraDanali2004r16.QXD 6/25/03 2:57 PM Page 15