fuse panel GMC SIERRA 2004 Owner's Manual
[x] Cancel search | Manufacturer: GMC, Model Year: 2004, Model line: SIERRA, Model: GMC SIERRA 2004Pages: 588, PDF Size: 3.74 MB
Page 120 of 588
How long should you keep the coolant heater plugged
in? The answer depends on the outside temperature, the
kind of oil you have, and some other things. Instead
of trying to list everything here, we ask that you contact
your dealer in the area where you'll be parking your
vehicle. The dealer can give you the best advice for that
particular area.
Automatic Transmission Operation
If your vehicle is equipped with an automatic
transmission, it features an electronic shift position
indicator within the instrument panel cluster. This display
must be powered anytime the shift lever is capable of
being moved out of PARK (P). See
Fuses and
Circuit Breakers on page 5-126.
There are several different positions for your shift lever.
PARK (P):This position locks your rear wheels. It's
the best position to use when you start your engine
because your vehicle can't move easily. If your vehicle
is equipped with the Allison
žTransmission, use
PARK (P) for stationary operation of the Power Takeoff
(PTO), if equipped.
{CAUTION:
It is dangerous to get out of your vehicle if the
shift lever is not fully in PARK (P) with the
parking brake ®rmly set. Your vehicle can roll.
Do not leave your vehicle when the engine is
running unless you have to. If you have left the
engine running, the vehicle can move
suddenly. You or others could be injured. To
be sure your vehicle will not move, even when
you are on fairly level ground, always set your
parking brake and move the shift lever to
PARK (P). See
Shifting Into Park (P) on
page 2-49
. If you are pulling a trailer, see
Towing a Trailer on page 4-70.
2-26
Page 169 of 588
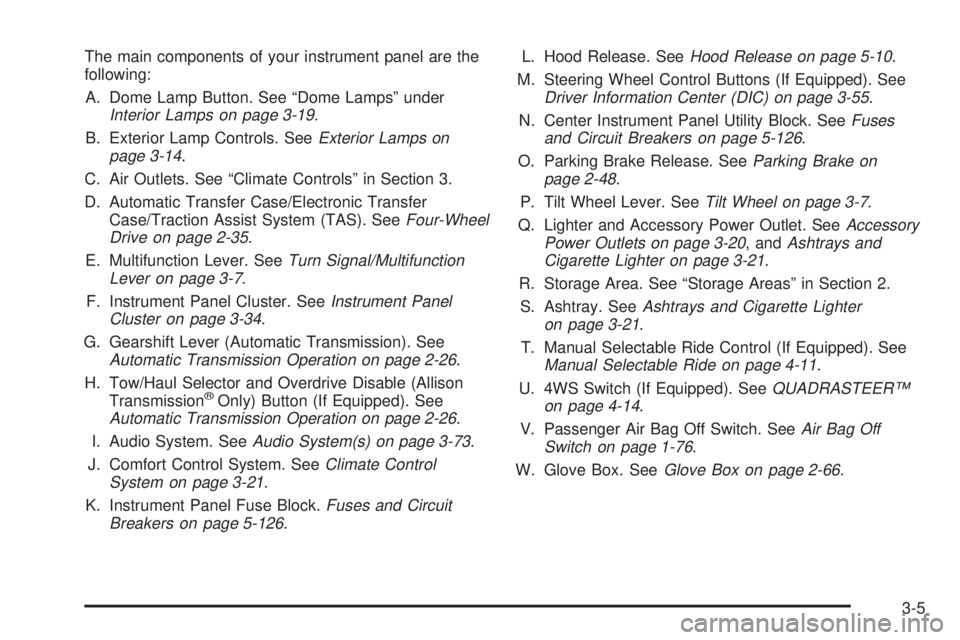
The main components of your instrument panel are the
following:
A. Dome Lamp Button. See ªDome Lampsº under
Interior Lamps on page 3-19.
B. Exterior Lamp Controls. See
Exterior Lamps on
page 3-14.
C. Air Outlets. See ªClimate Controlsº in Section 3.
D. Automatic Transfer Case/Electronic Transfer
Case/Traction Assist System (TAS). See
Four-Wheel
Drive on page 2-35.
E. Multifunction Lever. See
Turn Signal/Multifunction
Lever on page 3-7.
F. Instrument Panel Cluster. See
Instrument Panel
Cluster on page 3-34.
G. Gearshift Lever (Automatic Transmission). See
Automatic Transmission Operation on page 2-26.
H. Tow/Haul Selector and Overdrive Disable (Allison
Transmission
žOnly) Button (If Equipped). SeeAutomatic Transmission Operation on page 2-26.
I. Audio System. See
Audio System(s) on page 3-73.
J. Comfort Control System. See
Climate Control
System on page 3-21.
K. Instrument Panel Fuse Block.
Fuses and Circuit
Breakers on page 5-126.L. Hood Release. See
Hood Release on page 5-10.
M. Steering Wheel Control Buttons (If Equipped). See
Driver Information Center (DIC) on page 3-55.
N. Center Instrument Panel Utility Block. See
Fuses
and Circuit Breakers on page 5-126.
O. Parking Brake Release. See
Parking Brake on
page 2-48.
P. Tilt Wheel Lever. See
Tilt Wheel on page 3-7.
Q. Lighter and Accessory Power Outlet. See
Accessory
Power Outlets on page 3-20, andAshtrays and
Cigarette Lighter on page 3-21.
R. Storage Area. See ªStorage Areasº in Section 2.
S. Ashtray. See
Ashtrays and Cigarette Lighter
on page 3-21.
T. Manual Selectable Ride Control (If Equipped). See
Manual Selectable Ride on page 4-11.
U. 4WS Switch (If Equipped). See
QUADRASTEERŸ
on page 4-14.
V. Passenger Air Bag Off Switch. See
Air Bag Off
Switch on page 1-76.
W. Glove Box. See
Glove Box on page 2-66.
3-5
Page 172 of 588
Turn and Lane Change Signals
The turn signal has two upward (for right) and two
downward (for left) positions. These positions allow you
to signal a turn or a lane change.
To signal a turn, move the lever all the way up or down.
When the turn is ®nished, the lever will return
automatically.
To signal a lane change, just raise or lower the lever
until the arrow starts to ¯ash. Hold it there until you
complete your lane change. The lever will return by itself
when you release it.
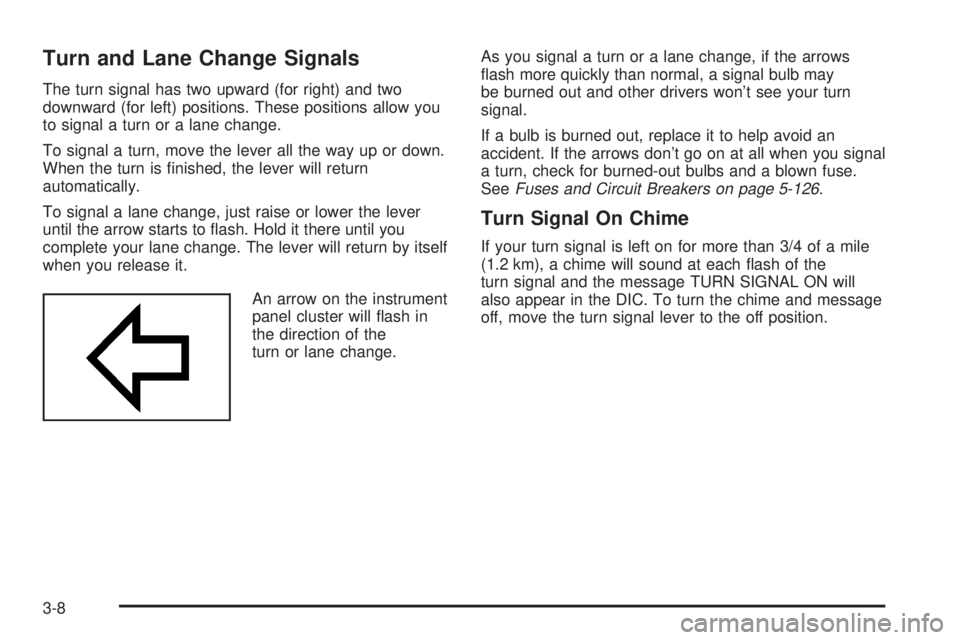
An arrow on the instrument
panel cluster will ¯ash in
the direction of the
turn or lane change.As you signal a turn or a lane change, if the arrows
¯ash more quickly than normal, a signal bulb may
be burned out and other drivers won't see your turn
signal.
If a bulb is burned out, replace it to help avoid an
accident. If the arrows don't go on at all when you signal
a turn, check for burned-out bulbs and a blown fuse.
See
Fuses and Circuit Breakers on page 5-126.
Turn Signal On Chime
If your turn signal is left on for more than 3/4 of a mile
(1.2 km), a chime will sound at each ¯ash of the
turn signal and the message TURN SIGNAL ON will
also appear in the DIC. To turn the chime and message
off, move the turn signal lever to the off position.
3-8
Page 185 of 588
Notice:Improper use of the power outlet can cause
damage not covered by your warranty. Do not
hang any type of accessory or accessory bracket
from the plug because the power outlets are
designed for accessory power plugs only.
Ashtrays and Cigarette Lighter
Your vehicle may be equipped with a front ashtray
located near the center of the instrument panel. Pull on
the door to open it.
Notice:If you put papers or other ¯ammable items
in the ashtray, hot cigarettes or other smoking
materials could ignite them and possibly damage
your vehicle. Never put ¯ammable items in the
ashtray.
To remove the front ashtray, pull the ashtray toward you.
To replace the ashtray, place the ashtray on the slides at
the side of its location in the instrument panel. To use the
cigarette lighter, push it in all the way, and let go. When
it's ready, it will pop back out by itself.
Notice:Holding a cigarette lighter in while it is
heating will not allow the lighter to back away from
the heating element when it is hot. Damage from
overheating may occur to the lighter or heating
element, or a fuse could be blown. Do not hold a
cigarette lighter in while it is heating.
Climate Controls
Climate Control System
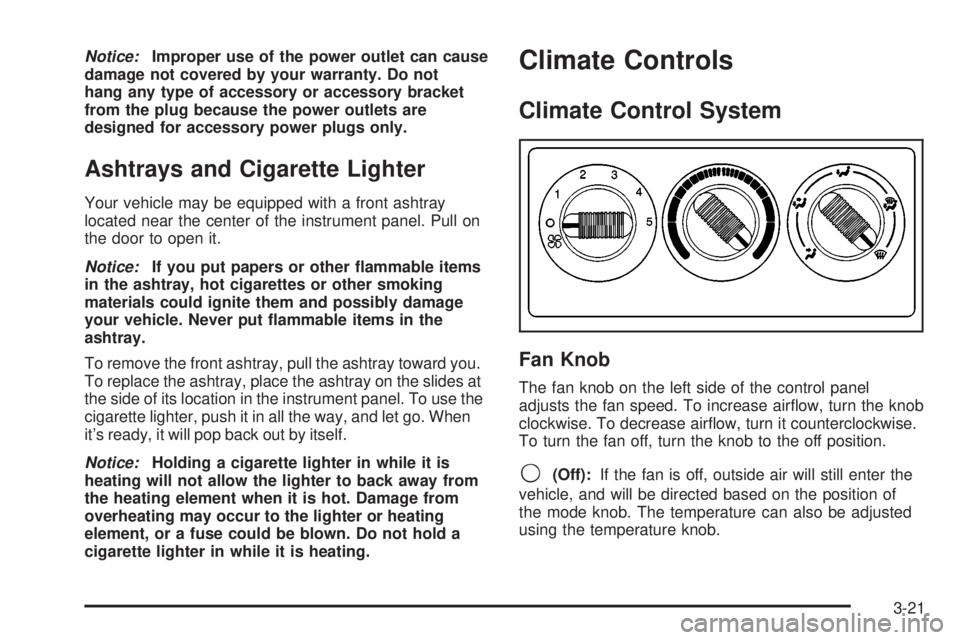
Fan Knob
The fan knob on the left side of the control panel
adjusts the fan speed. To increase air¯ow, turn the knob
clockwise. To decrease air¯ow, turn it counterclockwise.
To turn the fan off, turn the knob to the off position.
9(Off):If the fan is off, outside air will still enter the
vehicle, and will be directed based on the position of
the mode knob. The temperature can also be adjusted
using the temperature knob.
3-21
Page 526 of 588
Windshield Wiper Fuses
The windshield wiper motor is protected by an internal
circuit breaker and a fuse. If the motor overheats due to
heavy snow, etc., the wiper will stop until the motor
cools. If the overload is caused by some electrical
problem and not snow, etc., be sure to get it ®xed.
Power Windows and Other Power
Options
Circuit breakers protect the power windows and other
power accessories. When the current load is too heavy,
the circuit breaker opens and closes, protecting the
circuit until the problem is ®xed or goes away.
Fuses and Circuit Breakers
The wiring circuits in your vehicle are protected from
short circuits by a combination of fuses, circuit breakers
and fusible thermal links. This greatly reduces the
chance of ®res caused by electrical problems.
Look at the silver-colored band inside the fuse. If the
band is broken or melted, replace the fuse. Be sure you
replace a bad fuse with a new one of the identical
size and rating.If you ever have a problem on the road and don't have
a spare fuse, you can borrow one that has the same
amperage. Just pick some feature of your vehicle
that you can get along without ± like the radio or
cigarette lighter ± and use its fuse, if it is the correct
amperage. Replace it as soon as you can.
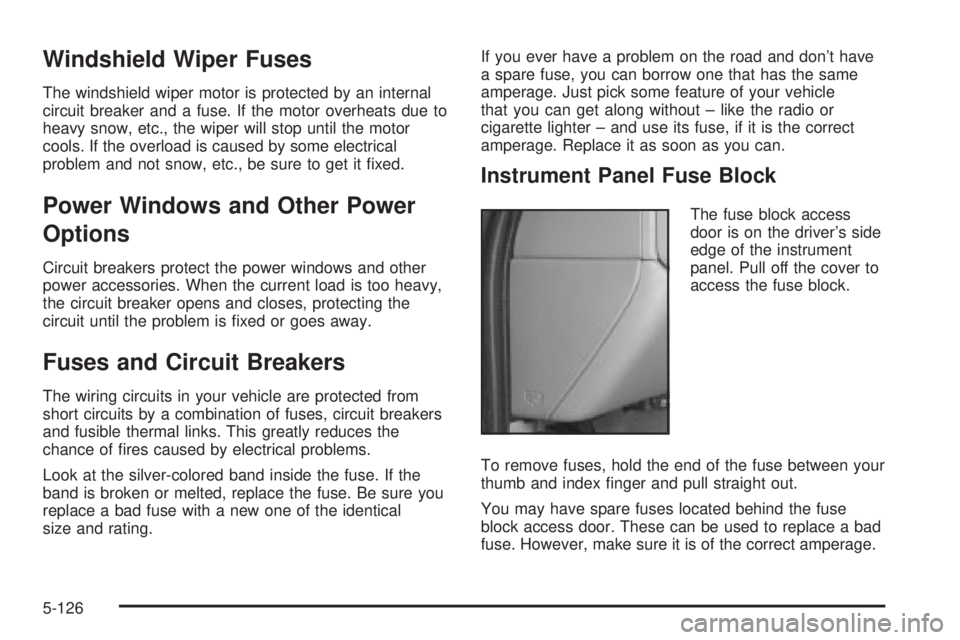
Instrument Panel Fuse Block
The fuse block access
door is on the driver's side
edge of the instrument
panel. Pull off the cover to
access the fuse block.
To remove fuses, hold the end of the fuse between your
thumb and index ®nger and pull straight out.
You may have spare fuses located behind the fuse
block access door. These can be used to replace a bad
fuse. However, make sure it is of the correct amperage.
5-126
Page 528 of 588
Fuses Usage
RT TRNRight Turn Signals and
Sidemarkers
BODY Harness Connector
DDM Driver Door Module
AUX PWR 2 Not Used
LOCKS Power Door Lock System
ECC Not Used
TBC 2C Truck Body Controller
FLASH Flasher Module
CB LT DOORSLeft Power Windows Circuit
Breaker
TBC 2B Truck Body Controller
TBC 2A Truck Body ControllerCenter Instrument Panel Fuse Block
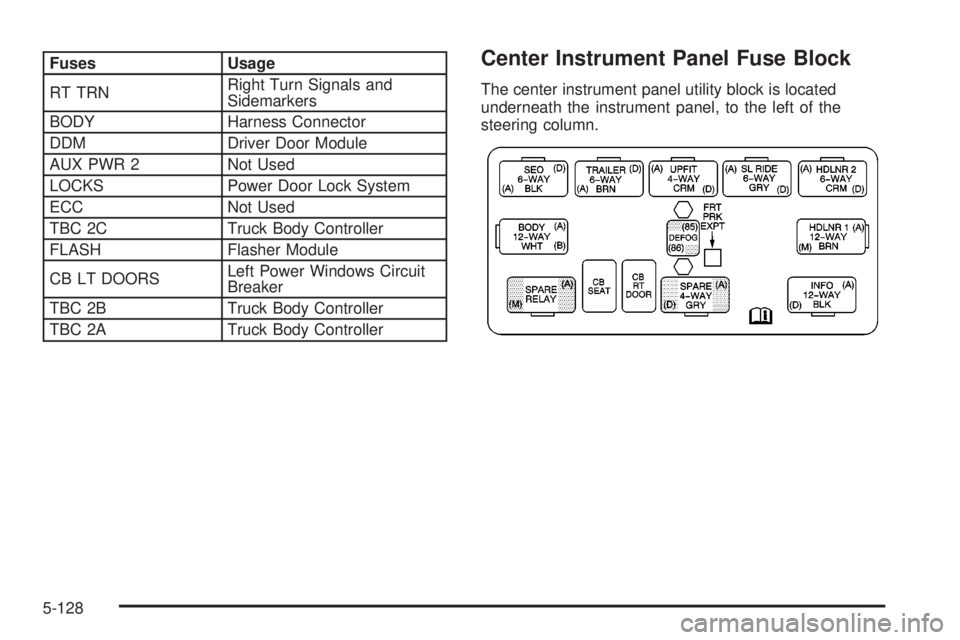
The center instrument panel utility block is located
underneath the instrument panel, to the left of the
steering column.
5-128
Page 531 of 588
*1Ð Gasoline Engine and Diesel Engine.
*2Ð Gasoline Engine; ECMRPV Ð Diesel Engine.
*3Ð Gasoline Engine; FUEL HT Ð Diesel Engine.
*4Ð Gasoline Engine; ECM I Ð Diesel Engine.
*5Ð IGN/EDU
Fuses Usage
GLOW PLUGDiesel Glow Plugs and Intake
Air Heater
CUST FEED Gasoline Accessory Power
STUD #1Auxiliary Power (Single
Battery and Diesels Only)/
Dual Battery (TP2) Do not
install fuse.
MBECMid Bussed Electrical Center
Power Feed, Front Seats,
Right Doors
BLOWER Front Climate Control Fan
LBECLeft Bussed Electrical Center,
Door Modules, Door Locks,
Auxiliary Power OutletÐRear
Cargo Area and Instrument
Panel
Fuses Usage
STUD 2Accessory Power/Trailer
Wiring Brake Feed
ABS Anti-Lock Brakes
VSES/ECAS Vehicle Stability
IGN A Ignition Power
IGN B Ignition Power
LBEC 1Left Bussed Electrical Center,
Left Doors, Truck Body
Controller, Flasher Module
TRL PARK Parking Lamps Trailer Wiring
RR PARKRight Rear Parking and
Sidemarker Lamps
LR PARKLeft Rear Parking and
Sidemarker Lamps
PARK LP Parking Lamps Relay
STARTER Starter Relay
INTPARK Interior Lamps
STOP LP Stoplamps
TBC BATTTruck Body Controller Battery
Feed
5-131
Page 532 of 588
Fuses Usage
SUNROOF Sunroof
SEO B2 Off-Road Lamps
4WSVent Solenoid
Canister/Quadrasteer Module
Power
RR HVAC Not Used
AUX PWRAuxiliary Power Outlet Ð
Console
IGN 1 Ignition Relay
PCM 1 Powertrain Control Module
ETC/ECMElectronic Throttle Control,
Electronic Brake Controller
IGN EInstrument Panel Cluster, Air
Conditioning Relay, Turn
Signal/Hazard Switch, Starter
Relay
RTD Ride Control
TRL B/U Backup Lamps Trailer Wiring
PCM BPowertrain Control Module,
Fuel Pump
F/PMP Fuel Pump (Relay)Fuses Usage
B/U LPBack-up Lamps, Automatic
Transmission Shift Lock
Control System
RR DEFOG Rear Window Defogger
HDLP-HI Headlamp High Beam Relay
PRIME Not Used
02B Oxygen Sensors
SIRSupplemental In¯atable
Restraint System
FRT PARKFront Parking Lamps,
Sidemarker Lamps
DRLDaytime Running Lamps
(Relay)
SEO IGN Rear Defog Relay
TBC IGN1 Truck Body Controller Ignition
HI HDLP-LT High Beam Headlamp-Left
LH HID Not Used
DRL Daytime Running Lamps
IPC/DICInstrument Panel
Cluster/Driver Information
Center
5-132
Page 573 of 588
Bulb Replacement (cont.)
Roof Marker Lamps.....................................5-67
Taillamps....................................................5-71
Buying New Tires...........................................5-89
C
California Fuel.................................................. 5-5
Canada........................................................... 7-5
Canadian Owners................................................ ii
Canadian Roadside Assistance........................... 7-7
Capacities and Speci®cations..........................5-134
Car Washes for QUADRASTEERŸ Equipped
Vehicles.....................................................4-16
Carbon Monoxide...................4-47, 4-70, 2-14, 2-53
Care of
Safety Belts..............................................5-119
Your Cassette Tape Player..........................3-129
Your CD and DVD Player...........................3-131
Your CDs and DVDs..................................3-130
Cargo Lamp...................................................3-18
CARGO LAMP ON.........................................3-67
Cassette Tape Messages.................................3-98
CD Adapter Kits.............................................3-99
CD Messages.............................3-87, 3-101, 3-115
Center Console Storage Area...........................2-67
Center High-Mounted Stoplamp (CHMSL) and
Cargo Lamp...............................................5-69
Center Instrument Panel Fuse Block................5-128Center Passenger Position, Safety Belts.............1-25
Chains, Tires..................................................5-94
CHANGE ENGINE OIL....................................3-68
Check
Engine Light...............................................3-49
Check Engine Light.........................................3-49
CHECK OIL LEVEL.........................................3-67
CHECK WASHER FLUID.................................3-67
Checking Brake Fluid......................................5-49
Checking Coolant............................................5-35
Checking Engine Oil........................................5-18
Checking Things Under the Hood......................5-10
Checking Your Restraint Systems......................1-87
Chemical Paint Spotting.................................5-123
Child Restraints
Child Restraint Systems...............................1-39
Infants and Young Children...........................1-35
Lower Anchorages and Top Tethers for
Children (LATCH System)..........................1-48
Older Children.............................................1-33
Securing a Child Restraint Designed
for the LATCH System......................1-50, 1-51
Securing a Child Restraint in a Center Rear
Seat Position...........................................1-58
Securing a Child Restraint in a Rear Outside
Seat Position...........................................1-55
Securing a Child Restraint in the Center Front
Seat Position...........................................1-60
Top Strap...................................................1-43
3
Page 578 of 588
Headlamps (cont.)
Front Turn Signal, Sidemarker and Daytime
Running Lamps........................................5-66
Halogen Bulbs............................................5-64
Pickup Box Identi®cation and Fender Marker
Lamps....................................................5-70
Roof Marker Lamps.....................................5-67
Headphones.................................................3-122
Heated Seats................................................... 1-6
Heating.........................................................3-31
Heavy-DutyTrailer Wiring Harness Package........4-96
Highway Hypnosis...........................................4-44
Hill and Mountain Roads..................................4-45
Hitches..........................................................4-88
Hood
Checking Things Under................................5-10
Release.....................................................5-10
Horn............................................................... 3-7
How to Add Coolant to the Coolant Surge Tank
for Gasoline Engines....................................5-41
How to Add Fluid............................5-27, 5-30, 5-32
How to Check........................5-25, 5-28, 5-31, 5-85
How to Check and Add Fluid............................5-33
How to Check Lubricant...................................5-59
How to Check Power Steering Fluid..................5-46
How to Inspect...............................................5-23
How to Use This Manual...................................... iiHow to Wear Safety Belts Properly...................1-16
Hydraulic Clutch.............................................5-32
Hydroplaning..................................................4-40
I
If No Steam Is Coming From Your Engine..........5-38
If Steam Is Coming From Your Engine...............5-37
If the Light is Flashing.....................................3-50
If the Light Is On Steady.................................3-50
If You Are Caught in a Blizzard.........................4-49
If You Are Stuck in Sand, Mud, Ice or Snow.......4-51
If You Do Decide To Pull A Trailer.....................4-71
Ignition Positions.............................................2-22
Infants and Young Children, Restraints...............1-35
In¯ation - Tire Pressure...................................5-84
Instrument Panel
Cluster.......................................................3-34
Overview..................................................... 3-4
Instrument Panel Brightness Control..................3-19
Instrument Panel Fuse Block..........................5-126
Interior Lamps................................................3-19
J
Jump Starting.................................................5-53
8