GMC SIERRA 2006 Owner's Manual
Manufacturer: GMC, Model Year: 2006, Model line: SIERRA, Model: GMC SIERRA 2006Pages: 600, PDF Size: 3.49 MB
Page 521 of 600
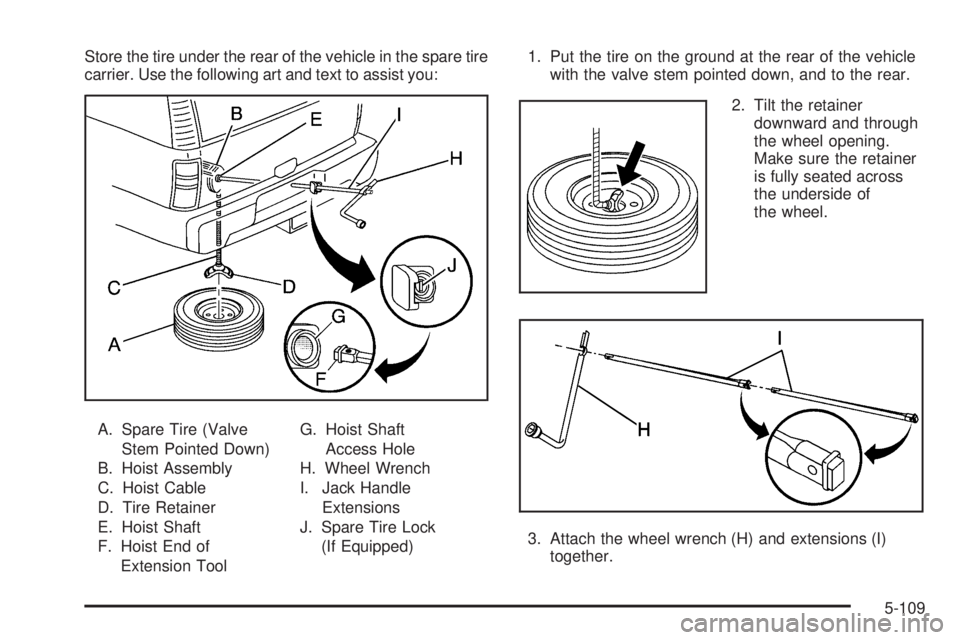
Store the tire under the rear of the vehicle in the spare tire
carrier. Use the following art and text to assist you:
A. Spare Tire (Valve
Stem Pointed Down)
B. Hoist Assembly
C. Hoist Cable
D. Tire Retainer
E. Hoist Shaft
F. Hoist End of
Extension ToolG. Hoist Shaft
Access Hole
H. Wheel Wrench
I. Jack Handle
Extensions
J. Spare Tire Lock
(If Equipped)1. Put the tire on the ground at the rear of the vehicle
with the valve stem pointed down, and to the rear.
2. Tilt the retainer
downward and through
the wheel opening.
Make sure the retainer
is fully seated across
the underside of
the wheel.
3. Attach the wheel wrench (H) and extensions (I)
together.
5-109
Page 522 of 600
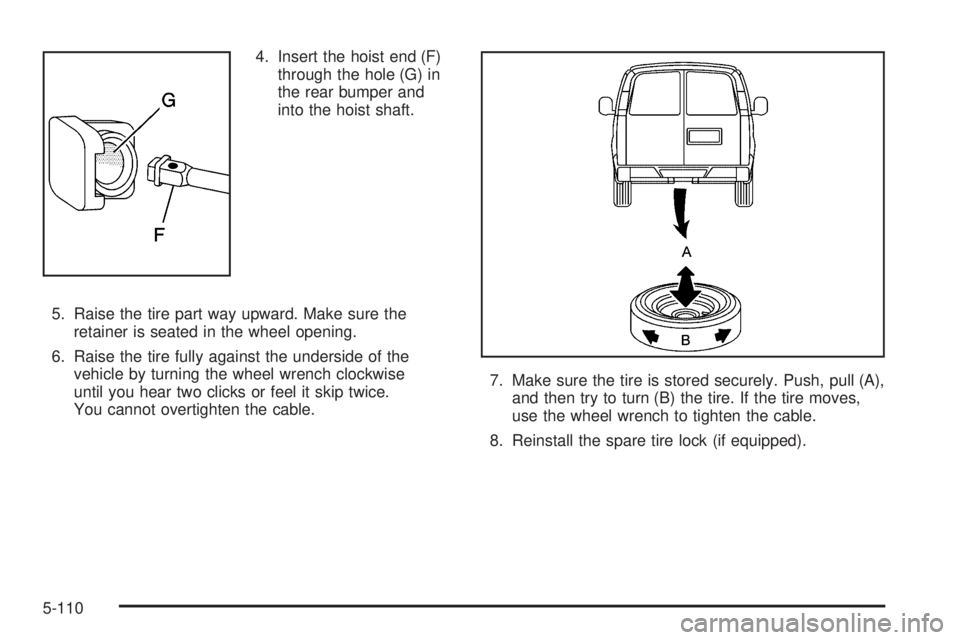
4. Insert the hoist end (F)
through the hole (G) in
the rear bumper and
into the hoist shaft.
5. Raise the tire part way upward. Make sure the
retainer is seated in the wheel opening.
6. Raise the tire fully against the underside of the
vehicle by turning the wheel wrench clockwise
until you hear two clicks or feel it skip twice.
You cannot overtighten the cable.7. Make sure the tire is stored securely. Push, pull (A),
and then try to turn (B) the tire. If the tire moves,
use the wheel wrench to tighten the cable.
8. Reinstall the spare tire lock (if equipped).
5-110
Page 523 of 600
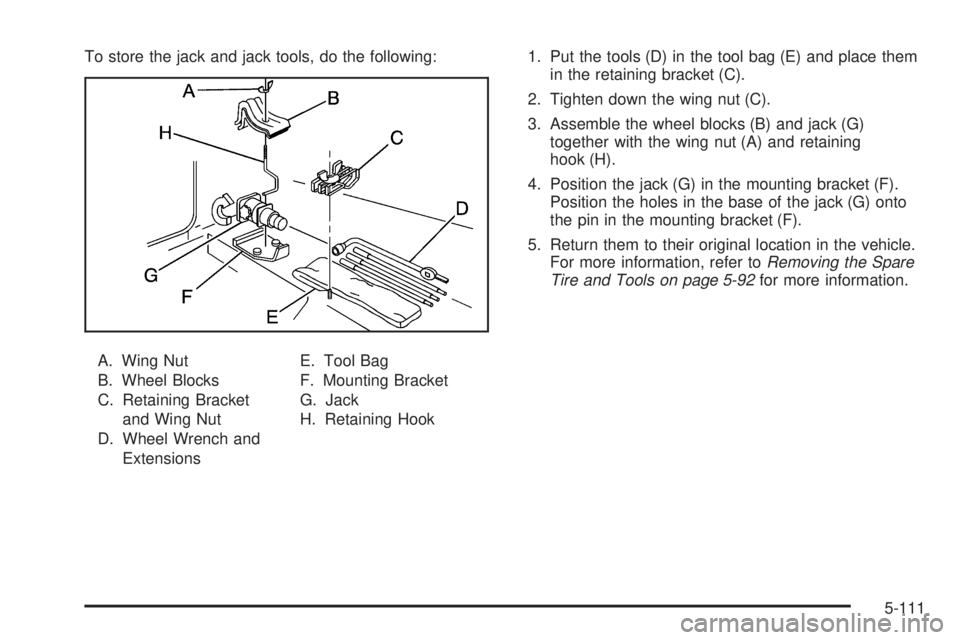
To store the jack and jack tools, do the following:
A. Wing Nut
B. Wheel Blocks
C. Retaining Bracket
and Wing Nut
D. Wheel Wrench and
ExtensionsE. Tool Bag
F. Mounting Bracket
G. Jack
H. Retaining Hook1. Put the tools (D) in the tool bag (E) and place them
in the retaining bracket (C).
2. Tighten down the wing nut (C).
3. Assemble the wheel blocks (B) and jack (G)
together with the wing nut (A) and retaining
hook (H).
4. Position the jack (G) in the mounting bracket (F).
Position the holes in the base of the jack (G) onto
the pin in the mounting bracket (F).
5. Return them to their original location in the vehicle.
For more information, refer toRemoving the Spare
Tire and Tools on page 5-92for more information.
5-111
Page 524 of 600
Spare Tire
Your vehicle, when new, had a fully-in�ated spare tire.
A spare tire may lose air over time, so check its
in�ation pressure regularly. SeeIn�ation - Tire Pressure
on page 5-79andLoading Your Vehicle on page 4-48
for information regarding proper tire in�ation and loading
your vehicle. For instruction on how to remove, install
or store a spare tire, seeRemoving the Flat Tire
and Installing the Spare Tire on page 5-96andStoring
a Flat or Spare Tire and Tools on page 5-108.
Your vehicle may have a different size spare tire than
the road tires originally installed on your vehicle.
This spare tire was developed for use on your vehicle,
so it is all right to drive on it. If your vehicle has
four-wheel drive and the different size spare tire is
installed, keep the vehicle in two-wheel drive.Notice:If your vehicle has four-wheel drive and the
different size spare tire is installed on your vehicle,
do not drive in four-wheel drive until you can have
your �at tire repaired and/or replaced. You could
damage your vehicle, and the repair costs would not
be covered by your warranty. Never use four-wheel
drive when the different size spare tire is installed
on your vehicle.
After installing the spare tire on your vehicle, you should
stop as soon as possible and make sure the spare
tire is correctly in�ated. Have the damaged or �at road
tire repaired or replaced as soon as you can and
installed back onto your vehicle. This way, the spare tire
will be available in case you need it again.
Do not mix tires and wheels of different sizes, because
they will not �t. Keep your spare tire and its wheel
together. If your vehicle has a spare tire that does not
match your vehicle’s original road tires and wheels
in size and type, do not include the spare in the
tire rotation.
5-112
Page 525 of 600
Appearance Care
Cleaning the Inside of Your Vehicle
Your vehicle’s interior will continue to look its best if
it is cleaned often. Although not always visible, dust and
dirt can accumulate on your upholstery. Dirt can
damage carpet, fabric, leather, and plastic surfaces.
Regular vacuuming is recommended to remove particles
from your upholstery. It is important to keep your
upholstery from becoming and remaining heavily soiled.
Soils should be removed as quickly as possible.
Your vehicle’s interior may experience extremes of heat
that could cause stains to set rapidly.
Lighter colored interiors may require more frequent
cleaning. Use care because newspapers and garments
that transfer color to your home furnishings may also
transfer color to your vehicle’s interior.
When cleaning your vehicle’s interior, only use cleaners
speci�cally designed for the surfaces being cleaned.
Permanent damage may result from using cleaners on
surfaces for which they were not intended. Use glass
cleaner only on glass. Remove any accidental
over-spray from other surfaces immediately. To prevent
over-spray, apply cleaner directly to the cleaning cloth.Notice:If you use abrasive cleaners when cleaning
glass surfaces on your vehicle, you could scratch
the glass. When cleaning the glass on your vehicle,
use only a soft cloth and glass cleaner.
Many cleaners contain solvents that may become
concentrated in your vehicle’s breathing space.
Before using cleaners, read and adhere to all safety
instructions on the label. While cleaning your vehicle’s
interior, maintain adequate ventilation by opening
your vehicle’s doors and windows.
Dust may be removed from small buttons and knobs
using a small brush with soft bristles.
Your GM dealer has a product for cleaning your
vehicle’s glass. Should it become necessary, you can
also obtain a product from your GM dealer to remove
odors from your vehicle’s upholstery.
5-113
Page 526 of 600
Do not clean your vehicle using the following cleaners
or techniques:
Never use a knife or any other sharp object to
remove a soil from any interior surface.
Never use a stiff brush. It can cause damage to
your vehicle’s interior surfaces.
Never apply heavy pressure or rub aggressively
with a cleaning cloth. Use of heavy pressure
can damage your interior and does not improve the
effectiveness of soil removal.
Use only mild, neutral-pH soaps. Avoid laundry
detergents or dishwashing soaps with degreasers.
Using too much soap will leave a residue that
leaves streaks and attracts dirt. For liquid cleaners,
about 20 drops per gallon (3.78 L) of water is a
good guide.
Do not heavily saturate your upholstery while
cleaning.
Damage to your vehicle’s interior may result from
the use of many organic solvents such as naptha,
alcohol, etc.
Fabric/Carpet
Use a vacuum cleaner with a soft brush attachment
frequently to remove dust and loose dirt. A canister
vacuum with a beater bar in the nozzle may only
be used on �oor carpet and carpeted �oor mats.
For soils, always try to remove them �rst with plain
water or club soda. Before cleaning, gently remove
as much of the soil as possible using one of the
following techniques:
For liquids: gently blot the remaining soil with a
paper towel. Allow the soil to absorb into the
paper towel until no more can be removed.
For solid dry soils: remove as much as possible
and then vacuum.
To clean, use the following instructions:
1. Saturate a lint-free, clean white cloth with water or
club soda.
2. Wring the cloth to remove excess moisture.
3. Start on the outside edge of the soil and gently rub
toward the center. Continue cleaning, using a clean
area of the cloth each time it becomes soiled.
4. Continue to gently rub the soiled area until the
cleaning cloth remains clean.
5. If the soil is not completely removed, use a mild
soap solution and repeat the cleaning process
that was used with plain water.
5-114
Page 527 of 600
If any of the soil remains, a commercial fabric cleaner or
spot lifter may be necessary. When a commercial
upholstery cleaner or spot lifter is to be used, test a
small hidden area for colorfastness �rst. If the locally
cleaned area gives any impression that a ring formation
may result, clean the entire surface.
After the cleaning process has been completed, a paper
towel can be used to blot excess moisture from the
fabric or carpet.
Leather
A soft cloth dampened with water may be used to
remove dust. If a more thorough cleaning is necessary,
a soft cloth dampened with a mild soap solution can
be used. Allow the leather to dry naturally. Do not use
heat to dry. Never use steam to clean leather. Never
use spot lifters or spot removers on leather. Many
commercial leather cleaners and coatings that are sold
to preserve and protect leather may permanently
change the appearance and feel of your leather and are
not recommended. Do not use silicone or wax-based
products, or those containing organic solvents to clean
your vehicle’s interior because they can alter the
appearance by increasing the gloss in a non-uniform
manner. Never use shoe polish on your leather.
Instrument Panel, Vinyl, and
Other Plastic Surfaces
A soft cloth dampened with water may be used to
remove dust. If a more thorough cleaning is necessary,
a clean soft cloth dampened with a mild soap solution
can be used to gently remove dust and dirt. Never use
spot lifters or removers on plastic surfaces. Many
commercial cleaners and coatings that are sold to
preserve and protect soft plastic surfaces may
permanently change the appearance and feel of your
interior and are not recommended. Do not use silicone
or wax-based products, or those containing organic
solvents to clean your vehicle’s interior because
they can alter the appearance by increasing the gloss in
a non-uniform manner.
Some commercial products may increase gloss on your
instrument panel. The increase in gloss may cause
annoying re�ections in the windshield and even make it
difficult to see through the windshield under certain
conditions.
5-115
Page 528 of 600
Care of Safety Belts
Keep belts clean and dry.
{CAUTION:
Do not bleach or dye safety belts. If you do,
it may severely weaken them. In a crash,
they might not be able to provide adequate
protection. Clean safety belts only with mild
soap and lukewarm water.
Weatherstrips
Silicone grease on weatherstrips will make them last
longer, seal better, and not stick or squeak. Apply
silicone grease with a clean cloth. During very cold,
damp weather frequent application may be required.
SeeRecommended Fluids and Lubricants (Gasoline
Engine) on page 6-14.
Washing Your Vehicle
The paint �nish on the vehicle provides beauty, depth of
color, gloss retention, and durability.
The best way to preserve the vehicle’s �nish is to keep it
clean by washing it often with lukewarm or cold water.
Do not wash the vehicle in the direct rays of the sun.
Use a car washing soap. Do not use strong soaps
or chemical detergents. Be sure to rinse the vehicle well,
removing all soap residue completely. GM-approved
cleaning products can be obtained from your dealer.
SeeVehicle Care/Appearance Materials on page 5-121.
Do not use cleaning agents that are petroleum based,
or that contain acid or abrasives. All cleaning agents
should be �ushed promptly and not allowed to dry on the
surface, or they could stain. Dry the �nish with a soft,
clean chamois or an all-cotton towel to avoid surface
scratches and water spotting.
High pressure car washes may cause water to enter
the vehicle.
5-116
Page 529 of 600
Cleaning Exterior Lamps/Lenses
Use only lukewarm or cold water, a soft cloth and a
car washing soap to clean exterior lamps and lenses.
Follow instructions underWashing Your Vehicle on
page 5-116.
Finish Care
Occasional waxing or mild polishing of your vehicle by
hand may be necessary to remove residue from the
paint �nish. You can get GM-approved cleaning products
from your dealer. SeeVehicle Care/Appearance
Materials on page 5-121.
If your vehicle has a “basecoat/clearcoat” paint �nish,
the clearcoat gives more depth and gloss to the colored
basecoat. Always use waxes and polishes that are
non-abrasive and made for a basecoat/clearcoat paint
�nish.
Notice:Machine compounding or aggressive
polishing on a basecoat/clearcoat paint �nish may
damage it. Use only non-abrasive waxes and
polishes that are made for a basecoat/clearcoat
paint �nish on your vehicle.Foreign materials such as calcium chloride and other
salts, ice melting agents, road oil and tar, tree sap, bird
droppings, chemicals from industrial chimneys, etc.,
can damage your vehicle’s �nish if they remain
on painted surfaces. Wash the vehicle as soon as
possible. If necessary, use non-abrasive cleaners that
are marked safe for painted surfaces to remove
foreign matter.
Exterior painted surfaces are subject to aging, weather
and chemical fallout that can take their toll over a
period of years. You can help to keep the paint �nish
looking new by keeping your vehicle garaged or covered
whenever possible.
Protecting Exterior Bright Metal Parts
Bright metal parts should be cleaned regularly to keep
their luster. Washing with water is all that is usually
needed. However, you may use chrome polish on
chrome or stainless steel trim, if necessary.
Use special care with aluminum trim. To avoid damaging
protective trim, never use auto or chrome polish,
steam or caustic soap to clean aluminum. A coating of
wax, rubbed to high polish, is recommended for all
bright metal parts.
5-117
Page 530 of 600
Windshield and Wiper Blades
If the windshield is not clear after using the windshield
washer, or if the wiper blade chatters when running,
wax, sap, or other material may be on the blade
or windshield.
Clean the outside of the windshield with a glass cleaning
liquid or powder and water solution. The windshield is
clean if beads do not form when it is rinsed with water.
Grime from the windshield will stick to the wiper blades
and affect their performance. Clean the blade by
wiping vigorously with a cloth soaked in full-strength
windshield washer solvent. Then rinse the blade
with water.
Check the wiper blades and clean them as necessary;
replace blades that look worn.
Aluminum or Chrome-Plated Wheels
The vehicle may be equipped with either aluminum or
chrome-plated wheels.
Keep the wheels clean using a soft clean cloth with mild
soap and water. Rinse with clean water. After rinsing
thoroughly, dry with a soft clean towel. A wax may then
be applied.
Notice:If you use strong soaps, chemicals,
abrasive polishes, cleaners, brushes, or cleaners
that contain acid on aluminum or chrome-plated
wheels, you could damage the surface of the
wheel(s). The repairs would not be covered by your
warranty. Use only GM-approved cleaners on
aluminum or chrome-plated wheels.
The surface of these wheels is similar to the painted
surface of your vehicle. Do not use strong soaps,
chemicals, abrasive polishes, abrasive cleaners,
cleaners with acid, or abrasive cleaning brushes on
them because you could damage the surface.
Do not use chrome polish on aluminum wheels.
5-118