tow GMC SIERRA 2006 Workshop Manual
[x] Cancel search | Manufacturer: GMC, Model Year: 2006, Model line: SIERRA, Model: GMC SIERRA 2006Pages: 600, PDF Size: 3.49 MB
Page 252 of 600
Adjusting the Speakers (Balance/Fade)
AUDIO:To adjust the balance between the right
and the left speakers, press and release AUDIO until
BAL appears on the display. Then press and hold the up
or the down arrow to move the sound toward the right
or the left speakers.
To adjust the fade between the front and the rear
speakers, press and release AUDIO until FAD appears
on the display. Then press and hold the up or the down
arrow to move the sound toward the front or the rear
speakers.
To adjust balance or fade to the middle position, select
BAL or FAD. Then press and hold AUDIO for more than
two seconds until you hear a beep. L (balance) and a
zero or F and a zero will appear on the display.
To adjust all tone and speaker controls to the middle
position, �rst end out of audio mode by pressing another
button, causing the radio to perform that function or by
waiting �ve seconds for the display to return to time
of day. Then press and hold AUDIO for more than
two seconds until you hear a beep. CEN will appear
on the display.
Fade may not be available if the vehicle is a regular cab
model.
Radio Messages
CAL (Calibrated):The audio system has been
calibrated for your vehicle from the factory. If CAL
appears on the display it means that the radio has not
been con�gured properly for your vehicle and must be
returned to your GM dealer for service.
LOC (Locked):This message is displayed when the
THEFTLOCK
®system has locked up. Take the vehicle
to your GM dealer for service.
If any error occurs repeatedly or if an error cannot be
corrected, contact your GM dealer.
3-74
Page 256 of 600
Setting the Tone (Bass/Treble)
AUDIO:Push and release the AUDIO knob until BASS
or TREB appears on the display. Turn the knob to
increase or to decrease. The display will show the bass
or treble level. If a station is weak or noisy, decrease
the treble.
To adjust the bass or treble to the middle position, while it
is displayed, push and hold the AUDIO knob. The radio
will produce one beep and adjust the display level to the
middle position.
To adjust all tone and speaker controls to the middle
position, push and hold the AUDIO knob when no tone or
speaker control is displayed. ALL CENTERED will appear
on the display, you will hear a beep, and the display level
will be adjusted to the middle position.
AUTO EQ (Automatic Equalization):Press this button
to select customized equalization settings designed
for country/western, jazz, talk, pop, rock, and classical.
Selecting CUSTOM or changing bass or treble,
returns the EQ to the manual bass and treble settings.
The radio will save separate AUTO EQ settings for
each preset and source.
If the radio is equipped with the Bose
®audio system,
the equalization settings are either CUSTOM or TALK.
Adjusting the Speakers (Balance/Fade)
AUDIO:To adjust the balance between the right
and the left speakers, push and release the AUDIO
knob until BAL appears on the display. Turn the knob to
move the sound toward the right or the left speakers.
To adjust the fade between the front and the rear
speakers, push and release the AUDIO knob until FADE
appears on the display. Turn the knob to move the sound
toward the front or the rear speakers.
To adjust the balance or fade to the middle position,
while it is displayed, push the AUDIO knob, then push it
again and hold it until the radio produces one beep. The
balance or fade will be adjusted to the middle position
and the display will show the speaker balance.
To adjust all tone and speaker controls to the middle
position, push and hold the AUDIO knob when no tone or
speaker control is displayed. ALL CENTERED will appear
on the display, you will hear a beep, and the display level
will be adjusted to the middle position.
3-78
Page 267 of 600
Adjusting the Speakers (Balance/Fade)
AUDIO:To adjust the balance between the right
and the left speakers, push and release the AUDIO
knob until BAL appears on the display. Turn the knob
to move the sound toward the right or the left speakers.
To adjust the fade between the front and the rear
speakers, push and release the AUDIO knob until FADE
appears on the display. Turn the knob to move the sound
toward the front or the rear speakers.
To adjust the balance or fade to the middle position while
it is displayed, push the AUDIO knob, then push it again
and hold it until the radio produces one beep. The
balance or fade will be adjusted to the middle position.
To adjust all tone and speaker controls to the middle
position, push and hold the AUDIO knob when no tone or
speaker control is displayed. ALL CENTERED will appear
on the display, you will hear a beep, and the display level
will be adjusted to the middle position.
Finding a Program Type (PTY) Station
(RDS and XM™)
To select and �nd a desired PTY perform the following:
1. Press the TYPE button to activate program type
select mode. TYPE and a PTY will appear on the
display.
2. Turn the TYPE knob or press and release the
TYPE button to select a PTY.
3. Once the desired PTY is displayed, press and
release either the TYPE or the SEEK arrows to
select and to take you to the PTY’s �rst station.
4. To go to another station within that PTY, press the
TYPE button then, press either the TYPE or the
SEEK arrows once.
5. Press either the TYPE or the SEEK arrows twice to
exit program type select mode.
If the radio cannot �nd the desired program type, NONE
will appear on the display and the radio will return to the
last station you were listening to.
3-89
Page 281 of 600
Setting the Tone (Bass/Treble)
AUDIO:Push and release the AUDIO knob until BASS
or TREB appears on the display. Turn the knob to
increase or to decrease. The display will show the bass
or treble level. If a station is weak or noisy, decrease
the treble.
To adjust the bass or treble to the middle position while it
is displayed, push and hold the AUDIO knob. The radio
will produce one beep and adjust the display level to the
middle position.
To adjust all tone and speaker controls to the middle
position, push and hold the AUDIO knob when no tone or
speaker controls are displayed. ALL CENTERED will
appear on the display and you will hear a beep.
AUTO EQ (Automatic Equalization):Press this button
to select customized equalization settings designed
for country/western, jazz, talk, pop, rock, and classical.
The radio will save separate AUTO EQ settings for
each preset and source.
If the radio is equipped with the Bose
®audio system,
the equalization settings are either CUSTOM or TALK.
Adjusting the Speakers (Balance/Fade)
AUDIO:To adjust the balance between the right
and the left speakers, push and release the AUDIO
knob until BAL appears on the display. Turn the knob
to move the sound toward the right or the left speakers.
To adjust the fade between the front and rear
speakers, push and release the AUDIO knob until FAD
appears on the display. Turn the knob to move the
sound toward the front or the rear speakers.
To adjust the balance or fade to the middle position
while it is displayed, push and hold the AUDIO knob.
The radio will produce one beep and adjust the display
level to the middle position.
To adjust all tone and speaker controls to the middle
position, push and hold the AUDIO knob when no tone
or speaker controls are displayed. ALL CENTERED
will appear on the display and you will hear a beep.
3-103
Page 304 of 600
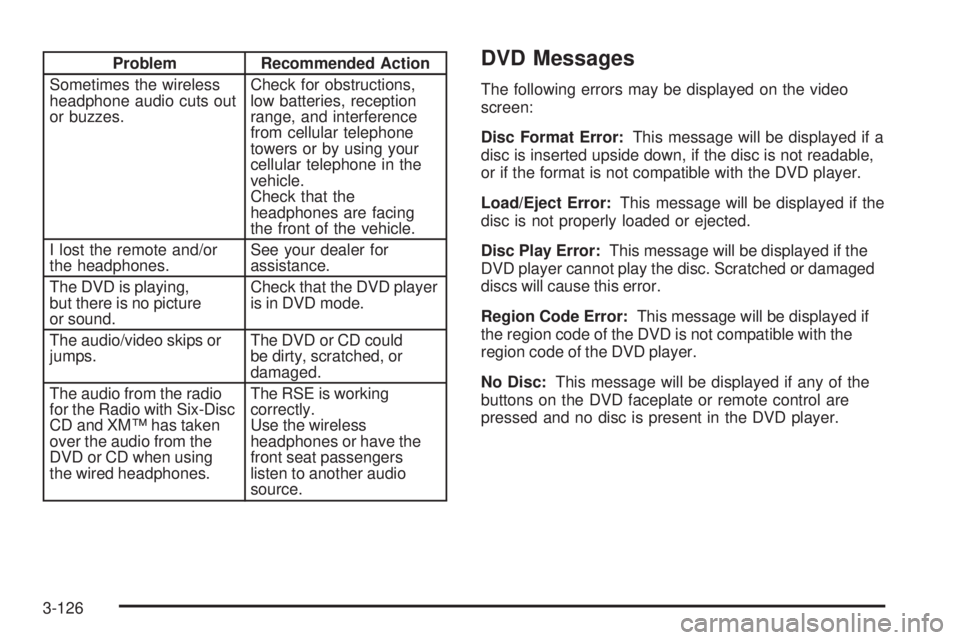
Problem Recommended Action
Sometimes the wireless
headphone audio cuts out
or buzzes.Check for obstructions,
low batteries, reception
range, and interference
from cellular telephone
towers or by using your
cellular telephone in the
vehicle.
Check that the
headphones are facing
the front of the vehicle.
I lost the remote and/or
the headphones.See your dealer for
assistance.
The DVD is playing,
but there is no picture
or sound.Check that the DVD player
is in DVD mode.
The audio/video skips or
jumps.The DVD or CD could
be dirty, scratched, or
damaged.
The audio from the radio
for the Radio with Six-Disc
CD and XM™ has taken
over the audio from the
DVD or CD when using
the wired headphones.The RSE is working
correctly.
Use the wireless
headphones or have the
front seat passengers
listen to another audio
source.DVD Messages
The following errors may be displayed on the video
screen:
Disc Format Error:This message will be displayed if a
disc is inserted upside down, if the disc is not readable,
or if the format is not compatible with the DVD player.
Load/Eject Error:This message will be displayed if the
disc is not properly loaded or ejected.
Disc Play Error:This message will be displayed if the
DVD player cannot play the disc. Scratched or damaged
discs will cause this error.
Region Code Error:This message will be displayed if
the region code of the DVD is not compatible with the
region code of the DVD player.
No Disc:This message will be displayed if any of the
buttons on the DVD faceplate or remote control are
pressed and no disc is present in the DVD player.
3-126
Page 313 of 600
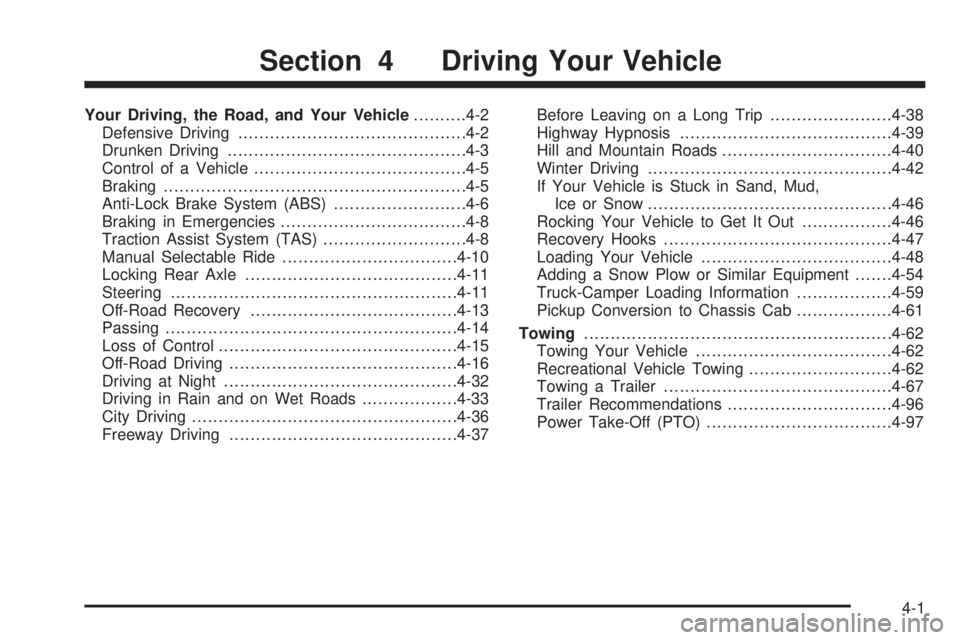
Your Driving, the Road, and Your Vehicle..........4-2
Defensive Driving...........................................4-2
Drunken Driving.............................................4-3
Control of a Vehicle........................................4-5
Braking.........................................................4-5
Anti-Lock Brake System (ABS).........................4-6
Braking in Emergencies...................................4-8
Traction Assist System (TAS)...........................4-8
Manual Selectable Ride.................................4-10
Locking Rear Axle........................................4-11
Steering......................................................4-11
Off-Road Recovery.......................................4-13
Passing.......................................................4-14
Loss of Control.............................................4-15
Off-Road Driving...........................................4-16
Driving at Night............................................4-32
Driving in Rain and on Wet Roads..................4-33
City Driving..................................................4-36
Freeway Driving...........................................4-37Before Leaving on a Long Trip.......................4-38
Highway Hypnosis........................................4-39
Hill and Mountain Roads................................4-40
Winter Driving..............................................4-42
If Your Vehicle is Stuck in Sand, Mud,
Ice or Snow..............................................4-46
Rocking Your Vehicle to Get It Out.................4-46
Recovery Hooks...........................................4-47
Loading Your Vehicle....................................4-48
Adding a Snow Plow or Similar Equipment.......4-54
Truck-Camper Loading Information..................4-59
Pickup Conversion to Chassis Cab..................4-61
Towing..........................................................4-62
Towing Your Vehicle.....................................4-62
Recreational Vehicle Towing...........................4-62
Towing a Trailer...........................................4-67
Trailer Recommendations...............................4-96
Power Take-Off (PTO)...................................4-97
Section 4 Driving Your Vehicle
4-1
Page 330 of 600
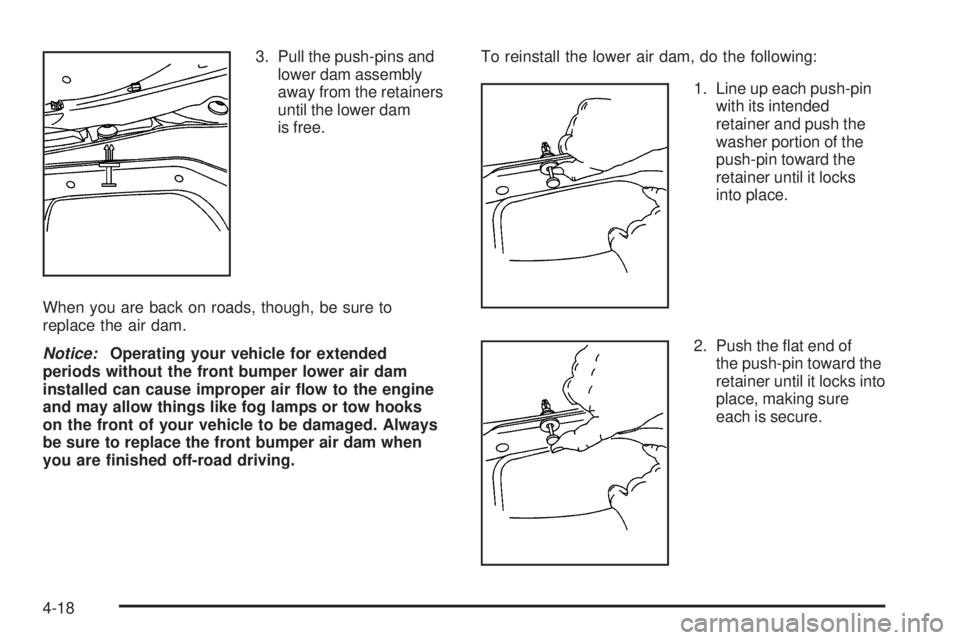
3. Pull the push-pins and
lower dam assembly
away from the retainers
until the lower dam
is free.
When you are back on roads, though, be sure to
replace the air dam.
Notice:Operating your vehicle for extended
periods without the front bumper lower air dam
installed can cause improper air �ow to the engine
and may allow things like fog lamps or tow hooks
on the front of your vehicle to be damaged. Always
be sure to replace the front bumper air dam when
you are �nished off-road driving.To reinstall the lower air dam, do the following:
1. Line up each push-pin
with its intended
retainer and push the
washer portion of the
push-pin toward the
retainer until it locks
into place.
2. Push the �at end of
the push-pin toward the
retainer until it locks into
place, making sure
each is secure.
4-18
Page 358 of 600
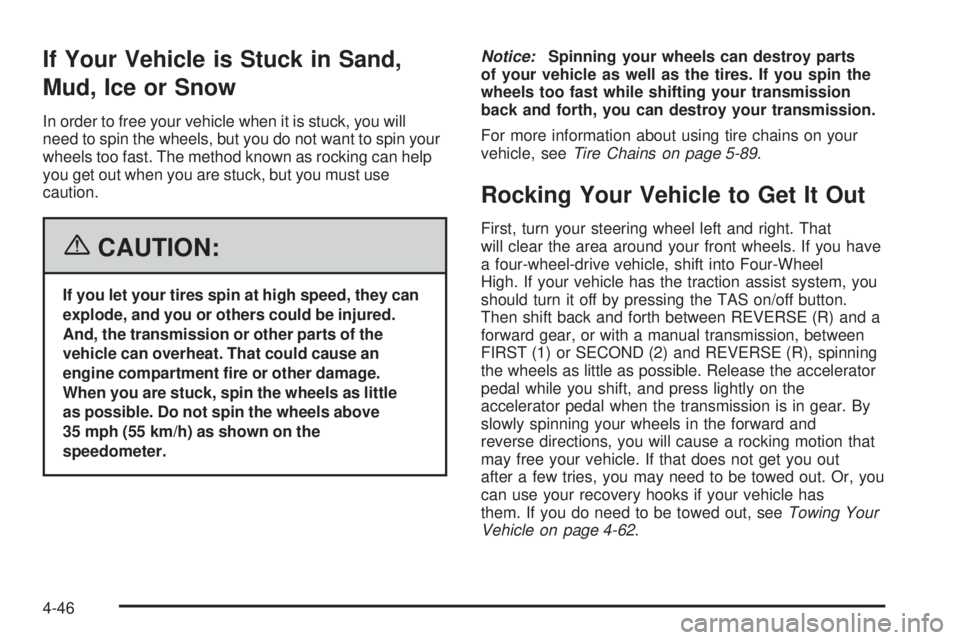
If Your Vehicle is Stuck in Sand,
Mud, Ice or Snow
In order to free your vehicle when it is stuck, you will
need to spin the wheels, but you do not want to spin your
wheels too fast. The method known as rocking can help
you get out when you are stuck, but you must use
caution.
{CAUTION:
If you let your tires spin at high speed, they can
explode, and you or others could be injured.
And, the transmission or other parts of the
vehicle can overheat. That could cause an
engine compartment �re or other damage.
When you are stuck, spin the wheels as little
as possible. Do not spin the wheels above
35 mph (55 km/h) as shown on the
speedometer.Notice:Spinning your wheels can destroy parts
of your vehicle as well as the tires. If you spin the
wheels too fast while shifting your transmission
back and forth, you can destroy your transmission.
For more information about using tire chains on your
vehicle, seeTire Chains on page 5-89.
Rocking Your Vehicle to Get It Out
First, turn your steering wheel left and right. That
will clear the area around your front wheels. If you have
a four-wheel-drive vehicle, shift into Four-Wheel
High. If your vehicle has the traction assist system, you
should turn it off by pressing the TAS on/off button.
Then shift back and forth between REVERSE (R) and a
forward gear, or with a manual transmission, between
FIRST (1) or SECOND (2) and REVERSE (R), spinning
the wheels as little as possible. Release the accelerator
pedal while you shift, and press lightly on the
accelerator pedal when the transmission is in gear. By
slowly spinning your wheels in the forward and
reverse directions, you will cause a rocking motion that
may free your vehicle. If that does not get you out
after a few tries, you may need to be towed out. Or, you
can use your recovery hooks if your vehicle has
them. If you do need to be towed out, seeTowing Your
Vehicle on page 4-62.
4-46
Page 359 of 600
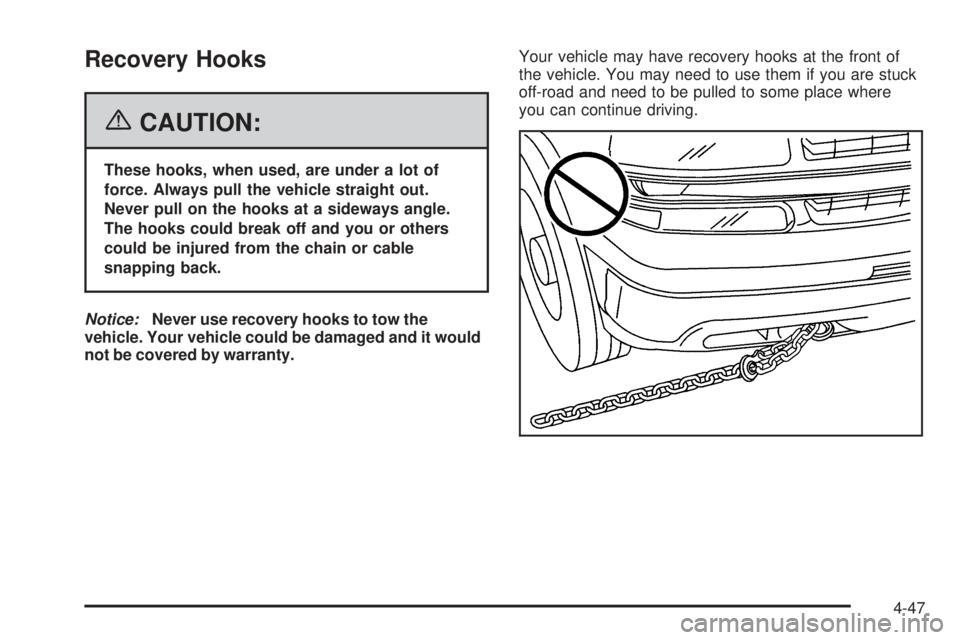
Recovery Hooks
{CAUTION:
These hooks, when used, are under a lot of
force. Always pull the vehicle straight out.
Never pull on the hooks at a sideways angle.
The hooks could break off and you or others
could be injured from the chain or cable
snapping back.
Notice:Never use recovery hooks to tow the
vehicle. Your vehicle could be damaged and it would
not be covered by warranty.Your vehicle may have recovery hooks at the front of
the vehicle. You may need to use them if you are stuck
off-road and need to be pulled to some place where
you can continue driving.
4-47
Page 361 of 600
There is also important loading information on the vehicle
Certi�cation/Tire label. It tells you the Gross Vehicle
Weight Rating (GVWR) and the Gross Axle Weight
Rating (GAWR) for the front and rear axles. See
“Certi�cation/Tire Label” later in this section.
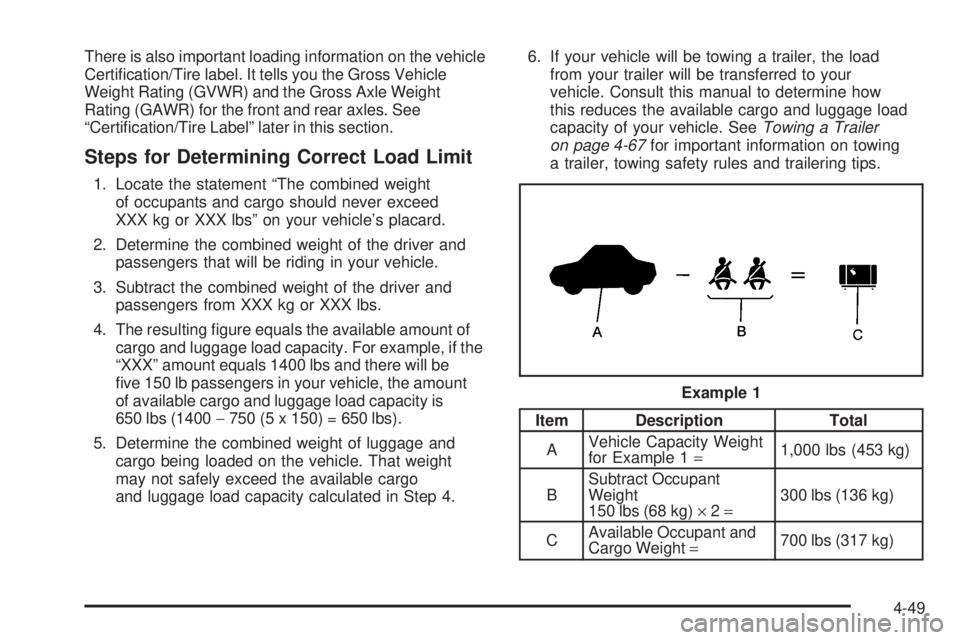
Steps for Determining Correct Load Limit
1. Locate the statement “The combined weight
of occupants and cargo should never exceed
XXX kg or XXX lbs” on your vehicle’s placard.
2. Determine the combined weight of the driver and
passengers that will be riding in your vehicle.
3. Subtract the combined weight of the driver and
passengers from XXX kg or XXX lbs.
4. The resulting �gure equals the available amount of
cargo and luggage load capacity. For example, if the
“XXX” amount equals 1400 lbs and there will be
�ve 150 lb passengers in your vehicle, the amount
of available cargo and luggage load capacity is
650 lbs (1400−750 (5 x 150) = 650 lbs).
5. Determine the combined weight of luggage and
cargo being loaded on the vehicle. That weight
may not safely exceed the available cargo
and luggage load capacity calculated in Step 4.6. If your vehicle will be towing a trailer, the load
from your trailer will be transferred to your
vehicle. Consult this manual to determine how
this reduces the available cargo and luggage load
capacity of your vehicle. SeeTowing a Trailer
on page 4-67for important information on towing
a trailer, towing safety rules and trailering tips.
Item Description Total
AVehicle Capacity Weight
for Example 1=1,000 lbs (453 kg)
BSubtract Occupant
Weight
150 lbs (68 kg)×2=300 lbs (136 kg)
CAvailable Occupant and
Cargo Weight=700 lbs (317 kg) Example 1
4-49