tow GMC SIERRA 2009 Get To Know Guide
[x] Cancel search | Manufacturer: GMC, Model Year: 2009, Model line: SIERRA, Model: GMC SIERRA 2009Pages: 24, PDF Size: 1.4 MB
Page 1 of 24
Congratulations on your purchase of a GMC Sierra. Please read this information about your vehicle’s features and
your Owner Manual to ensure an outstanding ownership experience. Note that your vehicle may not include all the
features described in this booklet. Keep this booklet with your Owner Manual for easy reference.
DRIVER INFORMATION
Instrument Panels . . . . . . . . . . . . .2
Instrument Panel Cluster . . . . . . .4
Voltmeter Operation . . . . . . . . . . . .5
Driver Information Center . . . . . .5
SAFETY & SECURITY
Remote Keyless Entry . . . . . . . . . .7
Content Theft-Deterrent System . .7
OnStar
® . . . . . . . . . . . . . . . . . . . . . .7
COMFORT
Power Seat Controls . . . . . . . . . . .8
Heated Seats . . . . . . . . . . . . . . . . . .8
Heated and Cooled Seats . . . . . . .8
Memory Settings . . . . . . . . . . . . . .8
Adjustable Pedals . . . . . . . . . . . . .9
Automatic Climate Controls . . . . .9
ENTERTAINMENT
Audio System Features . . . . . . . .10
Multiple-Disc CD Player . . . . . . . .13
Touch Screen Navigation
Entertainment System . . . . . . . . .13XM
®Radio . . . . . . . . . . . . . . . . . . .13
Rear Seat Audio and DVD Rear
Seat Entertainment Systems . . .14
Audio Steering Wheel Controls .14
Bluetooth
®System . . . . . . . . . . . .15
CONVENIENCE
Remote Vehicle Start . . . . . . . . . .15
Cruise Control . . . . . . . . . . . . . . .16
Rainsense™ II Windshield
Wipers . . . . . . . . . . . . . . . . . . . . . .16
Heated Windshield Washer
Fluid . . . . . . . . . . . . . . . . . . . . . . . .17
Automatic Headlamp System
and Interior Lamps . . . . . . . . . . . .17
Sunroof . . . . . . . . . . . . . . . . . . . . .18
Power Sliding Rear Window . . . .18
Ultrasonic Rear Parking Assist .18
Universal Home Remote . . . . . . .19
Automatic Dimming Rearview
Mirror . . . . . . . . . . . . . . . . . . . . . . .19
Power Foldaway Mirrors . . . . . . .19Rear Vision Camera . . . . . . . . . . .20
Trailer-Tow Mirrors . . . . . . . . . . . .20
Folding the Rear Seat . . . . . . . . .20
Cargo Management System . . . .20
PERFORMANCE & MAINTENANCE
6-Speed Automatic
Transmission Controls . . . . . . . .21
StabiliTrak
®– Stability Control
System . . . . . . . . . . . . . . . . . . . . .21
Tire Pressure Monitor . . . . . . . . .21
Integrated Trailer Brake Control
System . . . . . . . . . . . . . . . . . . . . .22
Tighten Gas Cap Message . . . . .22
FlexFuel (E85) – Yellow Gas Cap 22
Resetting the Oil Life
System . . . . . . . . . . . . . . . . . . . . .23
OWNER INFORMATION
Sierra Accessories . . . . . . . . . . . .23
Roadside Assistance . . . . . . . . . .24
My GMLink . . . . . . . . . . . . . . . . . .24
Page 2 of 24
Getting to Know Your Sierra2
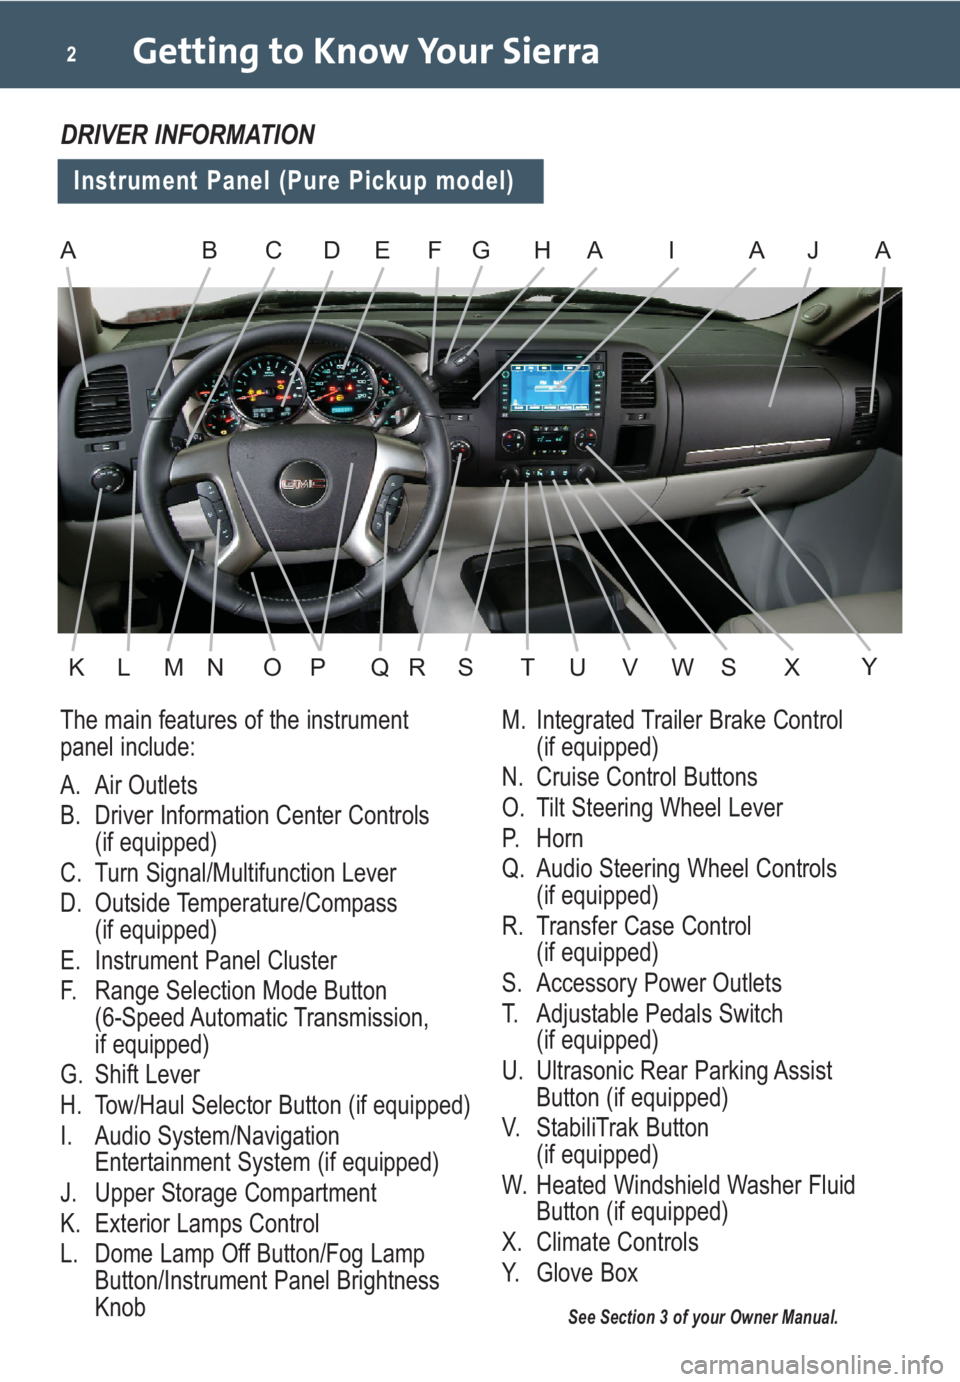
The main features of the instrument
panel include:
A. Air Outlets
B. Driver Information Center Controls
(if equipped)
C. Turn Signal/Multifunction Lever
D. Outside Temperature/Compass
(if equipped)
E. Instrument Panel Cluster
F. Range Selection Mode Button
(6-Speed Automatic Transmission,
if equipped)
G. Shift Lever
H. Tow/Haul Selector Button (if equipped)
I. Audio System/Navigation
Entertainment System (if equipped)
J. Upper Storage Compartment
K. Exterior Lamps Control
L. Dome Lamp Off Button/Fog Lamp
Button/Instrument Panel Brightness
Knob
See Section 3 of your Owner Manual.
DRIVER INFORMATION
Instrument Panel (Pure Pickup model)
M. Integrated Trailer Brake Control
(if equipped)
N. Cruise Control Buttons
O. Tilt Steering Wheel Lever
P. Horn
Q. Audio Steering Wheel Controls
(if equipped)
R. Transfer Case Control
(if equipped)
S. Accessory Power Outlets
T. Adjustable Pedals Switch
(if equipped)
U. Ultrasonic Rear Parking Assist
Button (if equipped)
V. StabiliTrak Button
(if equipped)
W. Heated Windshield Washer Fluid
Button (if equipped)
X. Climate Controls
Y. Glove Box
ABEFHAI
KLMOPQRST
A
U
CJ
VWXS
A
Y
D
N
G
Page 3 of 24
3
See Section 3 of your Owner Manual.
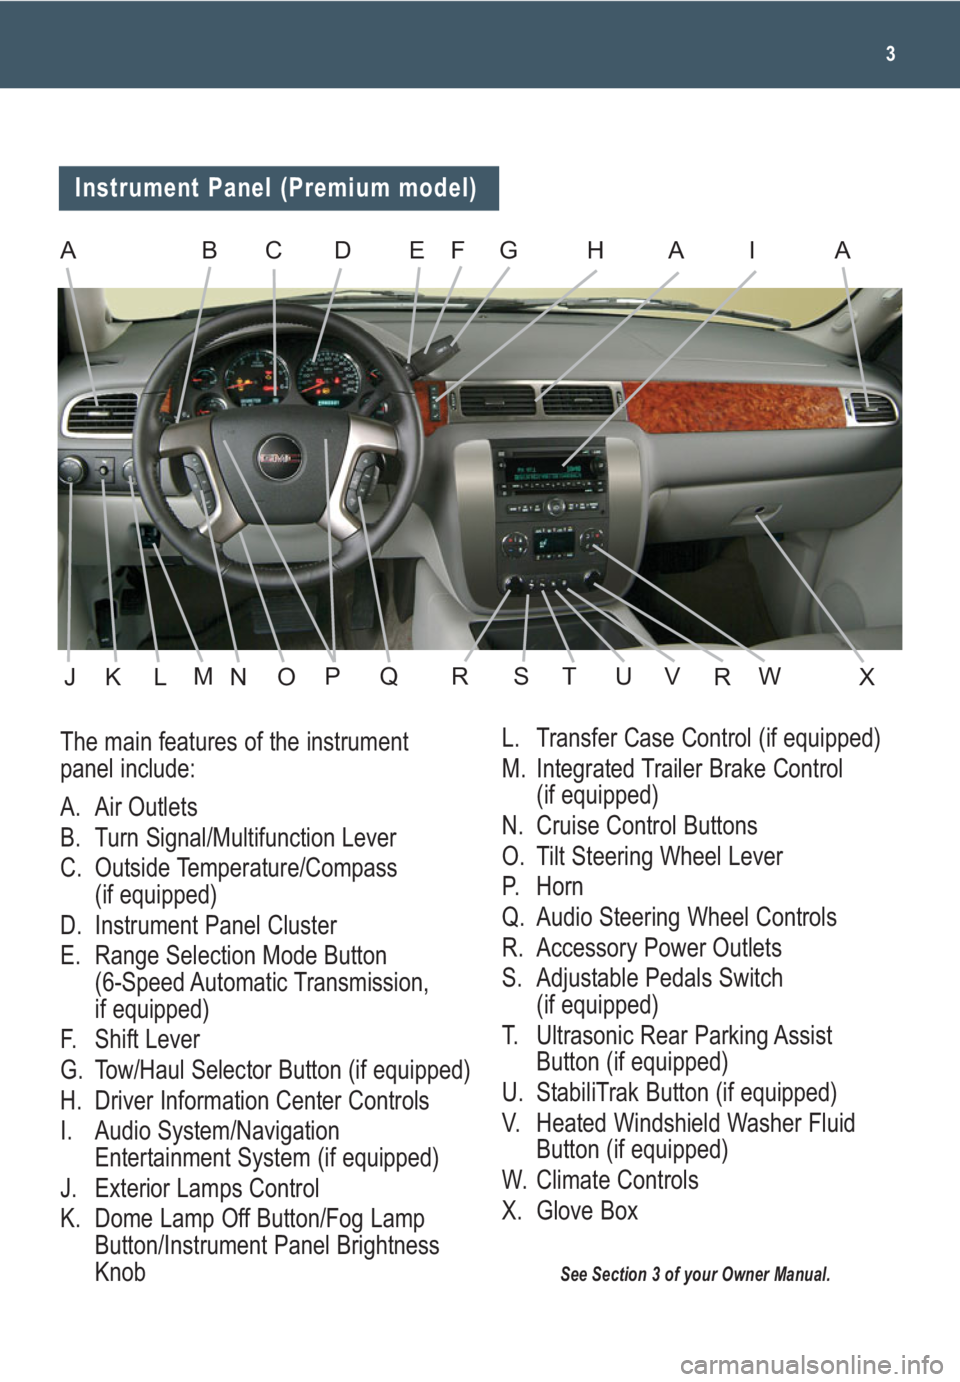
The main features of the instrument
panel include:
A. Air Outlets
B. Turn Signal/Multifunction Lever
C. Outside Temperature/Compass
(if equipped)
D. Instrument Panel Cluster
E. Range Selection Mode Button
(6-Speed Automatic Transmission,
if equipped)
F. Shift Lever
G. Tow/Haul Selector Button (if equipped)
H. Driver Information Center Controls
I. Audio System/Navigation
Entertainment System (if equipped)
J. Exterior Lamps Control
K. Dome Lamp Off Button/Fog Lamp
Button/Instrument Panel Brightness
Knob
Instrument Panel (Premium model)
ABEGHAAIC
JKLOPQRSXTUVWRN
L. Transfer Case Control (if equipped)
M. Integrated Trailer Brake Control
(if equipped)
N. Cruise Control Buttons
O. Tilt Steering Wheel Lever
P. Horn
Q. Audio Steering Wheel Controls
R. Accessory Power Outlets
S. Adjustable Pedals Switch
(if equipped)
T. Ultrasonic Rear Parking Assist
Button (if equipped)
U. StabiliTrak Button (if equipped)
V. Heated Windshield Washer Fluid
Button (if equipped)
W. Climate Controls
X. Glove Box
D
M
F
Page 4 of 24
Getting to Know Your Sierra4
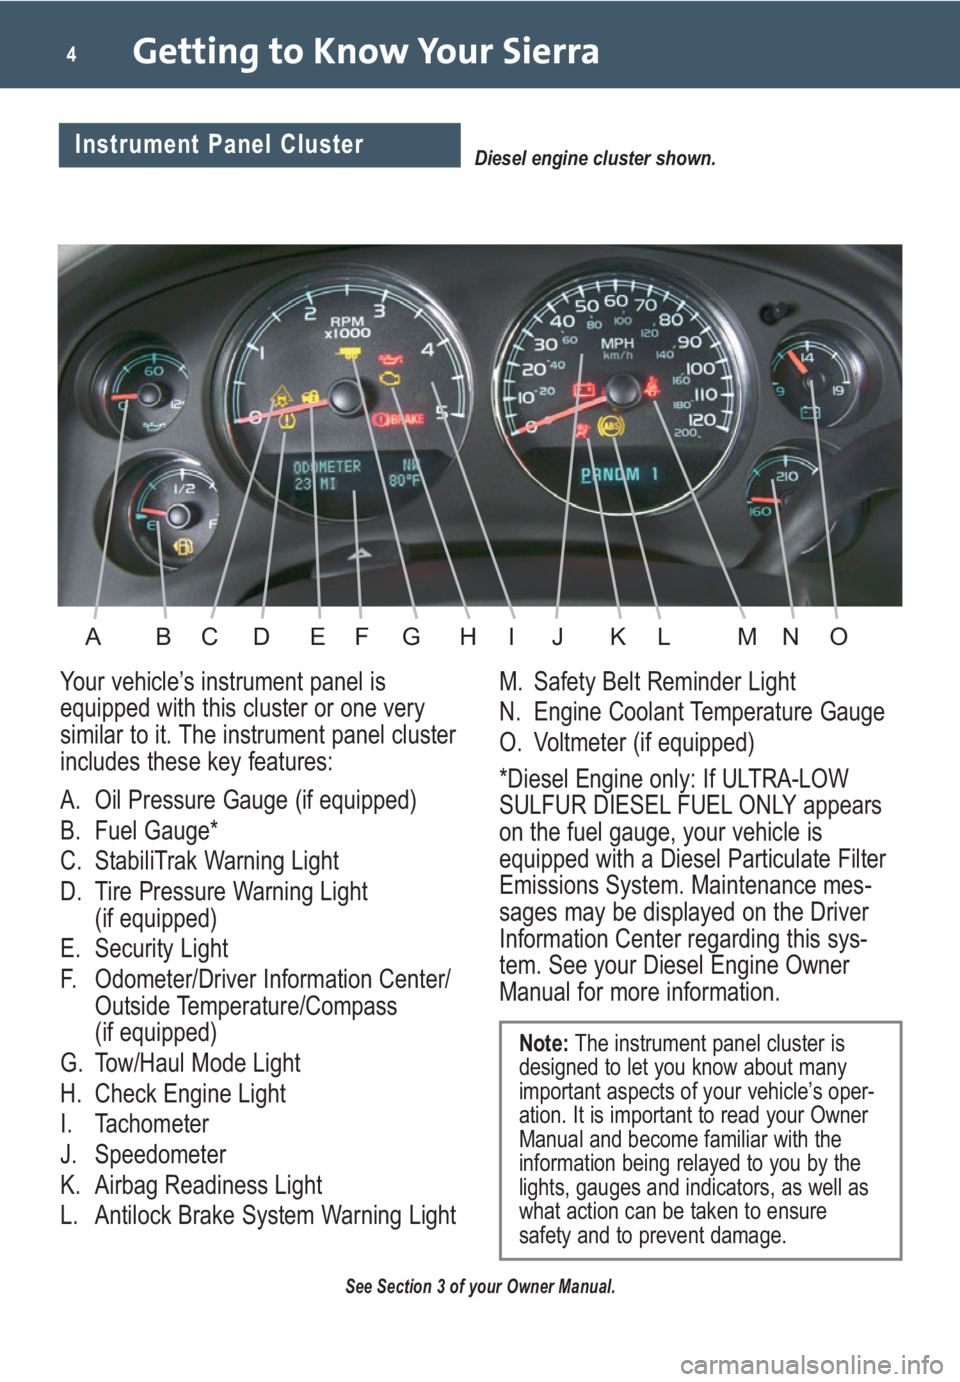
Your vehicle’s instrument panel is
equipped with this cluster or one very
similar to it. The instrument panel cluster
includes these key features:
A. Oil Pressure Gauge (if equipped)
B. Fuel Gauge*
C. StabiliTrak Warning Light
D. Tire Pressure Warning Light
(if equipped)
E. Security Light
F. Odometer/Driver Information Center/
Outside Temperature/Compass
(if equipped)
G. Tow/Haul Mode Light
H. Check Engine Light
I. Tachometer
J. Speedometer
K. Airbag Readiness Light
L. Antilock Brake System Warning LightM. Safety Belt Reminder Light
N. Engine Coolant Temperature Gauge
O. Voltmeter (if equipped)
*Diesel Engine only: If ULTRA-LOW
SULFUR DIESEL FUEL ONLY appears
on the fuel gauge, your vehicle is
equipped with a Diesel Particulate Filter
Emissions System. Maintenance mes-
sages may be displayed on the Driver
Information Center regarding this sys-
tem. See your Diesel Engine Owner
Manual for more information.
See Section 3 of your Owner Manual.
Note:The instrument panel cluster is
designed to let you know about many
important aspects of your vehicle’s oper-
ation. It is important to read your Owner
Manual and become familiar with the
information being relayed to you by the
lights, gauges and indicators, as well as
what action can be taken to ensure
safety and to prevent damage.
Diesel engine cluster shown.Instrument Panel Cluster
ABDFGHEIKLJNOMC
Page 9 of 24
9
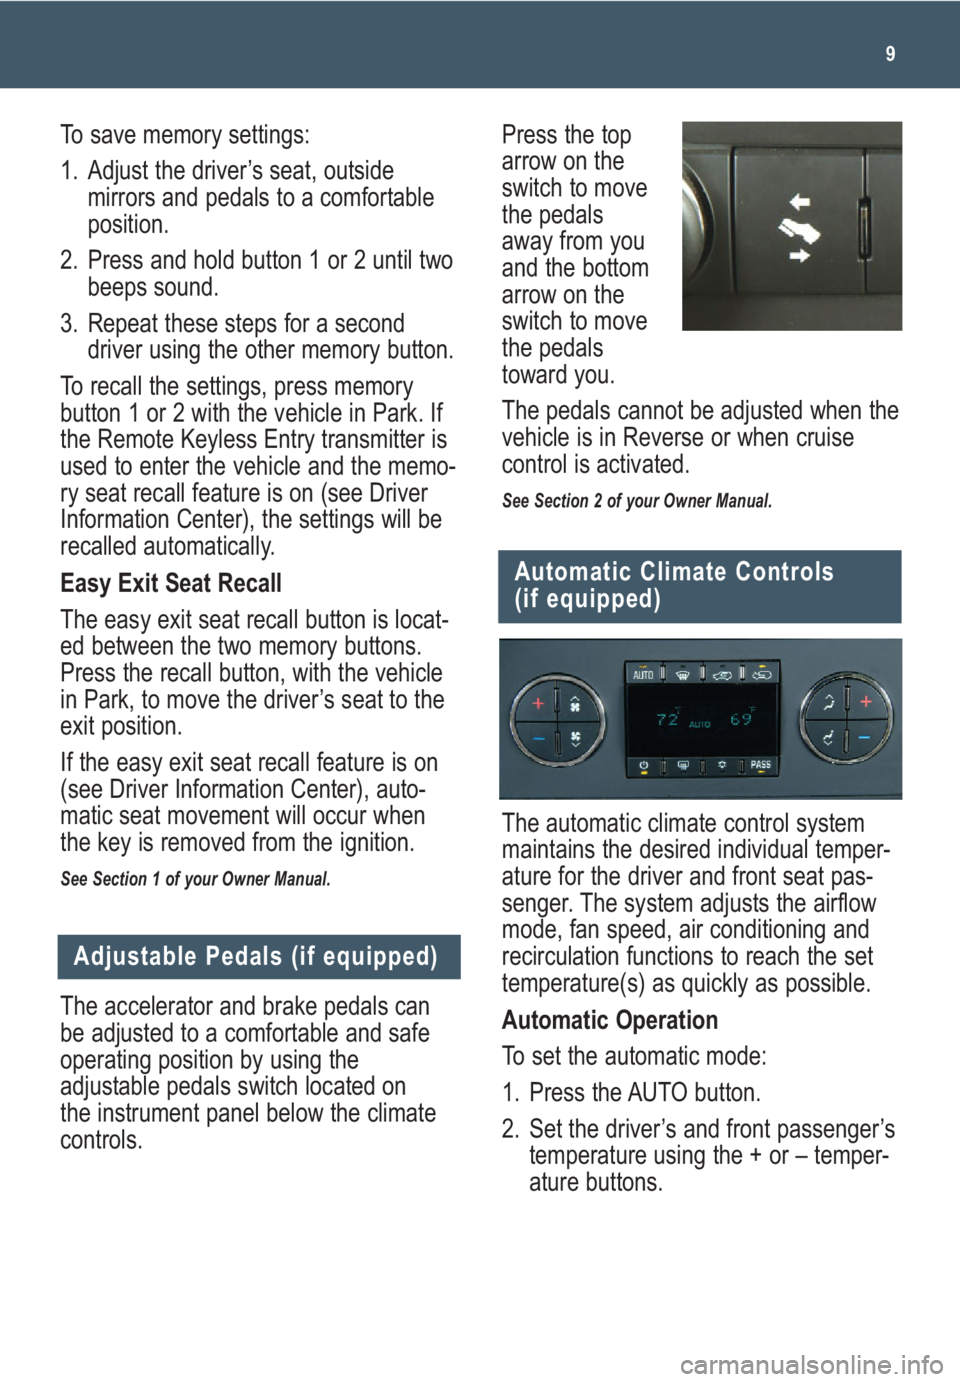
The accelerator and brake pedals can
be adjusted to a comfortable and safe
operating position by using the
adjustable pedals switch located on
the instrument panel below the climate
controls.
Adjustable Pedals (if equipped)
The automatic climate control system
maintains the desired individual temper-
ature for the driver and front seat pas-
senger. The system adjusts the airflow
mode, fan speed, air conditioning and
recirculation functions to reach the set
temperature(s) as quickly as possible.
Automatic Operation
To set the automatic mode:
1. Press the AUTO button.
2. Set the driver’s and front passenger’s
temperature using the + or – temper-
ature buttons.
Automatic Climate Controls
(if equipped)
Press the top
arrow on the
switch to move
the pedals
away from you
and the bottom
arrow on the
switch to move
the pedals
toward you.
The pedals cannot be adjusted when the
vehicle is in Reverse or when cruise
control is activated.
See Section 2 of your Owner Manual.
To save memory settings:
1. Adjust the driver’s seat, outside
mirrors and pedals to a comfortable
position.
2. Press and hold button 1 or 2 until two
beeps sound.
3. Repeat these steps for a second
driver using the other memory button.
To recall the settings, press memory
button 1 or 2 with the vehicle in Park. If
the Remote Keyless Entry transmitter is
used to enter the vehicle and the memo-
ry seat recall feature is on (see Driver
Information Center), the settings will be
recalled automatically.
Easy Exit Seat Recall
The easy exit seat recall button is locat-
ed between the two memory buttons.
Press the recall button, with the vehicle
in Park, to move the driver’s seat to the
exit position.
If the easy exit seat recall feature is on
(see Driver Information Center), auto-
matic seat movement will occur when
the key is removed from the ignition.
See Section 1 of your Owner Manual.
Page 20 of 24

Getting to Know Your Sierra20
Folding the Rear Seat
(if equipped)
60/40 Split-Bench Seat
To fold either side of the split-bench
seat, pull up the seat cushion.
To unfold the seat, pull down the seat
cushion.
Cargo Management System
(if equipped)
The cargo management system is com-
posed of three rails located on the front
and sides of the truck bed. It includes
four adjustable cargo tie-downs that can
be placed on the upper and lower slides
of the rail.
To adjust a tie-down, pull out the locator
pin and move the tie-down to another
location. Make sure the locator pin lines
up with a locator hole on the rail. Once
the pin is inside the hole, the tie-down
will not move side to side.
The rails are notched at each end to
allow the tie-downs to be removed and
placed on another rail. To remove, pull
out the locator pin and slide the tie-down
to the end of the rail and pull back.
Trailer-Tow Mirrors (if equipped)
The trailer-tow mirrors can be extended
manually to provide better visibility when
towing a trailer. The lower portion of the
mirror has a convex (spotter) mirror that
also can be adjusted manually to pro-
vide a better viewing angle.
See Section 2 of your Owner Manual.
Rear Vision Camera (if equipped)
When the vehicle is shifted into
Reverse, a view of the area behind the
vehicle is displayed on the inside
rearview mirror or the navigation system
screen (if equipped).
The camera is located near the tailgate
handle. Clean the camera lens with
water and a soft cloth.
See Section 2 of your Owner Manual.
Full-Bench Seat
To fold up the full-bench seat, push
down on the front of the seat cushion
while pulling down on the release strap
located under the seat cushion. Pull up
the seat cushion until it latches with the
seatback.
To fold down the full bench seat, push
on the seat cushion and pull the release
strap. Pull down the seat cushion until it
latches in place.
See Section 1 of your Owner Manual.
Page 21 of 24
21
PERFORMANCE & MAINTENANCE
The 6-speed automatic transmission has
a Range Selection Mode feature that
enables the driver to select the range
of gears desired for the current driving
conditions, such as when driving on
downhill grades.
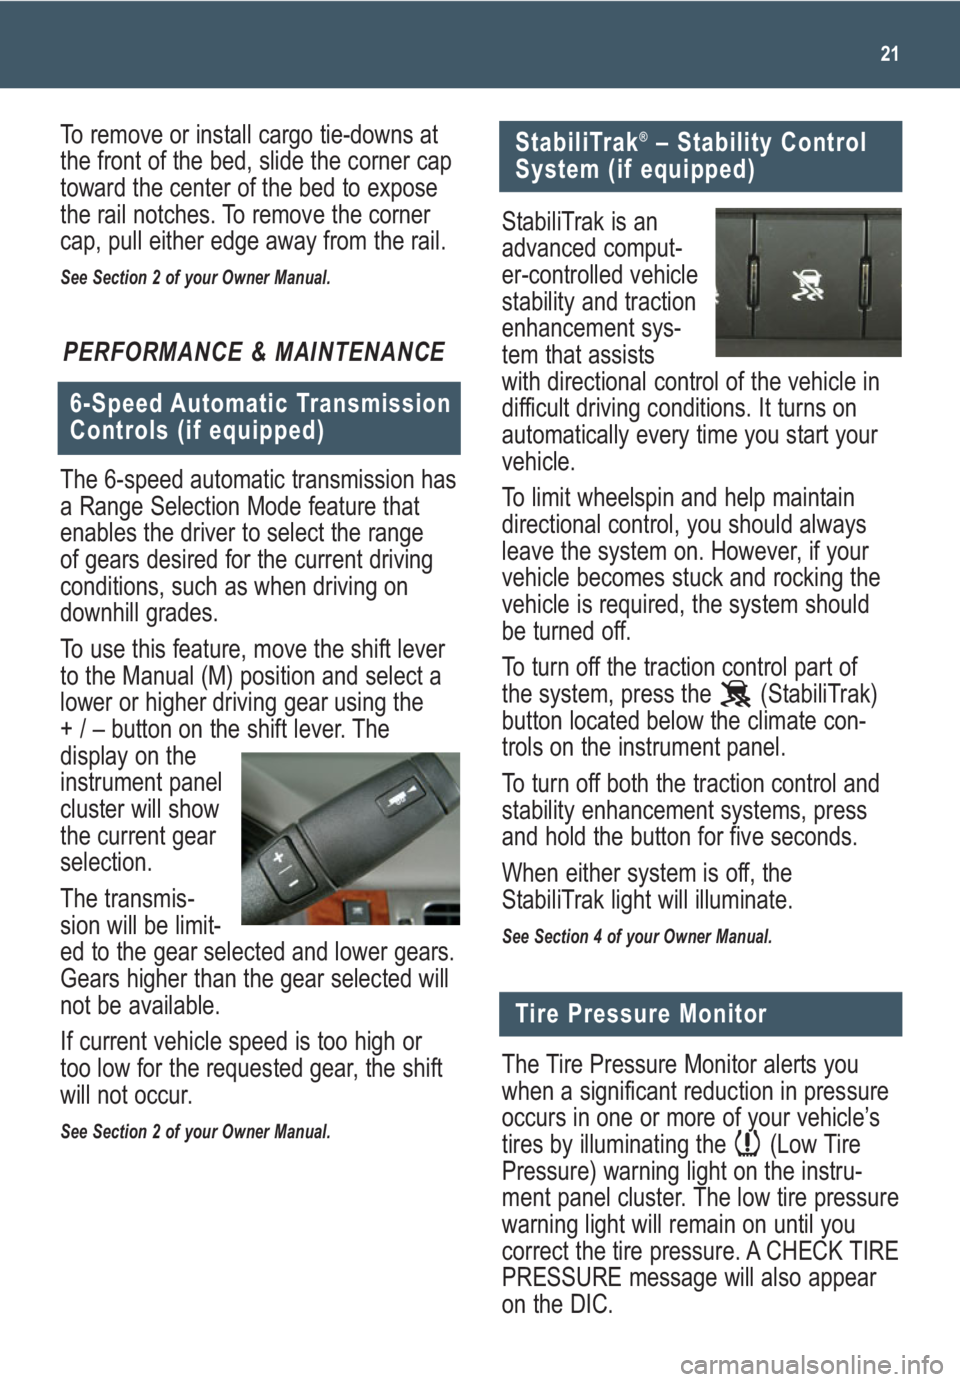
To use this feature, move the shift lever
to the Manual (M) position and select a
lower or higher driving gear using the
+ / – button on the shift lever. The
display on the
instrument panel
cluster will show
the current gear
selection.
The transmis-
sion will be limit-
ed to the gear selected and lower gears.
Gears higher than the gear selected will
not be available.
If current vehicle speed is too high or
too low for the requested gear, the shift
will not occur.
See Section 2 of your Owner Manual.
6-Speed Automatic Transmission
Controls (if equipped)
StabiliTrak®– Stability Control
System (if equipped)
Tire Pressure Monitor
The Tire Pressure Monitor alerts you
when a significant reduction in pressure
occurs in one or more of your vehicle’s
tires by illuminating the (Low Tire
Pressure) warning light on the instru-
ment panel cluster. The low tire pressure
warning light will remain on until you
correct the tire pressure. A CHECK TIRE
PRESSURE message will also appear
on the DIC.
StabiliTrak is an
advanced comput-
er-controlled vehicle
stability and traction
enhancement sys-
tem that assists
with directional control of the vehicle in
difficult driving conditions. It turns on
automatically every time you start your
vehicle.
To limit wheelspin and help maintain
directional control, you should always
leave the system on. However, if your
vehicle becomes stuck and rocking the
vehicle is required, the system should
be turned off.
To turn off the traction control part of
the system, press the (StabiliTrak)
button located below the climate con-
trols on the instrument panel.
To turn off both the traction control and
stability enhancement systems, press
and hold the button for five seconds.
When either system is off, the
StabiliTrak light will illuminate.
See Section 4 of your Owner Manual.
To remove or install cargo tie-downs at
the front of the bed, slide the corner cap
toward the center of the bed to expose
the rail notches. To remove the corner
cap, pull either edge away from the rail.
See Section 2 of your Owner Manual.
Page 24 of 24
Getting to Know Your Sierra24
My GMLink
1-800-GMC-8782
(1-800-462-8782)
TTY Users: 1-888-889-2438
As the proud owner of a new GMC vehicle,
you are automatically enrolled in the GMC
Roadside Assistance program. This value-
added service is intended to provide you
with peace of mind as you drive in the city
or travel the open road.
GMC’s Roadside Assistance toll-free
number is staffed by a team of technically
trained advisors, who are available 24
hours a day, 365 days a year. The advisors
can provide minor repair information or
make arrangements to tow your vehicle to
the nearest GMC dealer.
GMC will provide the following services
for 5 years/100,000 miles at no expense
to you:
• Fuel delivery
• Lockout service (identification required)
• Tow to nearest dealership for warranty
service
• Flat tire assistance
• Jump starts
In many instances, mechanical failures are
covered under GMC’s comprehensive
warranty. However, when other services
are utilized, our advisors will explain any
payment obligations you might incur.
The GMC Owner Center at My GMLink is
a complimentary service for GMC owners,
a one-stop resource to enhance your GMC
ownership experience. Exclusive member
benefits include online service reminders,
vehicle maintenance tips, online owner
manual, special privileges and more. Sign
up today atwww.mygmlink.com. For prompt and efficient assistance when
calling, please provide the following infor-
mation to the advisor:
• Location of the vehicle
• Telephone number and your location
• Vehicle model, year and color
• Vehicle mileage
• Vehicle Identification Number (VIN)
• Vehicle license plate number
GMC reserves the right to limit services
or reimbursement to an owner or driver
when, in GMC’s judgment, the claims
become excessive in frequency or type
of occurrence.
Roadside Assistance and OnStar
®
(if equipped)
If you have a current OnStar subscription,
press the OnStar button and the vehicle
will send your current GPS location to an
OnStar Advisor who will speak to you,
assess your problem, contact Roadside
Assistance and relay your exact location
so you will get the help you need.
Certain restrictions, precautions and safety procedures apply to your vehicle. Please read your Owner
Manual for complete instructions. All information contained herein is based on information available at the
time of printing and is subject to change without notice. Copyright 2008 by GM Corp. All rights reserved.
15911398 A
!15911398=A!
Roadside Assistance