center console GMC SIERRA 2010 Owner's Manual
[x] Cancel search | Manufacturer: GMC, Model Year: 2010, Model line: SIERRA, Model: GMC SIERRA 2010Pages: 630, PDF Size: 4.65 MB
Page 31 of 630
Setting the Clock
To set the time and date for the radio with CD, DVD,
and USB Port:1. Turn the ignition key to ACC/ACCESSORY or ON/RUN, then press
O, to turn the radio on.
2. Press
Hto display HR, MIN, MM, DD, YYYY
(hour, minute, month, day, and year).
3. Press the softkey located under any one of the labels to be changed.
4. To increase or decrease the time or date, turn
fclockwise or counter‐clockwise.
For detailed instructions on setting the clock for the
vehicle's specific audio system, see Setting the Clock
on page 4‑84.
Satellite Radio
XM is a satellite radio service that is based in the
48 contiguous United States and 10 Canadian
provinces. XM satellite radio has a wide variety of
programming and commercial-free music,
coast-to-coast, and in digital-quality sound.
A fee is required to receive the XM service.
For more information, refer to:
.www.xmradio.com or call 1-800-929-2100 (U.S.)
.www.xmradio.ca or call 1-877-438-9677 (Canada)
See “XM Satellite Radio Service” underRadio(s)
on
page 4‑87.
Portable Audio Devices
This vehicle may have an auxiliary input located on the
radio faceplate and a USB port located in the center
console or the dashboard. External devices such as
iPod
®, laptop computers, MP3 players, CD changers,
USB storage device, etc. can be connected to the
auxiliary port using a 3.5 mm (1/8 in) input cable or the
USB port depending on the audio system.
See “Using the Auxiliary Input Jack” and“Using the
USB Port” underRadio(s) on page 4‑87.
1-25
Page 138 of 630
Section 3 Features and Controls
Mirrors. . . . . . . . . . . . . . . . . . . . . . . . . . . . . . . . . . . . . . . . . . . . 3-56
Manual Rearview Mirror . . . . . . . . . . . . . . . . . . . . . . . . 3-56
Automatic Dimming Rearview Mirror . . . . . . . . . . . 3-56
Outside Manual Mirrors . . . . . . . . . . . . . . . . . . . . . . . . 3-56
Outside Towing Mirrors . . . . . . . . . . . . . . . . . . . . . . . . 3-57
Outside Power Mirrors . . . . . . . . . . . . . . . . . . . . . . . . . 3-57
Outside Power Foldaway Mirrors . . . . . . . . . . . . . . 3-58
Park Tilt Mirrors . . . . . . . . . . . . . . . . . . . . . . . . . . . . . . . . 3-59
Outside Convex Mirror . . . . . . . . . . . . . . . . . . . . . . . . . 3-59
Outside Heated Mirrors . . . . . . . . . . . . . . . . . . . . . . . . 3-59
Object Detection Systems . . . . . . . . . . . . . . . . . . . . . . .3-60
Ultrasonic Rear Parking Assist (URPA) . . . . . . . . 3-60
Rear Vision Camera (RVC) . . . . . . . . . . . . . . . . . . . . 3-63 Universal Home Remote System
. . . . . . . . . . . . . . . .3-69
Universal Home Remote System Operation (With Three Round LED) . . . . . . . . . . . . . . . . . . . . 3-69
Storage Areas . . . . . . . . . . . . . . . . . . . . . . . . . . . . . . . . . . . . 3-75
Glove Box . . . . . . . . . . . . . . . . . . . . . . . . . . . . . . . . . . . . . 3-75
Cupholders . . . . . . . . . . . . . . . . . . . . . . . . . . . . . . . . . . . . 3-75
Instrument Panel Storage . . . . . . . . . . . . . . . . . . . . . 3-76
Center Console Storage . . . . . . . . . . . . . . . . . . . . . . 3-76
Roof Rack System . . . . . . . . . . . . . . . . . . . . . . . . . . . . . 3-77
Rear Seat Armrest . . . . . . . . . . . . . . . . . . . . . . . . . . . . . 3-78
Cargo Management System . . . . . . . . . . . . . . . . . . . 3-78
Sunroof . . . . . . . . . . . . . . . . . . . . . . . . . . . . . . . . . . . . . . . . . . . 3-80
3-2
Page 211 of 630
Reprogramming Universal Home
Remote Buttons
Any of the three buttons can be reprogrammed by
repeating the instructions.
Erasing Universal Home Remote
Buttons
The programmed buttons should be erased when the
vehicle is sold or the lease ends.
To erase either Rolling Code or Fixed Code on the
Universal Home Remote device:1. Press and hold the two outside buttons at the same time for approximately 20 seconds, until the
indicator lights, located directly above the buttons,
begin to blink rapidly.
2. Once the indicator lights begin to blink, release both buttons. The codes from all buttons will be
erased.
For help or information on the Universal Home Remote
System, call the customer assistance phone number
under Customer Assistance Offices on page 8‑6.
Storage Areas
Glove Box
Lift up on the glove box lever to open it.
Cupholders
Vehicles with cupholders have them located on and
behind the center console and in the rear seat armrest.
Pull the loop down on the rear seat armrest to access
the cupholders.
Pull downward on the cover to access the cupholders
behind the center console.
3-75
Page 212 of 630
Instrument Panel Storage
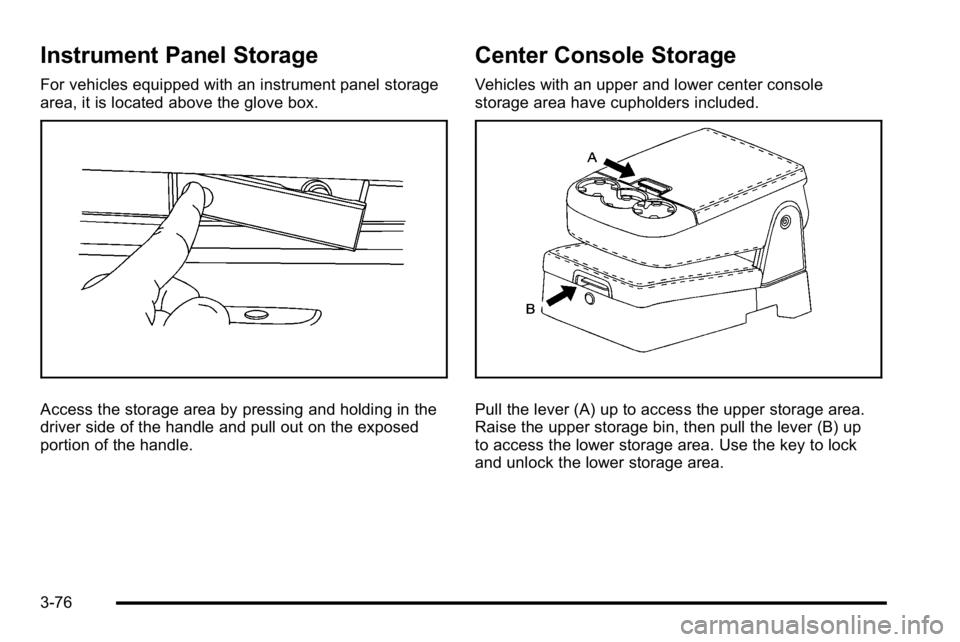
For vehicles equipped with an instrument panel storage
area, it is located above the glove box.
Access the storage area by pressing and holding in the
driver side of the handle and pull out on the exposed
portion of the handle.
Center Console Storage
Vehicles with an upper and lower center console
storage area have cupholders included.
Pull the lever (A) up to access the upper storage area.
Raise the upper storage bin, then pull the lever (B) up
to access the lower storage area. Use the key to lock
and unlock the lower storage area.
3-76
Page 232 of 630
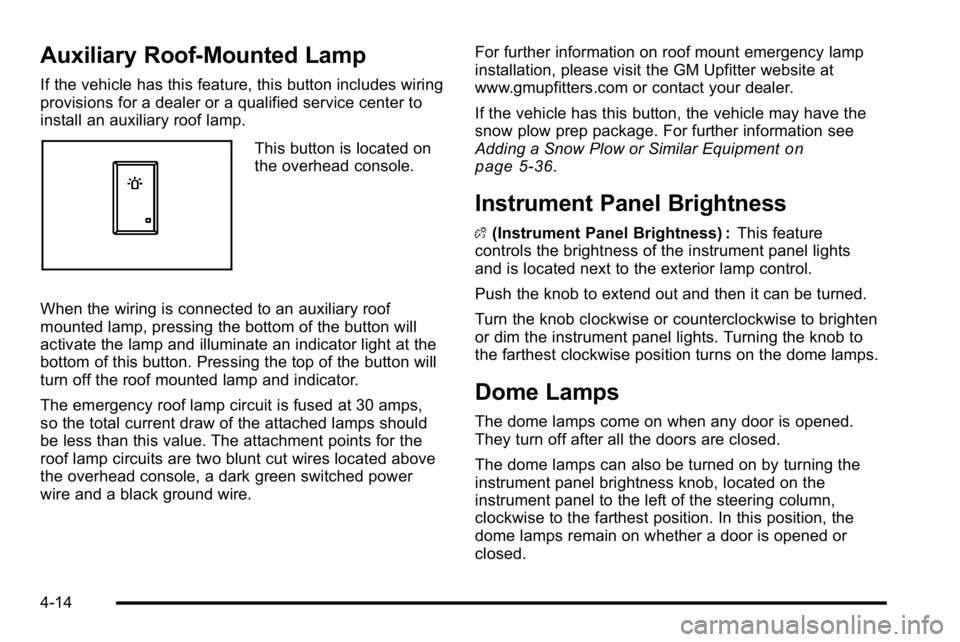
Auxiliary Roof-Mounted Lamp
If the vehicle has this feature, this button includes wiring
provisions for a dealer or a qualified service center to
install an auxiliary roof lamp.
This button is located on
the overhead console.
When the wiring is connected to an auxiliary roof
mounted lamp, pressing the bottom of the button will
activate the lamp and illuminate an indicator light at the
bottom of this button. Pressing the top of the button will
turn off the roof mounted lamp and indicator.
The emergency roof lamp circuit is fused at 30 amps,
so the total current draw of the attached lamps should
be less than this value. The attachment points for the
roof lamp circuits are two blunt cut wires located above
the overhead console, a dark green switched power
wire and a black ground wire. For further information on roof mount emergency lamp
installation, please visit the GM Upfitter website at
www.gmupfitters.com or contact your dealer.
If the vehicle has this button, the vehicle may have the
snow plow prep package. For further information see
Adding a Snow Plow or Similar Equipmenton
page 5‑36.
Instrument Panel Brightness
D (Instrument Panel Brightness) : This feature
controls the brightness of the instrument panel lights
and is located next to the exterior lamp control.
Push the knob to extend out and then it can be turned.
Turn the knob clockwise or counterclockwise to brighten
or dim the instrument panel lights. Turning the knob to
the farthest clockwise position turns on the dome lamps.
Dome Lamps
The dome lamps come on when any door is opened.
They turn off after all the doors are closed.
The dome lamps can also be turned on by turning the
instrument panel brightness knob, located on the
instrument panel to the left of the steering column,
clockwise to the farthest position. In this position, the
dome lamps remain on whether a door is opened or
closed.
4-14
Page 325 of 630
USB Support
The USB connector is located on the dashboard or in
the center console, and uses the USB 2.0 standard.
USB Supported Devices
.USB Flash Drives
.Portable USB Hard Drives
.Fifth generation or later iPod
.iPod nanos
.iPod touch
.iPod classic
Not all iPods and USB Drives are compatible with
the USB port.
Make sure the iPod has the latest firmware from Apple
®
for proper operation. iPod firmware can be updated
using the latest iTunes®application.
See www.apple.com/itunes.
For help with identifying your iPod, go to
www.apple.com/support.
Using an MP3 (Radios with CD)
Format
Radios that have the capability of playing MP3s can
play .mp3 or .wma files that were recorded onto a
CD-R or CD-RW disc. The files can be recorded
with the following fixed bit rates: 32 kbps, 40 kbps,
56 kbps, 64 kbps, 80 kbps, 96 kbps, 112 kbps,
128 kbps, 160 kbps, 192 kbps, 224 kbps, 256 kbps,
and 320 kbps or a variable bit rate.
Radios that have a USB port can play .mp3 and .wma
files that are stored on a USB storage device as well as
AAC files that are stored on an iPod
®.
Compressed Audio or Mixed Mode Discs
The radio can play discs that contain both
uncompressed CD audio and MP3 files. If both
formats are on the disc, the radio reads all MP3 files
first, then the uncompressed CD audio files.
4-107
Page 329 of 630
Connecting a USB Storage Device
or iPod®
The USB Port can be used to control an iPod or a
USB storage device.
To connect a USB storage device, connect the device to
the USB port located in the center console or on the
instrument panel.
To connect an iPod, connect one end of the USB cable
that came with the iPod to the iPod’s dock connector
and connect the other end to the USB port located in
the center console or on the instrument panel. If the
vehicle is on and the USB connection works, “OK to
disconnect” and a GM logo may appear on the iPod and
iPod appears on the radio display. The iPod music
appears on the radio’s display and begins playing.
The iPod charges while it is connected to the vehicle if
the vehicle is in the ACC/ACCESSORY or ON/RUN
position. When the vehicle is turned off, the iPod
automatically powers off and will not charge or draw
power from the vehicle's battery.
If you have an older iPod model that is not supported, it
can still be used by connecting it to the Auxiliary Input
Jack using a standard 3.5 mm (1/8 in) stereo cable.
See “Using the Auxiliary Input Jack” earlier for more
information.
Using the Radio to Control a USB
Storage Device or iPod
The radio can control a USB storage device or an
iPod using the radio buttons and knobs and display
song information on the radio’s display.
f(Tune): Turn to select files.
©SEEK:Press to go to the start of the track, if more
than ten seconds have played. Press and hold or press
multiple times to continue moving backward through
tracks.
¨SEEK: Press to go to the next track. Press and hold
or press multiple times to continue moving forward
through tracks.
sREV (Reverse): Press and hold to reverse
playback quickly. Sound is heard at a reduced volume.
Release
sREV to resume playing. The elapsed time
of the file displays.
\FWD (Fast Forward): Press and hold to advance
playback quickly. Sound is heard at a reduced volume.
Release
\FWD to resume playing. The elapsed time
of the file displays.
4(Information): Press to display additional information
about the selected track.
4-111
Page 336 of 630
When the scan is finished, the disc begins playing files
in order by artist. The current artist playing is shown on
the second line of the display. Once all songs by that
artist are played, the player moves to the next artist in
alphabetical order and begins playing files by that artist.
To listen to files by another artist, press the softkey
located below either arrow tab. The disc goes to the
next or previous artist in alphabetical order. Continue
pressing either softkey below the arrow tab until the
artist displays.
To change from playback by artist to playback by
album:1. Press the softkey located below the Sort By tab.
2. Press one of the softkeys below the album tab from the sort screen.
3. Press the softkey below the back tab to return to the main music navigator screen.
The album name displays on the second line between
the arrows and songs from the current album begin to
play. Once all songs from that album have played, the
player moves to the next album in alphabetical order on
the CD and begins playing MP3 files from that album.
To exit music navigator mode, press the softkey below
the Back tab to return to normal MP3 playback.Connecting a USB Storage Device
or iPod®
The USB Port can be used to control an iPod or a
USB storage device.
To connect a USB storage device, connect the device to
the USB port located in the center console or on the
instrument panel.
To connect an iPod, connect one end of the USB cable
that came with the iPod to the iPod’ s dock connector
and connect the other end to the USB port located in
the center console or on the instrument panel. If the
vehicle is on and the USB connection works, “OK to
disconnect” and a GM logo may appear on the iPod and
iPod appears on the radio display. The iPod music
appears on the radio’s display and begins playing.
The iPod charges while it is connected to the vehicle if
the vehicle is in the ACC/ACCESSORY or ON/RUN
position. When the vehicle is turned off, the iPod
automatically powers off and will not charge or draw
power from the vehicle's battery.
If you have an older iPod model that is not supported, it
can still be used by connecting it to the Auxiliary Input
Jack using a standard 3.5 mm (1/8 in) stereo cable.
See “Using the Auxiliary Input Jack” earlier for more
information.
4-118
Page 617 of 630

Bulb Replacement (cont.)License Plate Lamps . . . . . . . . . . . . . . . . . . . . . . . . . . . . . 6-62
Pickup Box Identification and Fender Marker
Lamps . . . . . . . . . . . . . . . . . . . . . . . . . . . . . . . . . . . . . . . . . . 6-59
Taillamps, Turn Signal, Stoplamps and Back-up Lamps . . . . . . . . . . . . . . . . . . . . . . . . . . . . . . . . . 6-60
Buying New Tires . . . . . . . . . . . . . . . . . . . . . . . . . . . . . . . . . . 6-83
C
Calibration . . . . . . . . . . . . . . . . . . . . . . . . . . . . . . . . . . . . . . . . . 4-62
California Perchlorate Materials Requirements . . . . . . . . . . . . . . . 6-5
Warning . . . . . . . . . . . . . . . . . . . . . . . . . . . . . . . . . . . . . . . . . . . 6-5
California Fuel . . . . . . . . . . . . . . . . . . . . . . . . . . . . . . . . . . . . . . .6-8
Camera, Rear Vision . . . . . . . . . . . . . . . . . . . . . . . . . . . . . . 3-63
Canadian Owners . . . . . . . . . . . . . . . . . . . . . . . . . . . . . . . . . . . . iii
Capacities and Specifications . . . . . . . . . . . . . . . . . . . . . 6-126
Carbon Monoxide Engine Exhaust . . . . . . . . . . . . . . . . . . . . . . . . . . . . . . . . . . . 3-54
Tailgate . . . . . . . . . . . . . . . . . . . . . . . . . . . . . . . . . . . . . . . . . . . 3-12
Winter Driving . . . . . . . . . . . . . . . . . . . . . . . . . . . . . . . . . . . . 5-26
Care of Safety Belts . . . . . . . . . . . . . . . . . . . . . . . . . . . . . . . . . . . . . 6-112
Cargo Lamp . . . . . . . . . . . . . . . . . . . . . . . . . . . . . . . . . . . . . . . 4-15 Cargo Management System . . . . . . . . . . . . . . . . . . . . . . . 3-78
CD, MP3 . . . . . . . . . . . . . . . . . . . . . . . . . . . . . . . . . . 4-107, 4-114
Center Console Storage . . . . . . . . . . . . . . . . . . . . . . . . . . . 3-76
Center High-Mounted Stoplamp (CHMSL) and
Cargo Lamp . . . . . . . . . . . . . . . . . . . . . . . . . . . . . . . . . . . . . . 6-58
Center Seat . . . . . . . . . . . . . . . . . . . . . . . . . . . . . . . . . . . . . . . 2-13
Chains, Tire . . . . . . . . . . . . . . . . . . . . . . . . . . . . . . . . . . . . . . . 6-89
Charging System Light . . . . . . . . . . . . . . . . . . . . . . . . . . . . 4-37
Check Engine Lamp . . . . . . . . . . . . . . . . . . . . . . . . . . . . . . . . . . . . . 4-42
Checking Things Under the Hood . . . . . . . . . . . . . . . . . . 6-14
Chemical Paint Spotting . . . . . . . . . . . . . . . . . . . . . . . . . . 6-116
Child Restraints
Infants and Young Children . . . . . . . . . . . . . . . . . . . . . . . 2-42
Lower Anchors and Tethers for Children . . . . . . . . . . 2-50
Older Children . . . . . . . . . . . . . . . . . . . . . . . . . . . . . . . . . . . . 2-39
Securing a Child Restraint in a Rear SeatPosition . . . . . . . . . . . . . . . . . . . . . . . . . . . . . . . . . . . . . . . . . 2-58
Securing a Child Restraint in the Center Front Seat Position . . . . . . . . . . . . . . . . . . . . . . . . . . . . . . . . . . . . 2-61
Securing a Child Restraint in the
Right Front Seat Position . . . . . . . . . . . . 2-62, 2-66, 2-70
Systems . . . . . . . . . . . . . . . . . . . . . . . . . . . . . . . . . . . . . . . . . . 2-46
Where to Put the Restraint . . . . . . . . . . . . . . . . . . . . . . . 2-48
i - 3
Page 628 of 630

Spare Tire . . . . . . . . . . . . . . . . . . . . . . . . . . . . . . . . . . . . . . . . 6-109Installing . . . . . . . . . . . . . . . . . . . . . . . . . . . . . . . . . . . . . . . . . . 6-97
Removing . . . . . . . . . . . . . . . . . . . . . . . . . . . . . . . . . . . . . . . . 6-92
Storing . . . . . . . . . . . . . . . . . . . . . . . . . . . . . . . . . . . . . . . . . .6-106
Specifications and Capacities . . . . . . . . . . . . . . . . . . . . . 6-126
Speedometer . . . . . . . . . . . . . . . . . . . . . . . . . . . . . . . . . . . . . . 4-31
StabiliTrak
®Indicator Light . . . . . . . . . . . . . . . . . . . . . . . . 4-41
StabiliTrak®System . . . . . . . . . . . . . . . . . . . . . . . . . . . . . . . . .5-6
Start Vehicle, Remote . . . . . . . . . . . . . . . . . . . . . . . . . . . . . . .3-7
Starting the Engine . . . . . . . . . . . . . . . . . . . . . . . . . . . . . . . . 3-23
Steering . . . . . . . . . . . . . . . . . . . . . . . . . . . . . . . . . . . . . . . . . . . . .5-8
Steering Wheel Controls, Audio . . . . . . . . . . . . . . . . . . 4-145
Steering Wheel, Tilt Wheel . . . . . . . . . . . . . . . . . . . . . . . . . .4-3
Storage Areas Cargo Management System . . . . . . . . . . . . . . . . . . . . . . 3-78
Center Console . . . . . . . . . . . . . . . . . . . . . . . . . . . . . . . . . . . 3-76
Cupholders . . . . . . . . . . . . . . . . . . . . . . . . . . . . . . . . . . . . . . . 3-75
Glove Box . . . . . . . . . . . . . . . . . . . . . . . . . . . . . . . . . . . . . . . . 3-75
Instrument Panel . . . . . . . . . . . . . . . . . . . . . . . . . . . . . . . . . 3-76
Rear Seat Armrest . . . . . . . . . . . . . . . . . . . . . . . . . . . . . . . . 3-78
Roof Rack System . . . . . . . . . . . . . . . . . . . . . . . . . . . . . . . . 3-77
Stuck in Sand, Mud, Ice, or Snow . . . . . . . . . . . . . . . . . 5-28
Sun Visors . . . . . . . . . . . . . . . . . . . . . . . . . . . . . . . . . . . . . . . . . 3-17
Sunroof . . . . . . . . . . . . . . . . . . . . . . . . . . . . . . . . . . . . . . . . . . . . 3-80
System Roof Rack . . . . . . . . . . . . . . . . . . . . . . . . . . . . . . . . . . . . . . . . 3-77
T
Tachometer . . . . . . . . . . . . . . . . . . . . . . . . . . . . . . . . . . . . . . . . 4-31
Tailgate . . . . . . . . . . . . . . . . . . . . . . . . . . . . . . . . . . . . . . . . . . . . 3-12
TaillampsTurn Signal, Stoplamps and Back-up Lamps . . . . . . 6-60
Tampering with Noise Control System Prohibited . . . . . . . . . . . . . . . . . . . . . . . . . . . . . . . . . . . . . . . . 6-53
Text Telephone (TTY) Users . . . . . . . . . . . . . . . . . . . . . . . . .8-6
Theft-Deterrent Feature . . . . . . . . . . . . . . . . . . . . . . . . . . . 4-145
Theft-Deterrent Systems . . . . . . . . . . . . . . . . . . . . . . . . . . . 3-17 Content Theft-Deterrent . . . . . . . . . . . . . . . . . . . . . . . . . . 3-17
PASS-Key
®III+ Electronic Immobilizer . . . . . . . . . . . . 3-19
PASS-Key®III+ Electronic Immobilizer
Operation . . . . . . . . . . . . . . . . . . . . . . . . . . . . . . . . . . . . . . . 3-19
Throttle, Adjustable . . . . . . . . . . . . . . . . . . . . . . . . . . . . . . . . 3-26
Tilt Wheel . . . . . . . . . . . . . . . . . . . . . . . . . . . . . . . . . . . . . . . . . . . .4-3
Time, Setting . . . . . . . . . . . . . . . . . . . . . . . . . . . . . . . . . . . . . . 4-84
Tires . . . . . . . . . . . . . . . . . . . . . . . . . . . . . . . . . . . . . . . . . . . . . . . 6-64 Aluminum or Chrome-Plated Wheels,Cleaning . . . . . . . . . . . . . . . . . . . . . . . . . . . . . . . . . . . . . . . 6-115
Buying New Tires . . . . . . . . . . . . . . . . . . . . . . . . . . . . . . . . . 6-83
Chains . . . . . . . . . . . . . . . . . . . . . . . . . . . . . . . . . . . . . . . . . . . . 6-89
Changing a Flat Tire . . . . . . . . . . . . . . . . . . . . . . . . . . . . . . 6-90
Cleaning . . . . . . . . . . . . . . . . . . . . . . . . . . . . . . . . . . . . . . . . . 6-116
Different Size . . . . . . . . . . . . . . . . . . . . . . . . . . . . . . . . . . . . . 6-85
Dual Tire Operation . . . . . . . . . . . . . . . . . . . . . . . . . . . . . . . 6-74
High-Speed Operation . . . . . . . . . . . . . . . . . . . . . . . . . . . . 6-74
i - 14