horn GMC SIERRA 2010 Owner's Manual
[x] Cancel search | Manufacturer: GMC, Model Year: 2010, Model line: SIERRA, Model: GMC SIERRA 2010Pages: 630, PDF Size: 4.65 MB
Page 9 of 630

A.Outlet Adjustment on page 4‑29.
B. Turn Signal/Multifunction Lever on page 4‑4.
C. Driver Information Center (DIC) Buttons. See Driver Information Center (DIC) on page 4‑51.
D. Hazard Warning Flashers on page 4‑3.
E. Instrument Panel Cluster on page 4‑30.
F. Shift Lever. See Automatic Transmission Operation
on page 3‑28. Tow/Haul Selector Button
(If Equipped). See Tow/Haul Modeon page 3‑34.
Range Selection Mode (Allison Transmission and
Hydra-Matic
®6‐Speed Button (If Equipped). See
Automatic Transmission Operation on page 3‑28.
G. Audio System(s) on page 4‑84.
H. Instrument Panel Storage on page 3‑76.
I. Integrated Trailer Brake Controller (If Equipped). See Towing a Trailer on page 5‑50.
J. Exterior Lamps on page 4‑10.
K. Hood Release on page 6‑15.
L. Parking Brake on page 3‑50.
M. Dome Lamp Override
on page 4‑15.Dome Lampson page 4‑14.Fog Lampson page 4‑13(If Equipped).
N. Cruise Control on page 4‑7.
O. Tilt Wheel on page 4‑3. P.
Horn on page 4‑3.
Q. Audio Steering Wheel Controls
on page 4‑145(If Equipped).
R. Automatic Transfer Case Control (If Equipped). See Four-Wheel Drive on page 3‑36.
S. Ashtray (If Equipped). See Ashtray(s) and
Cigarette Lighter on page 4‑18.
T. StabiliTrak
®Systemon page 5‑6(If Equipped).
Ultrasonic Rear Parking Assist (URPA)on
page 3‑60(If Equipped). Pedal Adjust Button
(If Equipped). See Adjustable Throttle and Brake
Pedal
on page 3‑26. Heated Windshield Washer
Fluid Button (If Equipped). Windshield Washeron
page 4‑6.
U. Accessory Power Outlet(s) on page 4‑17.
V. Climate Control System (With Heater Only)
on
page 4‑18or Climate Control System (With Air
Conditioning)on page 4‑20and Dual Automatic
Climate Control System on page 4‑22.
W. Power Take Off (PTO) Control (If Equipped). See Power Take Off (PTO) in the Duramax Diesel
Supplement Index.
X. Passenger Airbag Off Control (If Equipped). See Airbag Off Switch on page 2‑82.
Y. Glove Box on page 3‑75.
1-3
Page 11 of 630

A.Outlet Adjustment on page 4‑29.
B. Turn Signal/Multifunction Lever on page 4‑4.
C. Instrument Panel Cluster on page 4‑30.
D. Hazard Warning Flashers
on page 4‑3.
E. Shift Lever. See Automatic Transmission Operation
on page 3‑28.
F. Tow/Haul Mode
on page 3‑34(If Equipped).
G. Driver Information Center (DIC) Buttons. See Driver Information Center (DIC) on page 4‑51.
H. Audio System(s) on page 4‑84.
I. Exterior Lamps on page 4‑10.
J. Integrated Trailer Brake Controller (If Equipped). See Towing a Trailer on page 5‑50.
K. Dome Lamp Override
on page 4‑15.Dome Lampson page 4‑14.
L. Automatic Transfer Case Control. (If Equipped). See Four-Wheel Drive on page 3‑36.
M. Hood Release on page 6‑15.
N. Parking Brake on page 3‑50. O.
Cruise Control on page 4‑7.
P. Tilt Wheel on page 4‑3.
Q. Horn on page 4‑3.
R. Audio Steering Wheel Controls on page 4‑145.
S. Climate Control System (With Heater Only)
on
page 4‑18or Climate Control System (With Air
Conditioning)on page 4‑20or Dual Automatic
Climate Control Systemon page 4‑22(If Equipped).
T. Accessory Power Outlet(s)
on page 4‑17.
Cigarette Lighter (If Equipped). See Ashtray(s) and
Cigarette Lighter
on page 4‑18.
U. StabiliTrak®Systemon page 5‑6(If Equipped).
Pedal Adjust Button (If Equipped). See Adjustable
Throttle and Brake Pedal
on page 3‑26. Ultrasonic
Rear Parking Assist (URPA)on page 3‑60(If Equipped). Heated Windshield Washer Fluid
Button (If Equipped). See Windshield Washeron
page 4‑6.
V. Passenger Airbag Off Control (If Equipped). See Airbag Off Switch on page 2‑82.
W. Glove Box on page 3‑75.
1-5
Page 141 of 630

/(Remote Vehicle Start):For vehicles with this
feature, press /to start the engine from outside the
vehicle using the RKE transmitter. See Remote Vehicle
Start
on page 3‑7for additional information.
Q(Lock): Press to lock all the doors.
If enabled through the Driver Information Center (DIC),
the turn signal lamps flash once to indicate locking has
occurred. If enabled through the DIC, the horn chirps
when
Qis pressed again within three seconds.
See DIC Vehicle Customization (With DIC Buttons)
on
page 4‑75for additional information.
Pressing
Qarms the content theft‐deterrent system.
See Content Theft-Deterrent on page 3‑17.
K(Unlock): Press once to unlock only the driver door.
If
Kis pressed again within three seconds, all
remaining doors unlock. The interior lamps may come
on and stay on for 20 seconds or until the ignition is
turned on. If enabled through the DIC, the turn signal lamps flash
twice to indicate unlocking has occurred. See
DIC
Vehicle Customization (With DIC Buttons)
on
page 4‑75. If enabled through the DIC, the exterior
lights may turn on. See “APPROACH LIGHTING” under
DIC Vehicle Customization (With DIC Buttons)
on
page 4‑75.
Pressing
Kon the RKE transmitter disarms the content
theft‐deterrent system. See Content Theft-Deterrent
on
page 3‑17.
L(Vehicle Locator/Panic Alarm): Press and release
to locate the vehicle. The turn signal lamps flash and
the horn sounds three times.
Press and hold
Lfor more than two seconds to
activate the panic alarm. The turn signal lamps flash
and the horn sounds repeatedly for 30 seconds.
The alarm turns off when the ignition is moved to
ON/RUN or
Lis pressed again. The ignition must be
in LOCK/OFF for the panic alarm to work.
3-5
Page 153 of 630
Sun Visors
Pull the sun visor down to block glare. Swing the sun
visor to the side to cover the side window.
The passenger's side sun visor may have a vanity
mirror.
Theft-Deterrent Systems
Vehicle theft is big business, especially in some cities.
This vehicle has theft-deterrent features, however, they
do not make it impossible to steal.
Content Theft-Deterrent
Your vehicle may have a content theft-deterrent alarm
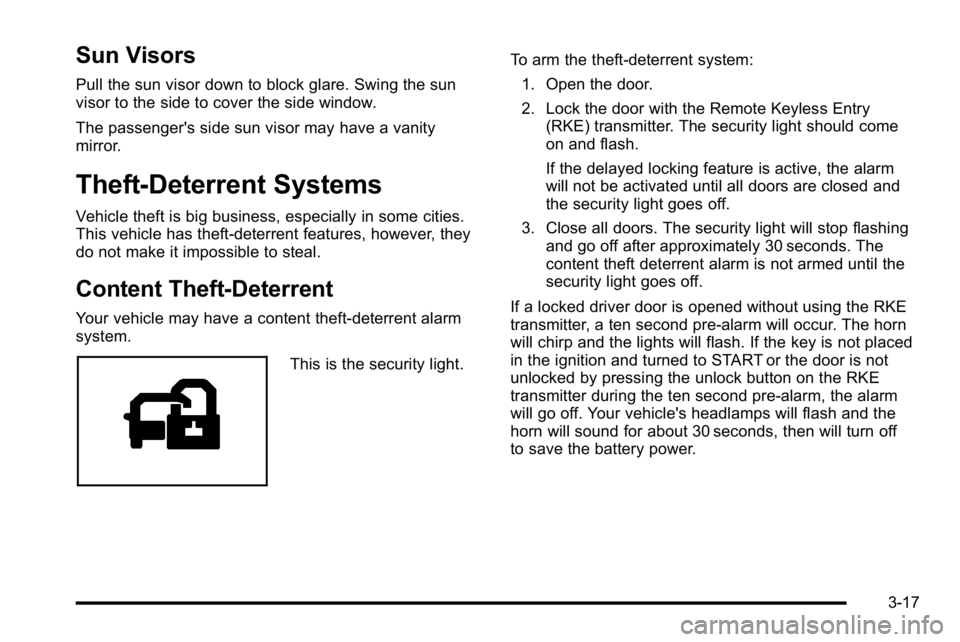
system.
This is the security light.To arm the theft-deterrent system:
1. Open the door.
2. Lock the door with the Remote Keyless Entry (RKE) transmitter. The security light should come
on and flash.
If the delayed locking feature is active, the alarm
will not be activated until all doors are closed and
the security light goes off.
3. Close all doors. The security light will stop flashing and go off after approximately 30 seconds. The
content theft deterrent alarm is not armed until the
security light goes off.
If a locked driver door is opened without using the RKE
transmitter, a ten second pre-alarm will occur. The horn
will chirp and the lights will flash. If the key is not placed
in the ignition and turned to START or the door is not
unlocked by pressing the unlock button on the RKE
transmitter during the ten second pre-alarm, the alarm
will go off. Your vehicle's headlamps will flash and the
horn will sound for about 30 seconds, then will turn off
to save the battery power.
3-17
Page 154 of 630
The theft-deterrent system will not activate if the doors
are locked with the vehicle's key or the manual door
lock. It activates only if you use the power door lock
switch with the door open or the RKE transmitter.
You should also remember that you can start your
vehicle with the correct ignition key if the alarm has
been set off.
To avoid setting off the alarm by accident:
.If you do not want to activate the theft-deterrent
system, the vehicle should be locked with the door
key after the doors are closed.
.Always unlock a door with the RKE transmitter.
Unlocking a door any other way will set off the
alarm if the system has been armed.
If you set off the alarm by accident, press unlock on the
RKE transmitter or place the key in the ignition and turn
it to START to turn it off.
Testing the Alarm
To test the alarm: 1. From inside the vehicle, lower the driver's window and open the driver's door.
2. Activate the system by locking the doors with the RKE transmitter.
3. Get out of the vehicle, close the door and wait for the security light to go out.
4. Then reach in through the window, unlock the door with the manual door lock and open the door.
This should set off the alarm.
If the alarm does not sound when it should but the
headlamps flash, check to see if the horn works.
The horn fuse may be blown. To replace the fuse,
see Fuses and Circuit Breakers on page 6‑118.
If the alarm does not sound or the headlamps do not
flash, see your dealer/retailer for service.
3-18
Page 219 of 630
Section 4 Instrument Panel
Instrument Panel Overview. . . . . . . . . . . . . . . . . . . . . . . .4-3
Hazard Warning Flashers . . . . . . . . . . . . . . . . . . . . . . . 4-3
Horn . . . . . . . . . . . . . . . . . . . . . . . . . . . . . . . . . . . . . . . . . . . . 4-3
Tilt Wheel . . . . . . . . . . . . . . . . . . . . . . . . . . . . . . . . . . . . . . . 4-3
Turn Signal/Multifunction Lever . . . . . . . . . . . . . . . . . . 4-4
Turn and Lane-Change Signals . . . . . . . . . . . . . . . . . 4-4
Headlamp High/Low-Beam Changer . . . . . . . . . . . . 4-5
Flash-to-Pass . . . . . . . . . . . . . . . . . . . . . . . . . . . . . . . . . . . 4-5
Windshield Wipers . . . . . . . . . . . . . . . . . . . . . . . . . . . . . . 4-6
Windshield Washer . . . . . . . . . . . . . . . . . . . . . . . . . . . . . 4-6
Cruise Control . . . . . . . . . . . . . . . . . . . . . . . . . . . . . . . . . . 4-7
Exterior Lamps . . . . . . . . . . . . . . . . . . . . . . . . . . . . . . . . 4-10
Headlamps on Reminder . . . . . . . . . . . . . . . . . . . . . . . 4-11
Daytime Running Lamps (DRL) . . . . . . . . . . . . . . . . 4-12
Automatic Headlamp System . . . . . . . . . . . . . . . . . . 4-12
Puddle Lamps . . . . . . . . . . . . . . . . . . . . . . . . . . . . . . . . . 4-13
Fog Lamps . . . . . . . . . . . . . . . . . . . . . . . . . . . . . . . . . . . . 4-13
Auxiliary Roof-Mounted Lamp . . . . . . . . . . . . . . . . . 4-14
Instrument Panel Brightness . . . . . . . . . . . . . . . . . . . 4-14
Dome Lamps . . . . . . . . . . . . . . . . . . . . . . . . . . . . . . . . . . 4-14
Dome Lamp Override . . . . . . . . . . . . . . . . . . . . . . . . . . 4-15
Entry Lighting . . . . . . . . . . . . . . . . . . . . . . . . . . . . . . . . . . 4-15
Exit Lighting . . . . . . . . . . . . . . . . . . . . . . . . . . . . . . . . . . . 4-15
Reading Lamps . . . . . . . . . . . . . . . . . . . . . . . . . . . . . . . . 4-15
Cargo Lamp . . . . . . . . . . . . . . . . . . . . . . . . . . . . . . . . . . . 4-15 Electric Power Management . . . . . . . . . . . . . . . . . . . 4-16
Battery Run-Down Protection . . . . . . . . . . . . . . . . . . 4-16
Accessory Power Outlet(s) . . . . . . . . . . . . . . . . . . . . . 4-17
Ashtray(s) and Cigarette Lighter . . . . . . . . . . . . . . . 4-18
Climate Controls . . . . . . . . . . . . . . . . . . . . . . . . . . . . . . . . . . 4-18
Climate Control System (With Heater Only) . . . . 4-18
Climate Control System (With Air Conditioning) . . . . . . . . . . . . . . . . . . . . . . . 4-20
Dual Automatic Climate Control System . . . . . . . 4-22
Outlet Adjustment . . . . . . . . . . . . . . . . . . . . . . . . . . . . . . 4-29
Warning Lights, Gages, and Indicators . . . . . . . . . .4-29
Instrument Panel Cluster . . . . . . . . . . . . . . . . . . . . . . . 4-30
Speedometer and Odometer . . . . . . . . . . . . . . . . . . . 4-31
Trip Odometer . . . . . . . . . . . . . . . . . . . . . . . . . . . . . . . . . 4-31
Tachometer . . . . . . . . . . . . . . . . . . . . . . . . . . . . . . . . . . . . 4-31
Safety Belt Reminders . . . . . . . . . . . . . . . . . . . . . . . . . 4-32
Airbag Readiness Light . . . . . . . . . . . . . . . . . . . . . . . . 4-33
Airbag Off Light . . . . . . . . . . . . . . . . . . . . . . . . . . . . . . . . 4-34
Passenger Airbag Status Indicator . . . . . . . . . . . . . 4-36
Charging System Light . . . . . . . . . . . . . . . . . . . . . . . . 4-37
Voltmeter Gage . . . . . . . . . . . . . . . . . . . . . . . . . . . . . . . . 4-38
Brake System Warning Light . . . . . . . . . . . . . . . . . . . 4-39
Antilock Brake System (ABS) Warning Light . . . 4-40
StabiliTrak
®Indicator Light . . . . . . . . . . . . . . . . . . . . . 4-41
Engine Coolant Temperature Gage . . . . . . . . . . . . 4-41
4-1
Page 221 of 630
Instrument Panel Overview
Hazard Warning Flashers
|(Hazard Warning Flasher):Press this button
located on top of the steering column, to make the front
and rear turn signal lamps flash on and off. This warns
others that you are having trouble. Press again to turn
the flashers off.
When the hazard warning flashers are on, the vehicle's
turn signals will not work.
Horn
To sound the horn, press the horn symbols located on
the steering wheel.
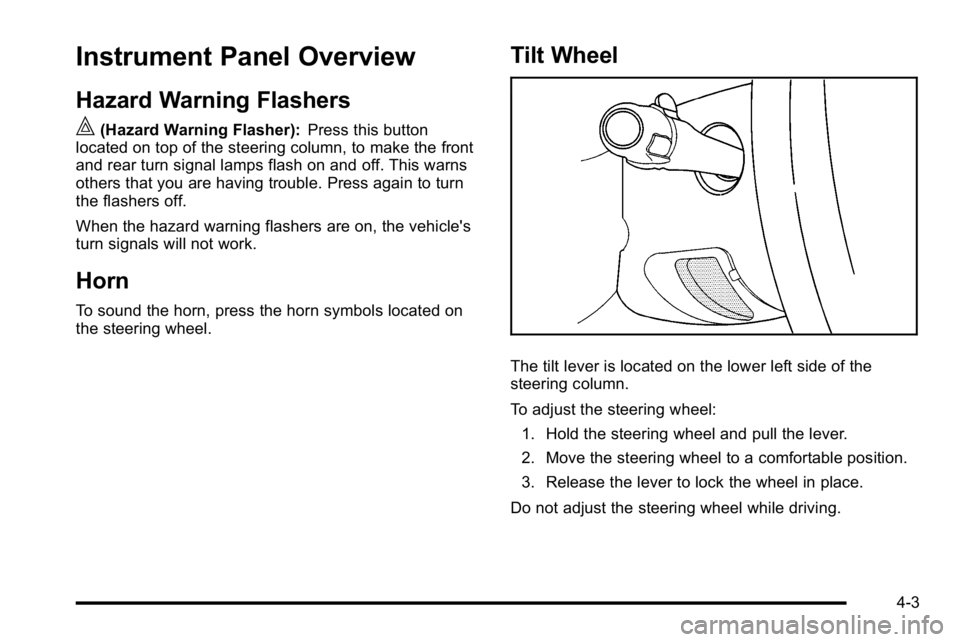
Tilt Wheel
The tilt lever is located on the lower left side of the
steering column.
To adjust the steering wheel:
1. Hold the steering wheel and pull the lever.
2. Move the steering wheel to a comfortable position.
3. Release the lever to lock the wheel in place.
Do not adjust the steering wheel while driving.
4-3
Page 295 of 630
AUTO DOOR UNLOCK
This feature allows you to select whether or not to turn
off the automatic door unlocking feature. It also allows
you to select which doors and when the doors will
automatically unlock. SeeProgrammable Automatic
Door Locks
on page 3‑10for more information.
Press the customization button until AUTO DOOR
UNLOCK appears on the DIC display. Press the set/
reset button once to access the settings for this feature.
Then press the customization button to scroll through
the following settings:
OFF : None of the doors will automatically unlock.
DRIVER AT KEY OUT : Only the driver's door will
unlock when the key is taken out of the ignition.
DRIVER IN PARK : Only the driver's door will unlock
when the vehicle is shifted into P (Park) .
ALL AT KEY OUT : All of the doors will unlock when
the key is taken out of the ignition.
ALL IN PARK (default) : All of the doors will unlock
when the vehicle is shifted into P (Park).
NO CHANGE : No change will be made to this feature.
The current setting will remain.
To select a setting, press the set/reset button while the
desired setting is displayed on the DIC.
REMOTE DOOR LOCK
This feature allows you to select the type of feedback
you will receive when locking the vehicle with the
Remote Keyless Entry (RKE) transmitter. You will not
receive feedback when locking the vehicle with the
RKE transmitter if the doors are open. See Remote
Keyless Entry (RKE) System Operation
on page 3‑4for more information.
Press the customization button until REMOTE DOOR
LOCK appears on the DIC display. Press the set/reset
button once to access the settings for this feature.
Then press the customization button to scroll through
the following settings:
OFF : There will be no feedback when you press the
lock button on the RKE transmitter.
LIGHTS ONLY : The exterior lamps will flash when you
press the lock button on the RKE transmitter.
HORN ONLY : The horn will sound on the second press
of the lock button on the RKE transmitter.
HORN & LIGHTS (default) : The exterior lamps will
flash when you press the lock button on the RKE
transmitter, and the horn will sound when the lock
button is pressed again within five seconds of the
previous command.
4-77
Page 385 of 630

.Sound the horn as you approach the top of the hill
to let opposing traffic know you are there.
.Use headlamps even during the day to make the
vehicle more visible to oncoming traffic.
{WARNING:
Driving to the top (crest) of a hill at full speed can
cause an accident. There could be a drop-off,
embankment, cliff, or even another vehicle. You
could be seriously injured or killed. As you near
the top of a hill, slow down and stay alert.
If the vehicle stalls, or is about to stall, and you cannot
make it up the hill:
.Push the brake pedal to stop the vehicle and
keep it from rolling backwards and apply the
parking brake.
.If the engine is still running, shift the transmission
to R (Reverse), release the parking brake, and
slowly back down the hill in R (Reverse).
.If the engine has stopped running, you need to
restart it. With the brake pedal pressed and the
parking brake still applied, shift the transmission to
P (Park) and restart the engine. Then, shift to
R (Reverse), release the parking brake, and slowly
back down the hill as straight as possible in
R (Reverse).
.While backing down the hill, put your left hand
on the steering wheel at the 12 o'clock position
so you can tell if the wheels are straight and can
maneuver as you back down. It is best to back
down the hill with the wheels straight rather than
in the left or right direction. Turning the wheel too
far to the left or right will increase the possibility
of a rollover.
Things not to do if the vehicle stalls, or is about to stall,
when going up a hill:
.Never attempt to prevent a stall by shifting into
N (Neutral) to rev-up the engine and regain forward
momentum. This will not work. The vehicle can roll
backward very quickly and could go out of control.
.Never try to turn around if about to stall when
going up a hill. If the hill is steep enough to stall
the vehicle, it is steep enough to cause it to roll
over. If you cannot make it up the hill, back straight
down the hill.
5-17
Page 525 of 630

The TPMS sensor matching process is outlined below:1. Set the parking brake.
2. Turn the ignition switch to ON/RUN with the engine off.
3. Press the Remote Keyless Entry (RKE) transmitter's LOCK and UNLOCK buttons at the
same time for approximately five seconds. The
horn sounds twice to signal the receiver is in
relearn mode and TIRE LEARNING ACTIVE
message displays on the DIC screen.
If your vehicle does not have RKE, press the
Driver Information Center (DIC) vehicle information
button until the PRESS
VTO RELEARN TIRE
POSITIONS message displays. The horn sounds
twice to signal the receiver is in relearn mode and
TIRE LEARNING ACTIVE message displays on
the DIC screen.
If your vehicle does not have RKE or DIC buttons,
press the trip odometer reset stem located on the
instrument panel cluster until the PRESS
VTO
RELEARN TIRE POSITIONS message displays.
The horn sounds twice to signal the receiver is in
relearn mode and TIRE LEARNING ACTIVE
message displays on the DIC screen.
4. Start with the driver side front tire. 5. Remove the valve cap from the valve cap stem.
Activate the TPMS sensor by increasing or
decreasing the tire's air pressure for five seconds,
or until a horn chirp sounds. The horn chirp, which
may take up to 30 seconds to sound, confirms that
the sensor identification code has been matched to
this tire and wheel position.
6. Proceed to the passenger side front tire, and repeat the procedure in Step 5.
7. Proceed to the passenger side rear tire, and repeat the procedure in Step 5.
8. Proceed to the driver side rear tire, and repeat the procedure in Step 5. The horn sounds two times to
indicate the sensor identification code has been
matched to the driver side rear tire, and that the
TPMS sensor matching process is no longer
active. The TIRE LEARNING ACTIVE message on
the DIC display screen goes off.
9. Turn the ignition switch to LOCK/OFF.
10. Set all four tires to the recommended air pressure level as indicated on the Tire and Loading
Information label.
11. Put the valve caps back on the valve stems.
6-79