rear entertainment GMC SIERRA 2010 Owner's Manual
[x] Cancel search | Manufacturer: GMC, Model Year: 2010, Model line: SIERRA, Model: GMC SIERRA 2010Pages: 630, PDF Size: 4.65 MB
Page 30 of 630
Vehicle Features
Radio(s)
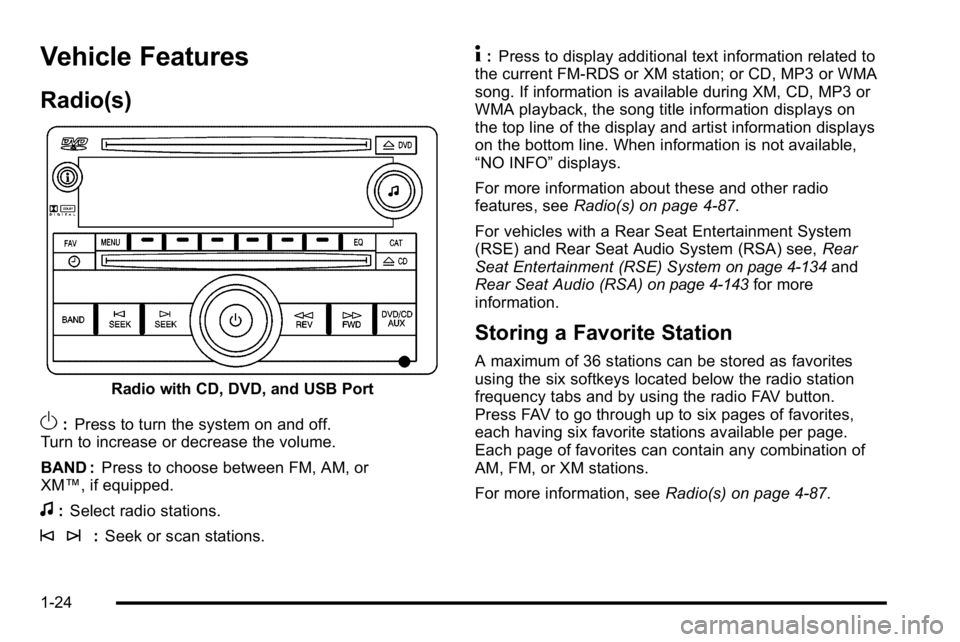
Radio with CD, DVD, and USB Port
O:Press to turn the system on and off.
Turn to increase or decrease the volume.
BAND : Press to choose between FM, AM, or
XM™, if equipped.
f: Select radio stations.
© ¨: Seek or scan stations.
4:Press to display additional text information related to
the current FM-RDS or XM station; or CD, MP3 or WMA
song. If information is available during XM, CD, MP3 or
WMA playback, the song title information displays on
the top line of the display and artist information displays
on the bottom line. When information is not available,
“NO INFO” displays.
For more information about these and other radio
features, see Radio(s) on page 4‑87.
For vehicles with a Rear Seat Entertainment System
(RSE) and Rear Seat Audio System (RSA) see, Rear
Seat Entertainment (RSE) System
on page 4‑134and
Rear Seat Audio (RSA)on page 4‑143for more
information.
Storing a Favorite Station
A maximum of 36 stations can be stored as favorites
using the six softkeys located below the radio station
frequency tabs and by using the radio FAV button.
Press FAV to go through up to six pages of favorites,
each having six favorite stations available per page.
Each page of favorites can contain any combination of
AM, FM, or XM stations.
For more information, see Radio(s) on page 4‑87.
1-24
Page 220 of 630
Section 4 Instrument Panel
Tire Pressure Light . . . . . . . . . . . . . . . . . . . . . . . . . . . . 4-42
Malfunction Indicator Lamp . . . . . . . . . . . . . . . . . . . . 4-42
Oil Pressure Gage . . . . . . . . . . . . . . . . . . . . . . . . . . . . . 4-46
Oil Pressure Light . . . . . . . . . . . . . . . . . . . . . . . . . . . . . 4-47
Security Light . . . . . . . . . . . . . . . . . . . . . . . . . . . . . . . . . . 4-48
Fog Lamp Light . . . . . . . . . . . . . . . . . . . . . . . . . . . . . . . . 4-48
Cruise Control Light . . . . . . . . . . . . . . . . . . . . . . . . . . . 4-48
Highbeam On Light . . . . . . . . . . . . . . . . . . . . . . . . . . . . 4-48
Four-Wheel-Drive Light . . . . . . . . . . . . . . . . . . . . . . . . 4-49
Tow/Haul Mode Light . . . . . . . . . . . . . . . . . . . . . . . . . . 4-49
Fuel Gage . . . . . . . . . . . . . . . . . . . . . . . . . . . . . . . . . . . . . 4-49
Low Fuel Warning Light . . . . . . . . . . . . . . . . . . . . . . . . 4-50
Driver Information Center (DIC) . . . . . . . . . . . . . . . . . .4-51
DIC Operation and Displays (With DIC Buttons) . . . . . . . . . . . . . . . . . . . . . . . . . . 4-51
DIC Operation and Displays (Without DIC Buttons) . . . . . . . . . . . . . . . . . . . . . . . 4-58
DIC Compass . . . . . . . . . . . . . . . . . . . . . . . . . . . . . . . . . . 4-62
DIC Warnings and Messages . . . . . . . . . . . . . . . . . . 4-65
DIC Vehicle Customization (With DIC Buttons) . . . . . . . . . . . . . . . . . . . . . . . . . . 4-75 Audio System(s)
. . . . . . . . . . . . . . . . . . . . . . . . . . . . . . . . . . 4-84
Setting the Clock . . . . . . . . . . . . . . . . . . . . . . . . . . . . . . 4-84
Radio(s) . . . . . . . . . . . . . . . . . . . . . . . . . . . . . . . . . . . . . . . 4-87
Using an MP3 (Radios with CD) . . . . . . . . . . . . . . 4-107
Using an MP3 (Radios with CD and DVD) . . . . 4-114
XM Radio Messages . . . . . . . . . . . . . . . . . . . . . . . . . 4-122
Navigation/Radio System . . . . . . . . . . . . . . . . . . . . . 4-123
Bluetooth
®. . . . . . . . . . . . . . . . . . . . . . . . . . . . . . . . . . . . 4-123
Rear Seat Entertainment (RSE) System . . . . . . 4-134
Rear Seat Audio (RSA) . . . . . . . . . . . . . . . . . . . . . . . 4-143
Theft-Deterrent Feature . . . . . . . . . . . . . . . . . . . . . . 4-145
Audio Steering Wheel Controls . . . . . . . . . . . . . . . 4-145
Radio Reception . . . . . . . . . . . . . . . . . . . . . . . . . . . . . . 4-148
Fixed Mast Antenna . . . . . . . . . . . . . . . . . . . . . . . . . . 4-149
XM™ Satellite Radio Antenna System . . . . . . . . 4-149
4-2
Page 233 of 630
Dome Lamp Override
The dome lamp override button is located next to the
exterior lamps control.
k(Dome Off):Press the button in and the dome
lamps remain off when a door is opened. Press the
button again to return it to the extended position so that
the dome lamps come on when a door is opened.
Entry Lighting
The vehicle has an illuminated entry feature.
When the doors are opened, the dome lamps will
come on if the dome override button is in the extended
position. If the dome override button is pressed in,
the lamps will not come on.
Exit Lighting
The interior lamps come on when the key is removed
from the ignition. They turn off automatically in
20 seconds. The lights do not come on if the dome
override button is pressed in.
Reading Lamps
For vehicles with reading lamps, they are located on the
overhead console.
To turn on the reading lamps, press the button located
next to each lamp. To turn them off, press the button
again.
The vehicle may also have reading lamps in other
locations. To turn the lamps on or off, press the
button located next to the lamp.
If the vehicle has a DVD Rear Seat Entertainment
(RSE) system, press the lamp lenses to turn the lamps
on or off.
The lamps are fixed and cannot be adjusted.
Cargo Lamp
The cargo lamps come on by turning the instrument
panel brightness control knob to the farthest clockwise
position. This knob is located on the instrument panel
and also turns on the dome lamps.
The cargo lamp can be used if more light is needed
in the cargo area of the vehicle or in the top-box storage
units.
4-15
Page 306 of 630
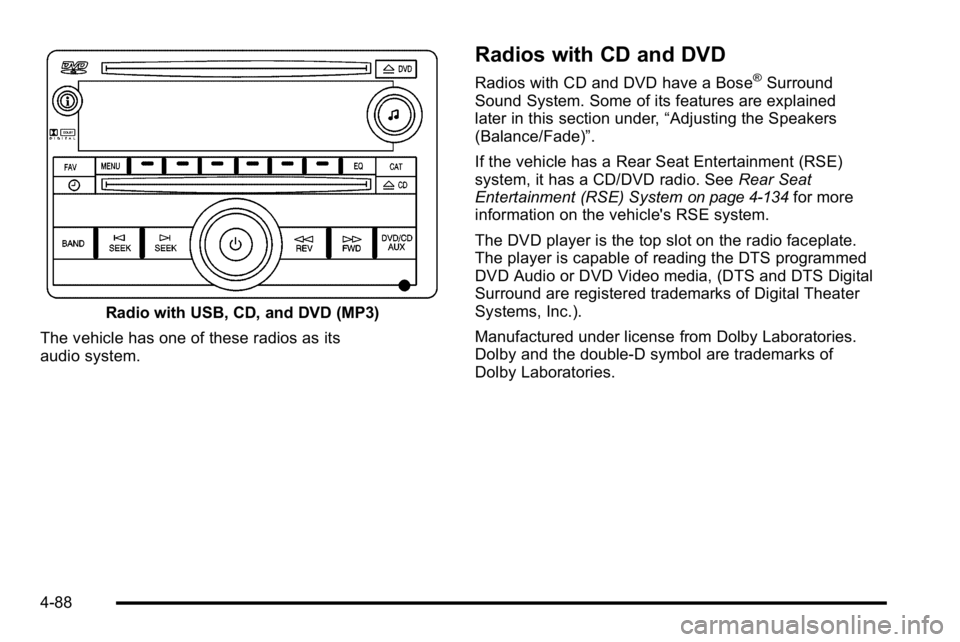
Radio with USB, CD, and DVD (MP3)
The vehicle has one of these radios as its
audio system.
Radios with CD and DVD
Radios with CD and DVD have a Bose®Surround
Sound System. Some of its features are explained
later in this section under, “Adjusting the Speakers
(Balance/Fade)”.
If the vehicle has a Rear Seat Entertainment (RSE)
system, it has a CD/DVD radio. See Rear Seat
Entertainment (RSE) System
on page 4‑134for more
information on the vehicle's RSE system.
The DVD player is the top slot on the radio faceplate.
The player is capable of reading the DTS programmed
DVD Audio or DVD Video media, (DTS and DTS Digital
Surround are registered trademarks of Digital Theater
Systems, Inc.).
Manufactured under license from Dolby Laboratories.
Dolby and the double-D symbol are trademarks of
Dolby Laboratories.
4-88
Page 317 of 630

RPT (Repeat) :For the AM-FM Radio with CD, press
and release the RPT button to repeat the current track.
An arrow symbol displays. Press RPT again to turn off
repeat play.
BAND : Press to listen to the radio when a CD is
playing. The CD remains inside the radio for
future listening.
For the radio with CD and DVD, press to listen to the
radio when a CD or DVD is playing. The CD or DVD
remains inside the radio for future listening or for
viewing entertainment.
CD/AUX (CD/Auxiliary) : Press to play a CD when
listening to the radio. The CD icon and a message
showing the disc and/or track number displays when a
CD is in the player. Press again and the system
automatically searches for an auxiliary input device,
such as a portable audio player. If a portable audio
player is not connected, “No Input Device Found”
displays. DVD/CD AUX (Auxiliary) :
Press this button to cycle
through DVD, CD, or Auxiliary when listening to the
radio. The DVD/CD text tab and a message showing
the track or chapter number displays when a disc is in
either slot. Press this button again and the system
automatically searches for an auxiliary input device,
such as a portable audio player. If a portable audio
player is not connected, “No Aux Input Device”displays.
If a disc is in both the DVD slot and the CD slot the
DVD/CD AUX button cycles between the two sources
and does not indicate “No Aux Input Device”. If a front
auxiliary device is connected, the DVD/CD AUX button
cycles through all available options, such as: DVD slot,
CD slot, Front Auxiliary, and Rear Auxiliary (if available).
See “Using the Auxiliary Input Jack(s)” later in this
section, or “Audio/Video (A/V) Jacks” under,Rear Seat
Entertainment (RSE) System
on page 4‑134for more
information.
If a disc is inserted into top DVD slot, the rear seat
operator can turn on the video screen and use the
remote control to navigate the CD (tracks only) through
the remote control.
4-99
Page 318 of 630
Radios with CD and DVD Audio Output
Only one audio source can be heard through the
speakers at one time. An audio source is defined as
DVD slot, CD slot, XM, FM/AM, Front Auxiliary Jack,
or Rear Auxiliary Jack.
Press the
Obutton to turn the radio on. The radio can
be heard through all of the vehicle speakers.
Front seat passengers can listen to the radio
(AM, FM, or XM) by pressing the BAND button or the
DVD/CD AUX button to select CD slot, DVD slot, front
or rear auxiliary input (if available).
If a playback device is plugged into the radio’s front
auxiliary input jack or the rear auxiliary jack, the front
seat passengers are able to listen to playback from this
source through the vehicle speakers. See “Using the
Auxiliary Input Jack(s)” later in this section, or“Audio/
Video (A/V) Jacks” under,Rear Seat Entertainment
(RSE) System
on page 4‑134for more information.
In some vehicles, depending on audio options, the rear
speakers can be muted when the RSA power is turned
on. See Rear Seat Audio (RSA)
on page 4‑143for
more information.
Playing an MP3 CD-R or CD-RW Disc
The Radio with CD (MP3), Radio with USB and CD
(MP3), and Radio with USB and Six-Disc CD (MP3)
have the capability of playing an MP3 CD-R or CD-RW
disc. For more information on how to play an MP3 CD-R
or CD-RW disc, see Using an MP3 (Radios with CD)
on
page 4‑107or Using an MP3 (Radios with CD and DVD)on page 4‑114for more information.
Playing an MP3/WMA CD-R or
CD-RW Disc
Radios with CD and DVD has the capability of playing
an MP3/WMA CD-R or CD-RW disc. For more
information on how to play an MP3/WMA CD-R or
CD-RW disc, see Using an MP3 (Radios with CD)
on
page 4‑107or Using an MP3 (Radios with CD and DVD)on page 4‑114for more information.
CD Messages
CHECK DISC : Radios with a Single CD player or
radios with a Six-Disc player displays CHECK DISC
and/or ejects the CD if an error occurs.
4-100
Page 319 of 630
Radios with a CD and DVD player may display other
messages when an error occurs:
Optical Error :The disc was inserted upside down.
Disk Read Error : A disc was inserted with an invalid or
unknown format.
Player Error : There are disc LOAD or disc EJECT
problems.
.It is very hot. When the temperature returns to
normal, the CD should play.
.The road is very rough. When the road becomes
smoother, the CD should play.
.The CD is dirty, scratched, wet, or upside down.
.The air is very humid. If so, wait about an hour and
try again.
.There could have been a problem while burning
the CD.
.The label could be caught in the CD player.
If the CD is not playing correctly, for any other reason,
try a known good CD. If any error occurs repeatedly or if an error cannot be
corrected, contact your dealer/retailer. If the radio
displays an error message, write it down and provide it
to your dealer/retailer when reporting the problem.
Using the DVD Player
The DVD player is controlled by the buttons on the
remote control, or by the RSA system, or by the buttons
on the radio faceplate. See
“Remote Control”, under
Rear Seat Entertainment (RSE) System
on page 4‑134and Rear Seat Audio (RSA)on page 4‑143for more
information.
The DVD player is only compatible with DVDs of the
appropriate region code that is printed on the jacket of
most DVDs.
The DVD slot of the radio is compatible with most audio
CDs, CD-R, CD-RW, DVD-Video, DVD-Audio, DVD-R/
RW, DVD+R/RW media along with MP3 and WMA
formats.
If an error message displays on the video screen or the
radio, see “DVD Display Error Messages” under,Rear
Seat Entertainment (RSE) System
on page 4‑134and
“DVD Radio Error Messages” in this section for more
information.
4-101
Page 320 of 630
Playing a DVD
DVD/CD AUX (Auxiliary) :Press this button to cycle
through DVD, CD, or Auxiliary when listening to the
radio. The DVD/CD text tab and a message showing
track or chapter number displays when a disc is in
either slot. Press this button again and the system
automatically searches for an auxiliary input device,
such as a portable audio player. If a portable audio
player is not connected, “No Aux Input Device”displays.
If a disc is in both the DVD slot and the CD slot the
DVD/CD AUX button cycles between the two sources
and not indicate “No Aux Input Device”. If a front
auxiliary device is connected, the DVD/CD AUX button
cycles through all available options, such as: DVD slot,
CD slot, Front Auxiliary, and Rear Auxiliary (if available).
See “Using the Auxiliary Input Jack(s)” later in this
section, or “Audio/Video (A/V) Jacks” under,Rear Seat
Entertainment (RSE) System
on page 4‑134for more
information.
O(Power): Press to turn the radio on or off. Turn this
knob clockwise or counterclockwise to increase or
decrease the volume. Press and hold for more than
two seconds to turn off the entire radio and Rear Seat
Entertainment (RSE) system and to start the parental
control feature. Parental control prevents the rear seat
occupant from operating the Rear Seat Audio (RSA)
system or remote control. A lock symbol displays next to the clock display.
The parental control feature remains on until the knob
is pressed and held for more than two seconds again,
or until the driver turns the ignition off and exits the
vehicle.
f(Tune):
Turn to change tracks on a CD or DVD, to
manually tune a radio station, or to change clock or
date settings, while in the clock or date setting mode.
See the information given earlier in this section specific
to the radio, CD, and the DVD. Also, see “Setting the
Time” in the index, for setting the clock and date.
©SEEK (Previous Track/Chapter): Press the left
arrow to return to the start of the current track or
chapter. Press the left arrow again to go to the previous
track or chapter. This button might not work when the
DVD is playing the copyright information or the
previews.
SEEK
¨(Next Track/Chapter): Press the right arrow
to go to the next track or chapter. This button might not
work when the DVD is playing the copyright information
or the previews.
sREV (Fast Reverse): Press to quickly reverse the
CD or DVD at five times the normal speed. The radio
displays the elapsed time while in fast reverse. To stop
fast reversing, press again. This button might not work
when the DVD is playing the copyright information or
the previews.
4-102
Page 321 of 630
\FWD (Fast Forward):Press to fast forward the
CD or DVD. The radio displays the elapsed time and
fast forwards five times the normal speed. To stop fast
forwarding, press again. This button might not work
when the DVD is playing the copyright information or
the previews.
Z(Eject): Press to eject a CD or DVD. If a CD or
DVD is ejected, but not removed, the player
automatically pulls it back in after 15 seconds.
If loading and reading of a CD cannot be completed,
because of an unknown format, etc., and the disc fails
to eject, press and hold for more than five seconds to
force the disc to eject.
DVD-V (Video) Display Buttons
Once a DVD-V is inserted, the radio display menu
shows several tag options for DVD playing. Press the
softkey located under any desired tag option during
DVD playback. See the tag options listed after, for
more information.
The rear seat passenger can navigate the DVD-V
menus and controls through the remote control. See
“Remote Control”, under Rear Seat Entertainment
(RSE) System
on page 4‑134for more information.
The Video Screen automatically turns on when the
DVD-V is inserted into the DVD slot.
r/j(Play/Pause): Press either the play or pause
icon displayed on the radio system, to toggle between
pausing or restarting playback of a DVD. If the forward
arrow is showing on display, the system is in pause
mode. If the pause icon is showing on display, the
system is in playback mode. If the DVD screen is off,
press the play button to turn the screen on.
Some DVDs begin playing after the previews have
finished, although there could be a delay of up to
30 seconds. If the DVD does not begin playing the
movie automatically, press the softkey located under
the play/pause symbol tag displayed on the radio.
If the DVD still does not play, refer to the on-screen
instructions, if available.
c(Stop): Press to stop playing, rewinding, or fast
forwarding a DVD.
r(Enter): Press to select the choices that are
highlighted in any menu.
y(Menu): Press to access the DVD menu. The DVD
menu is different on every DVD. Use the softkeys
located under the navigation arrows to navigate the
cursor through the DVD menu. After making a selection
press this button. This button only operates when using
a DVD.
4-103
Page 322 of 630
Nav (Navigate) :Press to display directional arrows
for navigating through the menus.
q(Return): Press to exit the current active menu and
return to the previous menu. This button operates only
when a DVD is playing and a menu is active.
DVD-A (Audio) Display Buttons
Once a DVD-A is inserted, radio display menu shows
several tag options for DVD playing. Press the softkeys
located under any desired tag option during DVD
playback. See the tag options listed after, for more
information.
The rear seat operator can navigate the DVD-A menus
and controls through the remote control. See “Remote
Control”, under Rear Seat Entertainment (RSE) System
on page 4‑134for more information. The Video Screen
does not automatically power on when the DVD-A is
inserted into the DVD slot. It must be manually turned
on by the rear seat occupant through the remote control
power button.
r/j(Play/Pause): Press either the play or pause
icon displayed on the radio system, to toggle between
pausing or restarting playback of a DVD. If the forward
arrow is showing on the display, the system is in pause
mode. If the pause icon is showing on the display, the
system is in playback mode.
qGroupr: Press to cycle through musical
groupings on the DVD-A disc.
Nav (Navigate) : Press to display directional arrows for
navigating through the menus.
e(Audio Stream): Press to cycle through audio
stream formats located on the DVD-A disc. The video
screen shows the audio stream changing.
Inserting a Disc
To play a disc, gently insert the disc, with the label side
up, into the loading slot. The DVD player might not
accept some paper labeled media. The player starts
loading the disc into the system and show “Loading
Disc” on the radio display. At the same time, the radio
displays a softkey menu of option(s). Some discs
automatically play the movie while others default to the
softkey menu display, which requires the Play, Enter,
or Navigation softkeys to be pressed; either by softkey
or by the rear seat passenger using the remote control.
Loading a disc into the system, depending on media
type and format, ranges from 5 to 20 seconds for a
CD, and up to 30 seconds for a DVD.
4-104