center console GMC SIERRA 2011 Owner's Manual
[x] Cancel search | Manufacturer: GMC, Model Year: 2011, Model line: SIERRA, Model: GMC SIERRA 2011Pages: 594, PDF Size: 6.55 MB
Page 34 of 594
Black plate (28,1)GMC Sierra Owner Manual - 2011
1-28 In Brief
Portable Audio Devices
This vehicle may have an auxiliary
input located on the radio faceplate
and a USB port located in the
center console or on the dashboard.
External devices such as an iPod
®,
laptop computer, MP3 player, CD
changer, or USB storage device.
can be connected to the auxiliary
port using a 3.5 mm (1/8 in) input
cable or the USB port depending
on the audio system.
See “Using the Auxiliary Input Jack”
and “Using the USB Port” in
Auxiliary Devices on page 7‑34.
Bluetooth®
For vehicles with a Bluetooth
system, it allows users with a
Bluetooth‐enabled cell phone to
make and receive hands-free calls
using the vehicle’ s audio system
and controls.
The Bluetooth‐enabled cell phone
must be paired with the Bluetooth
system before it can be used in the
vehicle. Not all phones will support
all functions. For more information,
visit www.gm.com/bluetooth.
For more information, see Bluetooth
on page 7‑50.
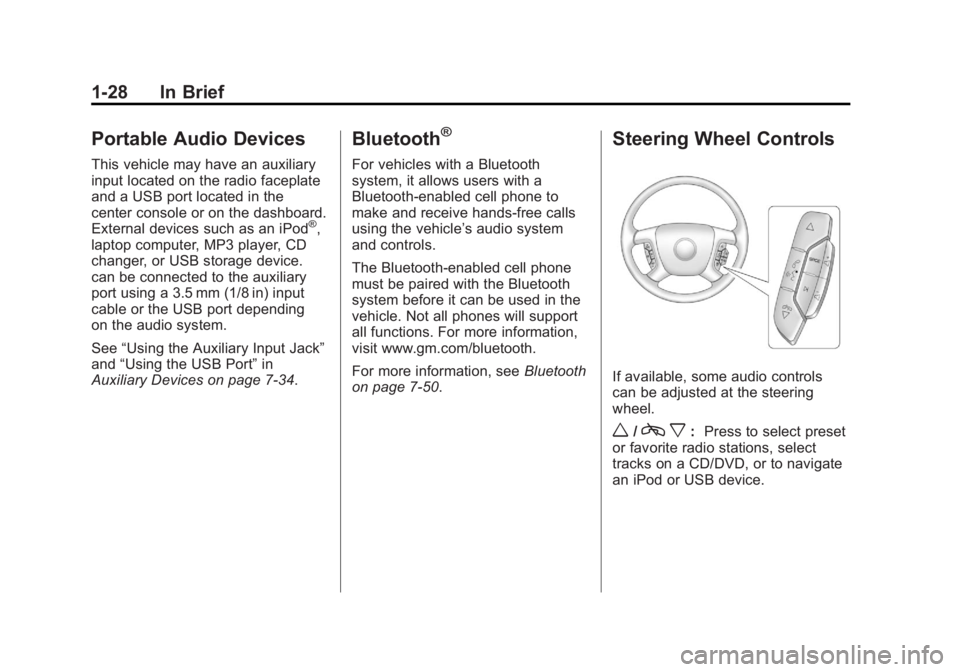
Steering Wheel Controls
If available, some audio controls
can be adjusted at the steering
wheel.
w/c x:Press to select preset
or favorite radio stations, select
tracks on a CD/DVD, or to navigate
an iPod or USB device.
Page 64 of 594
Black plate (20,1)GMC Sierra Owner Manual - 2011
2-20 Keys, Doors and Windows
Express-down Windows
Vehicles with the express-down
feature allow the driver and
front passenger windows to
be lowered without holding the
switch. Push the switch down to
the second detent, then release,
to activate the express-down mode.
The express-down mode can be
canceled at any time by pulling up
on the front of the switch. To open
the window partway, push the switch
down to the first detent until the
window is at the desired position.
Window Lockout
o(Window Lockout):If a crew
cab or extended cab vehicle has
power windows, the driver door
power window switch has a lockout
feature. This feature prevents the
rear windows from operating, except
from the driver position. Press the
switch to engage or disengage the
lockout feature. An indicator light
on the switch will come on when the
lockout feature is engaged, and will
go off when disengaged.
Rear Windows
Power Sliding Rear Window
On vehicles with a power sliding
rear window, the switch is located in
the overhead console.
The power sliding rear window
works when the ignition has been
turned to ACC/ACCESSORY or
ON/RUN, or when Retained
Accessory Power (RAP) is active.
See Retained Accessory Power
(RAP) on page 9‑40 for more
information. The power sliding rear window
cannot be operated manually.
.Push to open the window.
.Pull to close the window.
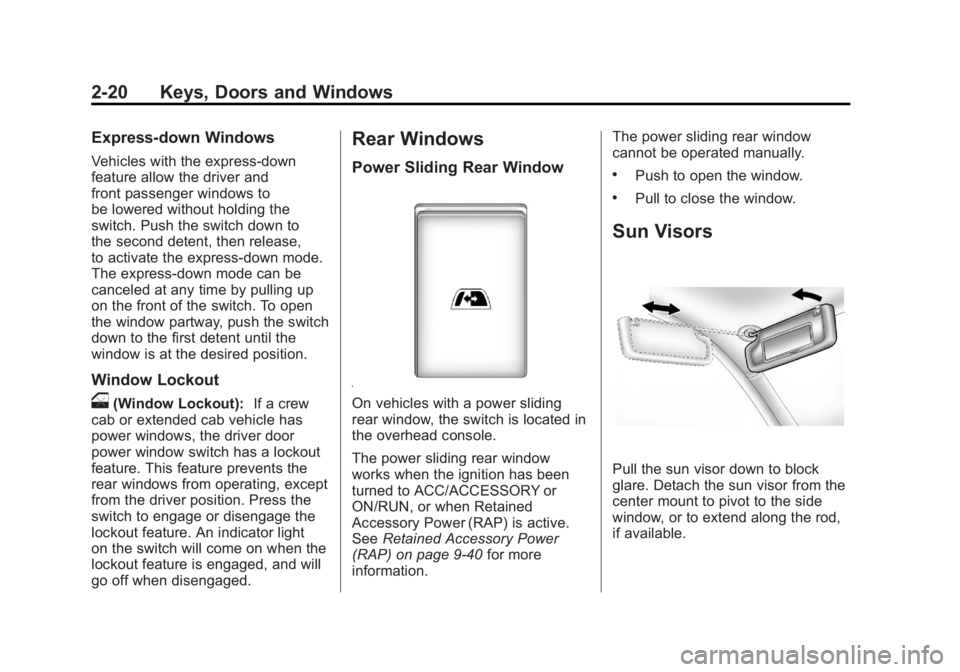
Sun Visors
Pull the sun visor down to block
glare. Detach the sun visor from the
center mount to pivot to the side
window, or to extend along the rod,
if available.
Page 147 of 594
Black plate (1,1)GMC Sierra Owner Manual - 2011
Storage 4-1
Storage
Storage Compartments
Instrument Panel Storage . . . . 4-1
Glove Box . . . . . . . . . . . . . . . . . . . . 4-1
Cupholders . . . . . . . . . . . . . . . . . . . 4-1
Armrest Storage . . . . . . . . . . . . . . 4-1
Center Console Storage . . . . . . 4-2
Storage
Compartments
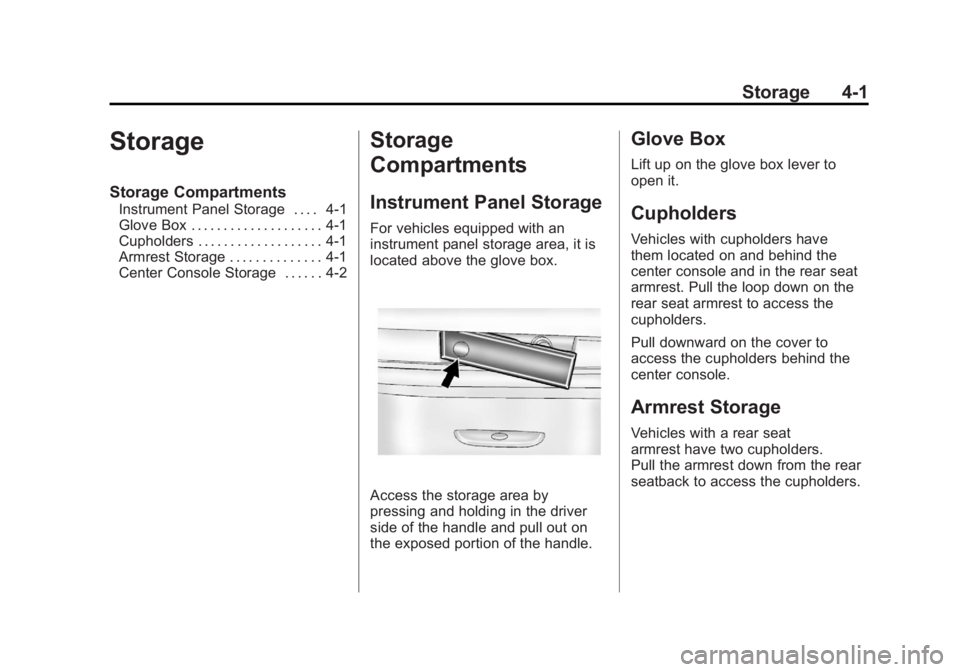
Instrument Panel Storage
For vehicles equipped with an
instrument panel storage area, it is
located above the glove box.
Access the storage area by
pressing and holding in the driver
side of the handle and pull out on
the exposed portion of the handle.
Glove Box
Lift up on the glove box lever to
open it.
Cupholders
Vehicles with cupholders have
them located on and behind the
center console and in the rear seat
armrest. Pull the loop down on the
rear seat armrest to access the
cupholders.
Pull downward on the cover to
access the cupholders behind the
center console.
Armrest Storage
Vehicles with a rear seat
armrest have two cupholders.
Pull the armrest down from the rear
seatback to access the cupholders.
Page 148 of 594
Black plate (2,1)GMC Sierra Owner Manual - 2011
4-2 Storage
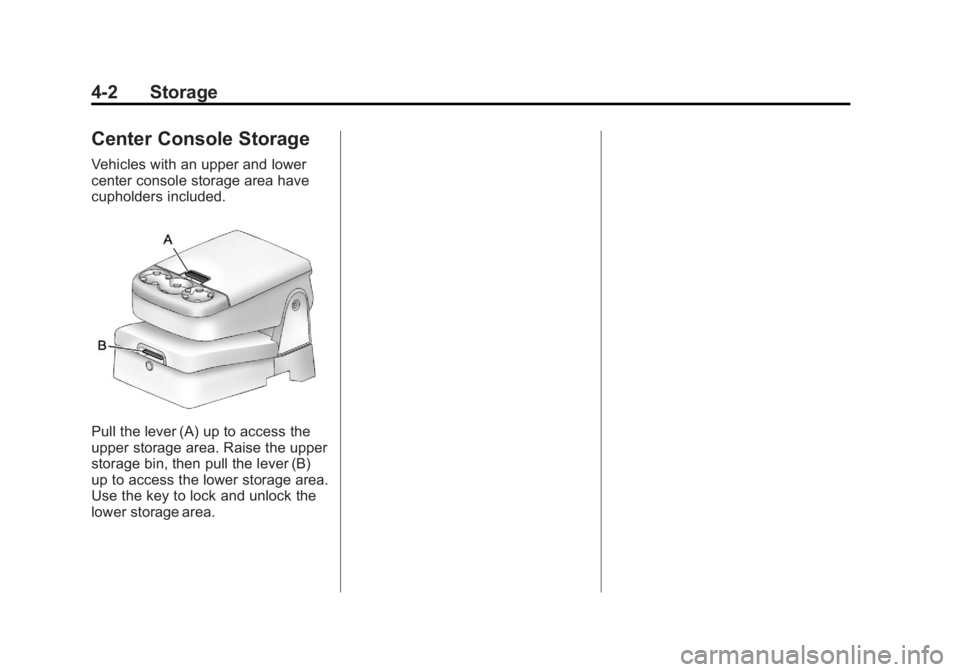
Center Console Storage
Vehicles with an upper and lower
center console storage area have
cupholders included.
Pull the lever (A) up to access the
upper storage area. Raise the upper
storage bin, then pull the lever (B)
up to access the lower storage area.
Use the key to lock and unlock the
lower storage area.
Page 169 of 594
Black plate (21,1)GMC Sierra Owner Manual - 2011
Instruments and Controls 5-21
{WARNING
If the airbag readiness light stays
on after the vehicle is started or
comes on while driving, it means
the airbag system might not be
working properly. The airbags in
the vehicle might not inflate in a
crash, or they could even inflate
without a crash. To help avoid
injury, have the vehicle serviced
right away.
If there is a problem with the airbag
system, a Driver Information Center
(DIC) message can also come on.
See Airbag System Messages on
page 5‑48 for more information.
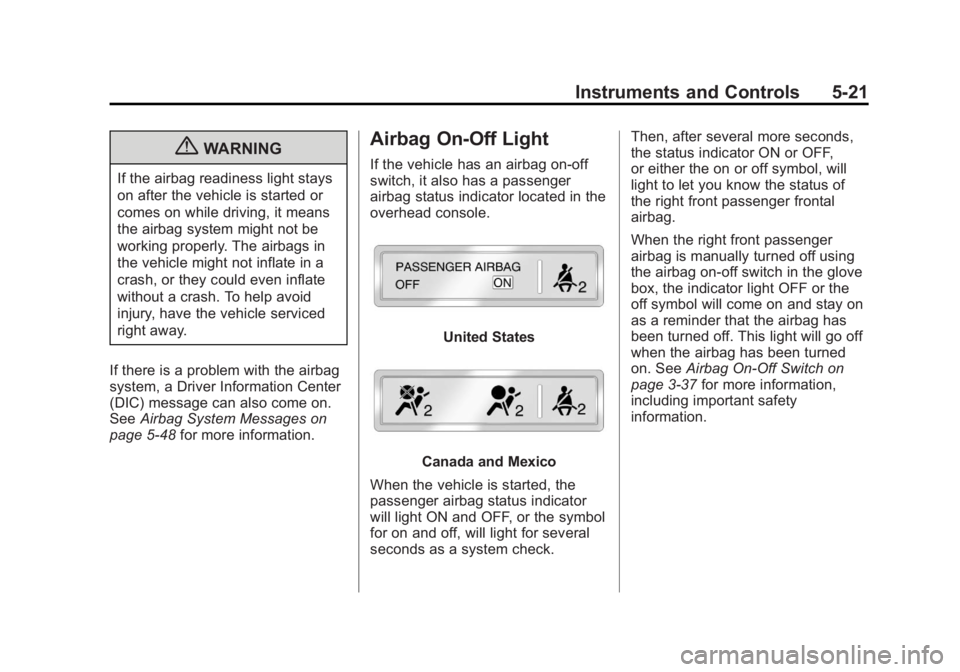
Airbag On-Off Light
If the vehicle has an airbag on-off
switch, it also has a passenger
airbag status indicator located in the
overhead console.
United States
Canada and Mexico
When the vehicle is started, the
passenger airbag status indicator
will light ON and OFF, or the symbol
for on and off, will light for several
seconds as a system check. Then, after several more seconds,
the status indicator ON or OFF,
or either the on or off symbol, will
light to let you know the status of
the right front passenger frontal
airbag.
When the right front passenger
airbag is manually turned off using
the airbag on-off switch in the glove
box, the indicator light OFF or the
off symbol will come on and stay on
as a reminder that the airbag has
been turned off. This light will go off
when the airbag has been turned
on. See
Airbag On-Off Switch on
page 3‑37 for more information,
including important safety
information.
Page 223 of 594
Black plate (7,1)GMC Sierra Owner Manual - 2011
Lighting 6-7
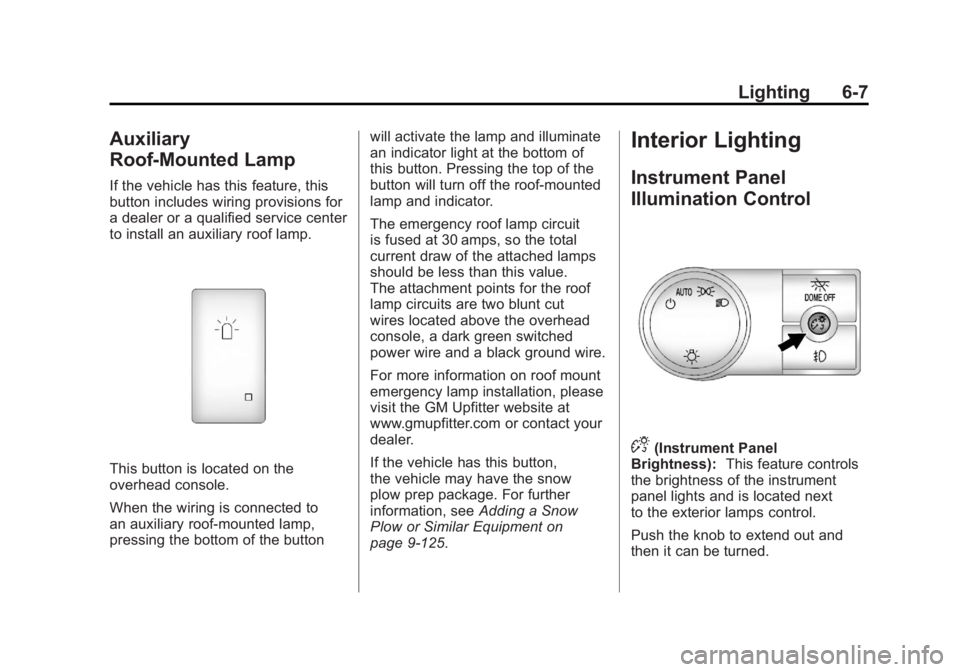
Auxiliary
Roof-Mounted Lamp
If the vehicle has this feature, this
button includes wiring provisions for
a dealer or a qualified service center
to install an auxiliary roof lamp.
This button is located on the
overhead console.
When the wiring is connected to
an auxiliary roof‐mounted lamp,
pressing the bottom of the buttonwill activate the lamp and illuminate
an indicator light at the bottom of
this button. Pressing the top of the
button will turn off the roof‐mounted
lamp and indicator.
The emergency roof lamp circuit
is fused at 30 amps, so the total
current draw of the attached lamps
should be less than this value.
The attachment points for the roof
lamp circuits are two blunt cut
wires located above the overhead
console, a dark green switched
power wire and a black ground wire.
For more information on roof mount
emergency lamp installation, please
visit the GM Upfitter website at
www.gmupfitter.com or contact your
dealer.
If the vehicle has this button,
the vehicle may have the snow
plow prep package. For further
information, see
Adding a Snow
Plow or Similar Equipment on
page 9‑125.
Interior Lighting
Instrument Panel
Illumination Control
D(Instrument Panel
Brightness): This feature controls
the brightness of the instrument
panel lights and is located next
to the exterior lamps control.
Push the knob to extend out and
then it can be turned.
Page 225 of 594
Black plate (9,1)GMC Sierra Owner Manual - 2011
Lighting 6-9
Reading Lamps
For vehicles with reading lamps,
they are located on the overhead
console.
To turn on the reading lamps, press
the button located next to each
lamp. To turn them off, press the
button again.
The vehicle may also have reading
lamps in other locations. To turn the
lamps on or off, press the button
located next to the lamp.
If the vehicle has a DVD Rear Seat
Entertainment (RSE) system, press
the lamp lenses to turn the lamps on
or off.
The lamps are fixed and cannot be
adjusted.
Lighting Features
Entry Lighting
The vehicle has an illuminated entry
feature.
When the doors are opened, the
dome lamps will come on if the
dome override button is in the
extended position. If the dome
override button is pressed in,
the lamps will not come on.
Exit Lighting
The interior lamps come on when
the key is removed from the ignition.
They turn off automatically in
20 seconds. The lights do not come
on if the dome override button is
pressed in.
Battery Load
Management
The vehicle has Electric Power
Management (EPM) that estimates
the battery's temperature and state
of charge. It then adjusts the voltage
for best performance and extended
life of the battery.
When the battery's state of charge
is low, the voltage is raised slightly
to quickly bring the charge back up.
When the state of charge is high,
the voltage is lowered slightly to
prevent overcharging. If the vehicle
has a voltmeter gauge or a voltage
display on the Driver Information
Center (DIC), you may see the
voltage move up or down. This is
normal. If there is a problem, an
alert will be displayed.
Page 261 of 594
Black plate (35,1)GMC Sierra Owner Manual - 2011
Infotainment System 7-35
CD/AUX (CD/Auxiliary):Press to
play a CD when a portable audio
device is playing. Press again and
the system begins playing audio
from the connected portable audio
player. If a portable audio player is
not connected, “No Input Device
Found” displays.
DVD/CD AUX (DVD/CD/
Auxiliary): Press to cycle
through DVD, CD, or Auxiliary
when listening to the radio.
The DVD/CD text tab and a
message showing track or chapter
number will display when a disc is
in either slot. Press again and the
system automatically searches for
an auxiliary input device, such as a
portable audio player. If a portable
audio player is not connected,
“No Aux Input Device” displays.
If a disc is in both the DVD slot
and the CD slot, the DVD/CD AUX
button cycles between the two
sources and does not indicate
“No Aux Input Device.” If a frontauxiliary device is connected, the
DVD/CD AUX button cycles through
all available options, such as: DVD
slot, CD slot, front auxiliary, and rear
auxiliary (if available). See
“Using
the Auxiliary Input Jack” in this
section, or “Audio/Video (A/V)
Jacks” underRear Seat
Entertainment (RSE) System on
page 7‑39 for more information.
Using the USB Port
Radios with a USB port can control
a USB storage device or an iPod®
using the radio buttons and knobs.
See“Playing an MP3” inCD Player
on page 7‑15 orCD/DVD Player on
page 7‑22 for information about
how to connect and control a USB
storage device or an iPod.
USB Support
The USB connector is located on
the dashboard or in the center
console, and uses the USB 2.0
standard. USB‐Supported Devices
.USB flash drive
.Portable USB hard drive
.Fifth generation or later iPod
.iPod nano
.iPod touch
.iPod classic
Not all iPods and USB drives are
compatible with the USB port.
Make sure the iPod has the latest
firmware from Apple
®for proper
operation. iPod firmware can be
updated using the latest iTunes
®
application. See www.apple.com/
itunes.
For help with identifying the iPod, go
to www.apple.com/support.
Radios that have a USB port can
play .mp3 and .wma files that are
stored on a USB storage device as
well as AAC files that are stored on
an iPod.
Page 262 of 594
Black plate (36,1)GMC Sierra Owner Manual - 2011
7-36 Infotainment System
USB‐Supported File and Folder
Structure
The radio supports:
.Up to 700 folders
.Up to 8 folders in depth
.Up to 65,535 files.
.Folder and file names up to
64 bytes
.Files with an .mp3 or .wma file
extension
.AAC files stored on an iPod
.FAT16
.FAT32
Connecting a USB Storage
Device or iPod®
The USB port can be used to
control an iPod or a USB storage
device.
To connect a USB storage device,
connect the device to the USB port
located in the center console or on
the instrument panel.To connect an iPod, connect one
end of the USB cable that came
with the iPod to the iPod’s dock
connector and connect the other
end to the USB port located in the
center console or on the instrument
panel. If the vehicle is on and the
USB connection works,
“OK to
disconnect” and a GM logo may
appear on the iPod, and iPod
appears on the radio display.
The iPod music appears on the
radio’s display and begins playing.
The iPod charges while it is
connected to the vehicle if the
vehicle is in the ACC/ACCESSORY
or ON/RUN position. When the
vehicle is turned off, the iPod
automatically powers off and
will not charge or draw power
from the vehicle's battery.
If you have an older iPod model
that is not supported, it can still
be used by connecting it to the
auxiliary input jack using a standard
3.5 mm (1/8 in) stereo cable. See
“Using the Auxiliary Input Jack”
earlier for more information.
Using the Radio to Control a
USB Storage Device or iPod
The radio can control a USB
storage device or an iPod using
the radio buttons and knobs, and
display song information on the
radio’s display.
f(Tune): Turn to select files.
©SEEK:Press to go to the start of
the track, if more than 10 seconds
have played. Press and hold or
press multiple times to continue
moving backward through tracks.
¨SEEK: Press to go to the next
track. Press and hold or press
multiple times to continue moving
forward through tracks.
sREV (Reverse): Press and hold
to reverse playback quickly. Sound
is heard at a reduced volume.
Release
sREV to resume playing.
The elapsed time of the file
displays.
Page 582 of 594
Black plate (2,1)GMC Sierra Owner Manual - 2011
i-2 INDEX
AuxiliaryRoof Mounted Lamp . . . . . . . . . . . 6-7
Auxiliary Devices . . . . . . . . . . . . . . 7-34
Axle, Front . . . . . . . . . . . . . . . . . . . . 10-36
Axle, Rear . . . . . . . . . . . . . . . . . . . . 10-37
B
Battery . . . . . . . . . . . . . . . . . . . . . . . 10-34 Jump Starting . . . . . . . . . . . . . . . 10-98
Load Management . . . . . . . . . . . . . 6-9
Power Protection . . . . . . . . . . . . . 6-10
Voltage and ChargingMessages . . . . . . . . . . . . . . . . . . . 5-41
Blade Replacement, Wiper . . . 10-41
Bluetooth . . . . . . . . . . . . . . . . . . . . . . 7-50
Brake Pedal and AdjustableThrottle . . . . . . . . . . . . . . . . . . . . . . 9-35
Brake System Warning Light . . . 5-27
Brakes . . . . . . . . . . . . . . . . . . . . . . . . 10-30 Antilock . . . . . . . . . . . . . . . . . . . . . . . 9-68
Assist . . . . . . . . . . . . . . . . . . . . . . . . . 9-69 Brakes (cont.)
Fluid . . . . . . . . . . . . . . . . . . . . . . . . 10-32
Parking . . . . . . . . . . . . . . . . . . . . . . . 9-69
System Messages . . . . . . . . . . . . 5-42
Braking . . . . . . . . . . . . . . . . . . . . . . . . . 9-3
Break-In, New Vehicle . . . . . . . . . 9-34
Bulb Replacement . . . . . . . . . . . . 10-48 Center High-MountedStoplamp (CHMSL) and
Cargo Lamp . . . . . . . . . . . . . . . 10-47
Fog Lamps . . . . . . . . . . . . . . . . . . . . 6-6
Halogen Bulbs . . . . . . . . . . . . . . 10-44
Headlamp Aiming . . . . . . . . . . . 10-42
Headlamps . . . . . . . . . . . . . . . . . 10-44
License Plate Lamps . . . . . . . 10-48
Pickup-Box Identification and Fender Marker
Lamps . . . . . . . . . . . . . . . . . . . . 10-45
Taillamps . . . . . . . . . . . . . . . . . . . 10-46
Taillamps, Turn Signal, Stoplamps, and
Back-Up Lamps . . . . . . . . . . . 10-46
Buying New Tires . . . . . . . . . . . . . 10-77
C
Calibration . . . . . . . . . . . . . . . . . . . . . . 5-6
California
Fuel Requirements . . . . . . . . . . . 9-85
Perchlorate MaterialsRequirements . . . . . . . . . . . . . . . 10-3
Warning . . . . . . . . . . . . . . . . . . . . . . 10-3
Camera, Rear Vision . . . . . . . . . . 9-78
Canadian Vehicle Owners . . . . . . . . iii
Capacities and Specifications . . . . . . . . . . . . . . . . 12-2
Carbon Monoxide Engine Exhaust . . . . . . . . . . . . . . . 9-44
Tailgate . . . . . . . . . . . . . . . . . . . . . . . 2-10
Winter Driving . . . . . . . . . . . . . . . . 9-21
Cargo Lamp . . . . . . . . . . . . . . . . . . . . 6-8
Cautions, Danger, and
Warnings . . . . . . . . . . . . . . . . . . . . . . . . iv
CD Player . . . . . . . . . . . . . . . . . . . . . 7-15
CD/DVD Player . . . . . . . . . . . . . . . . 7-22
Center Console Storage . . . . . . . . 4-2