change wheel GMC SIERRA 2013 User Guide
[x] Cancel search | Manufacturer: GMC, Model Year: 2013, Model line: SIERRA, Model: GMC SIERRA 2013Pages: 534, PDF Size: 6.47 MB
Page 271 of 534
Black plate (5,1)GMC Sierra Owner Manual - 2013 - crc - 8/14/12
Driving and Operating 9-5
The vehicle's right wheels can drop
off the edge of a road onto the
shoulder while driving. Follow
these tips:
1. Ease off the accelerator andthen, if there is nothing in the
way, steer the vehicle so that it
straddles the edge of the
pavement.
2. Turn the steering wheel about one-eighth of a turn, until the
right front tire contacts the
pavement edge.
3. Turn the steering wheel to go straight down the roadway.
Loss of Control
Skidding
There are three types of skids that
correspond to the vehicle's three
control systems:
.Braking Skid —wheels are not
rolling.
.Steering or Cornering Skid —
too much speed or steering in a
curve causes tires to slip and
lose cornering force.
.Acceleration Skid —too much
throttle causes the driving
wheels to spin.
Defensive drivers avoid most skids
by taking reasonable care suited to
existing conditions, and by not
overdriving those conditions. But
skids are always possible.
If the vehicle starts to slide, follow
these suggestions:
.Ease your foot off the
accelerator pedal and steer the
way you want the vehicle to go.
The vehicle may straighten out.
Be ready for a second skid if it
occurs.
.Slow down and adjust your
driving according to weather
conditions. Stopping distance
can be longer and vehicle
control can be affected when
traction is reduced by water,
snow, ice, gravel, or other material on the road. Learn to
recognize warning clues
—such
as enough water, ice, or packed
snow on the road to make a
mirrored surface —and slow
down when you have any doubt.
.Try to avoid sudden steering,
acceleration, or braking,
including reducing vehicle speed
by shifting to a lower gear. Any
sudden changes could cause
the tires to slide.
Remember: Antilock brakes help
avoid only the braking skid.
Off-Road Driving
Four-wheel-drive vehicles can be
used for off-road driving. Vehicles
without four-wheel drive and
vehicles not equipped with All
Terrain (AT) or On-Off Road (OOR)
tires must not be driven off-road
except on a level, solid surface. To
contact the tire manufacturer for
more information about the original
Page 272 of 534
Black plate (6,1)GMC Sierra Owner Manual - 2013 - crc - 8/14/12
9-6 Driving and Operating
equipment tires, see the Limited
Warranty and Owner Assistance
Information manual.
Controlling the vehicle is the key to
successful off-road driving. One of
the best ways to control the vehicle
is to control the speed.
{WARNING
When driving off-road, bouncing
and quick changes in direction
can easily throw you out of
position. This could cause you to
lose control and crash. You and
your passengers should always
wear safety belts.
Before Driving Off-Road
.Have all necessary maintenance
and service work completed.
.Fuel the vehicle, fill fluid levels,
and check inflation pressure in
all tires, including the spare,
if equipped.
.Read all the information about
four-wheel-drive vehicles in this
manual.
.Make sure all underbody
shields, if equipped, are properly
attached.
.Know the local laws that apply to
off-road driving.
To gain more ground clearance if
needed, it may be necessary to
remove the front fascia lower
air dam.
Notice: Operating the vehicle for
extended periods without the
front fascia lower air dam
installed can cause improper air
flow to the engine. Re‐attach the
front fascia air dam after off-road
driving.
Loading the Vehicle for
Off-Road Driving
{WARNING
.Unsecured cargo on the load
floor can be tossed about
when driving over rough
terrain. You or your
passengers can be struck by
flying objects. Secure the
cargo properly.
.Keep cargo in the cargo area
as far forward and as low as
possible. The heaviest things
should be on the floor,
forward of the rear axle.
.Heavy loads on the roof raise
the vehicle's center of gravity,
making it more likely to roll
over. You can be seriously or
fatally injured if the vehicle
rolls over. Put heavy loads
inside the cargo area, not on
the roof.
Page 275 of 534
Black plate (9,1)GMC Sierra Owner Manual - 2013 - crc - 8/14/12
Driving and Operating 9-9
3.2. Stay clear of the path thevehicle would take if it
rolled downhill.
.Avoid turns that take the vehicle
across the incline of the hill.
A hill that can be driven straight
up or down might be too steep to
drive across. Driving across an
incline puts more weight on the
downhill wheels which could
cause a downhill slide or a
rollover.
.Surface conditions can be a
problem. Loose gravel, muddy
spots, or even wet grass can
cause the tires to slip sideways,
downhill. If the vehicle slips
sideways, it can hit something
that will trip it –a rock, a rut, etc.
– and roll over.
.Hidden obstacles can make the
steepness of the incline more
severe. If a rock is driven across
with the uphill wheels, or if the
downhill wheels drop into a rut
or depression, the vehicle can tilt
even more.
.If an incline must be driven
across, and the vehicle starts to
slide, turn downhill. This should
help straighten out the vehicle
and prevent the side slipping.
{WARNING
Getting out of the vehicle on the
downhill side when stopped
across an incline is dangerous.
If the vehicle rolls over, you could
be crushed or killed. Always get
out on the uphill side of the
vehicle and stay well clear of the
rollover path.
Driving in Mud, Sand, Snow,
or Ice
Use a low gear when driving in mud
–the deeper the mud, the lower the
gear. Keep the vehicle moving to
avoid getting stuck. Traction changes when driving on
sand. On loose sand, such as on
beaches or sand dunes, the tires
tend to sink into the sand. This
affects steering, accelerating, and
braking. Drive at a reduced speed
and avoid sharp turns or abrupt
maneuvers.
Traction is reduced on hard packed
snow and ice and it is easy to lose
control. Reduce vehicle speed when
driving on hard packed snow
and ice.
{WARNING
Driving on frozen lakes, ponds,
or rivers can be dangerous. Ice
conditions vary greatly and the
vehicle could fall through the ice;
you and your passengers could
drown. Drive your vehicle on safe
surfaces only.
Page 317 of 534
Black plate (51,1)GMC Sierra Owner Manual - 2013 - crc - 8/14/12
Driving and Operating 9-51
If driving safely on a wet road and it
becomes necessary to slam on the
brakes and continue braking to
avoid a sudden obstacle, a
computer senses that the wheels
are slowing down. If one of the
wheels is about to stop rolling, the
computer will separately work the
brakes at each wheel.
ABS can change the brake pressure
to each wheel, as required, faster
than any driver could. This can help
the driver steer around the obstacle
while braking hard.
As the brakes are applied, the
computer keeps receiving updates
on wheel speed and controls
braking pressure accordingly.
Remember: ABS does not change
the time needed to get a foot up to
the brake pedal or always decrease
stopping distance. If you get too
close to the vehicle in front of you,there will not be enough time to
apply the brakes if that vehicle
suddenly slows or stops. Always
leave enough room up ahead to
stop, even with ABS.
Using ABS
Do not pump the brakes. Just hold
the brake pedal down firmly and let
ABS work. You might hear the ABS
pump or motor operating and feel
the brake pedal pulsate, but this is
normal.
Braking in Emergencies
ABS allows the driver to steer and
brake at the same time. In many
emergencies, steering can help
more than even the very best
braking.
Parking Brake
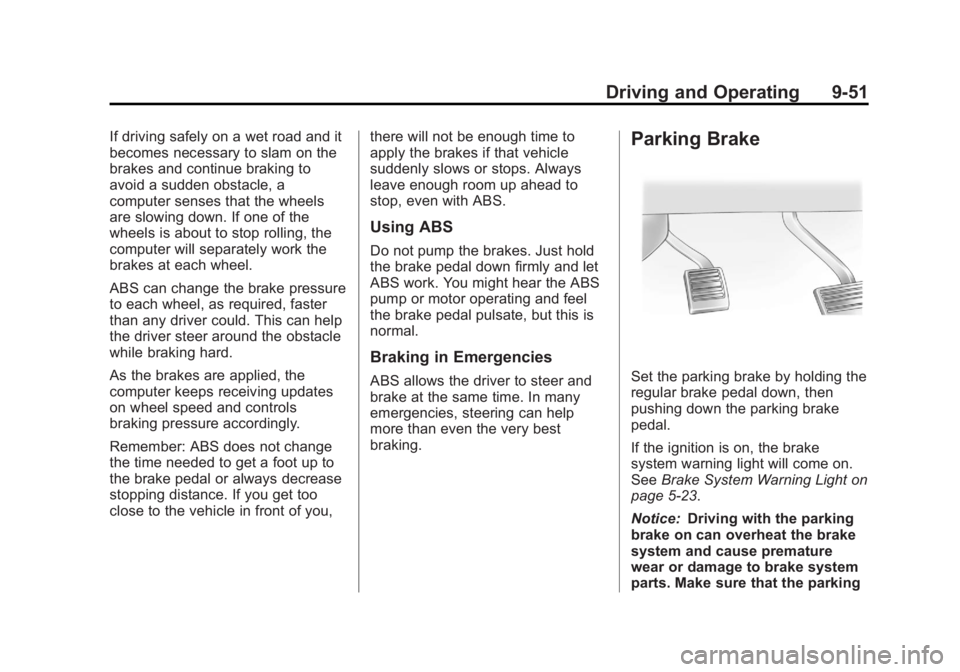
Set the parking brake by holding the
regular brake pedal down, then
pushing down the parking brake
pedal.
If the ignition is on, the brake
system warning light will come on.
See
Brake System Warning Light on
page 5‑23.
Notice: Driving with the parking
brake on can overheat the brake
system and cause premature
wear or damage to brake system
parts. Make sure that the parking
Page 322 of 534
Black plate (56,1)GMC Sierra Owner Manual - 2013 - crc - 8/14/12
9-56 Driving and Operating
Cruise Control
{WARNING
Cruise control can be dangerous
where you cannot drive safely at
a steady speed. So, do not use
the cruise control on winding
roads or in heavy traffic.
Cruise control can be dangerous
on slippery roads. On such roads,
fast changes in tire traction can
cause excessive wheel slip, and
you could lose control. Do not use
cruise control on slippery roads.
For vehicles with cruise control, a
speed of about 40 km/h (25 mph) or
more can be maintained without
keeping your foot on the
accelerator. Cruise control does not
work at speeds below about 40 km/h
(25 mph).
When the brakes are applied, cruise
control is turned off. For vehicles with an Allison or
Hydra-Matic 6-speed automatic
transmission, see
“Grade Braking”
under Tow/Haul Mode on page 9‑37
for an explanation of how cruise
control interacts with the Range
Selection Mode, tow/haul and grade
braking systems.
For vehicles with the StabiliTrak
system that begins to limit wheel
spin while you are using cruise
control, the cruise control will
automatically disengage. See
StabiliTrak
®System on page 9‑53.
When road conditions allow the
cruise control to be safely used
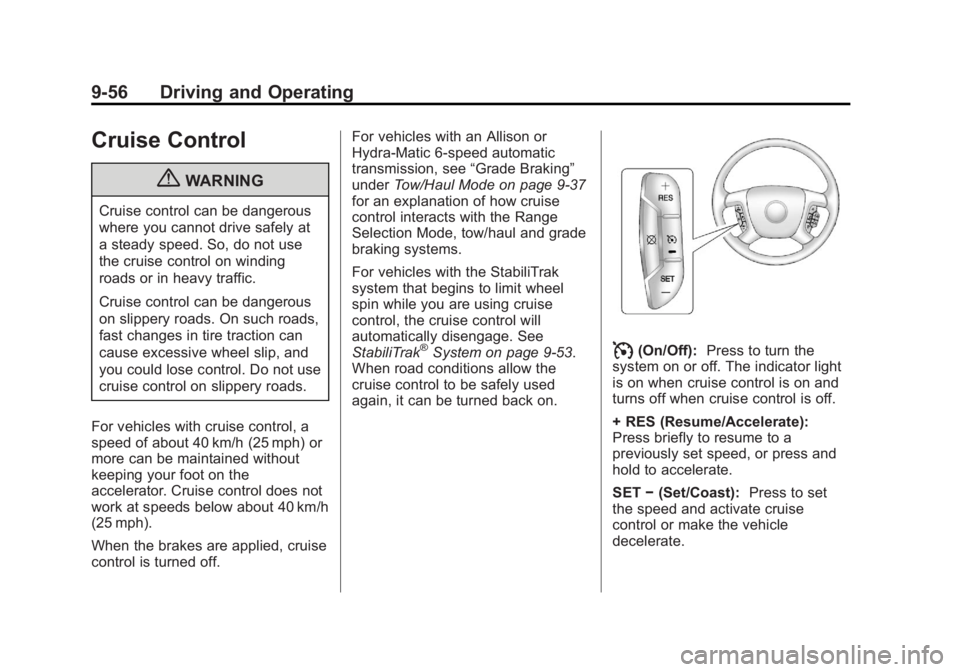
again, it can be turned back on.I(On/Off): Press to turn the
system on or off. The indicator light
is on when cruise control is on and
turns off when cruise control is off.
+ RES (Resume/Accelerate):
Press briefly to resume to a
previously set speed, or press and
hold to accelerate.
SET −(Set/Coast): Press to set
the speed and activate cruise
control or make the vehicle
decelerate.
Page 364 of 534
Black plate (98,1)GMC Sierra Owner Manual - 2013 - crc - 8/14/12
9-98 Driving and Operating
Trailer Gain Adjustment Procedure
Trailer Gain should be set for a
specific trailering condition and must
be adjusted any time vehicle
loading, trailer loading, or road
surface conditions change.
Setting the Trailer Gain properly is
needed for the best trailer stopping
performance. A trailer that is
over-gained may result in locked
trailer brakes. A trailer that is
under-gained may result in not
enough trailer braking. Both of these
conditions may result in poorer
stopping and stability of the vehicle
and trailer.
Use the following procedure to
correctly adjust Trailer Gain for each
towing condition:
1. Make sure the trailer brakes arein proper working condition.
2. Connect a properly loaded trailer to the vehicle and make all
necessary mechanical and electrical connections. See
Vehicle Load Limits on
page 9‑15
for more information.
3. After the electrical connection is made to a trailer equipped with
electric brakes:
.A TRAILER CONNECTED
message will be briefly
displayed on the DIC.
.The Trailer Brake Display
Page will appear on the
DIC showing TRAILER
GAIN and TRAILER
OUTPUT.
.In the Trailer Output display
on the DIC, “- - - - - -”will
disappear if there is no
error present. Connecting a
trailer without electric
brakes will not clear the six
dashed lines.
4. Adjust the Trailer Gain by using the gain adjustment (+ / -)
buttons on the Trailer Brake
Control Panel. 5. Drive the vehicle with the trailer
attached on a level road surface
representative of the towing
condition and free of traffic at
about 32 to 40 km/h (20 to
25 mph) and fully apply the
Manual Trailer Brake Apply
Lever.
Adjusting trailer gain at speeds
lower than 32 to 40 km/h (20 to
25 mph) may result in an
incorrect gain setting.
6. Adjust the Trailer Gain to just below the point of trailer wheel
lock-up, indicated by trailer
wheel squeal or tire smoke when
a trailer wheel locks.
Trailer wheel lock-up may not
occur if towing a heavily loaded
trailer. In this case, adjust the
Trailer Gain to the highest
allowable setting for the towing
condition.
Page 365 of 534
Black plate (99,1)GMC Sierra Owner Manual - 2013 - crc - 8/14/12
Driving and Operating 9-99
7. Re-adjust Trailer Gain any timevehicle loading, trailer loading or
road surface conditions change
or if trailer wheel lock-up is
noticed at any time while towing.
Other ITBC-Related DIC Messages
In addition to displaying TRAILER
GAIN and TRAILER OUTPUT
through the DIC, trailer connection
and ITBC system status are
displayed on the DIC.
TRAILER CONNECTED: This
message will be briefly displayed
when a trailer with electric brakes is
first connected to the vehicle. This
message will automatically turn off
in about 10 seconds. The driver can
also acknowledge this message
before it automatically turns off. CHECK TRAILER WIRING: This
message will be displayed if:
1. The ITBC system first
determines connection to a
trailer with electric brakes and
then the trailer harness becomes
disconnected from the vehicle.
If the disconnect occurs while
the vehicle is stationary, this
message will automatically turn
off in about 30 seconds. This
message will also turn off if the
driver acknowledges this
message or if the trailer harness
is re-connected.
If the disconnect occurs while
the vehicle is moving, this
message will continue until the
ignition is turned off. This
message will also turn off if the
driver acknowledges this
message or if the trailer harness
is re-connected. 2. There is an electrical fault in the
wiring to the electric trailer
brakes. This message will
continue as long as there is an
electrical fault in the trailer
wiring. This message will also
turn off if the driver
acknowledges this message.
To determine if the electrical fault is
on the vehicle side or trailer side of
the trailer wiring harness
connection, do the following:
1. Disconnect the trailer wiring harness from the vehicle.
2. Turn the ignition off.
3. Wait 10 seconds, then turn the ignition back to RUN.
4. If the CHECK TRAILER WIRING message re-appears, the
electrical fault is on the
vehicle side.
Page 395 of 534
Black plate (25,1)GMC Sierra Owner Manual - 2013 - crc - 8/14/12
Vehicle Care 10-25
Some driving conditions or climates
can cause a brake squeal when the
brakes are first applied or lightly
applied. This does not mean
something is wrong with the brakes.
Properly torqued wheel nuts are
necessary to help prevent brake
pulsation. When tires are rotated,
inspect brake pads for wear and
evenly tighten wheel nuts in the
proper sequence to torque
specifications inCapacities and
Specifications on page 12‑2.
If the vehicle has rear drum brakes,
they do not have wear indicators,
but if a rear brake rubbing noise is
heard, have the rear brake linings
inspected immediately. Rear brake
drums should be removed and
inspected each time the tires are
removed for rotation or changing.
Drum brakes have an inspection
hole to inspect lining wear during
scheduled maintenance. When the
front brake pads are replaced, have
the rear brakes inspected, too. Brake linings should always be
replaced as complete axle sets.
Brake Pedal Travel
See your dealer if the brake pedal
does not return to normal height,
or if there is a rapid increase in
pedal travel. This could be a sign
that brake service might be
required.
Brake Adjustment
Every time the brakes are applied,
with or without the vehicle moving,
the brakes adjust for wear.
Replacing Brake System Parts
The braking system on a vehicle is
complex. Its many parts have to be
of top quality and work well together
if the vehicle is to have really good
braking. The vehicle was designed
and tested with top-quality brake
parts. When parts of the braking
system are replaced, be sure to get
new, approved replacement parts.
If this is not done, the brakes might
not work properly. For example,
installing disc brake pads that are
wrong for the vehicle, can change
the balance between the front and
rear brakes
—for the worse. The
braking performance expected can
change in many other ways if the
wrong replacement brake parts are
installed.
Brake Fluid
The brake master cylinder reservoir
is filled with DOT 3 brake fluid. See
Engine Compartment Overview on
page 10‑5 for the location of the
reservoir.
Page 418 of 534
Black plate (48,1)GMC Sierra Owner Manual - 2013 - crc - 8/14/12
10-48 Vehicle Care
Consider installing winter tires on
the vehicle if frequent driving on
snow or ice-covered roads is
expected. All-season tires provide
adequate performance for most
winter driving conditions, but they
may not offer the same level of
traction or performance as winter
tires on snow or ice-covered roads.
SeeWinter Tires on page 10‑48.
Winter Tires
This vehicle was not, originally,
equipped with winter tires. Winter
tires are designed for increased
traction on snow and ice-covered
roads. Consider installing winter
tires on the vehicle if frequent
driving on snow or ice-covered
roads is expected. See your dealer
for details regarding winter tire
availability and proper tire selection.
Also, see Buying New Tires on
page 10‑65. With winter tires, there may be
decreased dry road traction,
increased road noise, and shorter
tread life. After changing to winter
tires, be alert for changes in vehicle
handling and braking.
If using winter tires:
.Use tires of the same brand and
tread type on all four wheel
positions.
.Use only radial ply tires of the
same size, load range, and
speed rating as the original
equipment tires.
Winter tires with the same speed
rating as the original equipment tires
may not be available for H, V, W, Y,
and ZR speed rated tires. If winter
tires with a lower speed rating are
chosen, never exceed the tire's
maximum speed capability.
Summer Tires
This vehicle may come with high
performance summer tires. These
tires have a special tread and
compound that are optimized for
maximum dry and wet road
performance. This special tread and
compound will decrease
performance in cold climates, and
on ice and snow. We recommend
installing winter tires on the vehicle
if frequent driving in cold
temperatures or on snow or ice
covered roads is expected. See
Winter Tires on page 10‑48.
Tire Sidewall Labeling
Useful information about a tire is
molded into the sidewall. The
examples show a typical
passenger and light truck tire
sidewall.
Page 433 of 534
Black plate (63,1)GMC Sierra Owner Manual - 2013 - crc - 8/14/12
Vehicle Care 10-63
Loading Information label after
the tires have been rotated. See
Tire Pressure on page 10‑55
andVehicle Load Limits on
page 9‑15.
Check that all wheel nuts are
properly tightened. See “Wheel
Nut Torque” underCapacities
and Specifications on
page 12‑2.
{WARNING
Rust or dirt on a wheel, or on the
parts to which it is fastened, can
make wheel nuts become loose
after time. The wheel could come
off and cause an accident. When
changing a wheel, remove any
rust or dirt from places where the
wheel attaches to the vehicle. In
an emergency, a cloth or a paper
towel can be used; however, use
a scraper or wire brush later to
remove all rust or dirt.
Lightly coat the center of the
wheel hub with wheel bearing
grease after a wheel change or
tire rotation to prevent corrosion
or rust build-up. Do not get
grease on the flat wheel
mounting surface or on the
wheel nuts or bolts.
Reset the Tire Pressure Monitor
System (TPMS), if the vehicle
has one. See Tire Pressure
Monitor Operation on
page 10‑58.
Check that the spare tire, if the
vehicle has one, is stored
properly. Push, pull, and then try
to rotate or turn the tire. If it
moves, tighten the cable. See
“Storing a Flat or Spare Tire and
Tools” underTire Changing on
page 10‑72.Dual Tire Rotation
When the vehicle is new,
or whenever a wheel, wheel bolt,
or wheel nut is replaced, check the
wheel nut torque after
160, 1 600, and 10 000 km (100,
1,000, and 6,000 mi) of driving. For
proper torque and wheel nut
tightening information, see
“Removing the Flat Tire and
Installing the Spare Tire” underTire
Changing on page 10‑72.
The outer tire on a dual wheel setup
generally wears faster than the
inner tire. Tires last longer and wear
more evenly if they are rotated. See
Tire Inspection on page 10‑61 and
Tire Rotation on page 10‑61. Also
see Maintenance Schedule on
page 11‑3.