TPMS reset GMC SIERRA 2013 Owner's Manual
[x] Cancel search | Manufacturer: GMC, Model Year: 2013, Model line: SIERRA, Model: GMC SIERRA 2013Pages: 534, PDF Size: 6.47 MB
Page 34 of 534
Black plate (28,1)GMC Sierra Owner Manual - 2013 - crc - 8/14/12
1-28 In Brief
3:Press to display the
odometer, trip odometer, fuel range,
average economy, fuel used, timer,
instantaneous economy and Active
Fuel Management
®indicator, and
transmission temperature. The
compass and outside air
temperature will also be shown in
the display. The temperature will be
shown in °C or °F depending on the
units selected.
T: Press to display the oil life,
units, tire pressure readings for
vehicles with the Tire Pressure
Monitor System (TPMS), trailer
brake gain and output information
for vehicles with the Integrated
Trailer Brake Control (ITBC) system,
engine hours, compass zone
setting, and compass recalibration.
U: Press to customize the feature
settings on your vehicle. See
Vehicle Personalization (With DIC
Buttons) on page 5‑46 for more
information.
V: Press to set or reset certain
functions and to turn off or
acknowledge messages on the DIC.
For more information, see Driver
Information Center (DIC) on
page 5‑28.
Vehicle Customization
Some vehicle features can be
programmed by using the DIC
buttons next to the steering wheel.
These features include:
.Language
.Door Lock and Unlock Settings
.RKE Lock and Unlock Feedback
.Lighting
.Chime Volume
.Memory Features
See Vehicle Personalization (With
DIC Buttons) on page 5‑46.
Rear Vision
Camera (RVC)
If available, the RVC displays a view
of the area behind the vehicle when
the vehicle is shifted into
R (Reverse). This is displayed on
the inside rearview mirror or the
navigation screen, if equipped.
To clean the camera lens, near the
tailgate handle, rinse it with water
and wipe it with a soft cloth.
For more information, see Rear
Vision Camera (RVC) on page 9‑60.
Ultrasonic Parking Assist
If available, this system uses
sensors on the rear bumper to
assist with parking and avoiding
objects while in R (Reverse).
It operates at speeds less than
8 km/h (5 mph). URPA uses audible
beeps to provide distance and
system information.
Keep the sensors on the vehicle's
rear bumper clean to ensure proper
operation.
Page 38 of 534
Black plate (32,1)GMC Sierra Owner Manual - 2013 - crc - 8/14/12
1-32 In Brief
The low tire pressure warning light
may come on in cool weather when
the vehicle is first started, and then
turn off as the vehicle is driven. This
may be an early indicator that the
tire pressures are getting low and
the tires need to be inflated to the
proper pressure.
The TPMS does not replace normal
monthly tire maintenance. Maintain
the correct tire pressures.
SeeTire Pressure Monitor System
on page 10‑57.
Engine Oil Life System
The engine oil life system calculates
engine oil life based on vehicle use
and, on most vehicles, displays a
DIC message when it is necessary
to change the engine oil and filter.
The oil life system should be reset
to 100% only following an oil
change. Resetting the Oil Life System
To reset the Engine Oil Life System
on most vehicles:
1. Display OIL LIFE REMAINING
on the DIC. If the vehicle does
not have DIC buttons, the
vehicle must be in P (Park) to
access this display.
2. Press and hold the SET/RESET button on the DIC, or the trip
odometer reset stem if the
vehicle does not have DIC
buttons, for more than
five seconds. The oil life will
change to 100%.
On all vehicles, the Engine Oil Life
System can be reset as follows:
1. Turn the ignition to ON/RUN with the engine off.
2. Fully press the accelerator pedal slowly three times within
five seconds. 3. Display OIL LIFE REMAINING
on the DIC. If the display shows
100%, the system is reset.
See Engine Oil Life System on
page 10‑9.
Fuel E85 (85% Ethanol)
Vehicles that have a yellow fuel cap
can use either unleaded gasoline or
ethanol fuel containing up to 85%
ethanol (E85). See Fuel E85 (85%
Ethanol) on page 9‑68. For all other
vehicles, use only the unleaded
gasoline described under
Recommended Fuel on page 9‑66.
Page 159 of 534
Black plate (29,1)GMC Sierra Owner Manual - 2013 - crc - 8/14/12
Instruments and Controls 5-29
The DIC has different displays
which can be accessed by pressing
the DIC buttons located on the
instrument panel, next to the
steering wheel. If the vehicle does
not have DIC buttons, the trip
odometer reset stem can be used to
access some of the menu items.
The DIC displays trip, fuel, and
vehicle system information, and
warning messages if a system
problem is detected.
The DIC also allows some features
to be customized. SeeVehicle
Personalization (With DIC Buttons)
on page 5‑46 for more information.
If the vehicle has a diesel engine,
see the Duramax
®diesel
supplement for more information.
DIC Buttons
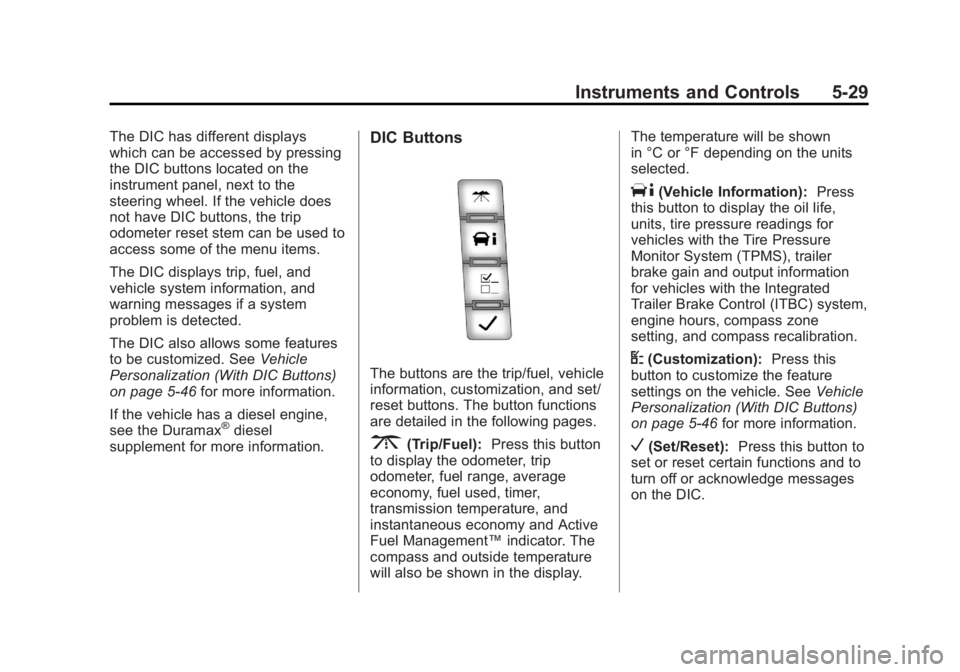
The buttons are the trip/fuel, vehicle
information, customization, and set/
reset buttons. The button functions
are detailed in the following pages.
3(Trip/Fuel): Press this button
to display the odometer, trip
odometer, fuel range, average
economy, fuel used, timer,
transmission temperature, and
instantaneous economy and Active
Fuel Management™ indicator. The
compass and outside temperature
will also be shown in the display. The temperature will be shown
in °C or °F depending on the units
selected.
T(Vehicle Information):
Press
this button to display the oil life,
units, tire pressure readings for
vehicles with the Tire Pressure
Monitor System (TPMS), trailer
brake gain and output information
for vehicles with the Integrated
Trailer Brake Control (ITBC) system,
engine hours, compass zone
setting, and compass recalibration.
U(Customization): Press this
button to customize the feature
settings on the vehicle. See Vehicle
Personalization (With DIC Buttons)
on page 5‑46 for more information.
V(Set/Reset):Press this button to
set or reset certain functions and to
turn off or acknowledge messages
on the DIC.
Page 162 of 534
Black plate (32,1)GMC Sierra Owner Manual - 2013 - crc - 8/14/12
5-32 Instruments and Controls
An Active Fuel Management
indicator displays on the right side
of the DIC, while INST ECON
displays on the left side. Active Fuel
Management allows the engine to
operate on either four or eight
cylinders, depending on driving
demands. When Active Fuel
Management is active, V4 will
display on the DIC. When Active
Fuel Management is inactive, V8
will display. SeeActive Fuel
Management
®on page 9‑30 for
more information.
Blank Display
This display shows no information.
Vehicle Information Menu
Items (with DIC Buttons)
T(Vehicle Information): Press
this button to scroll through the
following menu items:
Oil Life
Press the vehicle information button
until OIL LIFE REMAINING
displays. This display shows an estimate of the oil's remaining useful
life. If you see 99% OIL LIFE
REMAINING on the display, that
means 99% of the current oil life
remains. The engine oil life system
will alert you to change the oil on a
schedule consistent with your
driving conditions.
When the remaining oil life is low,
the CHANGE ENGINE OIL SOON
message will appear on the display.
See
“CHANGE ENGINE OIL SOON”
under Engine Oil Messages on
page 5‑40. You should change the
oil as soon as you can. See Engine
Oil on page 10‑6. In addition to the
engine oil life system monitoring the
oil life, additional maintenance is
recommended in the Maintenance
Schedule in this manual. See
Maintenance Schedule on
page 11‑3 for more information.
Remember, you must reset the OIL
LIFE display after each oil change.
It will not reset itself. Also, be
careful not to reset the OIL LIFE
display accidentally at any time
other than when the oil has just been changed. It cannot be reset
accurately until the next oil change.
To reset the engine oil life system,
see
Engine Oil Life System on
page 10‑9.
Units
Press the vehicle information button
until UNITS displays. This display
allows you to select between metric
or English units of measurement.
Once in this display, press the set/
reset button to select between
METRIC or ENGLISH units. All of
the vehicle information will then be
displayed in the unit of
measurement selected.
Tire Pressure
If the vehicle has the Tire Pressure
Monitor System (TPMS), the
pressure for each tire can be viewed
in the DIC. The tire pressure will be
shown in either kilopascals (kPa) or
pounds per square inch (psi). Press
the vehicle information button until
the DIC displays FRONT
TIRES kPa (PSI) LEFT ##
RIGHT ##. Press the vehicle
Page 174 of 534
Black plate (44,1)GMC Sierra Owner Manual - 2013 - crc - 8/14/12
5-44 Instruments and Controls
comes on and stays on, there may
be a problem with the TPMS. See
your dealer.
TIRE LEARNING ACTIVE
If the vehicle has the Tire Pressure
Monitor System (TPMS), this
message displays when the system
is re-learning the tire positions on
your vehicle. The tire positions must
be re-learned after rotating the tires
or after replacing a tire or sensor.
SeeTire Inspection on page 10‑61,
Tire Rotation on page 10‑61, Tire
Pressure Monitor System on
page 10‑57, and Tire Pressure on
page 10‑55 for more information.
TIRE LOW ADD AIR TO TIRE
If the vehicle has the Tire Pressure
Monitor System (TPMS), this
message displays when the
pressure in one or more of the
vehicle's tires is low. This message
also displays LEFT FRT (left front),
RIGHT FRT (right front), LEFT RR
(left rear), or RIGHT RR (right rear) to indicate the location of the low
tire. The low tire pressure warning
light will also come on. See
Tire
Pressure Light on page 5‑26. You
can receive more than one tire
pressure message at a time. To
read the other messages that may
have been sent at the same time,
press the set/reset button or the trip
odometer reset stem. If a tire
pressure message appears on the
DIC, stop as soon as you can. Have
the tire pressures checked and set
to those shown on the Tire Loading
Information label. See Tires on
page 10‑46, Vehicle Load Limits on
page 9‑15, and Tire Pressure on
page 10‑55. The DIC also shows
the tire pressure values. See Driver
Information Center (DIC) on
page 5‑28.
Transmission Messages
GRADE BRAKING DISABLED
This message displays when the
grade braking has been disabled
with the tow/haul mode button on the end of the shift lever. See
Tow/
Haul Mode on page 9‑37, Automatic
Transmission on page 9‑32, and
Cruise Control on page 9‑56.
GRADE BRAKING ENABLED
This message displays when the
grade braking has been enabled
with the tow/haul mode button on
the end of the shift lever. See Tow/
Haul Mode on page 9‑37, Automatic
Transmission on page 9‑32, and
Cruise Control on page 9‑56.
GRADE BRAKING ON
This message displays when the
grade braking has been activated
while driving on downhill grades.
This message will only appear the
first time the feature is activated in
an ignition cycle. See Tow/Haul
Mode on page 9‑37, Automatic
Transmission on page 9‑32, and
Cruise Control on page 9‑56.
Page 430 of 534
Black plate (60,1)GMC Sierra Owner Manual - 2013 - crc - 8/14/12
10-60 Vehicle Care
.Operating electronic devices or
being near facilities using radio
wave frequencies similar to the
TPMS could cause the TPMS
sensors to malfunction.
If the TPMS is not functioning
properly, it cannot detect or signal a
low tire condition. See your dealer
for service if the TPMS malfunction
light and DIC message come on
and stay on.
TPMS Sensor Matching
Process
Each TPMS sensor has a unique
identification code. The identification
code needs to be matched to a new
tire/wheel position after rotating the
vehicle’s tires or replacing one or
more of the TPMS sensors. Also,
the TPMS sensor matching process
should be performed after replacing
a spare tire with a road tire
containing the TPMS sensor. The
malfunction light and the DIC
message should go off at the next
ignition cycle. The sensors are
matched to the tire/wheel positions, using a TPMS relearn tool, in the
following order: driver side front tire,
passenger side front tire, passenger
side rear tire, and driver side rear.
See your dealer for service or to
purchase a relearn tool.
There are two minutes to match the
first tire/wheel position, and
five minutes overall to match all four
tire/wheel positions. If it takes
longer, the matching process stops
and must be restarted.
The TPMS sensor matching
process is:
1. Set the parking brake.
2. Turn the ignition to ON/RUN with
the engine off.
3. Press the Remote Keyless Entry (RKE) transmitter's
QandK
buttons at the same time for
approximately five seconds. The
horn sounds twice to signal the receiver is in relearn mode and
the TIRE LEARNING ACTIVE
message displays on the DIC
screen.
If the vehicle does not have
RKE, press the Driver
Information Center (DIC) vehicle
information button until the
PRESS
VTO RELEARN TIRE
POSITIONS message displays.
The horn sounds twice to signal
the receiver is in relearn mode
and TIRE LEARNING ACTIVE
message displays on the DIC
screen.
If the vehicle does not have RKE
or DIC buttons, press the trip
odometer reset stem on the
instrument cluster until the
PRESS
VTO RELEARN TIRE
POSITIONS message displays.
The horn sounds twice to signal
the receiver is in relearn mode
and TIRE LEARNING ACTIVE
message displays on the DIC
screen.
Page 433 of 534
Black plate (63,1)GMC Sierra Owner Manual - 2013 - crc - 8/14/12
Vehicle Care 10-63
Loading Information label after
the tires have been rotated. See
Tire Pressure on page 10‑55
andVehicle Load Limits on
page 9‑15.
Check that all wheel nuts are
properly tightened. See “Wheel
Nut Torque” underCapacities
and Specifications on
page 12‑2.
{WARNING
Rust or dirt on a wheel, or on the
parts to which it is fastened, can
make wheel nuts become loose
after time. The wheel could come
off and cause an accident. When
changing a wheel, remove any
rust or dirt from places where the
wheel attaches to the vehicle. In
an emergency, a cloth or a paper
towel can be used; however, use
a scraper or wire brush later to
remove all rust or dirt.
Lightly coat the center of the
wheel hub with wheel bearing
grease after a wheel change or
tire rotation to prevent corrosion
or rust build-up. Do not get
grease on the flat wheel
mounting surface or on the
wheel nuts or bolts.
Reset the Tire Pressure Monitor
System (TPMS), if the vehicle
has one. See Tire Pressure
Monitor Operation on
page 10‑58.
Check that the spare tire, if the
vehicle has one, is stored
properly. Push, pull, and then try
to rotate or turn the tire. If it
moves, tighten the cable. See
“Storing a Flat or Spare Tire and
Tools” underTire Changing on
page 10‑72.Dual Tire Rotation
When the vehicle is new,
or whenever a wheel, wheel bolt,
or wheel nut is replaced, check the
wheel nut torque after
160, 1 600, and 10 000 km (100,
1,000, and 6,000 mi) of driving. For
proper torque and wheel nut
tightening information, see
“Removing the Flat Tire and
Installing the Spare Tire” underTire
Changing on page 10‑72.
The outer tire on a dual wheel setup
generally wears faster than the
inner tire. Tires last longer and wear
more evenly if they are rotated. See
Tire Inspection on page 10‑61 and
Tire Rotation on page 10‑61. Also
see Maintenance Schedule on
page 11‑3.