buttons GMC SIERRA 2015 Get To Know Guide
[x] Cancel search | Manufacturer: GMC, Model Year: 2015, Model line: SIERRA, Model: GMC SIERRA 2015Pages: 20, PDF Size: 3.17 MB
Page 2 of 20
2
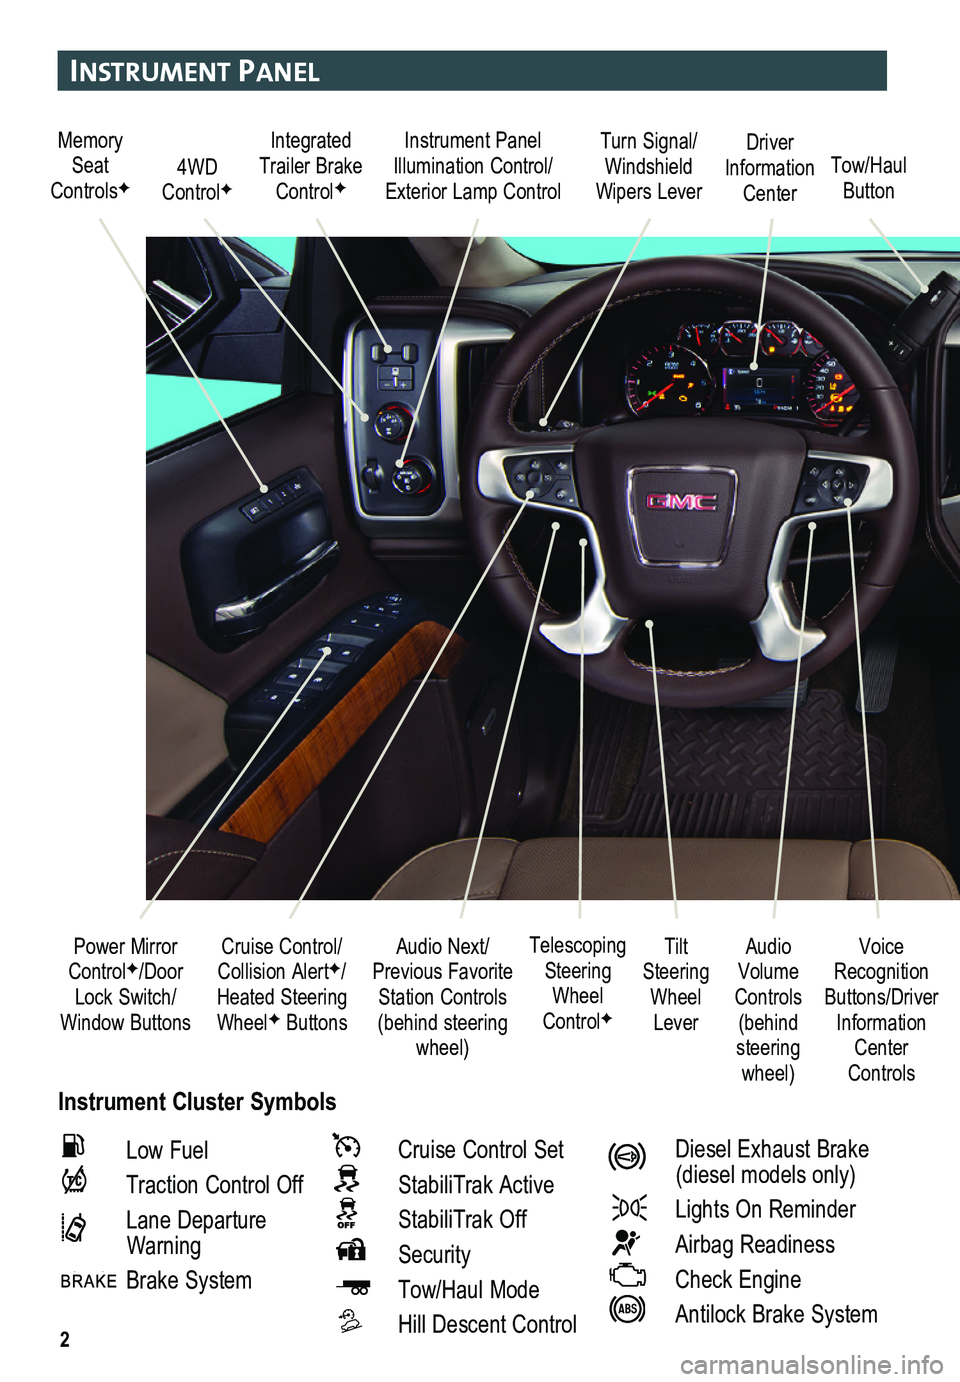
Instrument Panel
Instrument Cluster Symbols
Audio Next/Previous Favorite Station Controls (behind steering wheel)
Cruise Control/ Collision AlertF/Heated Steering WheelF Buttons
Power Mirror ControlF/Door Lock Switch/Window Buttons
Voice Recognition Buttons/Driver Information Center Controls
Audio Volume Controls (behind steering wheel)
Tilt Steering Wheel Lever
Telescoping Steering Wheel ControlF
Memory Seat ControlsF4WD ControlF
Instrument Panel Illumination Control/Exterior Lamp ControlTow/Haul Button
Driver Information Center
Turn Signal/Windshield Wipers Lever
Integrated Trailer Brake ControlF
Low Fuel
Traction Control Off
Lane Departure Warning
Brake System
Cruise Control Set
StabiliTrak Active
StabiliTrak Off
Security
Tow/Haul Mode
Hill Descent Control
Diesel Exhaust Brake (diesel models only)
Lights On Reminder
Airbag Readiness
Check Engine
Antilock Brake System
Page 3 of 20
3
Refer to your Owner Manual to learn about the information being relayed by the lights, gauges and indicators on the instrument cluster.
See In Brief in your Owner Manual.
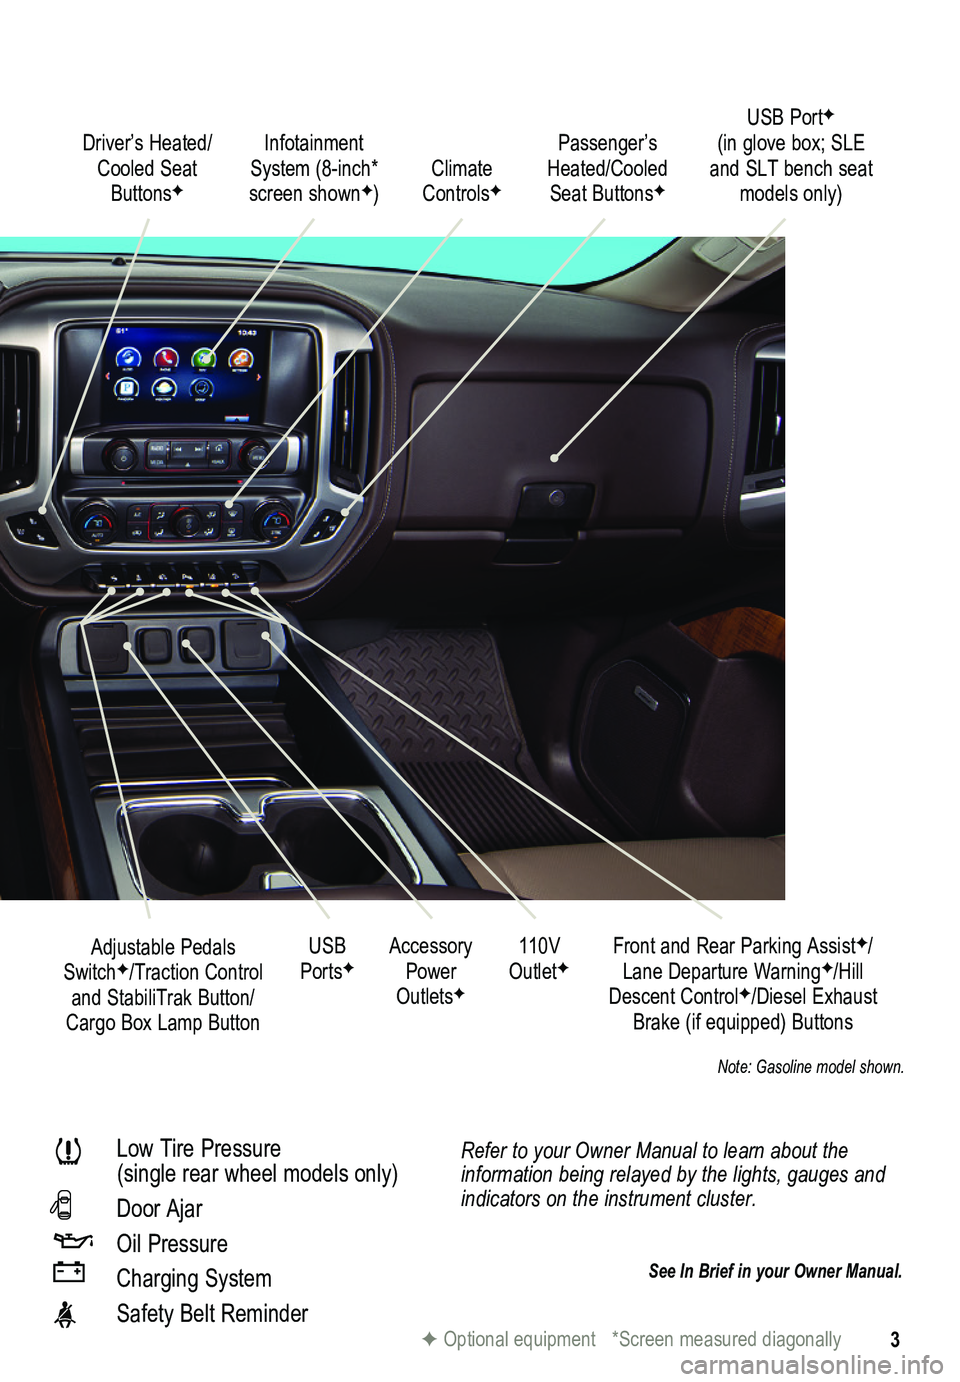
Driver’s Heated/Cooled Seat ButtonsF
Infotainment System (8-inch* screen shownF)
Passenger’s Heated/Cooled Seat ButtonsFClimate ControlsF
Accessory Power OutletsF
Adjustable Pedals SwitchF/Traction Control and StabiliTrak Button/Cargo Box Lamp Button
110V OutletFUSB PortsF
Low Tire Pressure (single rear wheel models only)
Door Ajar
Oil Pressure
Charging System
Safety Belt Reminder
Front and Rear Parking AssistF/Lane Departure WarningF/Hill Descent ControlF/Diesel Exhaust Brake (if equipped) Buttons
F Optional equipment *Screen measured diagonally
USB PortF (in glove box; SLE and SLT bench seat models only)
Note: Gasoline model shown.
Page 9 of 20
9
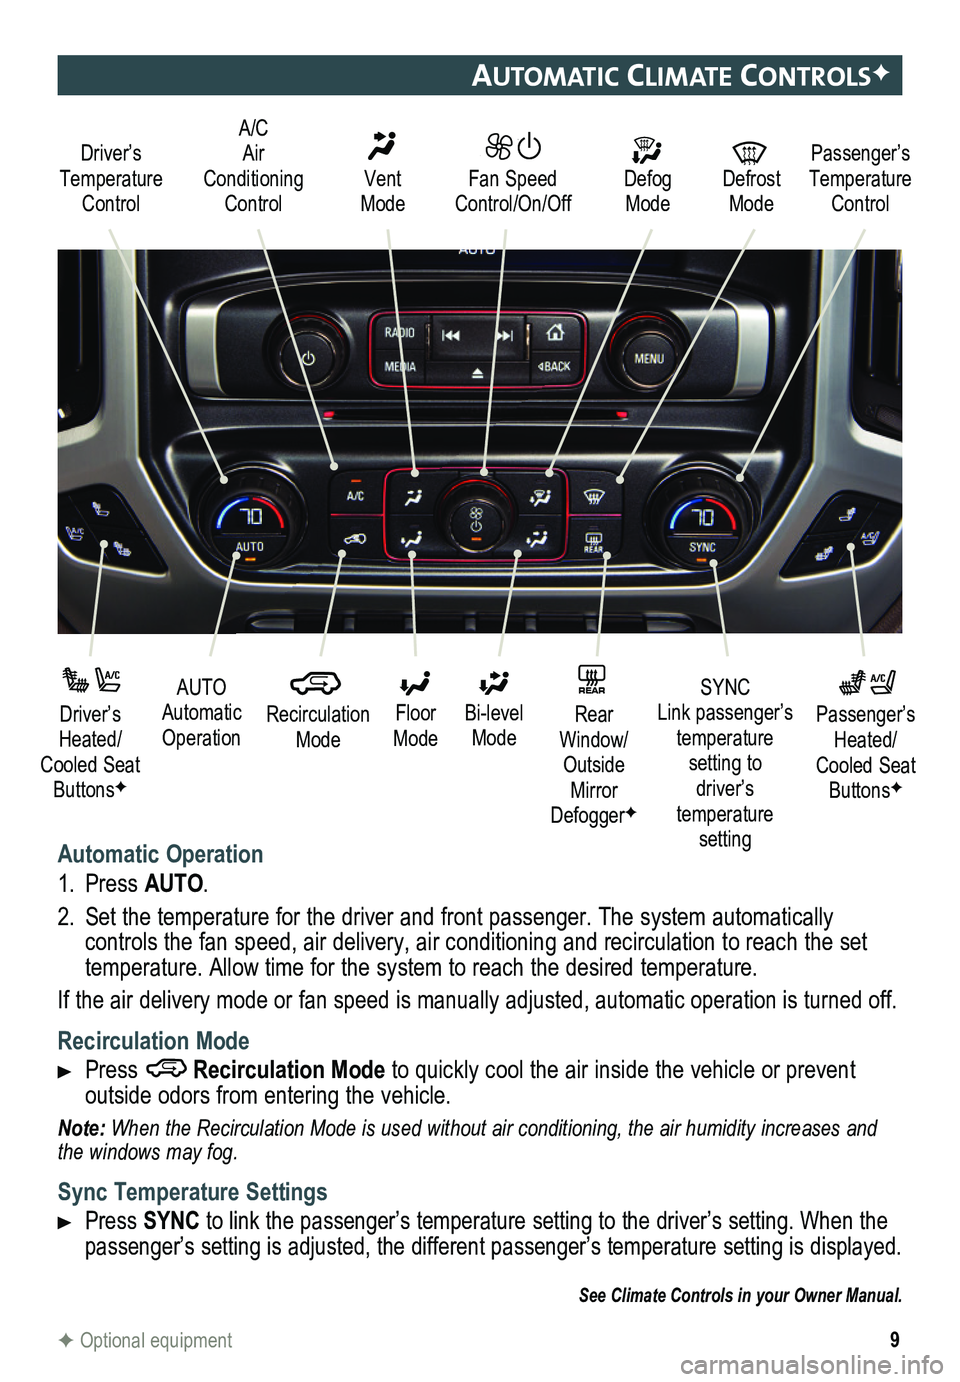
automatIc clImate controlsF
Automatic Operation
1. Press AUTO.
2. Set the temperature for the driver and front passenger. The system autom\
atically
controls the fan speed, air delivery, air conditioning and recirculation to reach the set temperature. Allow time for the system to reach the desired temperature.
If the air delivery mode or fan speed is manually adjusted, automatic op\
eration is turned off.
Recirculation Mode
Press Recirculation Mode to quickly cool the air inside the vehicle or prevent
outside odors from entering the vehicle.
Note: When the Recirculation Mode is used without air conditioning, the air humidity increases and the windows may fog.
Sync Temperature Settings
Press SYNC to link the passenger’s temperature setting to the driver’s setting. When the passenger’s setting is adjusted, the different passenger’s temperature setting is displayed.\
See Climate Controls in your Owner Manual.
Driver’s Temperature Control
Defog Mode
Defrost Mode
Passenger’s Temperature Control
Fan Speed Control/On/Off
Vent Mode
A/C Air Conditioning Control
F Optional equipment
AUTO Automatic Operation
Driver’s Heated/Cooled Seat ButtonsF
Passenger’s Heated/Cooled Seat ButtonsF
Recirculation Mode
Floor Mode
SYNC Link passenger’s temperature setting to driver’s temperature setting
Bi-level Mode
REAR Rear Window/ Outside Mirror DefoggerF
Page 11 of 20
11
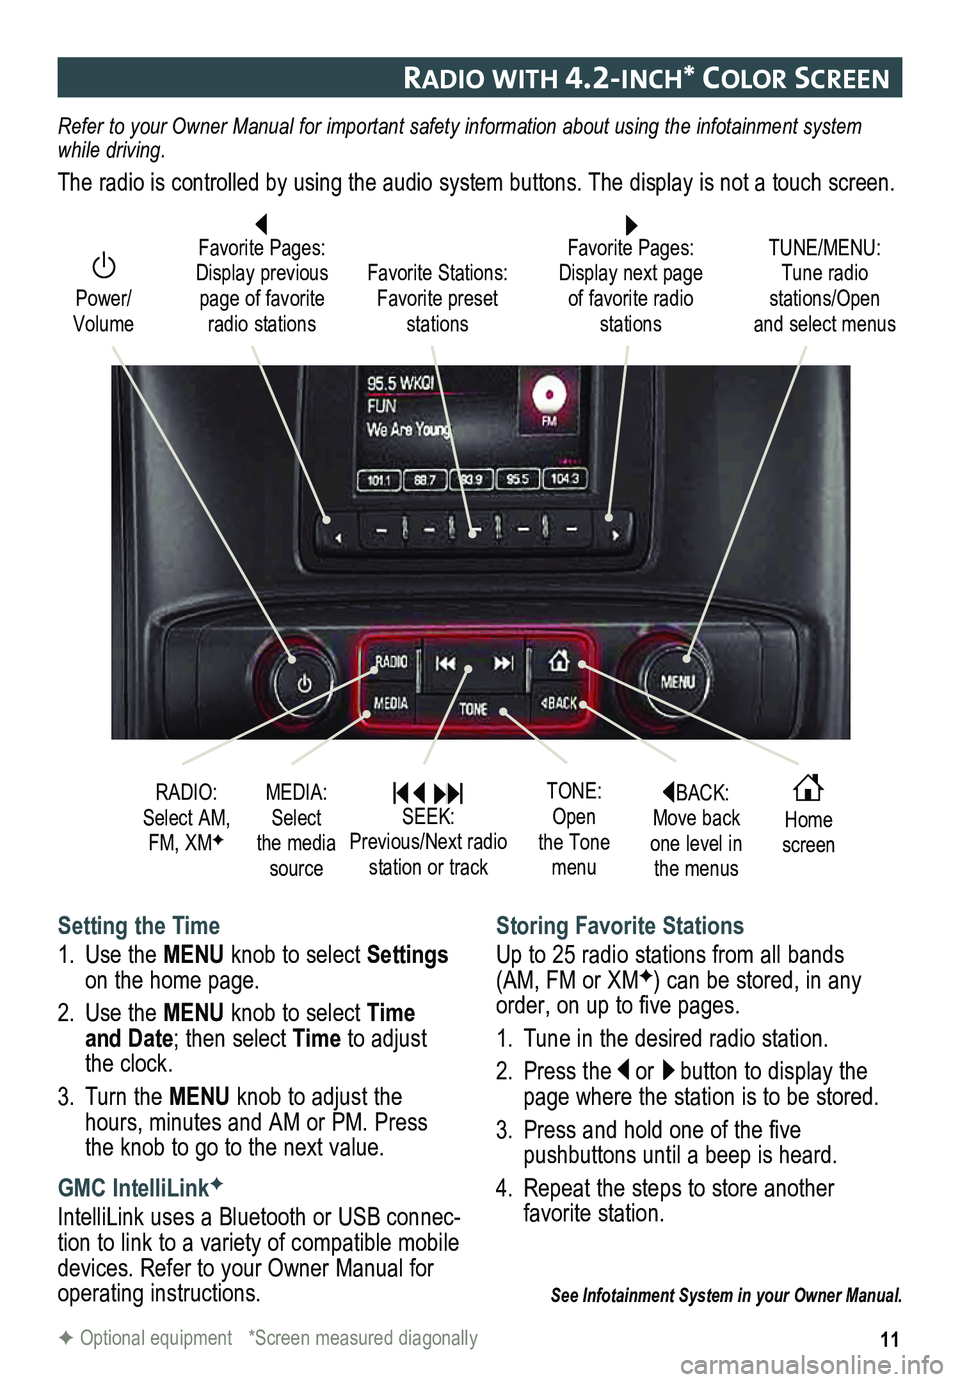
raDIo wIt H 4.2-Inc H* color screen
BACK: Move back one level in the menus
Home screen
TONE: Open the Tone menu
Power/ Volume
Favorite Pages: Display next page of favorite radio stations
TUNE/MENU: Tune radio stations/Open and select menus
Favorite Stations: Favorite preset stations
Favorite Pages: Display previous page of favorite radio stations
Setting the Time
1. Use the MENU knob to select Settings on the home page.
2. Use the MENU knob to select Time and Date; then select Time to adjust the clock.
3. Turn the MENU knob to adjust the hours, minutes and AM or PM. Press the knob to go to the next value.
GMC IntelliLinkF
IntelliLink uses a Bluetooth or USB connec-tion to link to a variety of compatible mobile devices. Refer to your Owner Manual for operating instructions.
Storing Favorite Stations
Up to 25 radio stations from all bands (AM, FM or XMF) can be stored, in any order, on up to five pages.
1. Tune in the desired radio station.
2. Press the or button to display the page where the station is to be stored.
3. Press and hold one of the five
pushbuttons until a beep is heard.
4. Repeat the steps to store another favorite station.
See Infotainment System in your Owner Manual.
RADIO: Select AM, FM, XMF
MEDIA: Select the media source
SEEK: Previous/Next radio station or track
Refer to your Owner Manual for important safety information about using \
the infotainment system while driving.
The radio is controlled by using the audio system buttons. The display i\
s not a touch screen.
F Optional equipment *Screen measured diagonally
Page 12 of 20
12
gmc IntellIlIn K raDIo w It H 8-Inc H* color screenF
Refer to your Owner Manual for important safety information about using \
the infotainment system while driving.
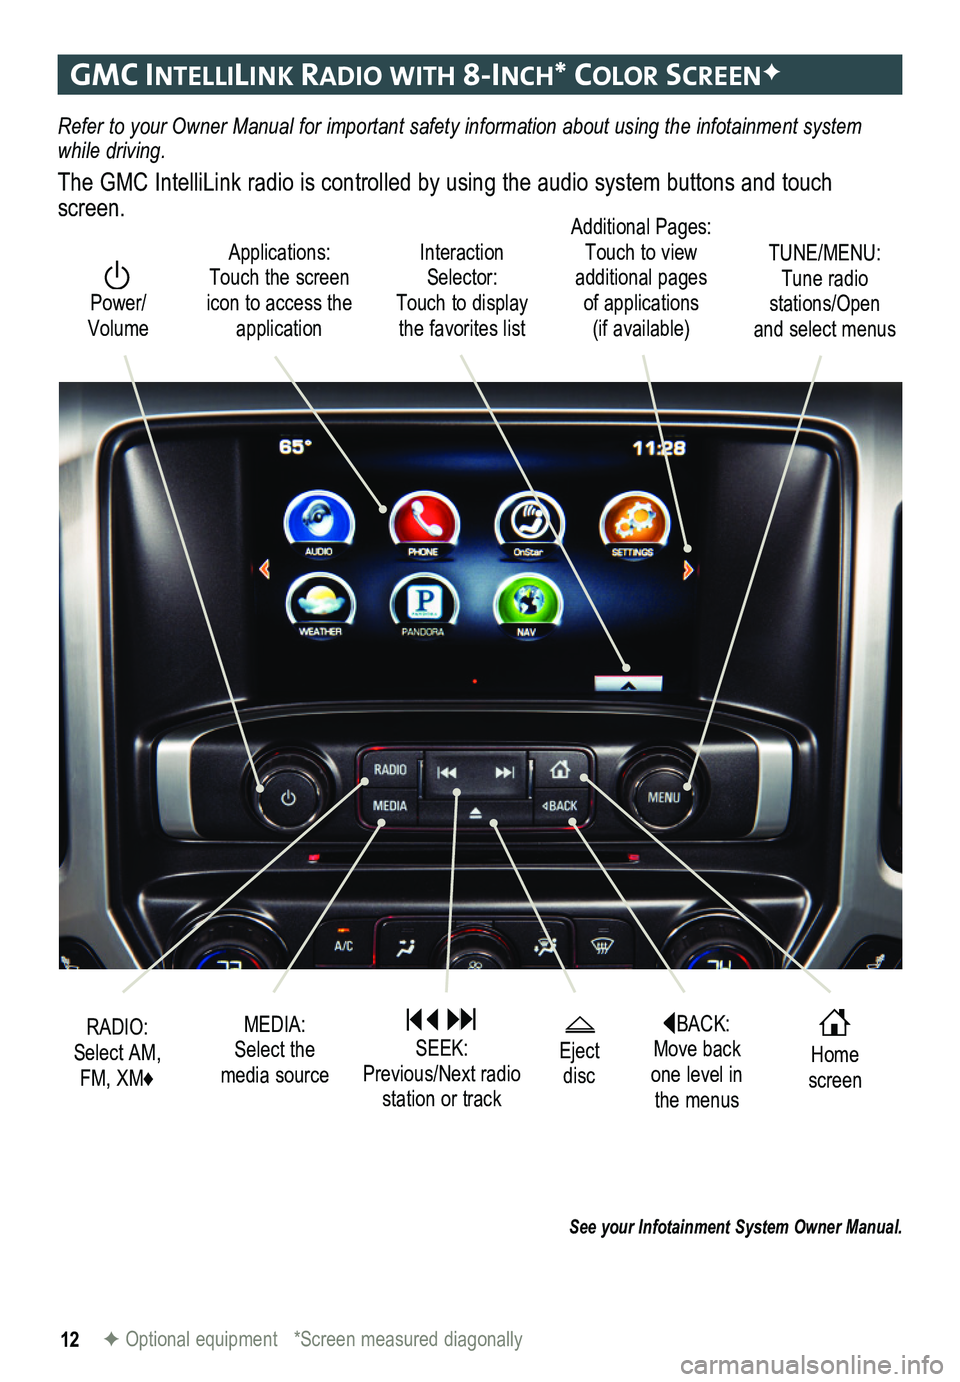
The GMC IntelliLink radio is controlled by using the audio system buttons and touch screen.
See your Infotainment System Owner Manual.
F Optional equipment *Screen measured diagonally
Interaction Selector: Touch to display the favorites list
TUNE/MENU: Tune radio stations/Open and select menus
Applications: Touch the screen icon to access the application
Additional Pages: Touch to view additional pages of applications (if available)
Power/ Volume
BACK: Move back one level in the menus
Home screen
Eject disc
MEDIA: Select the media source
RADIO: Select AM, FM, XM♦
SEEK: Previous/Next radio station or track
Page 13 of 20
13
gmc IntellIlIn K raDIo w It H 8-Inc H* color screenF
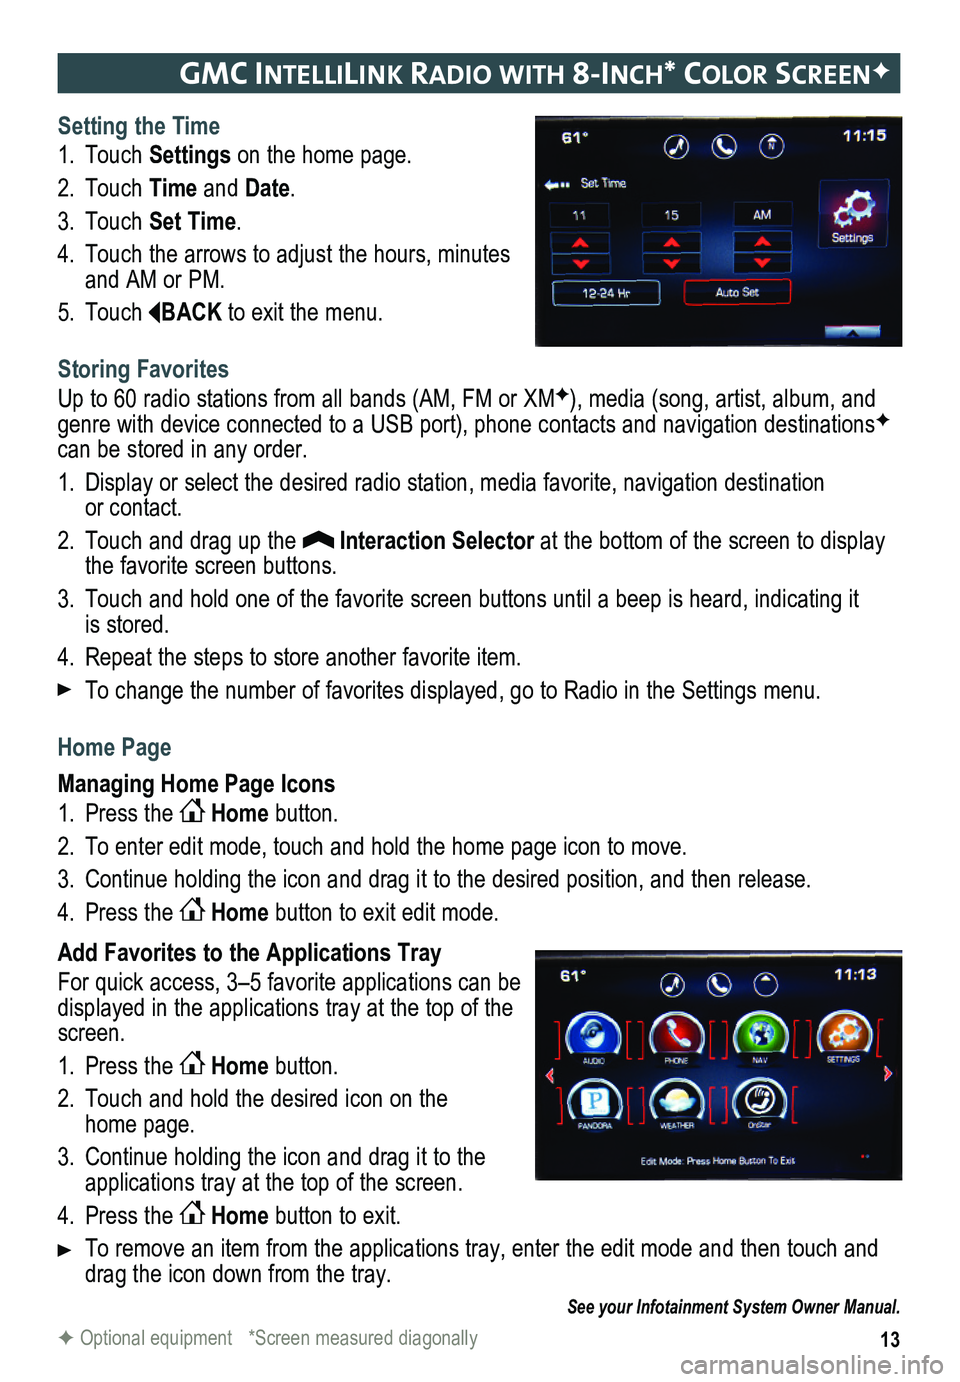
Setting the Time
1. Touch Settings on the home page.
2. Touch Time and Date.
3. Touch Set Time.
4. Touch the arrows to adjust the hours, minutes and AM or PM.
5. Touch BACK to exit the menu.
Storing Favorites
Up to 60 radio stations from all bands (AM, FM or XMF), media (song, artist, album, and genre with device connected to a USB port), phone contacts and navigation destinationsF can be stored in any order.
1. Display or select the desired radio station, media favorite, navigation destination or contact.
2. Touch and drag up the Interaction Selector at the bottom of the screen to display the favorite screen buttons.
3. Touch and hold one of the favorite screen buttons until a beep is heard,\
indicating it is stored.
4. Repeat the steps to store another favorite item.
To change the number of favorites displayed, go to Radio in the Settings menu.
Home Page
Managing Home Page Icons
1. Press the Home button.
2. To enter edit mode, touch and hold the home page icon to move.
3. Continue holding the icon and drag it to the desired position, and then release.
4. Press the Home button to exit edit mode.
Add Favorites to the Applications Tray
For quick access, 3–5 favorite applications can be displayed in the applications tray at the top of the screen.
1. Press the Home button.
2. Touch and hold the desired icon on the home page.
3. Continue holding the icon and drag it to the applications tray at the top of the screen.
4. Press the Home button to exit.
To remove an item from the applications tray, enter the edit mode and then touch and drag the icon down from the tray.
See your Infotainment System Owner Manual.
F Optional equipment *Screen measured diagonally
Page 16 of 20
16
veHIcle PersonalIzatIon
cruIse control
F Optional equipment
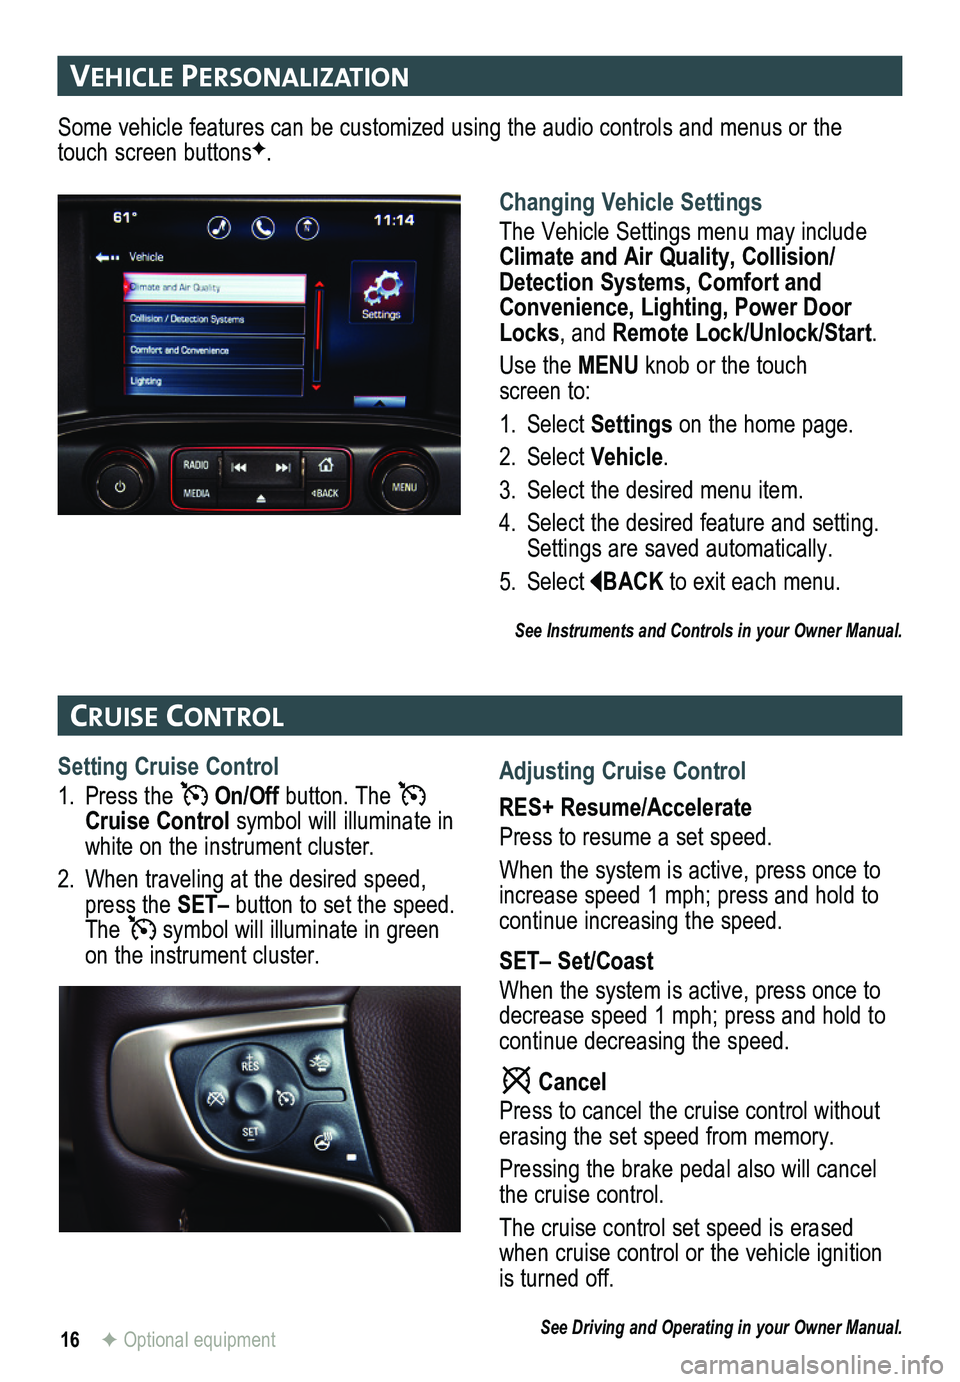
Changing Vehicle Settings
The Vehicle Settings menu may include Climate and Air Quality, Collision/Detection Systems, Comfort and Convenience, Lighting, Power Door Locks, and Remote Lock/Unlock/Start.
Use the MENU knob or the touch screen to:
1. Select Settings on the home page.
2. Select Vehicle.
3. Select the desired menu item.
4. Select the desired feature and setting. Settings are saved automatically.
5. Select BACK to exit each menu.
See Instruments and Controls in your Owner Manual.
Some vehicle features can be customized using the audio controls and menus or the touch screen buttonsF.
Setting Cruise Control
1. Press the On/Off button. The Cruise Control symbol will illuminate in white on the instrument cluster.
2. When traveling at the desired speed, press the SET– button to set the speed. The symbol will illuminate in green on the instrument cluster.
Adjusting Cruise Control
RES+ Resume/Accelerate
Press to resume a set speed.
When the system is active, press once to increase speed 1 mph; press and hold to continue increasing the speed.
SET– Set/Coast
When the system is active, press once to decrease speed 1 mph; press and hold to continue decreasing the speed.
Cancel
Press to cancel the cruise control without erasing the set speed from memory.
Pressing the brake pedal also will cancel the cruise control.
The cruise control set speed is erased when cruise control or the vehicle ignition is turned off.
See Driving and Operating in your Owner Manual.
Page 18 of 20
18
automatIc transmIssIon
IntegrateD traI ler braKe control (Itbc)F
DIesel ex Haust braKe (Diesel Models Only)
F Optional equipment
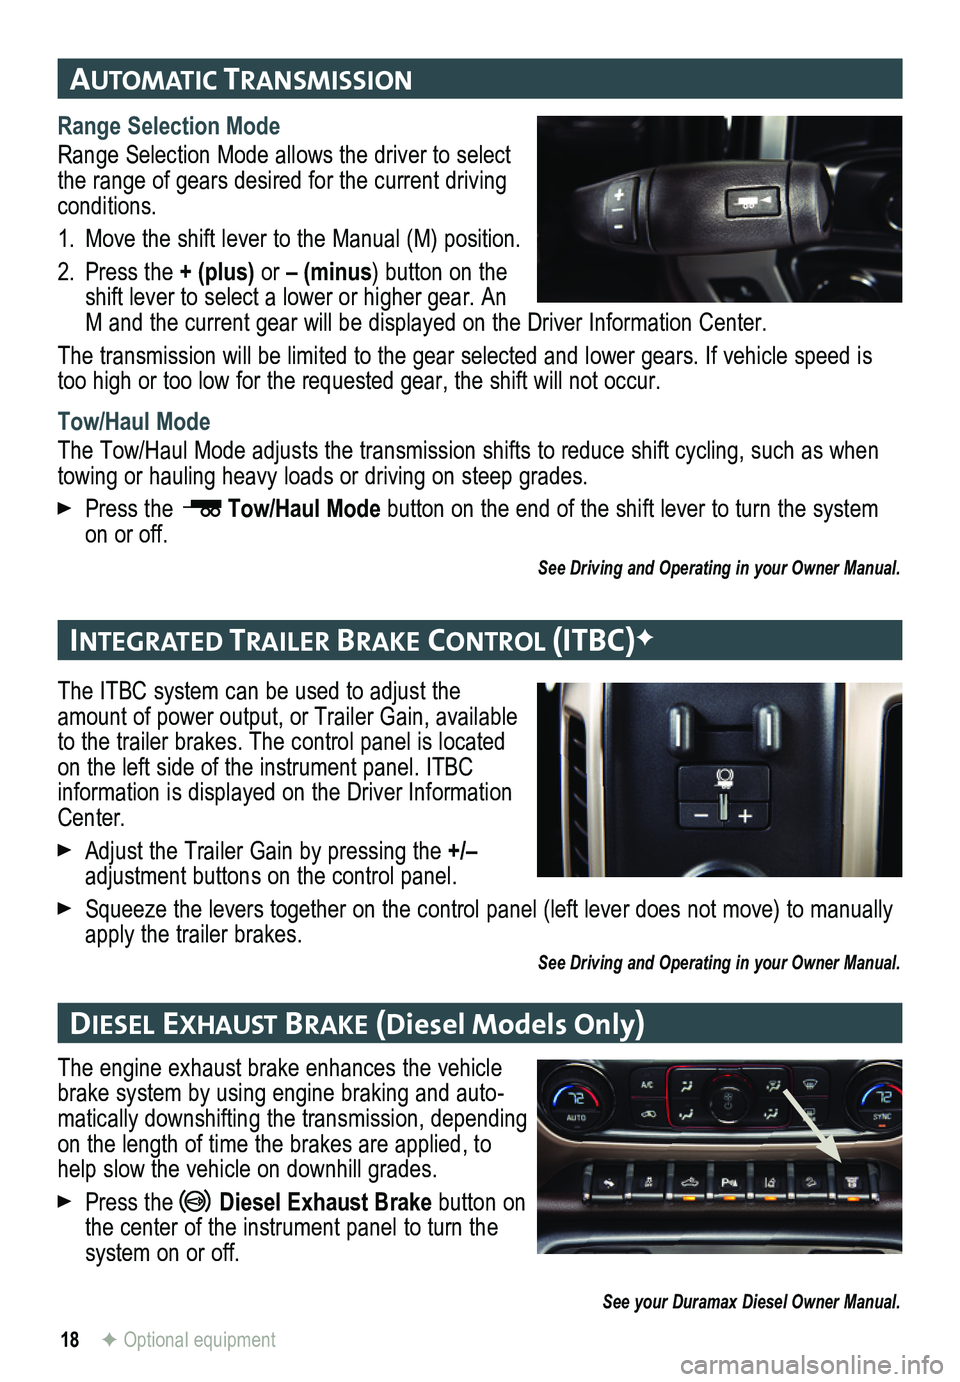
Range Selection Mode
Range Selection Mode allows the driver to select the range of gears desired for the current driving conditions.
1. Move the shift lever to the Manual (M) position.
2. Press the + (plus) or – (minus) button on the shift lever to select a lower or higher gear. An M and the current gear will be displayed on the Driver Information Center.
The transmission will be limited to the gear selected and lower gears. If vehicle speed is too high or too low for the requested gear, the shift will not occur.
Tow/Haul Mode
The Tow/Haul Mode adjusts the transmission shifts to reduce shift cycling, such as when towing or hauling heavy loads or driving on steep grades.
Press the Tow/Haul Mode button on the end of the shift lever to turn the system on or off.
See Driving and Operating in your Owner Manual.
The ITBC system can be used to adjust the amount of power output, or Trailer Gain, available to the trailer brakes. The control panel is located on the left side of the instrument panel. ITBC information is displayed on the Driver Information Center.
Adjust the Trailer Gain by pressing the +/– adjustment buttons on the control panel.
Squeeze the levers together on the control panel (left lever does not m\
ove) to manually apply the trailer brakes.See Driving and Operating in your Owner Manual.
The engine exhaust brake enhances the vehicle brake system by using engine braking and auto-matically downshifting the transmission, depending on the length of time the brakes are applied, to help slow the vehicle on downhill grades.
Press the Diesel Exhaust Brake button on the center of the instrument panel to turn the system on or off.
See your Duramax Diesel Owner Manual.