light GMC SIERRA 2020 Get To Know Guide
[x] Cancel search | Manufacturer: GMC, Model Year: 2020, Model line: SIERRA, Model: GMC SIERRA 2020Pages: 24, PDF Size: 4.75 MB
Page 1 of 24

1
Review this Quick Reference Guide for an overview of some important features in your light-duty (LD) or heavy-duty (HD) GMC Sierra. Some optional equipment described in this guide may not be included in your vehicle. More information can be found in your Owner’s Manual and at my.gmc.com/learn. For easy reference, keep this guide with your Owner’s Manual in your glove box.
gmc.com
2020 SIERRA & SIERRA DENALI
1500/2500HD/3500HD
GETTING TO KNOW YOUR
Certain restrictions, precautions, and safety procedures apply to your v\
ehicle. Please read your Owner’s Manual for complete instructions.
Page 2 of 24
2
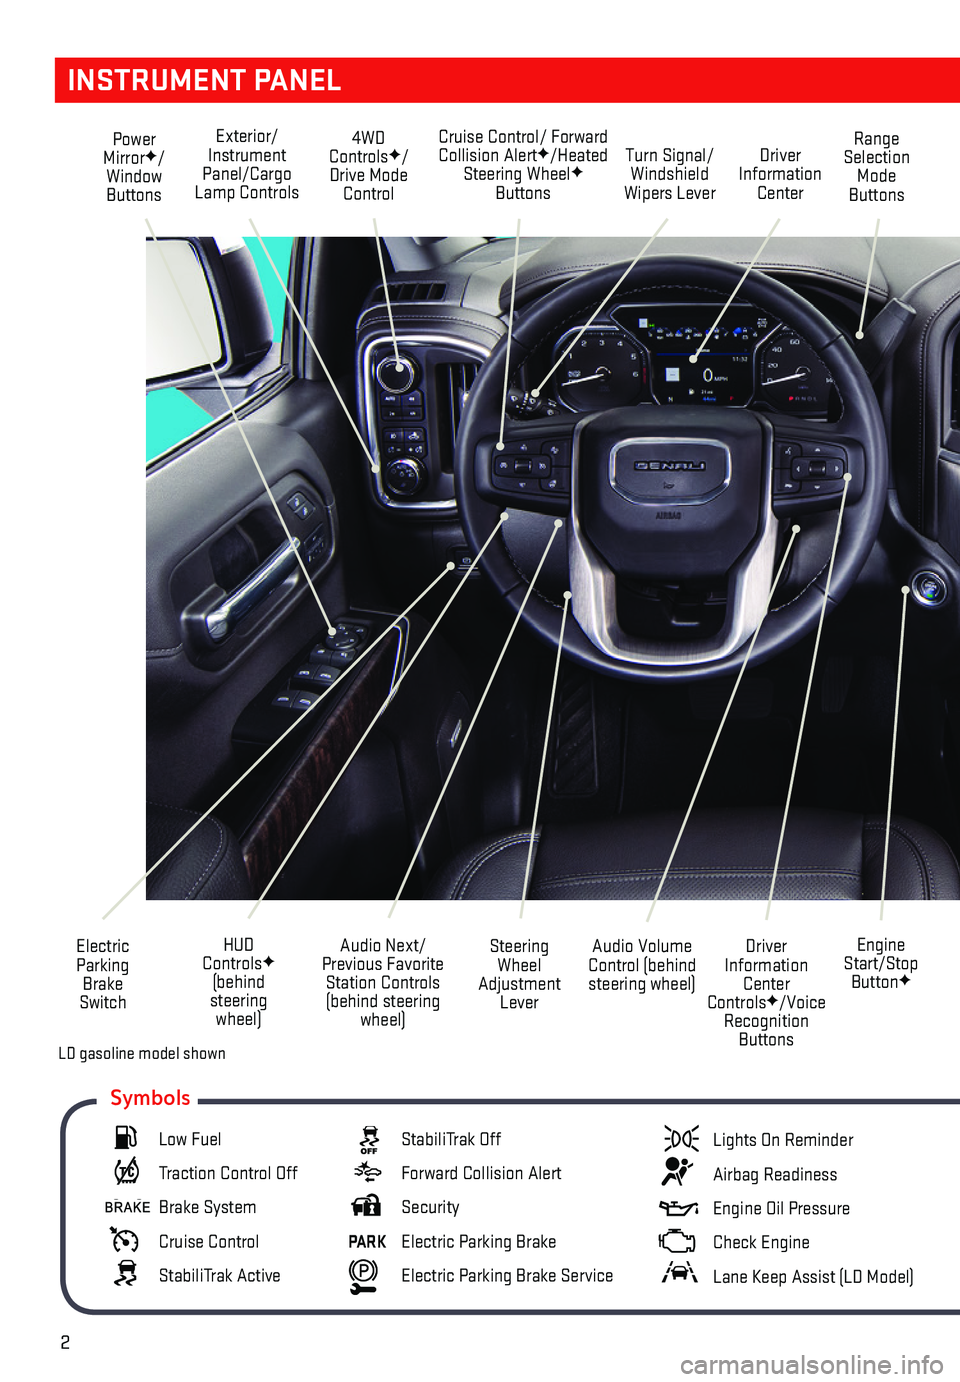
INSTRUMENT PANEL
Engine Start/Stop ButtonF
Cruise Control/ Forward Collision AlertF/Heated Steering WheelF Buttons
Electric Parking Brake Switch
Power MirrorF/Window Buttons
Driver Information Center ControlsF/Voice Recognition Buttons
Audio Volume Control (behind steering wheel)
Steering Wheel Adjustment Lever
Audio Next/Previous Favorite Station Controls (behind steering wheel)
Exterior/Instrument Panel/Cargo Lamp Controls
4WD ControlsF/Drive Mode Control
Turn Signal/Windshield Wipers Lever
Range Selection Mode Buttons
Driver Information Center
HUD ControlsF (behind steering wheel)
Low Fuel
Traction Control Off
Brake System
Cruise Control
StabiliTrak Active
StabiliTrak Off
Forward Collision Alert
Security
PARK Electric Parking Brake
Electric Parking Brake Service
Lights On Reminder
Airbag Readiness
Engine Oil Pressure
Check Engine
Lane Keep Assist (LD Model)
Symbols
LD gasoline model shown
Page 3 of 24
3
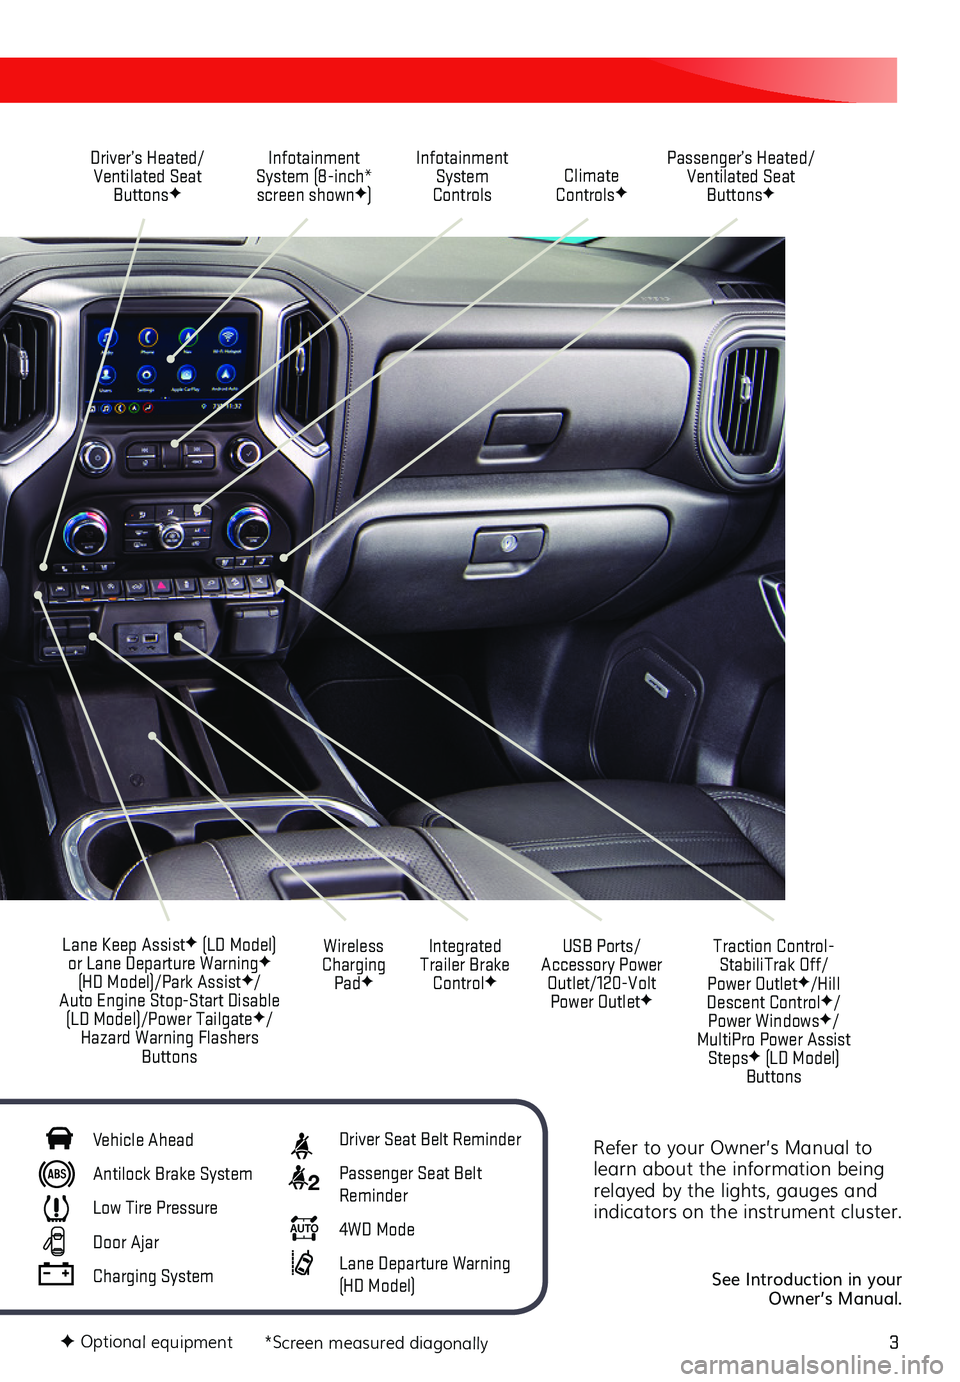
Refer to your Owner’s Manual to learn about the information being relayed by the lights, gauges and indicators on the instrument cluster.
See Introduction in your Owner’s Manual.
Driver’s Heated/Ventilated Seat ButtonsF
Infotainment System (8-inch* screen shownF)
Passenger’s Heated/Ventilated Seat ButtonsF
Infotainment System Controls Climate ControlsF
USB Ports/ Accessory Power Outlet/120-Volt Power OutletF
Integrated Trailer Brake ControlF
Wireless Charging PadF
Lane Keep AssistF (LD Model) or Lane Departure WarningF (HD Model)/Park AssistF/Auto Engine Stop-Start Disable (LD Model)/Power TailgateF/Hazard Warning Flashers Buttons
F Optional equipment *Screen measured diagonally
Traction Control-StabiliTrak Off/ Power OutletF/Hill Descent ControlF/ Power WindowsF/MultiPro Power Assist StepsF (LD Model) Buttons
Vehicle Ahead
Antilock Brake System
Low Tire Pressure
Door Ajar
Charging System
Driver Seat Belt Reminder
2 Passenger Seat Belt Reminder
AUTO 4WD Mode
Lane Departure Warning (HD Model)
Page 8 of 24
8
REAR SEATSF
POWER MIRRORSF/TRAILER-TOW MIRRORSF
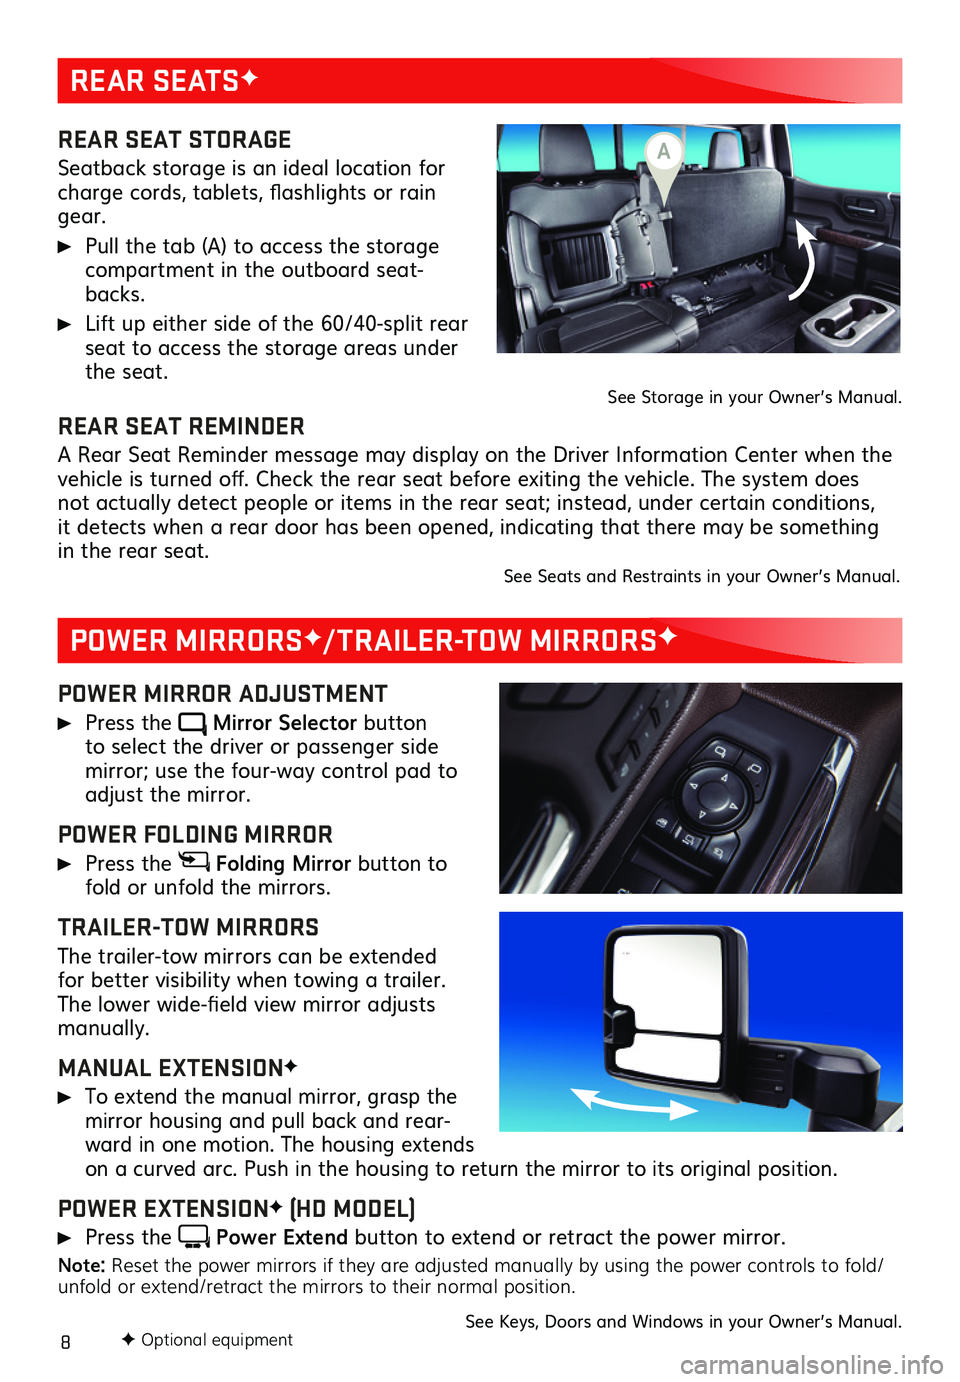
REAR SEAT STORAGE
Seatback storage is an ideal location for charge cords, tablets, flashlights or rain gear.
Pull the tab (A) to access the storage compartment in the outboard seat-backs.
Lift up either side of the 60/40-split rear seat to access the storage areas under the seat.See Storage in your Owner’s Manual.
POWER MIRROR ADJUSTMENT
Press the Mirror Selector button to select the driver or passenger side
mirror; use the four-way control pad to adjust the mirror.
POWER FOLDING MIRROR
Press the Folding Mirror button to fold or unfold the mirrors.
TRAILER-TOW MIRRORS
The trailer-tow mirrors can be extended for better visibility when towing a trailer. The lower wide-field view mirror adjusts manually.
MANUAL EXTENSIONF
To extend the manual mirror, grasp the mirror housing and pull back and rear-ward in one motion. The housing extends on a curved arc. Push in the housing to return the mirror to its original position.
POWER EXTENSIONF (HD MODEL)
Press the Power Extend button to extend or retract the power mirror.
Note: Reset the power mirrors if they are adjusted manually by using the power controls to fold/unfold or extend/retract the mirrors to their normal position.
See Keys, Doors and Windows in your Owner’s Manual.
REAR SEAT REMINDER
A Rear Seat Reminder message may display on the Driver Information Center when the vehicle is turned off. Check the rear seat before exiting the vehicle. The system does not actually detect people or items in the rear seat; instead, under certain conditions, it detects when a rear door has been opened, indicating that there may be something in the rear seat. See Seats and Restraints in your Owner’s Manual.
F Optional equipment
A
Page 11 of 24
11
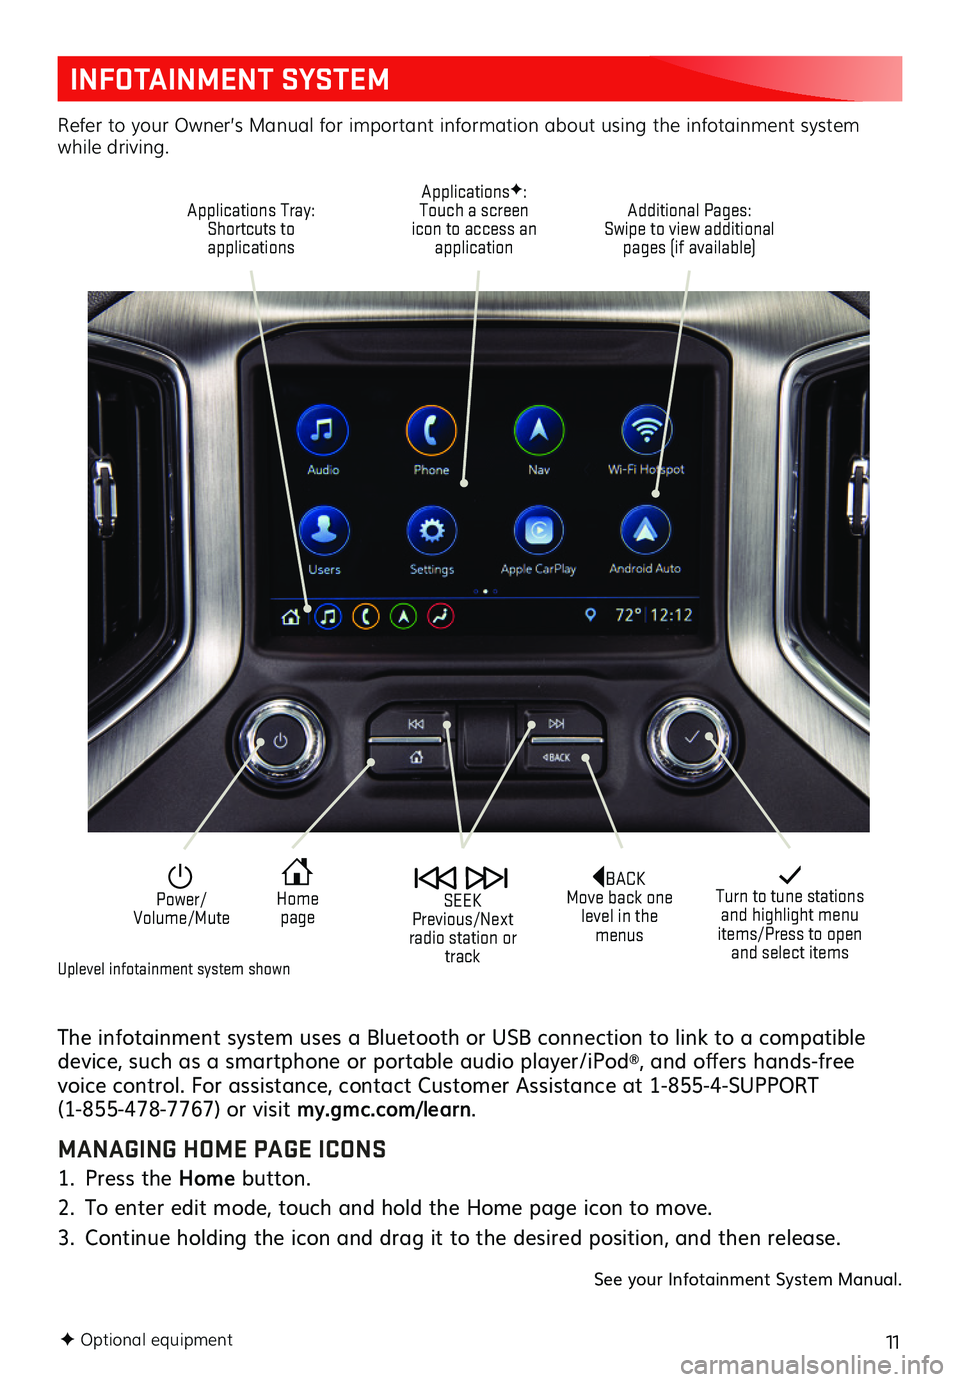
INFOTAINMENT SYSTEM
The infotainment system uses a Bluetooth or USB connection to link to a compatible device, such as a smartphone or portable audio player/iPod®, and offers hands-free voice control. For assistance, contact Customer Assistance at 1-855-4-SUPPORT (1-855-478-7767) or visit my.gmc.com/learn.
MANAGING HOME PAGE ICONS
1. Press the Home button.
2. To enter edit mode, touch and hold the Home page icon to move.
3. Continue holding the icon and drag it to the desired position, and then release.
See your Infotainment System Manual.
F Optional equipment
Turn to tune stations and highlight menu items/Press to open and select items
Home page
Power/ Volume/Mute
SEEK Previous/Next radio station or track
Refer to your Owner’s Manual for important information about using the infotainment system while driving.
Additional Pages: Swipe to view additional pages (if available)
ApplicationsF: Touch a screen icon to access an application
Applications Tray: Shortcuts to applications
BACK Move back one level in the menus
Uplevel infotainment system shown
Page 12 of 24
12F Optional equipment
INFOTAINMENT SYSTEM
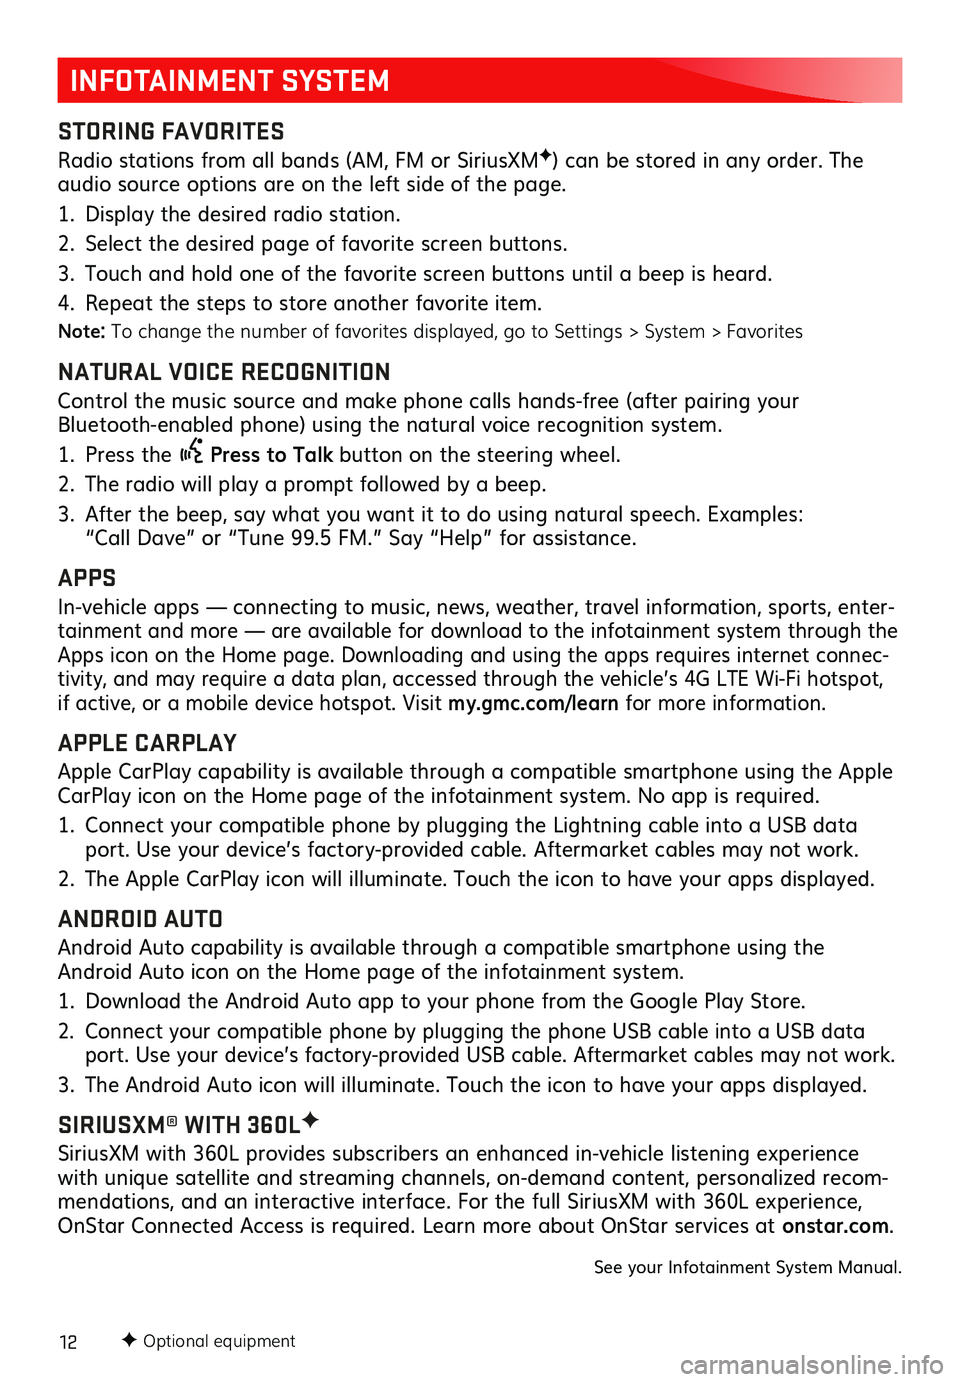
STORING FAVORITES
Radio stations from all bands (AM, FM or SiriusXMF) can be stored in any order. The audio source options are on the left side of the page.
1. Display the desired radio station.
2. Select the desired page of favorite screen buttons.
3. Touch and hold one of the favorite screen buttons until a beep is heard.
4. Repeat the steps to store another favorite item.
Note: To change the number of favorites displayed, go to Settings > System > Favorites
NATURAL VOICE RECOGNITION
Control the music source and make phone calls hands-free (after pairing your Bluetooth-enabled phone) using the natural voice recognition system.
1. Press the Press to Talk button on the steering wheel.
2. The radio will play a prompt followed by a beep.
3. After the beep, say what you want it to do using natural speech. Examples: “Call Dave” or “Tune 99.5 FM.” Say “Help” for assistance.
APPS
In-vehicle apps — connecting to music, news, weather, travel information, sports, enter-tainment and more — are available for download to the infotainment system through the Apps icon on the Home page. Downloading and using the apps requires internet connec-tivity, and may require a data plan, accessed through the vehicle’s 4G LTE Wi-Fi hotspot, if active, or a mobile device hotspot. Visit my.gmc.com/learn for more information.
APPLE CARPLAY
Apple CarPlay capability is available through a compatible smartphone using the Apple CarPlay icon on the Home page of the infotainment system. No app is required.
1. Connect your compatible phone by plugging the Lightning cable into a USB data port. Use your device’s factory-provided cable. Aftermarket cables may not work.
2. The Apple CarPlay icon will illuminate. Touch the icon to have your apps displayed.
ANDROID AUTO
Android Auto capability is available through a compatible smartphone using the Android Auto icon on the Home page of the infotainment system.
1. Download the Android Auto app to your phone from the Google Play Store.
2. Connect your compatible phone by plugging the phone USB cable into a USB data port. Use your device’s factory-provided USB cable. Aftermarket cables may not work.
3. The Android Auto icon will illuminate. Touch the icon to have your apps displayed.
SIRIUSXM® WITH 360LF
SiriusXM with 360L provides subscribers an enhanced in-vehicle listening experience with unique satellite and streaming channels, on-demand content, personalized recom-mendations, and an interactive interface. For the full SiriusXM with 360L experience, OnStar Connected Access is required. Learn more about OnStar services at onstar.com.
See your Infotainment System Manual.
Page 14 of 24
14F Optional equipment
4G LTE WI-FI® HOTSPOTF
WIRELESS CHARGINGF
VEHICLE CUSTOMIZATIONF
UNIVERSAL REMOTE SYSTEMF
With the vehicle’s available built-in 4G LTE Wi-Fi hotspot, up to 7 devices (smartphones, tablets and laptops) can be connected to high-speed internet.
To retrieve the SSID and password for the hotspot, select the Wi-Fi icon on the Home page or go to Settings > System > Wi-Fi Hotspot on the infotainment system.
For more information, call 1-855-478-7767 or visit my.gmc.com/learn.
See your Infotainment System Manual.
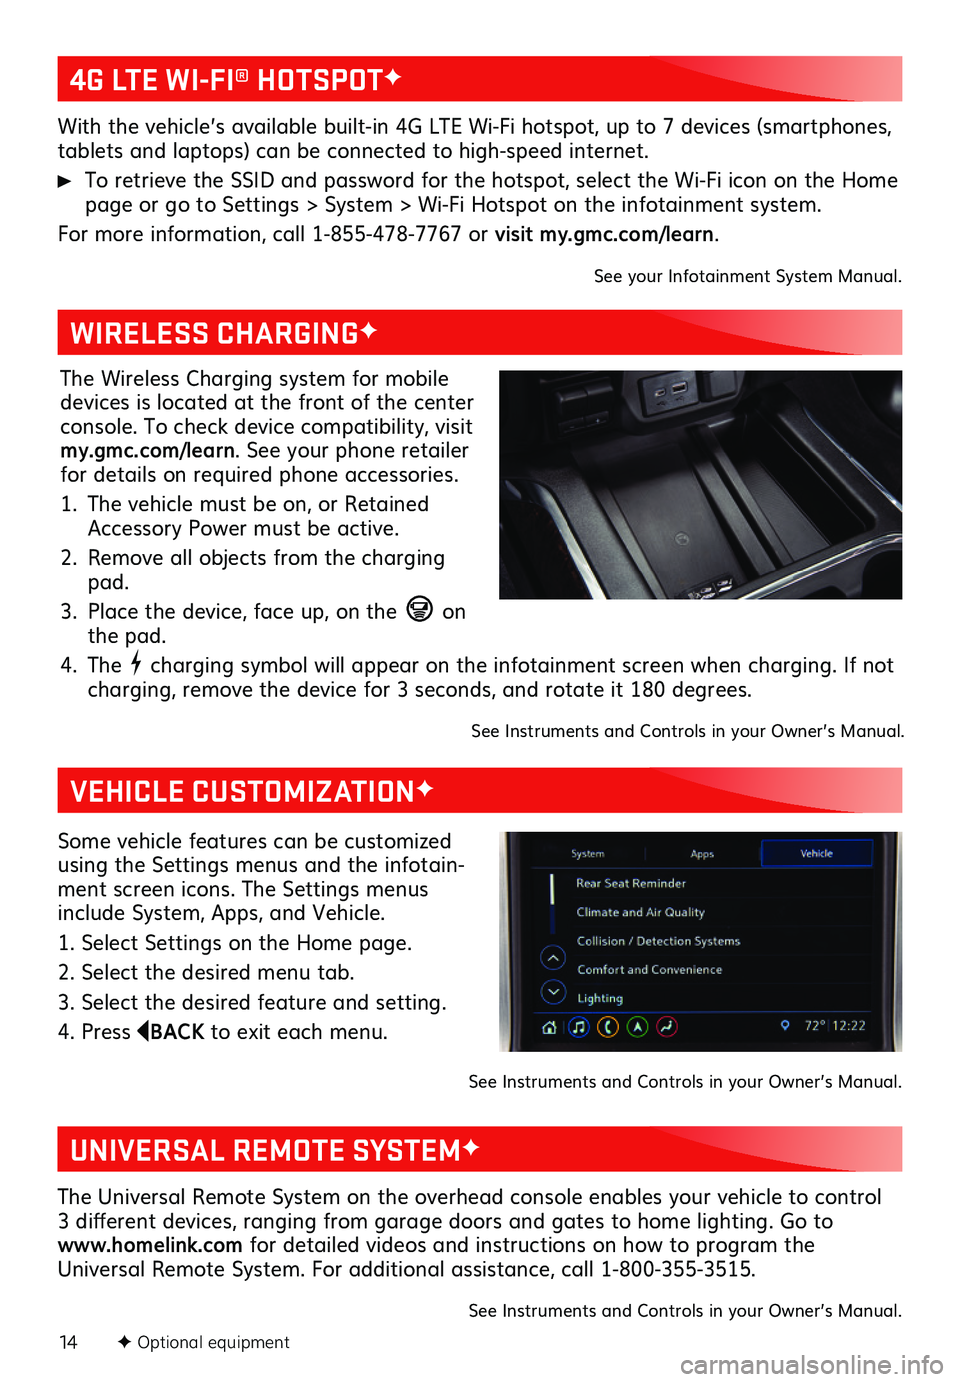
The Wireless Charging system for mobile devices is located at the front of the center console. To check device compatibility, visit my.gmc.com/learn. See your phone retailer for details on required phone accessories.
1. The vehicle must be on, or Retained Accessory Power must be active.
2. Remove all objects from the charging pad.
3. Place the device, face up, on the on the pad.
4. The charging symbol will appear on the infotainment screen when charging. If not charging, remove the device for 3 seconds, and rotate it 180 degrees.
See Instruments and Controls in your Owner’s Manual.
Some vehicle features can be customized using the Settings menus and the infotain-ment screen icons. The Settings menus include System, Apps, and Vehicle.
1. Select Settings on the Home page.
2. Select the desired menu tab.
3. Select the desired feature and setting.
4. Press BACK to exit each menu.
See Instruments and Controls in your Owner’s Manual.
The Universal Remote System on the overhead console enables your vehicle to control 3 different devices, ranging from garage doors and gates to home lighting. Go to www.homelink.com for detailed videos and instructions on how to program the Universal Remote System. For additional assistance, call 1-800-355-3515.
See Instruments and Controls in your Owner’s Manual.
Page 15 of 24
15F Optional equipment
LIGHTING
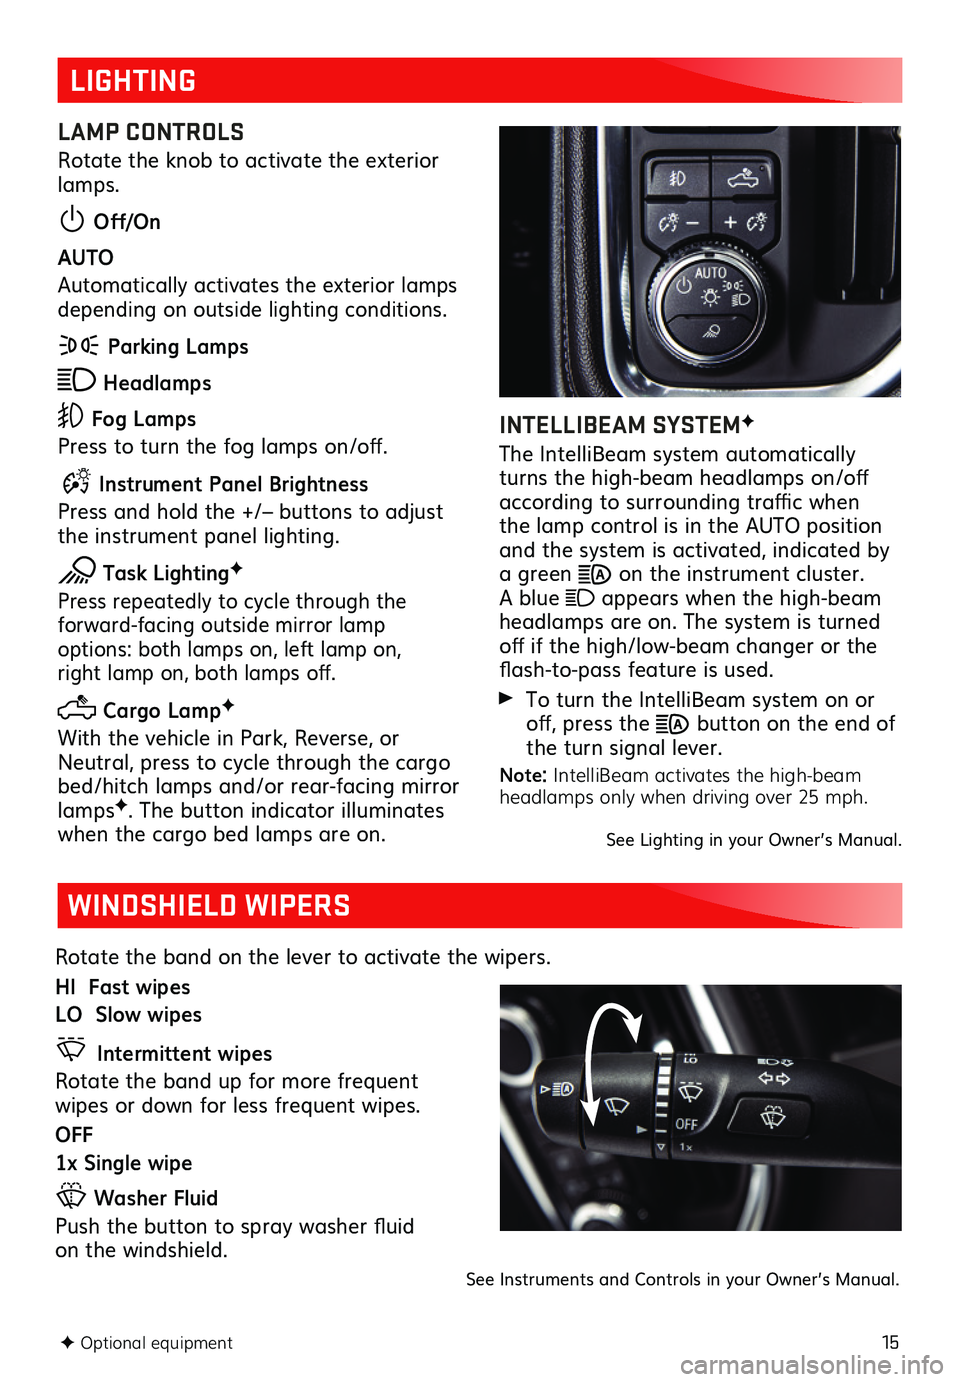
LAMP CONTROLS
Rotate the knob to activate the exterior lamps.
Off/On
AUTO
Automatically activates the exterior lamps depending on outside lighting conditions.
Parking Lamps
Headlamps
Fog Lamps
Press to turn the fog lamps on/off.
Instrument Panel Brightness
Press and hold the +/– buttons to adjust the instrument panel lighting.
Task LightingF
Press repeatedly to cycle through the
forward-facing outside mirror lamp options: both lamps on, left lamp on, right lamp on, both lamps off.
Cargo LampF
With the vehicle in Park, Reverse, or Neutral, press to cycle through the cargo bed/hitch lamps and/or rear-facing mirror lampsF. The button indicator illuminates when the cargo bed lamps are on.
INTELLIBEAM SYSTEMF
The IntelliBeam system automatically turns the high-beam headlamps on/off according to surrounding traffic when the lamp control is in the AUTO position and the system is activated, indicated by a green on the instrument cluster. A blue appears when the high-beam headlamps are on. The system is turned off if the high/low-beam changer or the flash-to-pass feature is used.
To turn the IntelliBeam system on or off, press the button on the end of the turn signal lever.
Note: IntelliBeam activates the high-beam headlamps only when driving over 25 mph.
See Lighting in your Owner’s Manual.
WINDSHIELD WIPERS
Rotate the band on the lever to activate the wipers.
HI Fast wipes
LO Slow wipes
Intermittent wipes
Rotate the band up for more frequent wipes or down for less frequent wipes.
OFF
1x Single wipe
Washer Fluid
Push the button to spray washer fluid on the windshield.
See Instruments and Controls in your Owner’s Manual.
Page 20 of 24
20F Optional equipment
HILL DESCENT CONTROLF
PARK GRADE HOLD ASSIST
Hill Descent Control sets and maintains vehicle speed from 1–14 mph while descending a steep incline in a forward or reverse gear.
1. Press the Hill Descent Control button on the center of the instrument panel. Vehicle speed must be below 31 mph to enable the system. The Hill Descent Control symbol will illuminate on the instrument cluster.
2. Increase or decrease speed by applying the accelerator or brake pedal or use the Cruise Control +/– buttons on the steering wheel. The adjusted speed becomes the new set speed. The symbol flashes when the system is actively applying the brakes to maintain vehicle speed.
See Driving and Operating in your Owner’s Manual.
Park Grade Hold Assist enhances hill hold by using braking effort at all four wheels to help keep the truck in place for an extended length of time.
See Driving and Operating in your Owner’s Manual.
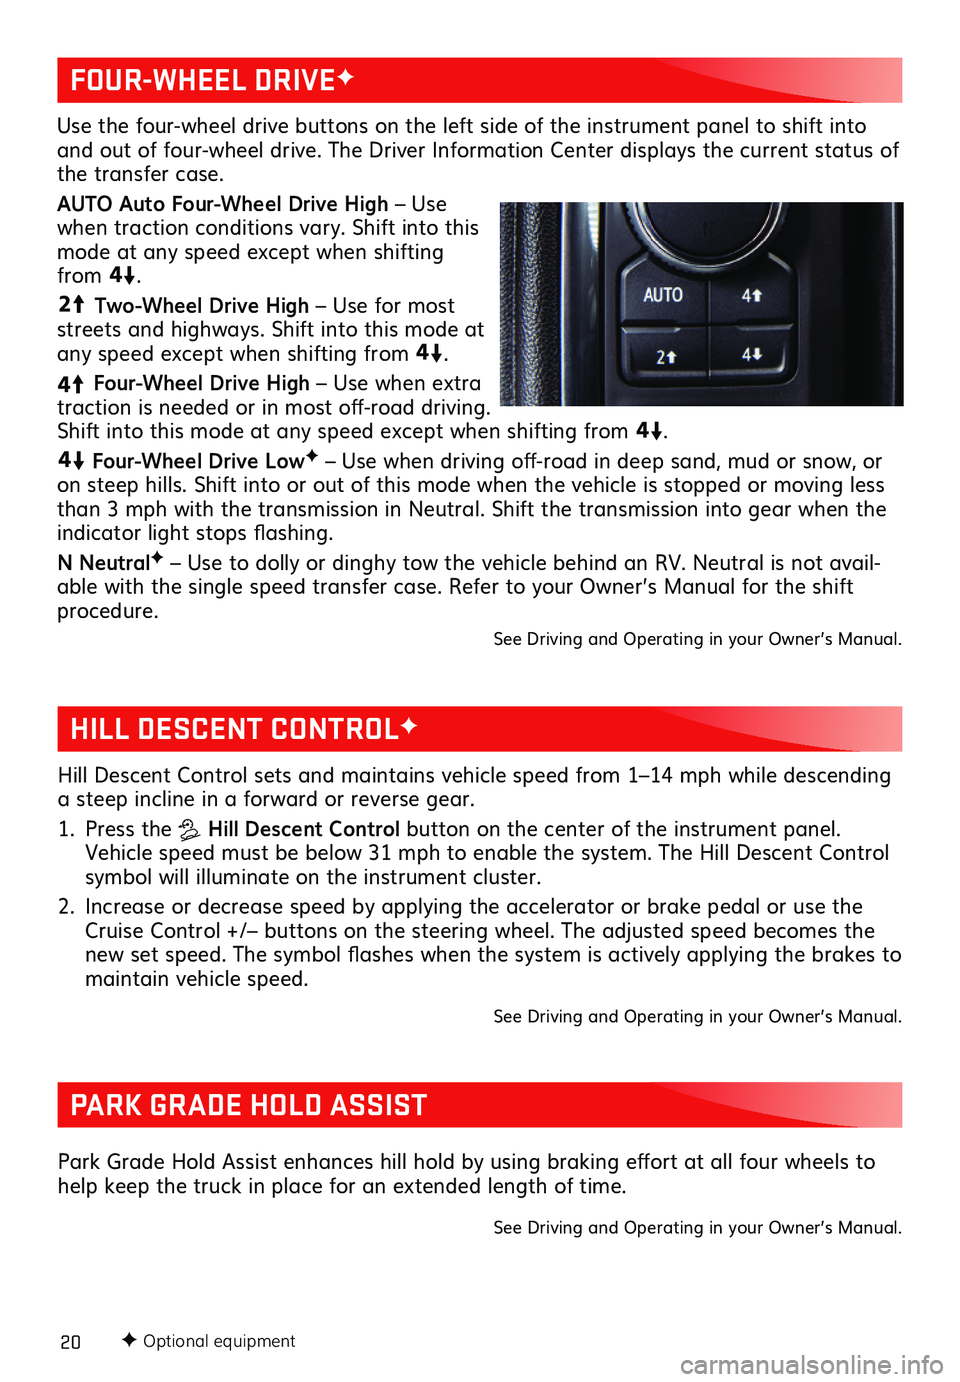
Use the four-wheel drive buttons on the left side of the instrument panel to shift into and out of four-wheel drive. The Driver Information Center displays the current status of the transfer case.
AUTO Auto Four-Wheel Drive High – Use when traction conditions vary. Shift into this mode at any speed except when shifting from
4
4
2
.
44
2
Two-Wheel Drive High – Use for most streets and highways. Shift into this mode at any speed except when shifting from
44
2
.
4
4
2
Four-Wheel Drive High – Use when extra traction is needed or in most off-road driving. Shift into this mode at any speed except when shifting from
44
2
.
44
2
Four-Wheel Drive LowF – Use when driving off-road in deep sand, mud or snow, or on steep hills. Shift into or out of this mode when the vehicle is stopped or moving less than 3 mph with the transmission in Neutral. Shift the transmission into gear when the indicator light stops flashing.
N NeutralF – Use to dolly or dinghy tow the vehicle behind an RV. Neutral is not avail-able with the single speed transfer case. Refer to your Owner’s Manual for the shift procedure.
See Driving and Operating in your Owner’s Manual.
FOUR-WHEEL DRIVEF
Page 21 of 24
21F Optional equipment
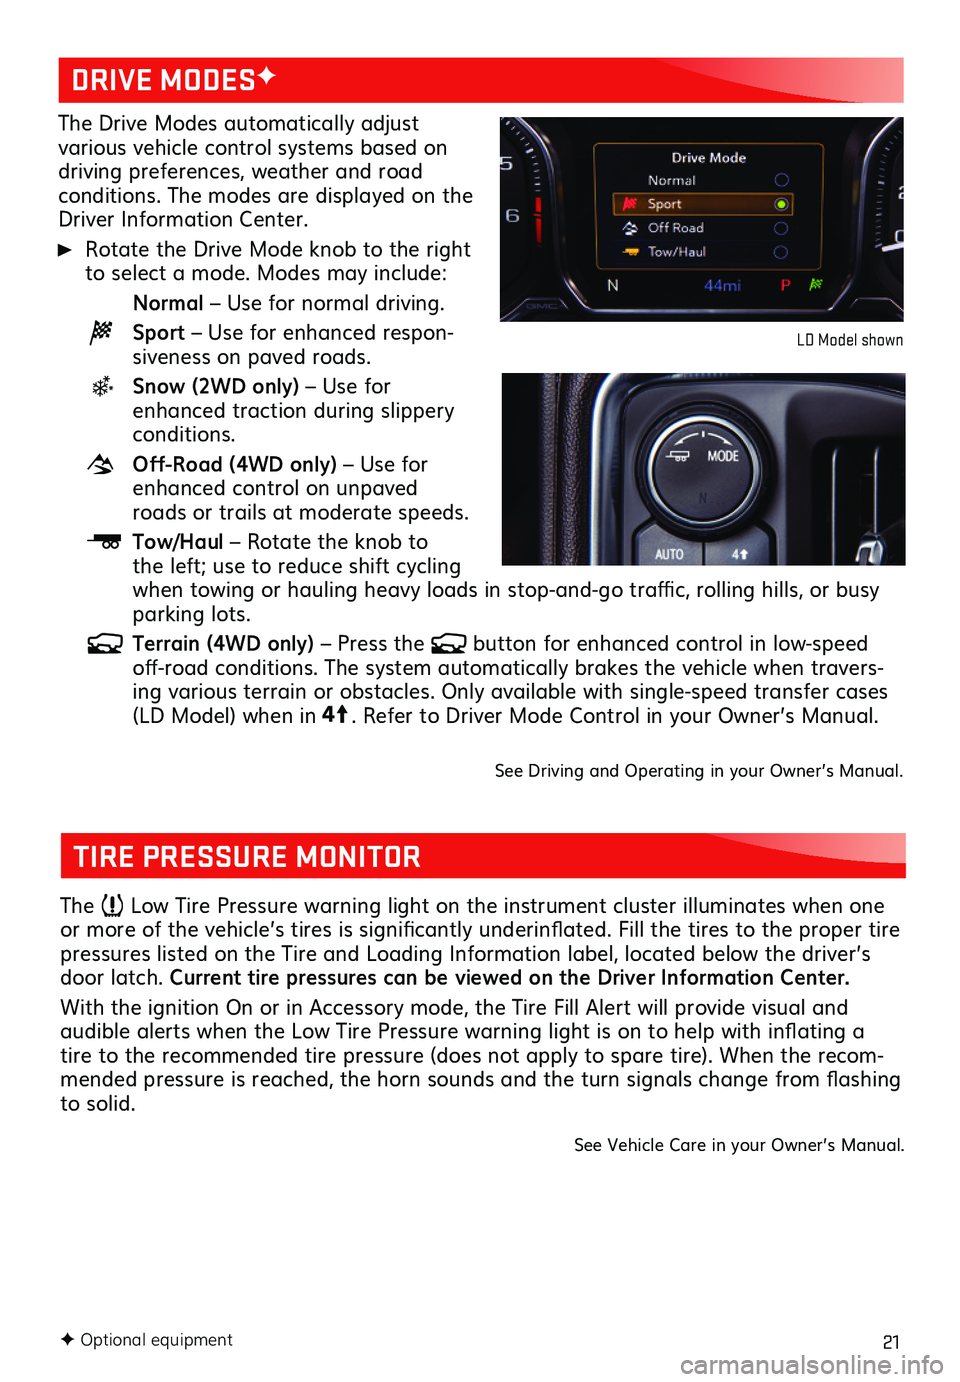
The Drive Modes automatically adjust various vehicle control systems based on driving preferences, weather and road conditions. The modes are displayed on the Driver Information Center.
Rotate the Drive Mode knob to the right to select a mode. Modes may include:
Normal – Use for normal driving.
Sport – Use for enhanced respon-siveness on paved roads.
Snow (2WD only) – Use for enhanced traction during slippery conditions.
Off-Road (4WD only) – Use for enhanced control on unpaved roads or trails at moderate speeds.
Tow/Haul – Rotate the knob to the left; use to reduce shift cycling when towing or hauling heavy loads in stop-and-go traffic, rolling hills, or busy parking lots.
Terrain (4WD only) – Press the button for enhanced control in low-speed off-road conditions. The system automatically brakes the vehicle when travers-ing various terrain or obstacles. Only available with single-speed transfer cases (LD Model) when in4
4
2
. Refer to Driver Mode Control in your Owner’s Manual.
See Driving and Operating in your Owner’s Manual.
DRIVE MODESF
LD Model shown
TIRE PRESSURE MONITOR
The Low Tire Pressure warning light on the instrument cluster illuminates when one or more of the vehicle’s tires is significantly underinflated. Fill the tires to the proper tire pressures listed on the Tire and Loading Information label, located below the driver’s door latch. Current tire pressures can be viewed on the Driver Information Center.
With the ignition On or in Accessory mode, the Tire Fill Alert will provide visual and
audible alerts when the Low Tire Pressure warning light is on to help with inflating a tire to the recommended tire pressure (does not apply to spare tire). When the recom-mended pressure is reached, the horn sounds and the turn signals change from flashing to solid.
See Vehicle Care in your Owner’s Manual.