display GMC SIERRA 2020 Get To Know Guide
[x] Cancel search | Manufacturer: GMC, Model Year: 2020, Model line: SIERRA, Model: GMC SIERRA 2020Pages: 24, PDF Size: 4.75 MB
Page 8 of 24
8
REAR SEATSF
POWER MIRRORSF/TRAILER-TOW MIRRORSF
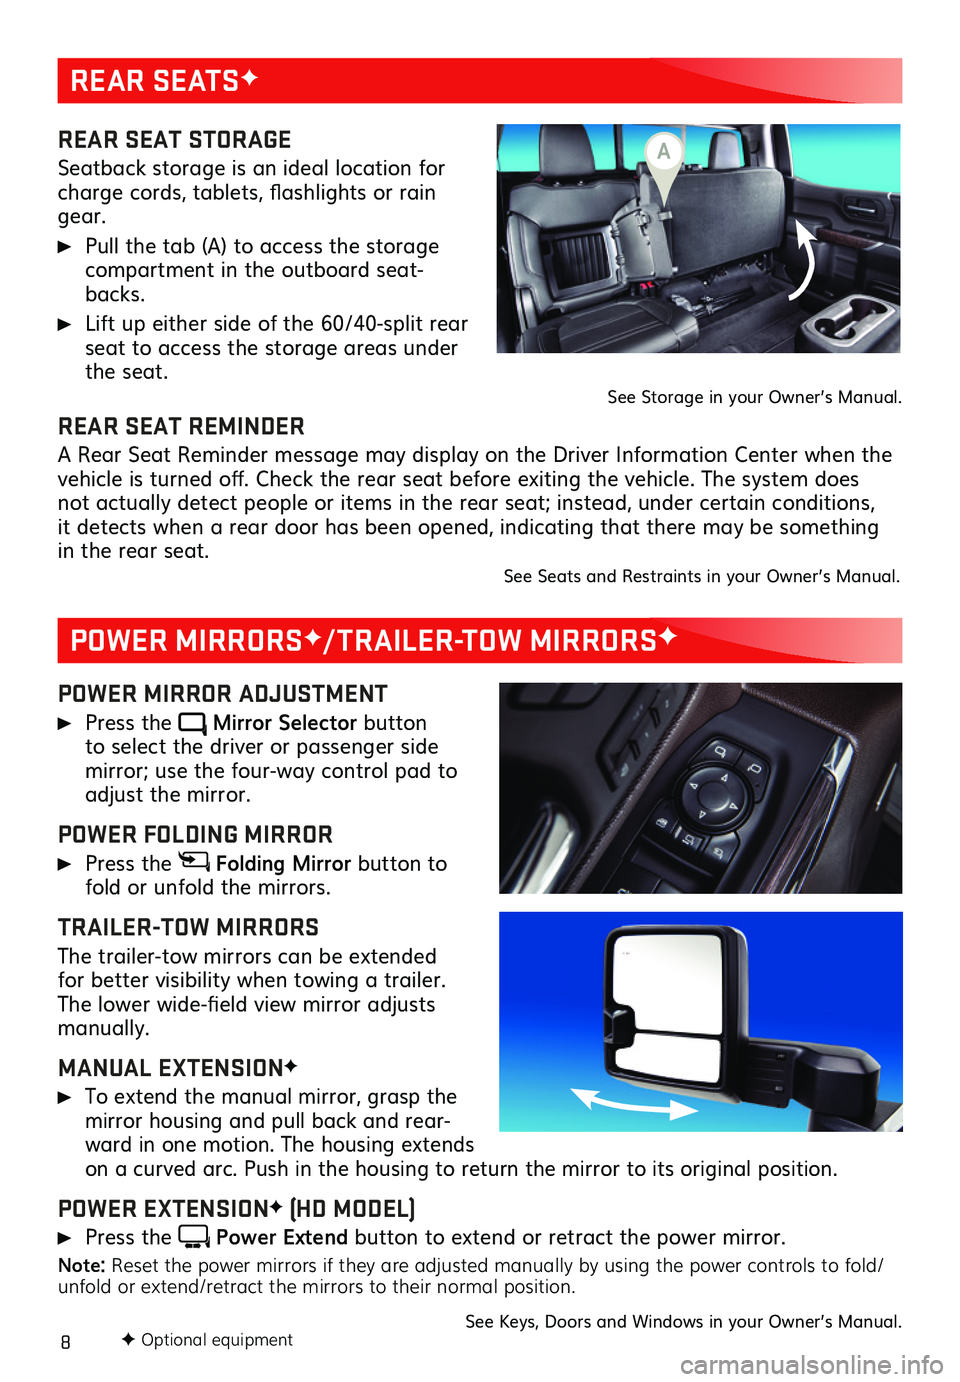
REAR SEAT STORAGE
Seatback storage is an ideal location for charge cords, tablets, flashlights or rain gear.
Pull the tab (A) to access the storage compartment in the outboard seat-backs.
Lift up either side of the 60/40-split rear seat to access the storage areas under the seat.See Storage in your Owner’s Manual.
POWER MIRROR ADJUSTMENT
Press the Mirror Selector button to select the driver or passenger side
mirror; use the four-way control pad to adjust the mirror.
POWER FOLDING MIRROR
Press the Folding Mirror button to fold or unfold the mirrors.
TRAILER-TOW MIRRORS
The trailer-tow mirrors can be extended for better visibility when towing a trailer. The lower wide-field view mirror adjusts manually.
MANUAL EXTENSIONF
To extend the manual mirror, grasp the mirror housing and pull back and rear-ward in one motion. The housing extends on a curved arc. Push in the housing to return the mirror to its original position.
POWER EXTENSIONF (HD MODEL)
Press the Power Extend button to extend or retract the power mirror.
Note: Reset the power mirrors if they are adjusted manually by using the power controls to fold/unfold or extend/retract the mirrors to their normal position.
See Keys, Doors and Windows in your Owner’s Manual.
REAR SEAT REMINDER
A Rear Seat Reminder message may display on the Driver Information Center when the vehicle is turned off. Check the rear seat before exiting the vehicle. The system does not actually detect people or items in the rear seat; instead, under certain conditions, it detects when a rear door has been opened, indicating that there may be something in the rear seat. See Seats and Restraints in your Owner’s Manual.
F Optional equipment
A
Page 10 of 24
10F Optional equipment
DRIVER INFORMATION CENTER
MULTI-COLOR HEAD-UP DISPLAYF
The Driver Information Center (DIC) on the instrument cluster displays a variety of
vehicle messages and system information.
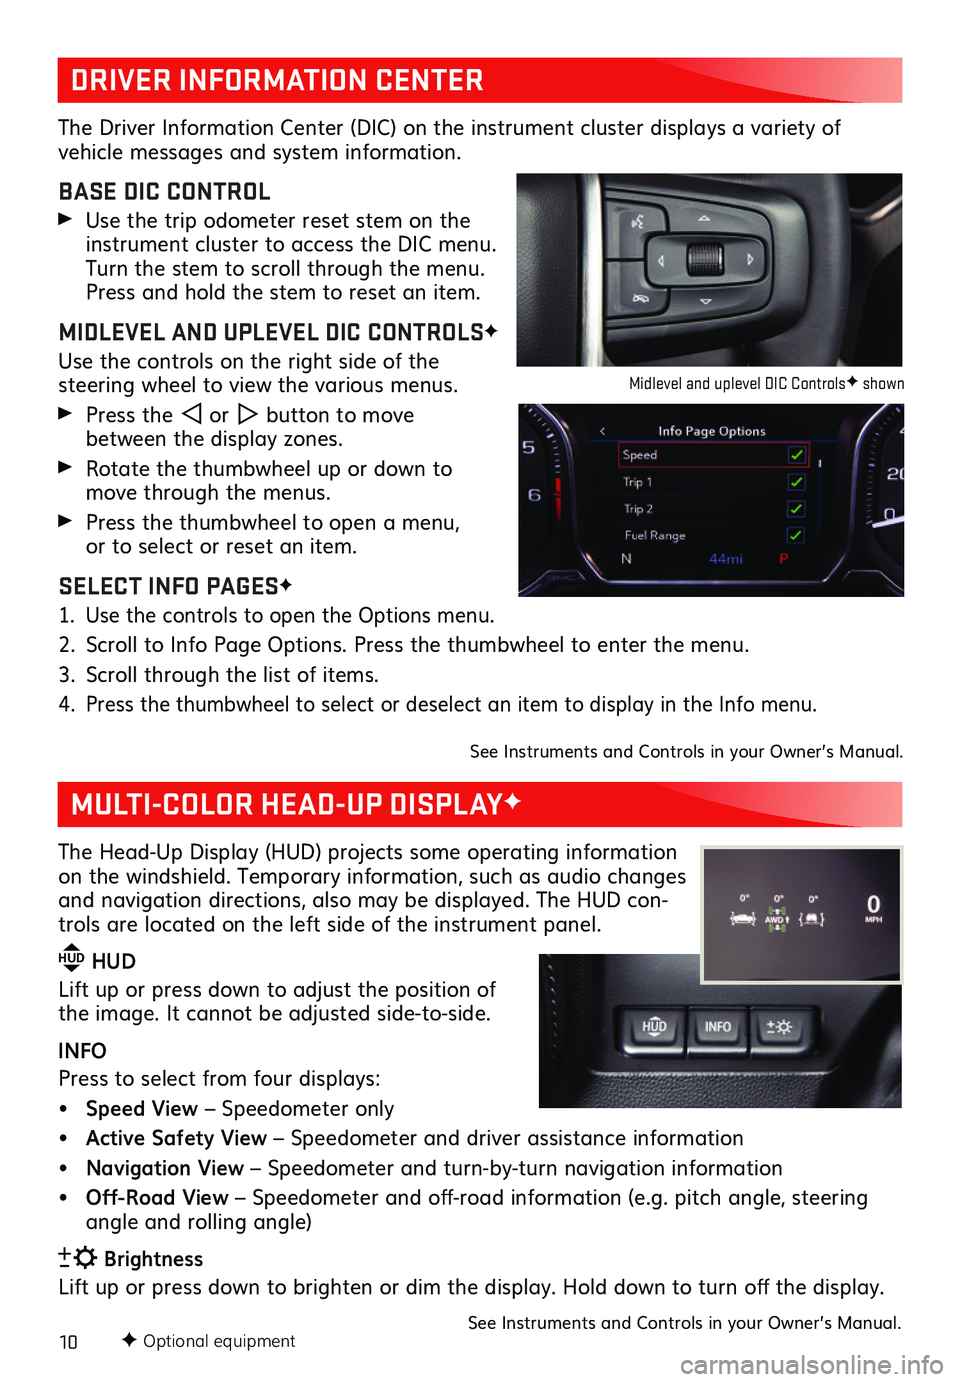
BASE DIC CONTROL
Use the trip odometer reset stem on the instrument cluster to access the DIC menu. Turn the stem to scroll through the menu. Press and hold the stem to reset an item.
MIDLEVEL AND UPLEVEL DIC CONTROLSF
Use the controls on the right side of the
steering wheel to view the various menus.
Press the or button to move between the display zones.
Rotate the thumbwheel up or down to move through the menus.
Press the thumbwheel to open a menu, or to select or reset an item.
SELECT INFO PAGESF
1. Use the controls to open the Options menu.
2. Scroll to Info Page Options. Press the thumbwheel to enter the menu.
3. Scroll through the list of items.
4. Press the thumbwheel to select or deselect an item to display in the Info menu.
See Instruments and Controls in your Owner’s Manual.
The Head-Up Display (HUD) projects some operating information on the windshield. Temporary information, such as audio changes and navigation directions, also may be displayed. The HUD con-trols are located on the left side of the instrument panel.
HUD HUD
Lift up or press down to adjust the position of the image. It cannot be adjusted side-to-side.
INFO
Press to select from four displays:
• Speed View – Speedometer only
• Active Safety View – Speedometer and driver assistance information
• Navigation View – Speedometer and turn-by-turn navigation information
• Off-Road View – Speedometer and off-road information (e.g. pitch angle, steering angle and rolling angle)
Brightness
Lift up or press down to brighten or dim the display. Hold down to turn off the display.
See Instruments and Controls in your Owner’s Manual.
Midlevel and uplevel DIC ControlsF shown
Page 12 of 24
12F Optional equipment
INFOTAINMENT SYSTEM
STORING FAVORITES
Radio stations from all bands (AM, FM or SiriusXMF) can be stored in any order. The audio source options are on the left side of the page.
1. Display the desired radio station.
2. Select the desired page of favorite screen buttons.
3. Touch and hold one of the favorite screen buttons until a beep is heard.
4. Repeat the steps to store another favorite item.
Note: To change the number of favorites displayed, go to Settings > System > Favorites
NATURAL VOICE RECOGNITION
Control the music source and make phone calls hands-free (after pairing your Bluetooth-enabled phone) using the natural voice recognition system.
1. Press the Press to Talk button on the steering wheel.
2. The radio will play a prompt followed by a beep.
3. After the beep, say what you want it to do using natural speech. Examples: “Call Dave” or “Tune 99.5 FM.” Say “Help” for assistance.
APPS
In-vehicle apps — connecting to music, news, weather, travel information, sports, enter-tainment and more — are available for download to the infotainment system through the Apps icon on the Home page. Downloading and using the apps requires internet connec-tivity, and may require a data plan, accessed through the vehicle’s 4G LTE Wi-Fi hotspot, if active, or a mobile device hotspot. Visit my.gmc.com/learn for more information.
APPLE CARPLAY
Apple CarPlay capability is available through a compatible smartphone using the Apple CarPlay icon on the Home page of the infotainment system. No app is required.
1. Connect your compatible phone by plugging the Lightning cable into a USB data port. Use your device’s factory-provided cable. Aftermarket cables may not work.
2. The Apple CarPlay icon will illuminate. Touch the icon to have your apps displayed.
ANDROID AUTO
Android Auto capability is available through a compatible smartphone using the Android Auto icon on the Home page of the infotainment system.
1. Download the Android Auto app to your phone from the Google Play Store.
2. Connect your compatible phone by plugging the phone USB cable into a USB data port. Use your device’s factory-provided USB cable. Aftermarket cables may not work.
3. The Android Auto icon will illuminate. Touch the icon to have your apps displayed.
SIRIUSXM® WITH 360LF
SiriusXM with 360L provides subscribers an enhanced in-vehicle listening experience with unique satellite and streaming channels, on-demand content, personalized recom-mendations, and an interactive interface. For the full SiriusXM with 360L experience, OnStar Connected Access is required. Learn more about OnStar services at onstar.com.
See your Infotainment System Manual.
Page 13 of 24
13
BLUETOOTH® SYSTEMF
AUDIO STEERING WHEEL CONTROLSF
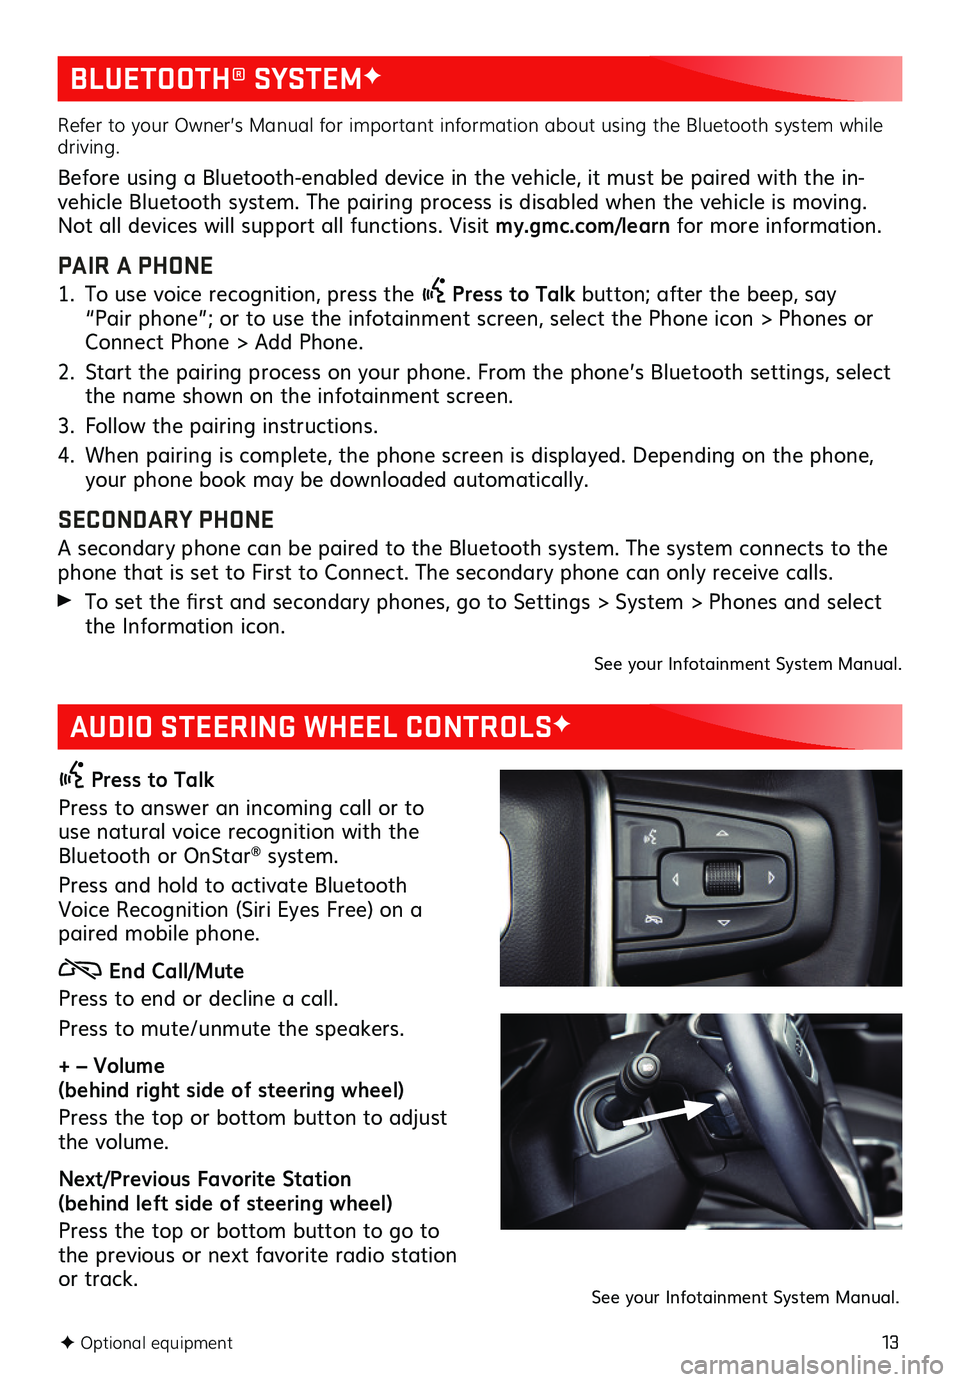
Press to Talk
Press to answer an incoming call or to use natural voice recognition with the Bluetooth or OnStar® system.
Press and hold to activate Bluetooth Voice Recognition (Siri Eyes Free) on a paired mobile phone.
End Call/Mute
Press to end or decline a call.
Press to mute/unmute the speakers.
+ – Volume (behind right side of steering wheel)
Press the top or bottom button to adjust the volume.
Next/Previous Favorite Station (behind left side of steering wheel)
Press the top or bottom button to go to the previous or next favorite radio station or track.
F Optional equipment
Refer to your Owner’s Manual for important information about using the Bluetooth system while driving.
Before using a Bluetooth-enabled device in the vehicle, it must be paired with the in-vehicle Bluetooth system. The pairing process is disabled when the vehicle is moving. Not all devices will support all functions. Visit my.gmc.com/learn for more information.
PAIR A PHONE
1. To use voice recognition, press the Press to Talk button; after the beep, say “Pair phone”; or to use the infotainment screen, select the Phone icon > Phones or Connect Phone > Add Phone.
2. Start the pairing process on your phone. From the phone’s Bluetooth settings, select the name shown on the infotainment screen.
3. Follow the pairing instructions.
4. When pairing is complete, the phone screen is displayed. Depending on the phone, your phone book may be downloaded automatically.
SECONDARY PHONE
A secondary phone can be paired to the Bluetooth system. The system connects to the phone that is set to First to Connect. The secondary phone can only receive calls.
To set the first and secondary phones, go to Settings > System > Phones and select the Information icon.
See your Infotainment System Manual.
See your Infotainment System Manual.
Page 16 of 24
16F Optional equipment
DRIVER ASSISTANCE SYSTEMSF
Safety or driver assistance features are no substitute for the driver’s responsibility to operate the vehicle in a safe manner. The driver should remain attentive to traffic, surroundings and road conditions at all times. Read your Owner’s Manual for important feature limitations and information.
SAFETY ALERT SEAT – The driver’s seat pulses — left side, right side or simultaneously — to alert the driver of the direction of potential hazards.
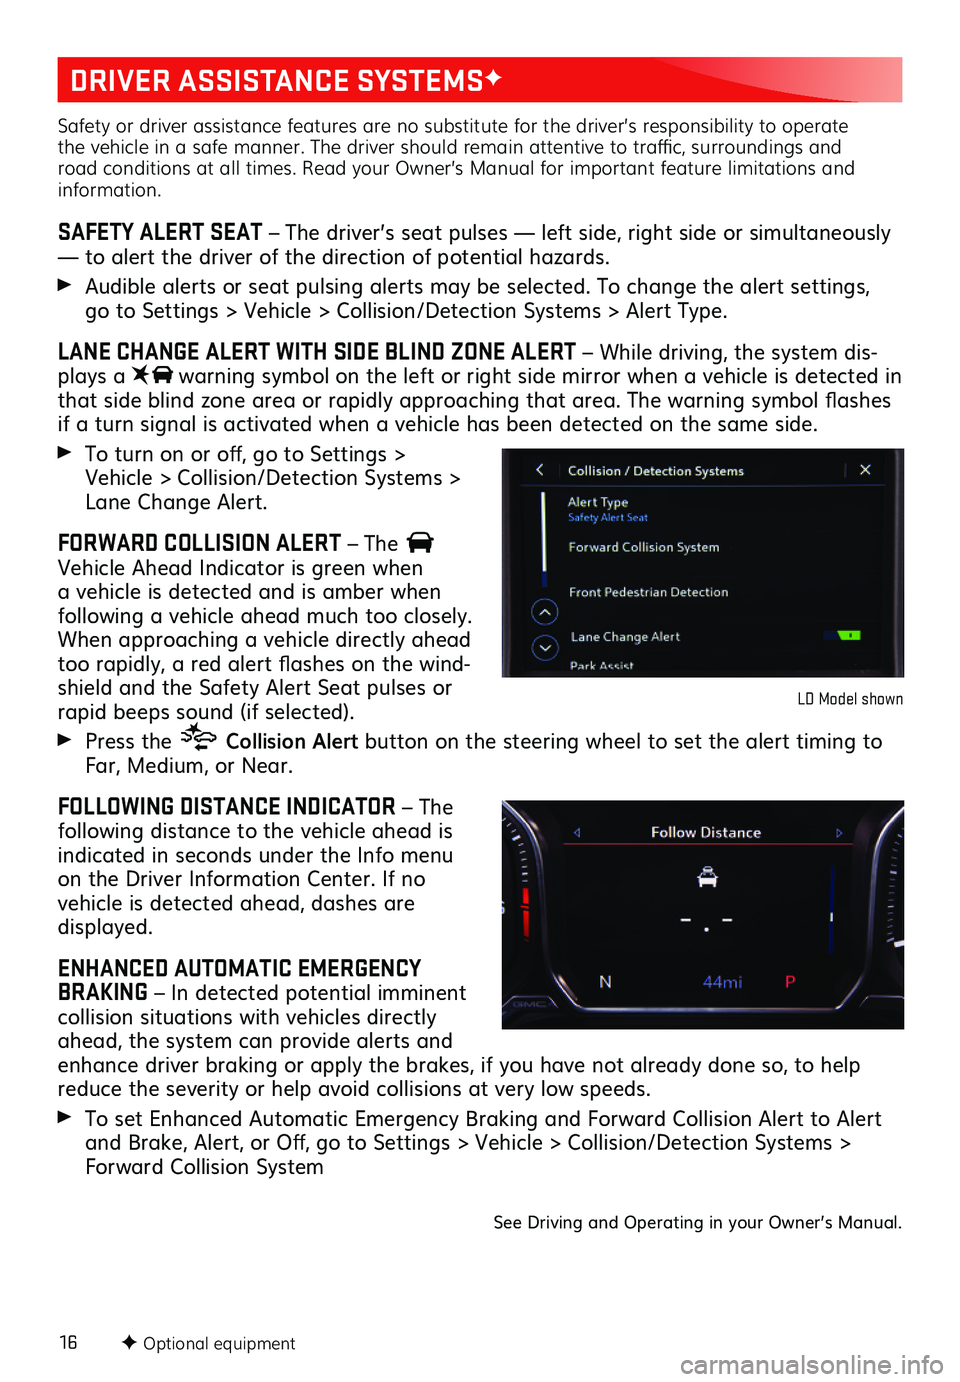
Audible alerts or seat pulsing alerts may be selected. To change the alert settings, go to Settings > Vehicle > Collision/Detection Systems > Alert Type.
LANE CHANGE ALERT WITH SIDE BLIND ZONE ALERT – While driving, the system dis-plays a warning symbol on the left or right side mirror when a vehicle is detected in that side blind zone area or rapidly approaching that area. The warning symbol flashes if a turn signal is activated when a vehicle has been detected on the same side.
To turn on or off, go to Settings > Vehicle > Collision/Detection Systems > Lane Change Alert.
FORWARD COLLISION ALERT – The Vehicle Ahead Indicator is green when a vehicle is detected and is amber when
following a vehicle ahead much too closely. When approaching a vehicle directly ahead too rapidly, a red alert flashes on the wind-shield and the Safety Alert Seat pulses or rapid beeps sound (if selected).
Press the Collision Alert button on the steering wheel to set the alert timing to Far, Medium, or Near.
FOLLOWING DISTANCE INDICATOR – The following distance to the vehicle ahead is indicated in seconds under the Info menu on the Driver Information Center. If no
vehicle is detected ahead, dashes are displayed.
ENHANCED AUTOMATIC EMERGENCY BRAKING – In detected potential imminent collision situations with vehicles directly ahead, the system can provide alerts and enhance driver braking or apply the brakes, if you have not already done so, to help reduce the severity or help avoid collisions at very low speeds.
To set Enhanced Automatic Emergency Braking and Forward Collision Alert to Alert and Brake, Alert, or Off, go to Settings > Vehicle > Collision/Detection Systems > Forward Collision System
LD Model shown
See Driving and Operating in your Owner’s Manual.
Page 17 of 24
17F Optional equipment
DRIVER ASSISTANCE SYSTEMSF
FRONT PEDESTRIAN BRAKING (LD Model) – During daytime driving, the system can detect pedestrians directly ahead up to a distance of approximately 131 ft. and displays an amber indicator. When approaching a detected pedestrian too quickly, a red alert flashes on the windshield and the Safety Alert Seat pulses or rapid beeps sound (if selected). The
system may enhance driver braking or automatically brake the vehicle, if you have not already done so.
To set to Alert and Brake, Alert, or Off, go to Settings > Vehicle > Collision/Detection Systems > Front Pedestrian Detection.
LANE KEEP ASSIST WITH LANE DEPARTURE WARNING (LD Model) – The system may help you avoid collisions due to unintentional lane departures. The Lane Keep Assist indicator is green if the system is available to assist. If the vehicle approaches a detect-ed lane marking without using a turn signal in that direction, the system may assist by gently turning the steering wheel and displaying an amber .
If active driver steering is not detected, the amber may flash and the Safety Alert Seat may pulse or beeps may sound (if selected) on the side of the departure direction as the lane marking is crossed. The Lane Keep Assist system does not continuously steer the vehicle; the driver needs to steer and be in complete control of the vehicle.
To turn on or off, press the Lane Keep Assist button on the center of the instrument panel.
LANE DEPARTURE WARNING (HD Model) – When crossing a detected lane marking without using a turn signal in that direction, the system flashes an amber indicator on the instrument cluster and the Safety Alert Seat pulses or beeps sound (if selected) on the side of the lane departure direction.
To turn on or off, press the Lane Departure Warning button on the center of the instrument panel.
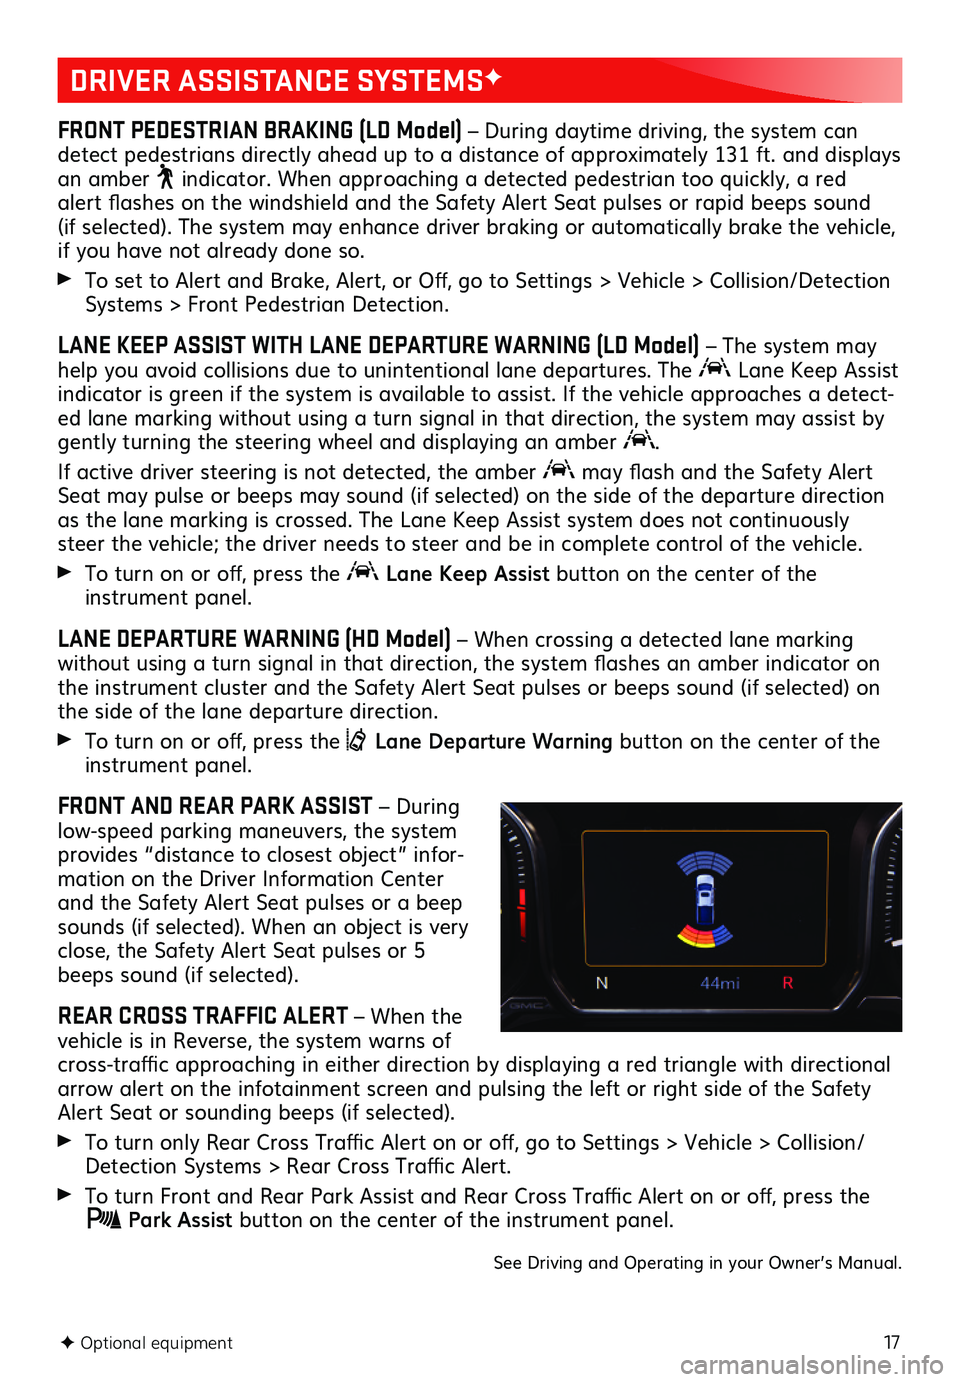
FRONT AND REAR PARK ASSIST – During low-speed parking maneuvers, the system provides “distance to closest object” infor-mation on the Driver Information Center and the Safety Alert Seat pulses or a beep sounds (if selected). When an object is very close, the Safety Alert Seat pulses or 5 beeps sound (if selected).
REAR CROSS TRAFFIC ALERT – When the vehicle is in Reverse, the system warns of cross-traffic approaching in either direction by displaying a red triangle with directional arrow alert on the infotainment screen and pulsing the left or right side of the Safety Alert Seat or sounding beeps (if selected).
To turn only Rear Cross Traffic Alert on or off, go to Settings > Vehicle > Collision/Detection Systems > Rear Cross Traffic Alert.
To turn Front and Rear Park Assist and Rear Cross Traffic Alert on or off, press the Park Assist button on the center of the instrument panel.
See Driving and Operating in your Owner’s Manual.
Page 18 of 24
18
REAR VISION CAMERA/SURROUND VISIONF
REAR VISION CAMERA
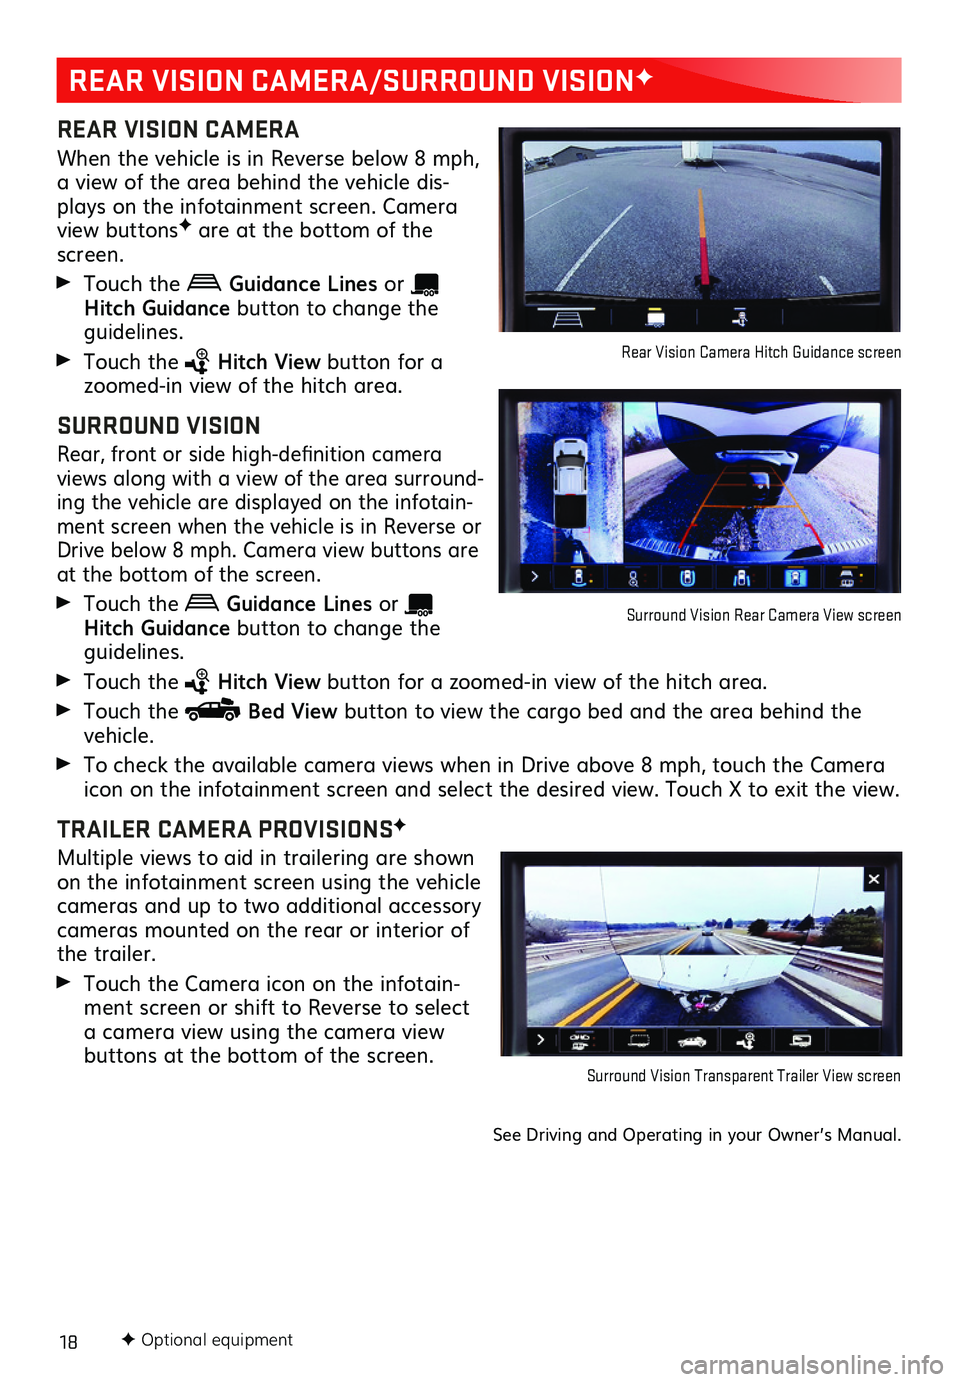
When the vehicle is in Reverse below 8 mph, a view of the area behind the vehicle dis-plays on the infotainment screen. Camera view buttonsF are at the bottom of the screen.
Touch the Guidance Lines or Hitch Guid ance button to change the guidelines.
Touch the Hitch View button for a zoomed-in view of the hitch area.
SURROUND VISION
Rear, front or side high-definition
camera views along with a view of the area surround-ing the vehicle are displayed on the infotain-ment screen when the vehicle is in Reverse or Drive below 8 mph. Camera view
buttons are at the bottom of the screen.
Touch the Guidance Lines or Hitch Guidance button to change the guidelines.
Touch the Hitch View button for a zoomed-in view of the hitch area.
Touch the Bed View button to view the cargo bed and the area behind the vehicle.
To check the available camera views when in Drive above 8 mph, touch the Camera icon on the
infotainment screen and select the desired view. Touch X to exit the view.
TRAILER CAMERA PROVISIONSF
Multiple views to aid in trailering are shown on the infotainment screen using the vehicle cameras and up to two additional accessory cameras mounted on the rear or interior of the trailer.
Touch the Camera icon on the infotain-ment screen or shift to Reverse to select a camera view using the camera view buttons at the bottom of the screen.
See Driving and Operating in your Owner’s Manual.
Surround Vision Transparent Trailer View screen
Rear Vision Camera Hitch Guidance screen
Surround Vision Rear Camera View screen
F Optional equipment
Page 19 of 24
19
CRUISE CONTROLF
SETTING CRUISE CONTROL
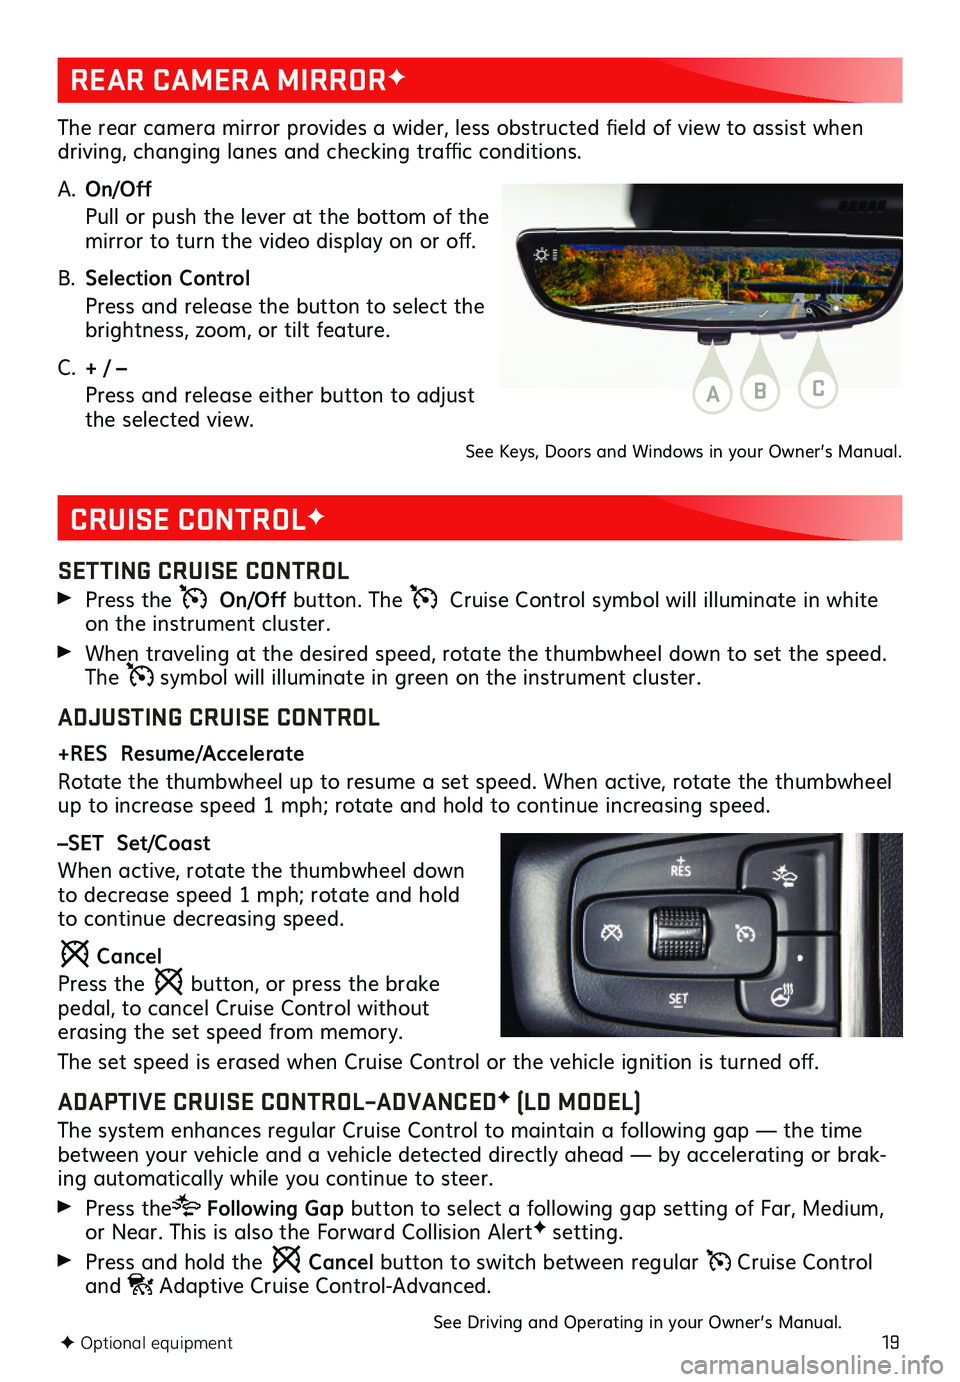
Press the On/Off button. The Cruise Control symbol will illuminate in white on the instrument cluster.
When traveling at the desired speed, rotate the thumbwheel down to set the speed. The symbol will illuminate in green on the instrument cluster.
ADJUSTING CRUISE CONTROL
+RES Resume/Accelerate
Rotate the thumbwheel up to resume a set speed. When active, rotate the thumbwheel up to increase speed 1 mph; rotate and hold to continue increasing speed.
–SET Set/Coast
When active, rotate the thumbwheel down to decrease speed 1 mph; rotate and hold to continue decreasing speed.
Cancel
Press the button, or press the brake pedal, to cancel Cruise Control without erasing the set speed from memory.
The set speed is erased when Cruise Control or the vehicle ignition is turned off.
ADAPTIVE CRUISE CONTROL–ADVANCEDF (LD MODEL)
The system enhances regular Cruise Control to maintain a following gap — the time between your vehicle and a vehicle detected directly ahead — by accelerating or brak-ing automatically while you continue to steer.
Press the Following Gap button to select a following gap setting of Far, Medium, or Near. This is also the Forward Collision AlertF setting.
Press and hold the Cancel button to switch between regular Cruise Control and Adaptive Cruise Control-Advanced.
See Driving and Operating in your Owner’s Manual.
REAR CAMERA MIRRORF
The rear camera mirror provides a wider, less obstructed field of view to assist when driving, changing lanes and checking traffic conditions.
A. On/Off
Pull or push the lever at the bottom of the mirror to turn the video display on or off.
B. Selection Control
Press and release the button to select the brightness, zoom, or tilt feature.
C. + / –
Press and release either button to adjust the selected view.
See Keys, Doors and Windows in your Owner’s Manual.
ABC
F Optional equipment
Page 20 of 24
20F Optional equipment
HILL DESCENT CONTROLF
PARK GRADE HOLD ASSIST
Hill Descent Control sets and maintains vehicle speed from 1–14 mph while descending a steep incline in a forward or reverse gear.
1. Press the Hill Descent Control button on the center of the instrument panel. Vehicle speed must be below 31 mph to enable the system. The Hill Descent Control symbol will illuminate on the instrument cluster.
2. Increase or decrease speed by applying the accelerator or brake pedal or use the Cruise Control +/– buttons on the steering wheel. The adjusted speed becomes the new set speed. The symbol flashes when the system is actively applying the brakes to maintain vehicle speed.
See Driving and Operating in your Owner’s Manual.
Park Grade Hold Assist enhances hill hold by using braking effort at all four wheels to help keep the truck in place for an extended length of time.
See Driving and Operating in your Owner’s Manual.
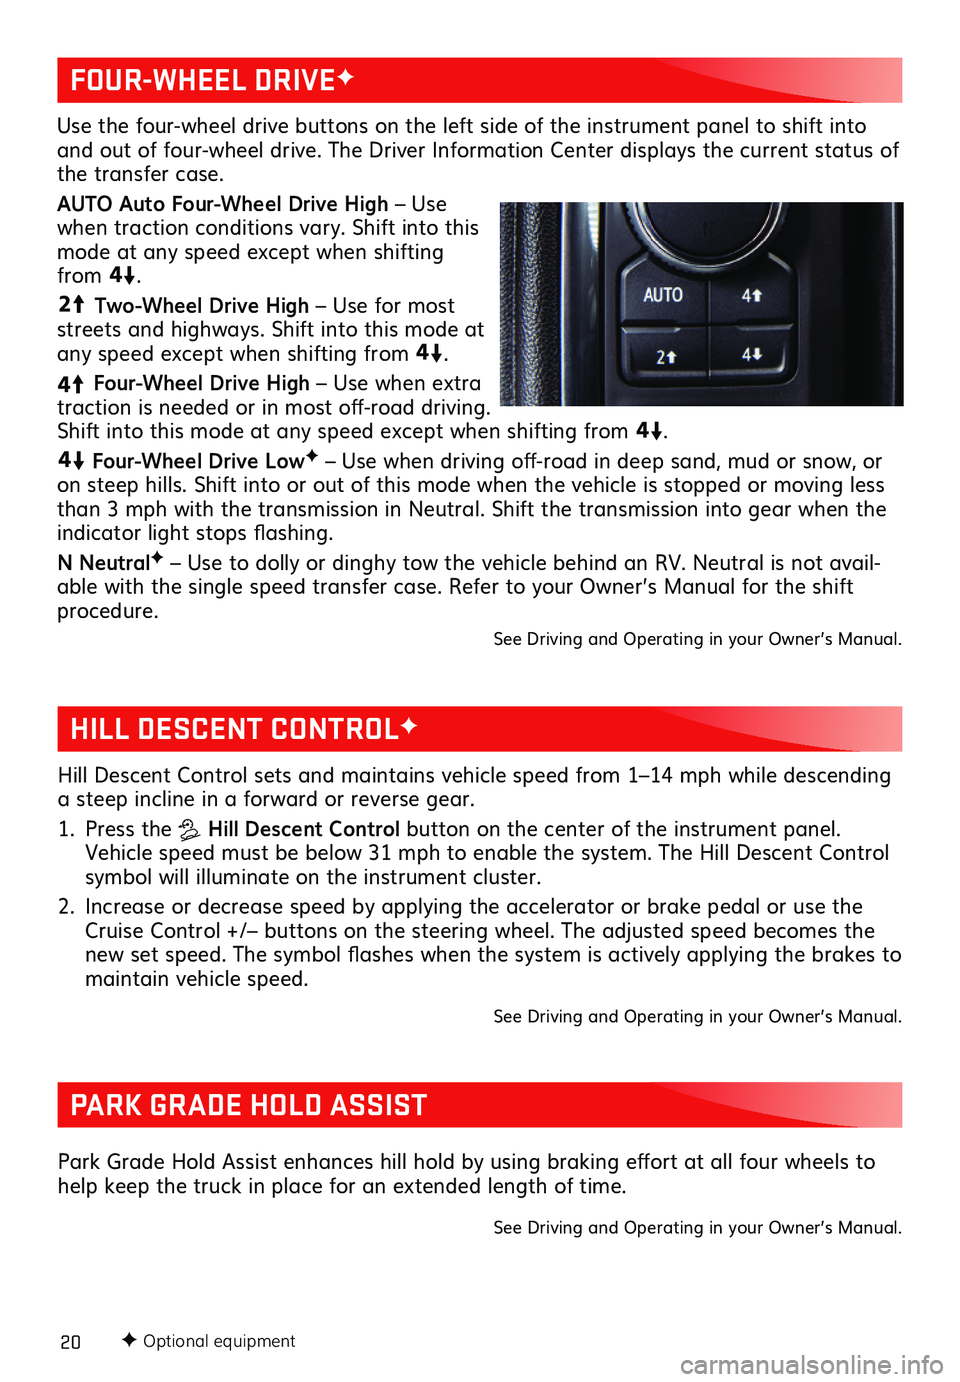
Use the four-wheel drive buttons on the left side of the instrument panel to shift into and out of four-wheel drive. The Driver Information Center displays the current status of the transfer case.
AUTO Auto Four-Wheel Drive High – Use when traction conditions vary. Shift into this mode at any speed except when shifting from
4
4
2
.
44
2
Two-Wheel Drive High – Use for most streets and highways. Shift into this mode at any speed except when shifting from
44
2
.
4
4
2
Four-Wheel Drive High – Use when extra traction is needed or in most off-road driving. Shift into this mode at any speed except when shifting from
44
2
.
44
2
Four-Wheel Drive LowF – Use when driving off-road in deep sand, mud or snow, or on steep hills. Shift into or out of this mode when the vehicle is stopped or moving less than 3 mph with the transmission in Neutral. Shift the transmission into gear when the indicator light stops flashing.
N NeutralF – Use to dolly or dinghy tow the vehicle behind an RV. Neutral is not avail-able with the single speed transfer case. Refer to your Owner’s Manual for the shift procedure.
See Driving and Operating in your Owner’s Manual.
FOUR-WHEEL DRIVEF
Page 21 of 24
21F Optional equipment
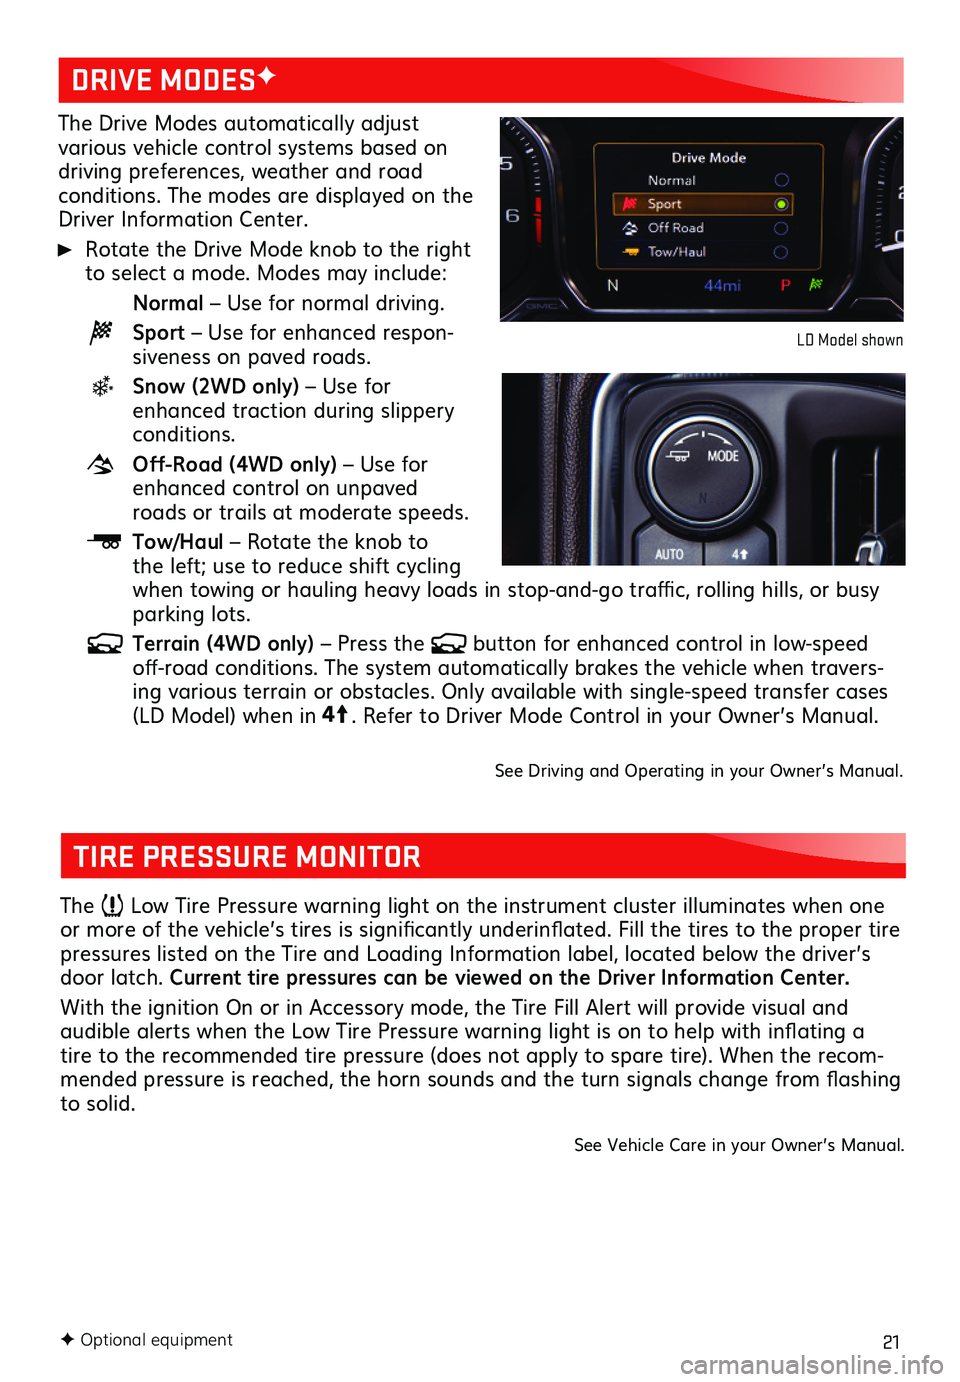
The Drive Modes automatically adjust various vehicle control systems based on driving preferences, weather and road conditions. The modes are displayed on the Driver Information Center.
Rotate the Drive Mode knob to the right to select a mode. Modes may include:
Normal – Use for normal driving.
Sport – Use for enhanced respon-siveness on paved roads.
Snow (2WD only) – Use for enhanced traction during slippery conditions.
Off-Road (4WD only) – Use for enhanced control on unpaved roads or trails at moderate speeds.
Tow/Haul – Rotate the knob to the left; use to reduce shift cycling when towing or hauling heavy loads in stop-and-go traffic, rolling hills, or busy parking lots.
Terrain (4WD only) – Press the button for enhanced control in low-speed off-road conditions. The system automatically brakes the vehicle when travers-ing various terrain or obstacles. Only available with single-speed transfer cases (LD Model) when in4
4
2
. Refer to Driver Mode Control in your Owner’s Manual.
See Driving and Operating in your Owner’s Manual.
DRIVE MODESF
LD Model shown
TIRE PRESSURE MONITOR
The Low Tire Pressure warning light on the instrument cluster illuminates when one or more of the vehicle’s tires is significantly underinflated. Fill the tires to the proper tire pressures listed on the Tire and Loading Information label, located below the driver’s door latch. Current tire pressures can be viewed on the Driver Information Center.
With the ignition On or in Accessory mode, the Tire Fill Alert will provide visual and
audible alerts when the Low Tire Pressure warning light is on to help with inflating a tire to the recommended tire pressure (does not apply to spare tire). When the recom-mended pressure is reached, the horn sounds and the turn signals change from flashing to solid.
See Vehicle Care in your Owner’s Manual.