transfer case GMC SIERRA 2020 User Guide
[x] Cancel search | Manufacturer: GMC, Model Year: 2020, Model line: SIERRA, Model: GMC SIERRA 2020Pages: 502, PDF Size: 8.04 MB
Page 232 of 502
GMC Sierra/Sierra Denali Owner Manual (GMNA-Localizing-U.S./Canada/
Mexico-13337776) - 2020 - CRC - 4/4/19
Driving and Operating 231
Shifting Into N (Neutral)
To shift into N (Neutral):1. Start the vehicle.
2. Shift the transmission to N (Neutral).
3. Shift the transfer case to 2
m.
4. Apply the parking brake and/or brake pedal.
5. Press 2
mfive times in
10 seconds until the N (Neutral)
graphic starts flashing in the
instrument cluster. When the
shift is complete, the graphic
stops flashing. If the parking
brake and/or brake pedal is not
applied within 20 seconds, the
transfer case will remain in the
original state.
6. If the transmission is not shifted into N (Neutral) or the
vehicle has not slowed to
5 km/h (3 mph) within
20 seconds, the transfer case
will remain in its original state.
This will be indicated in the
instrument cluster. Shifting Out of N (Neutral)
To shift out of N (Neutral):
1. Turn the ignition on with the engine off. See Ignition
Positions (Keyless Access)
0 208 or
Ignition Positions (Key Access)
0 210.
2. Set the parking brake. See Electric Parking Brake 0233.
3. Shift the transmission to N (Neutral).
4. Shift the transfer case to 2
m.
Transfer case shifts out of
N (Neutral) can only be made
into 2
m. When the shift to 2mis
complete, the graphic in the
instrument cluster will stop
flashing. If the transfer case
cannot complete a shift, the
graphic will return to the
previously selected setting. Single Speed Transfer Case
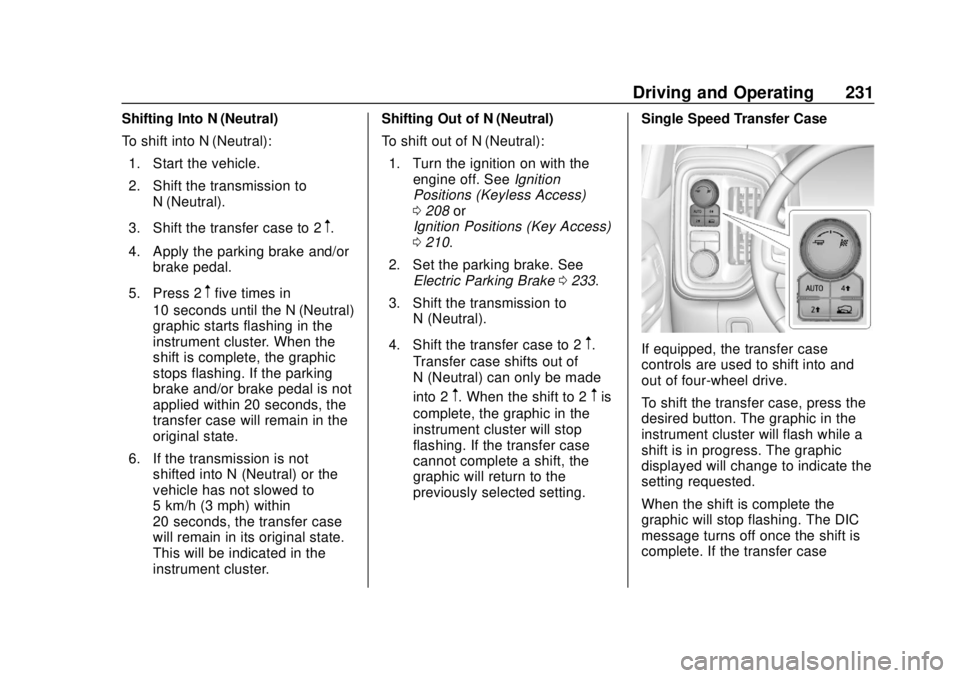
If equipped, the transfer case
controls are used to shift into and
out of four-wheel drive.
To shift the transfer case, press the
desired button. The graphic in the
instrument cluster will flash while a
shift is in progress. The graphic
displayed will change to indicate the
setting requested.
When the shift is complete the
graphic will stop flashing. The DIC
message turns off once the shift is
complete. If the transfer case
Page 237 of 502

GMC Sierra/Sierra Denali Owner Manual (GMNA-Localizing-U.S./Canada/
Mexico-13337776) - 2020 - CRC - 4/4/19
236 Driving and Operating
intended path. Trailer Sway Control
(TSC) is also on automatically when
the vehicle is started. SeeTrailer
Sway Control (TSC) 0308.
If cruise control is being used and
traction control or StabiliTrak/ESC
begins to limit wheel spin, cruise
control will disengage. Cruise
control may be turned back on when
road conditions allow.
Both systems come on
automatically when the vehicle is
started and begins to move. The
systems may be heard or felt while
they are operating or while
performing diagnostic checks. This
is normal and does not mean there
is a problem with the vehicle.
It is recommended to leave both
systems on for normal driving
conditions, but it may be necessary
to turn TCS off if the vehicle gets
stuck in sand, mud, ice, or snow.
See If the Vehicle Is Stuck 0199
and “Turning the Systems Off and
On” later in this section. When the transfer case (if equipped)
is in Four-Wheel Drive Low, the
stability system is automatically
disabled,
gcomes on, and the
appropriate message will appear on
the Driver Information Center (DIC).
Both traction control and StabiliTrak/
ESC are automatically disabled in
this condition.
The indicator light for both systems
is in the instrument cluster. This
light will:
. Flash when TCS is limiting
wheel spin.
. Flash when StabiliTrak/ESC is
activated.
. Turn on and stay on when either
system is not working.
If either system fails to turn on or to
activate, a message displays in the
Driver Information Center (DIC), and
dcomes on and stays on to
indicate that the system is inactive
and is not assisting the driver in
maintaining control. The vehicle is
safe to drive, but driving should be
adjusted accordingly.
If
dcomes on and stays on:
1. Stop the vehicle.
2. Turn the engine off and wait 15 seconds.
3. Start the engine.
Drive the vehicle. If
dcomes on
and stays on, the vehicle may need
more time to diagnose the problem.
If the condition persists, see your
dealer.
Turning the Systems Off
and On
Page 239 of 502
GMC Sierra/Sierra Denali Owner Manual (GMNA-Localizing-U.S./Canada/
Mexico-13337776) - 2020 - CRC - 4/4/19
238 Driving and Operating
If HDC is to be used for more than
three minutes or on grades steeper
than 25%, the transfer case should
be put into Four-Wheel Drive Low (4
n) to reduce the possibility of brake
overheating.
Noise from the Electronic Brake
Control Module (EBCM) is normal
when HDC is active.
When HDC is activated, the initial
HDC speed is set to the current
driving speed. It can be increased or
decreased by pressing +RES or
SET- on the steering wheel, or by
applying the accelerator or brake
pedal. This adjusted speed
becomes the new set speed.
HDC will remain enabled between
30 and 60 km/h (19 and 37 mph);
however, vehicle speed cannot be
set or maintained in this range. HDC
will automatically disable if the
vehicle speed is above 80 km/h
(50 mph) or above 60 km/h
(37 mph) for at least 30 seconds.
5must be pressed again to
re-enable HDC. HDC may disable
after an extended period of use. If this happens, HDC will require
time to cool down. The length of
time HDC remains active depends
on road conditions, grade, set
speed, vehicle loading, and outside
temperature.
When enabled, if the vehicle speed
is above 30 km/h (19 mph) and
below 60 km/h (37 mph), a DIC
message will display.
Driver Mode Control
This feature adds a sportier feel,
provides a more comfortable ride,
or assists in different weather
conditions or terrain. Depending on
the option package, available
features, and mode selected; the
suspension, steering, and
powertrain will change settings to
achieve the desired mode
characteristics. If the vehicle is
equipped with magnetic ride control,
selecting the various Driver Modes
enhances the ride performance for
the road conditions and the
selected mode.
Mode availability is dependent upon
vehicle trim level, region, and
optional features.
Not all drive modes are available
on. 1500 series vehicles may have
Normal, Sport, Off Road, Terrain,
and Tow Haul. 2500/3500 series
vehicles may have Normal, Off
Road, and Tow/Haul.
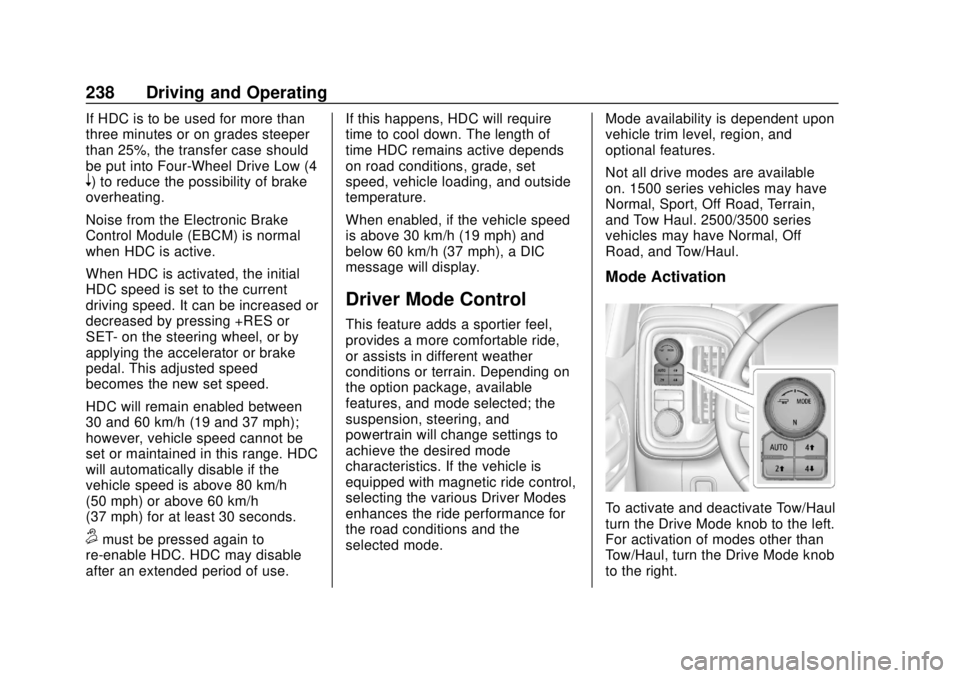
Mode Activation
To activate and deactivate Tow/Haul
turn the Drive Mode knob to the left.
For activation of modes other than
Tow/Haul, turn the Drive Mode knob
to the right.
Page 240 of 502

GMC Sierra/Sierra Denali Owner Manual (GMNA-Localizing-U.S./Canada/
Mexico-13337776) - 2020 - CRC - 4/4/19
Driving and Operating 239
Vehicles with the MODE graphic on
the knob will have a menu selection
screen in the instrument cluster to
select the desired mode. When the
Drive Mode knob is turned to the
right, the mode list will display and
activate the next available mode.If equipped, select Terrain Mode by
pressing the
gbelow the 4m
transfer case button.
Modes:
Normal Mode
Use for normal city and highway
driving to provide a smooth, soft
ride. This mode provides a balanced
setting between comfort and
handling. This is the standard mode
and when selected, there is no
indicator in the instrument cluster.Sport Mode
Use where road conditions or
personal preference demand a more
controlled response.
When you enter this mode you will
immediately feel a down shift. In this
mode, the vehicle also monitors
driving behaviors and automatically
enables Performance Shift Features
when spirited driving is detected.
These features maintain lower
transmission gears to increase
available engine braking and
improve acceleration response. The
vehicle will exit these features and
return to normal operation after a
short period when no spirited driving
is detected. The steering will
change to provide more precise
control. If the vehicle has Magnetic
Ride Control, the suspension will
change to provide better cornering
performance.
When selected, the Sport Mode light
displays in the instrument cluster.
Page 242 of 502
GMC Sierra/Sierra Denali Owner Manual (GMNA-Localizing-U.S./Canada/
Mexico-13337776) - 2020 - CRC - 4/4/19
Driving and Operating 241
Use when:
.Traveling on very rough roads at
very low speeds, such as a
two-track or heavily rutted road.
. Traveling slowly in grassy fields.
. Pulling a boat out of the water
on a trailer.
. Using the vehicle for public
off-road recreational driving. See
Off-Road Driving 0191 and
Hill and Mountain Roads 0197.
When in Terrain Mode, the vehicle
will shift automatically but may hold
a lower gear longer to maximize
engine torque. The steering will
change to provide more precise
control. A unique pedal map,
transmission shift pattern, and rpm
control are utilized to give better
control at lower speeds and over
rough terrain. When the vehicle
comes to a stop, Vehicle Hold is
engaged. TCS will be optimized for
maximum torque transfer across
axles, and Active Braking During Lift
Throttle will be engaged. Active Braking During Lift Throttle:
.
Automatically applies light
braking, similar to heavy engine
braking of four-wheel-drive low.
. Applies light braking in D (Drive)
until the vehicle is at idle
speeds. In Manual L1 and
Manual L2, moderate braking
may stop the vehicle.
. Reduces trailer braking.
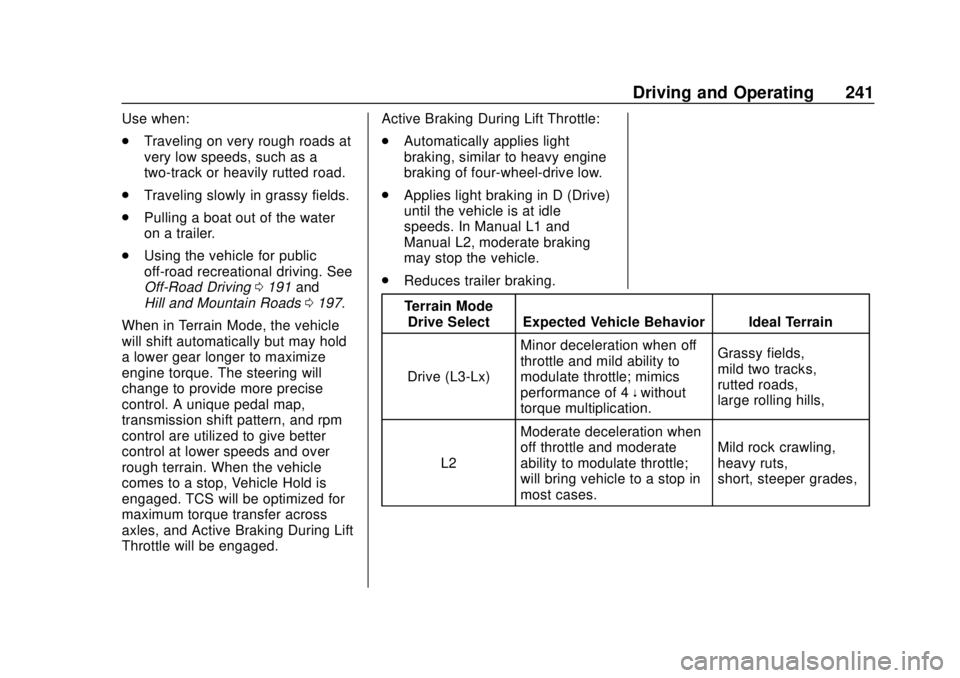
Terrain Mode Drive Select Expected Vehicle Behavior Ideal Terrain
Drive (L3-Lx) Minor deceleration when off
throttle and mild ability to
modulate throttle; mimics
performance of 4
nwithout
torque multiplication. Grassy fields,
mild two tracks,
rutted roads,
large rolling hills,
L2 Moderate deceleration when
off throttle and moderate
ability to modulate throttle;
will bring vehicle to a stop in
most cases. Mild rock crawling,
heavy ruts,
short, steeper grades,
Page 243 of 502

GMC Sierra/Sierra Denali Owner Manual (GMNA-Localizing-U.S./Canada/
Mexico-13337776) - 2020 - CRC - 4/4/19
242 Driving and Operating
Terrain ModeDrive Select Expected Vehicle Behavior Ideal Terrain
L1 Significant deceleration when
off throttle and significant
ability to modulate throttle;
will bring vehicle to a stop in
most cases.
Rock crawling downhill
Active Braking During Lift Throttle
will reduce the back and forth
between the accelerator and brake
pedals.
Vehicle Hold Features:
. When the vehicle comes to a
stop on an incline grade in
forward gear or on a decline
grade in reverse gear, Vehicle
Hold is engaged until the
accelerator pedal is pressed.
. When the vehicle is in forward
gear on a decline, the vehicle is
allowed to creep down the hill
when the brake pedal is
released without pressing the accelerator pedal. The vehicle
will also creep forward on flat
ground.
. If the driver seat belt is removed
and the driver door is opened
while the vehicle is being held,
EPB will be engaged.
. EPB will engage if the vehicle is
held for an extended period.
Terrain Mode is only available on
vehicles equipped with the single
speed transfer case.
Terrain Mode can only be
active when:
. Vehicle speed is less than
80 km/h (50 mph).
. The transfer case is in 4
m. Frequent use of this mode may
cause brake wear due to the light
braking.
The vehicle will automatically exit
the mode if the brakes get too hot.
Terrain Mode can be turned back on
after the brakes have cooled.
When Terrain Mode is selected:
.
Auto Engine Start/Stop will be
disabled.
. The Terrain Mode indicator
displays on the instrument
cluster.
Limited-Slip Differential
If equipped, the limited-slip
differential can give more traction on
snow, mud, ice, sand, or gravel.
It works like a standard axle most of
the time, but when traction is low,
this feature allows the drive wheel
with the most traction to move the
vehicle. For vehicles with the
limited-slip differential, driven under
severe conditions, the rear axle fluid
should be changed. See
Maintenance Schedule 0442.
Page 362 of 502
GMC Sierra/Sierra Denali Owner Manual (GMNA-Localizing-U.S./Canada/
Mexico-13337776) - 2020 - CRC - 4/10/19
Vehicle Care 361
For vehicles equipped with the Stop/
Start system:1. Install the negative battery cable to the battery
sensor stud.
2. Install the negative battery cable nut to the battery sensor
stud and tighten.
3. Turn the ignition on.
For vehicles not equipped with the
Stop/Start system: 1. Install the negative battery cable clamp to the negative
battery post.
2. Tighten the negative battery cable nut.
3. Turn the ignition on.
Four-Wheel Drive
Transfer Case
When to Check Lubricant
Refer to Maintenance Schedule
0 442 to determine when to check
the lubricant.
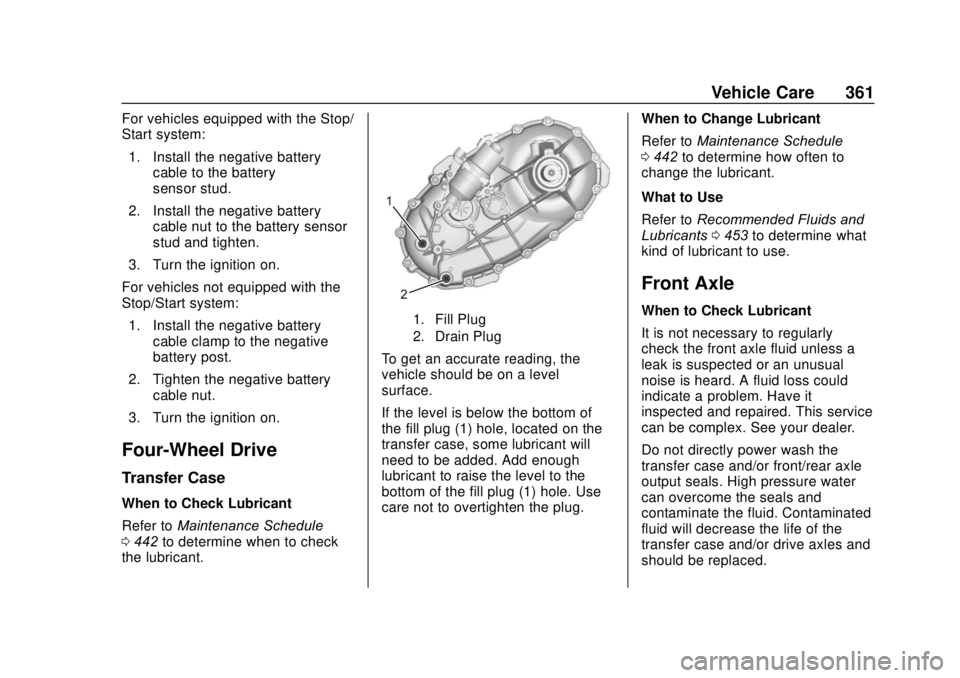
1. Fill Plug
2. Drain Plug
To get an accurate reading, the
vehicle should be on a level
surface.
If the level is below the bottom of
the fill plug (1) hole, located on the
transfer case, some lubricant will
need to be added. Add enough
lubricant to raise the level to the
bottom of the fill plug (1) hole. Use
care not to overtighten the plug. When to Change Lubricant
Refer to
Maintenance Schedule
0 442 to determine how often to
change the lubricant.
What to Use
Refer to Recommended Fluids and
Lubricants 0453 to determine what
kind of lubricant to use.
Front Axle
When to Check Lubricant
It is not necessary to regularly
check the front axle fluid unless a
leak is suspected or an unusual
noise is heard. A fluid loss could
indicate a problem. Have it
inspected and repaired. This service
can be complex. See your dealer.
Do not directly power wash the
transfer case and/or front/rear axle
output seals. High pressure water
can overcome the seals and
contaminate the fluid. Contaminated
fluid will decrease the life of the
transfer case and/or drive axles and
should be replaced.
Page 363 of 502
GMC Sierra/Sierra Denali Owner Manual (GMNA-Localizing-U.S./Canada/
Mexico-13337776) - 2020 - CRC - 4/10/19
362 Vehicle Care
Rear Axle
When to Check Lubricant
It is not necessary to regularly
check the rear axle fluid unless a
leak is suspected or an unusual
noise is heard. A fluid loss could
indicate a problem. Have it
inspected and repaired. This service
can be complex. See your dealer.
Do not directly power wash the
transfer case and/or front/rear axle
output seals. High pressure water
can overcome the seals and
contaminate the fluid. Contaminated
fluid will decrease the life of the
transfer case and/or drive axles and
should be replaced.
Noise Control System
NOISE EMISSIONS
WARRANTY
General Motors LLC, warrants to the
first person who purchases this
vehicle for purposes other than
resale and to each subsequent
purchaser that this vehicle as
manufactured by General MotorsLLC, was designed, built and
equipped to conform at the time it
left General Motors LLC’s control
with all applicable U.S. EPA Noise
Control Regulations. This warranty
covers this vehicle as designed,
built and equipped by General
Motors LLC, and is not limited to
any particular part, component or
system of the vehicle manufactured
by General Motors LLC. Defects in
design, assembly or in any part,
component or system of the vehicle
as manufactured by General Motors
LLC, which, at the time it left
General Motors LLC’
s control,
caused noise emissions to exceed
Federal standards, are covered by
this warranty for the life of the
vehicle.
TAMPERING WITH NOISE
CONTROL SYSTEM
PROHIBITED
Federal law prohibits the following
acts or the causing thereof:
1. The removal or rendering inoperative by any person,
other than for purposes of maintenance, repair,
or replacement, of any device
or element of design
incorporated into any new
vehicle for the purpose of noise
control prior to its sale or
delivery to the ultimate
purchaser or while it is in
use; or
2. the use of the vehicle after such device or element of
design has been removed or
rendered inoperative by any
person.
Among those acts presumed to
constitute tampering are the acts
listed below.
Insulation:
Removal of the noise shields or any
undercab insulation.
Engine:
Removal or rendering engine speed
governor, if so equipped, inoperative
so as to allow engine speed to
exceed manufacturer specifications.
Modification of the engine control
system or calibration.
Page 374 of 502
GMC Sierra/Sierra Denali Owner Manual (GMNA-Localizing-U.S./Canada/
Mexico-13337776) - 2020 - CRC - 4/10/19
Vehicle Care 373
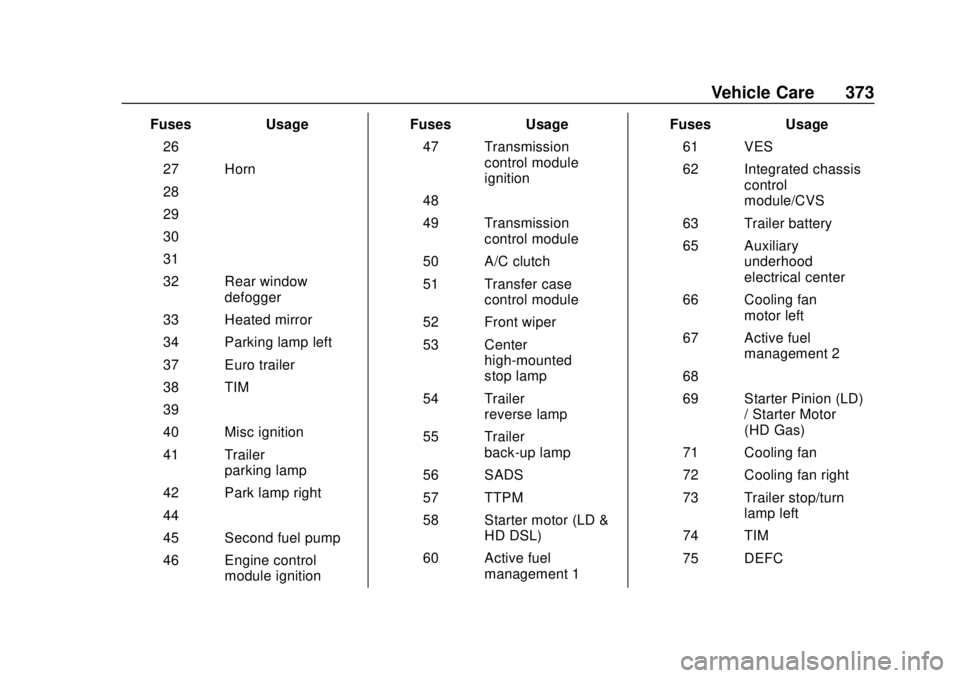
FusesUsage
26 –
27 Horn
28 –
29 –
30 –
31 –
32 Rear window defogger
33 Heated mirror
34 Parking lamp left
37 Euro trailer
38 TIM
39 –
40 Misc ignition
41 Trailer parking lamp
42 Park lamp right
44 –
45 Second fuel pump
46 Engine control module ignition Fuses
Usage
47 Transmission control module
ignition
48 –
49 Transmission control module
50 A/C clutch
51 Transfer case control module
52 Front wiper
53 Center high-mounted
stop lamp
54 Trailer reverse lamp
55 Trailer back-up lamp
56 SADS
57 TTPM
58 Starter motor (LD & HD DSL)
60 Active fuel management 1 Fuses
Usage
61 VES
62 Integrated chassis control
module/CVS
63 Trailer battery
65 Auxiliary underhood
electrical center
66 Cooling fan motor left
67 Active fuel management 2
68 –
69 Starter Pinion (LD) / Starter Motor
(HD Gas)
71 Cooling fan
72 Cooling fan right
73 Trailer stop/turn lamp left
74 TIM
75 DEFC
Page 407 of 502
GMC Sierra/Sierra Denali Owner Manual (GMNA-Localizing-U.S./Canada/
Mexico-13337776) - 2020 - CRC - 4/10/19
406 Vehicle Care
{Warning
Lifting a vehicle and getting under
it to do maintenance or repairs is
dangerous without the
appropriate safety equipment and
training. If a jack is provided with
the vehicle, it is designed only for
changing a flat tire. If it is used for
anything else, you or others could
be badly injured or killed if the
vehicle slips off the jack. If a jack
is provided with the vehicle, only
use it for changing a flat tire.
If a tire goes flat, avoid further tire
and wheel damage by driving slowly
to a level place, well off the road,
if possible. Turn on the hazard
warning flashers. See Hazard
Warning Flashers 0169.
{Warning
Changing a tire can be
dangerous. The vehicle can slip
off the jack and roll over or fall
causing injury or death. Find a
level place to change the tire. To
help prevent the vehicle from
moving:
1. Set the parking brake firmly.
2. Put the shift lever inP (Park).
3. For vehicles with four-wheel drive with an N (Neutral)
transfer case position, be
sure the transfer case is in a
drive gear —not in
N (Neutral).
4. Turn off the engine and do not restart while the vehicle
is raised.
5. Do not allow passengers to remain in the vehicle.
(Continued)
Warning (Continued)
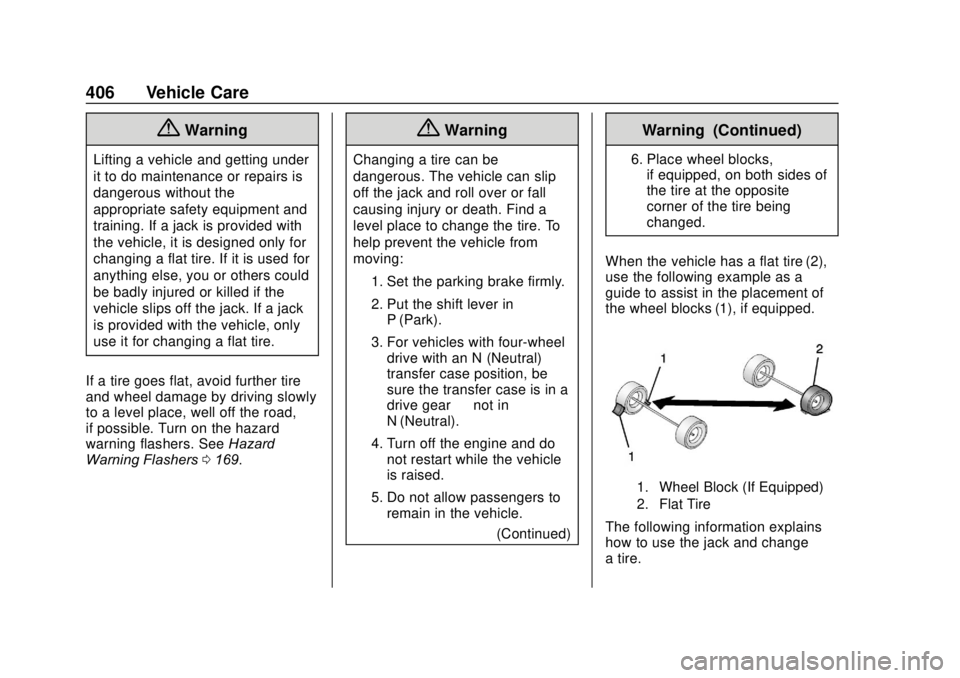
6. Place wheel blocks,if equipped, on both sides of
the tire at the opposite
corner of the tire being
changed.
When the vehicle has a flat tire (2),
use the following example as a
guide to assist in the placement of
the wheel blocks (1), if equipped.
1. Wheel Block (If Equipped)
2. Flat Tire
The following information explains
how to use the jack and change
a tire.