warning light GMC SIERRA 2020 Workshop Manual
[x] Cancel search | Manufacturer: GMC, Model Year: 2020, Model line: SIERRA, Model: GMC SIERRA 2020Pages: 502, PDF Size: 8.04 MB
Page 306 of 502
GMC Sierra/Sierra Denali Owner Manual (GMNA-Localizing-U.S./Canada/
Mexico-13337776) - 2020 - CRC - 4/4/19
Driving and Operating 305
available power output to the trailer
brakes can be adjusted to a wide
range of trailering situations.
The ITBC system is integrated with
the vehicle’s brake, antilock brake,
and StabiliTrak/Electronic Stability
Control (ESC) systems. In trailering
conditions that cause the vehicle’s
antilock brake or StabiliTrak/ESC
systems to activate, power sent to
the trailer's brakes will be
automatically adjusted to minimize
trailer wheel lock-up. This does not
imply that the trailer has
StabiliTrak/ESC.
If the vehicle’s brake, antilock brake,
or StabiliTrak/ESC systems are not
functioning properly, the ITBC
system may not function fully or at
all. Make sure all of these systems
are fully operational to allow the
ITBC system to function properly.
The ITBC system is powered
through the vehicle's electrical
system. Turning the ignition off will
also turn off the ITBC system. The
ITBC system is fully functional only
when the ignition is in on.{Warning
Connecting a trailer that has an
air brake system may result in
reduced or complete loss of trailer
braking, including increased
stopping distance or trailer
instability which could result in
serious injury, death, or property
damage. Only use the ITBC
system with electric or electric
over hydraulic trailer brake
systems.
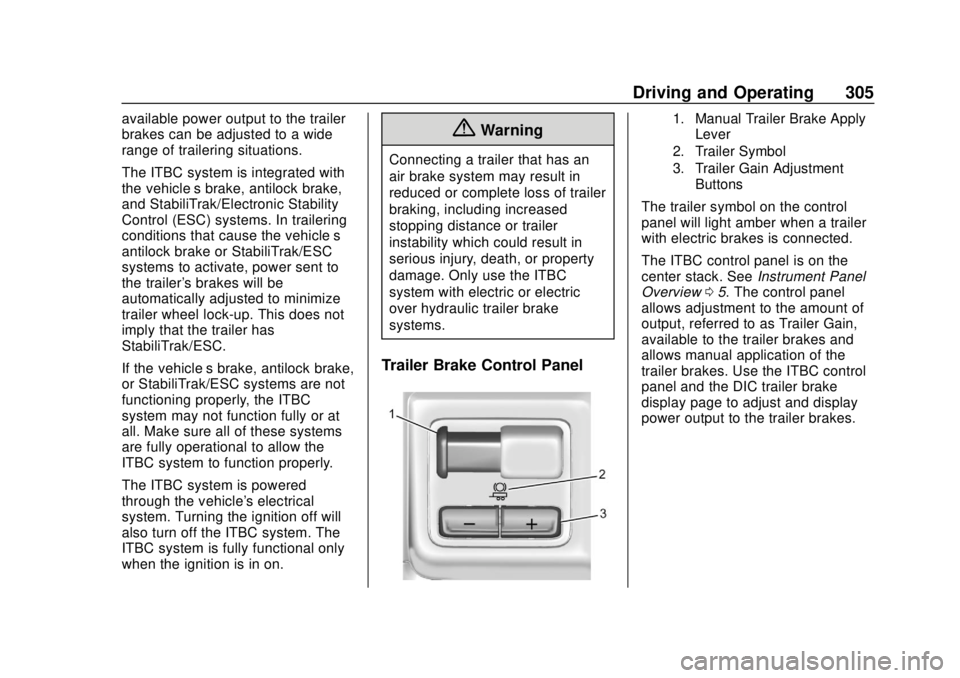
Trailer Brake Control Panel
1. Manual Trailer Brake Apply
Lever
2. Trailer Symbol
3. Trailer Gain Adjustment Buttons
The trailer symbol on the control
panel will light amber when a trailer
with electric brakes is connected.
The ITBC control panel is on the
center stack. See Instrument Panel
Overview 05. The control panel
allows adjustment to the amount of
output, referred to as Trailer Gain,
available to the trailer brakes and
allows manual application of the
trailer brakes. Use the ITBC control
panel and the DIC trailer brake
display page to adjust and display
power output to the trailer brakes.
Page 309 of 502

GMC Sierra/Sierra Denali Owner Manual (GMNA-Localizing-U.S./Canada/
Mexico-13337776) - 2020 - CRC - 4/4/19
308 Driving and Operating
To determine whether the electrical
fault is on the vehicle side or trailer
side of the trailer wiring harness
connection:1. Disconnect the trailer wiring harness from the vehicle.
2. Turn the ignition off.
3. Wait 10 seconds, then turn the ignition back to RUN.
4. If the CHECK TRAILER WIRING message reappears,
the electrical fault is on the
vehicle side.
If the CHECK TRAILER WIRING
message only reappears when
connecting the trailer wiring harness
to the vehicle, the electrical fault is
on the trailer side.
SERVICE TRAILER BRAKE
SYSTEM: This message will display
when there is a problem with the
ITBC system. If this message
continues over multiple ignition
cycles, have the vehicle serviced.
If either the CHECK TRAILER
WIRING or SERVICE TRAILER
BRAKE SYSTEM message displays while driving, the ITBC system may
not be fully functional or may not
function at all. When traffic
conditions allow, carefully pull the
vehicle over to the side of the road
and turn the ignition off. Check the
wiring connection to the trailer and
turn the ignition back on. If either of
these messages continues, either
the vehicle or trailer needs service.
A GM dealer may be able to
diagnose and repair problems with
the trailer. However, any diagnosis
and repair of the trailer is not
covered under the vehicle warranty.
Contact your trailer dealer for
assistance with trailer repairs and
trailer warranty information.
Trailer Sway
Control (TSC)
Vehicles with StabiliTrak/Electronic
Stability Control (ESC) have a
Trailer Sway Control (TSC) feature.
Trailer sway is unintended
side-to-side motion of a trailer while
towing. If the vehicle is towing a
trailer and the TSC detects that
sway is increasing, the vehiclebrakes are selectively applied at
each wheel, to help reduce
excessive trailer sway. If equipped
with the Integrated Trailer Brake
Control (ITBC) system, and the
trailer has an electric brake system,
StabiliTrak/ESC may also apply the
trailer brakes.If TSC is enabled, the Traction
Control System (TCS)/StabiliTrak/
ESC warning light will flash on the
instrument cluster. Reduce vehicle
speed by gradually removing your
foot from the accelerator. If trailer
sway continues, StabiliTrak/ESC
can reduce engine torque to help
Page 311 of 502
GMC Sierra/Sierra Denali Owner Manual (GMNA-Localizing-U.S./Canada/
Mexico-13337776) - 2020 - CRC - 4/4/19
310 Driving and Operating
Warning (Continued)
.If the trailer brakes are not
operating properly at any
time, or if a DIC message
indicates problems with the
trailer connections or trailer
brakes, carefully pull the
vehicle over to the side of
the road when traffic
conditions allow.
Trailer Tires
Special Trailer (ST) tires differ from
vehicle tires. Trailer tires are
designed with stiff sidewalls to help
prevent sway and to support heavy
loads. These features can make it
difficult to determine if the trailer tire
pressures are low only based on a
visual inspection.
Always check all trailer tire
pressures before each trip when the
tires are cool. Low trailer tire
pressure is a leading cause of trailer
tire blow-outs. If the vehicle is equipped with a
trailer tire pressure monitoring
system, see the trailer tire pressure
monitoring system description and
the trailering app.
Trailer tires deteriorate over time.
The trailer tire sidewall will show the
week and year the tire was
manufactured. Many trailer tire
manufacturers recommend
replacing tires more than six
years old.
Overloading is another leading
cause of trailer tire blow-outs. Never
load your trailer with more weight
than the tires are designed to
support. The load rating is located
on the trailer tire sidewall.
Always know the maximum speed
rating for the trailer tires before
driving. This may be significantly
lower than the vehicle tire speed
rating. The speed rating may be on
the trailer tire sidewall. If the speed
rating is not shown, the default
trailer tire speed rating is 105 km/h
(65 mph).
Trailering App
Trailer Light App
If equipped, the Trailer Lights App is
on the Home Page of the
infotainment display.
Touch Start to cycle the trailer lamps
on and off to determine if they are
working. The test follows this
sequence:
1. The running lights turn on first and remain on throughout the
sequence.
2. The brake lights turn on for about two seconds.
3. The left turn signal light flashes three times.
4. The right turn signal light flashes three times.
5. The reverse lights turn on for about two seconds.
6. Steps 2–5 repeat for approximately one minute and
45 seconds, or until the test
deactivates.
Page 312 of 502
GMC Sierra/Sierra Denali Owner Manual (GMNA-Localizing-U.S./Canada/
Mexico-13337776) - 2020 - CRC - 4/4/19
Driving and Operating 311
Touch Stop to stop the test. The test
will automatically end after
one minute and 45 seconds.
The sequence also deactivates
when any of the following occur:
.The ignition is turned off.
. The transmission is shifted out
of P (Park).
. The brake pedal is pressed.
. The turn signal is activated.
. The hazard warning lights are
activated.
Trailering App
If equipped, the Trailering App is on
the Home Page of the infotainment
display.
If equipped this feature allows
profiles for connected trailers to be
created to view status, to store and
track trailer usage information, and
to set up towing assistance
features.
The Trailering App Preview will
appear when the Trailering App is
opened for the first time from the Home Page. Touch GET STARTED
in the Trailering App to go into
the app.
When a trailer is electrically
connected, there will be an option to
create a profile, use a guest profile,
or cancel. After Cancel is selected a
third time, Don’t Remind Me will
display and touching that will turn off
the trailer detection pop-up. To turn
the Trailer Detection Alert on, select
ON in the Settings tab.
When a trailer is electrically
connected and after a Trailer Profile
has been created, the trailer
detection pop-up will appear with a
list of all of the custom Trailer
Profiles made on the vehicle. To
load an existing Trailer Profile,
select one of the Trailer Profiles
listed, or load the Guest Trailer
Profile by selecting GUEST
TRAILER. Touching Cancel,
Accessory/No trailer, or shifting the
vehicle from P (Park), will select
Accessory/No trailer as the active
Trailer Profile and will dismiss the
pop- up.
Create a Trailer Profile
1. Touch Create Profile on the pop-up or touch + Add Trailer
in the Trailering App.
2. Create a name for the trailer.
3. Select the hitch type. A checklist profile will be
created based on the type
selected.
4. Select the trailer type.
A pop-up will indicate the setup is
complete. Touch DONE to complete
the process or touch TRAILER
FEATURE SETUP to set up the
Tow/Haul Mode reminder, Trailer
Tire Pressure Monitoring System,
if equipped, maintenance reminders,
or towing assistance, if equipped.
Import a Trailer Profile
A trailer profile saved to an OnStar
account can be imported to the
vehicle. 1. Touch Import Profile on the pop-up.
2. Select a trailer profile from the list.
Page 316 of 502
GMC Sierra/Sierra Denali Owner Manual (GMNA-Localizing-U.S./Canada/
Mexico-13337776) - 2020 - CRC - 4/4/19
Driving and Operating 315
Light, Reverse Lights, and Electric
Brakes, if equipped), the view will
display OK.
Connection Problem
If any of the trailer connections are
not detected, a message about the
connection issue will appear on the
Driver Information Center (DIC). The
infotainment display will also show
the connection issue in the
Connection Status view.
Diagnose View
Touch Diagnose to see more
information about the connection
problem.
This view will display the names of
the trailer connector pins, a graphic
of the trailer connector, and a
graphic of the back of the trailer.
Any connector pin that failed will be
amber color, and the location of the
corresponding connection will be
highlighted on the graphic of the
back of the trailer.The Running Lights connection may
not detect partial outages. Activate
the light test to check all trailer
lamps. See
“Light Test”following.
If the trailer is not equipped with
reverse lights or electric brakes and
you are receiving failure messages
in the DIC or on this view, turn off
the Reverse Lights Alert or the
Electric Brakes Alert setting in the
trailer ’s profile page.
Light Test
Touch Start Light Test to cycle the
trailer lights on and off to determine
if they are working. The test follows
this sequence: 1. The running lights turn on first and remain on throughout the
sequence.
2. The brake lights turn on for about two seconds.
3. The left turn signal light flashes three times.
4. The right turn signal light flashes three times. 5. The reverse lights turn on for
about two seconds.
6. Steps 2–5 repeat for approximately one minute and
45 seconds, or until the test
deactivates.
Touch Stop to stop the test. The test
will automatically end after
one minute and 45 seconds.
The sequence also deactivates
when any of the following occur:
. The ignition is turned off.
. The transmission is shifted out
of P (Park).
. The brake pedal is pressed.
. The turn signal is activated.
. The hazard warning lights are
activated.
Page 323 of 502

GMC Sierra/Sierra Denali Owner Manual (GMNA-Localizing-U.S./Canada/
Mexico-13337776) - 2020 - CRC - 4/4/19
322 Driving and Operating
reminder will appear to turn on Tow/
Haul Mode when the Trailer Profile
is active.
If Tow/Haul Mode is on and this
setting is on for a Trailer Profile, the
reminder will not appear when the
Trailer Profile is active.Conversions and
Add-Ons
Add-On Electrical
Equipment
{Warning
The Data Link Connector (DLC) is
used for vehicle service and
Emission Inspection/Maintenance
testing. SeeMalfunction Indicator
Lamp (Check Engine Light) 0138
. A device connected to the DLC
— such as an aftermarket fleet or
driver-behavior tracking device —
may interfere with vehicle
systems. This could affect vehicle
operation and cause a crash.
Such devices may also access
information stored in the vehicle’s
systems.
Caution
Some electrical equipment can
damage the vehicle or cause
components to not work and
would not be covered by the
vehicle warranty. Always check
with your dealer before adding
electrical equipment.
Add-on equipment can drain the
vehicle's 12-volt battery, even if the
vehicle is not operating.
The vehicle has an airbag system.
Before attempting to add anything
electrical to the vehicle, see
Servicing the Airbag-Equipped
Vehicle 083 and
Adding Equipment to the
Airbag-Equipped Vehicle 083.
For information on wiring auxiliary
switches, see www.gmupfitter.com
or contact your dealer.
Page 328 of 502
GMC Sierra/Sierra Denali Owner Manual (GMNA-Localizing-U.S./Canada/
Mexico-13337776) - 2020 - CRC - 4/10/19
Vehicle Care 327
Vehicle Care
General Information
General Information . . . . . . . . . . 328
California Proposition65 Warning . . . . . . . . . . . . . . . . . 329
California Perchlorate Materials Requirements . . . . . 329
Accessories and Modifications . . . . . . . . . . . . . . . . 329
Vehicle Checks
Doing Your OwnService Work . . . . . . . . . . . . . . . 330
Hood . . . . . . . . . . . . . . . . . . . . . . . . . 330
Engine Compartment Overview . . . . . . . . . . . . . . . . . . . . 332
Engine Oil . . . . . . . . . . . . . . . . . . . . 339
Engine Oil Life System . . . . . . . 341
Automatic Transmission Fluid . . . . . . . . . . . . . . . . . . . . . . . . 343
Engine Air Filter Life System . . . . . . . . . . . . . . . . . . . . . . 343
Engine Air Cleaner/Filter . . . . . . 344
Cooling System . . . . . . . . . . . . . . 346
Engine Overheating . . . . . . . . . . 351
Overheated Engine Protection Operating Mode . . . . . . . . . . . . . 352
Engine Fan . . . . . . . . . . . . . . . . . . . 353 Power Steering Fluid . . . . . . . . . 354
Washer Fluid . . . . . . . . . . . . . . . . . 354
Brakes . . . . . . . . . . . . . . . . . . . . . . . 355
Brake Pad Life System . . . . . . . 356
Brake Fluid . . . . . . . . . . . . . . . . . . . 357
Battery - North America . . . . . . 358
Four-Wheel Drive . . . . . . . . . . . . . 361
Front Axle . . . . . . . . . . . . . . . . . . . . 361
Rear Axle . . . . . . . . . . . . . . . . . . . . 362
Noise Control System . . . . . . . . 362
Starter Switch Check . . . . . . . . . 363
Automatic Transmission Shift
Lock Control Function
Check . . . . . . . . . . . . . . . . . . . . . . . 363
Ignition Transmission Lock Check . . . . . . . . . . . . . . . . . . . . . . . 363
Park Brake and P (Park) Mechanism Check . . . . . . . . . . 364
Wiper Blade Replacement . . . . 364
Windshield Replacement . . . . . 365
Gas Strut(s) . . . . . . . . . . . . . . . . . . 365
Headlamp Aiming
Headlamp Aiming . . . . . . . . . . . . 366
Bulb Replacement
Bulb Replacement . . . . . . . . . . . . 367
Halogen Bulbs . . . . . . . . . . . . . . . . 367
LED Lighting . . . . . . . . . . . . . . . . . 367 Headlamps, Front Turn Signal,
Sidemarker, and Parking
Lamps . . . . . . . . . . . . . . . . . . . . . . 367
Taillamps, Turn Signal, Stoplamps, and Back-Up
Lamps . . . . . . . . . . . . . . . . . . . . . . 368
Center High-Mounted Stoplamp (CHMSL) and
Cargo Lamp . . . . . . . . . . . . . . . . . 369
License Plate Lamp . . . . . . . . . . 369
Electrical System
Electrical System Overload . . . 370
Fuses and Circuit Breakers . . . 370
Engine Compartment Fuse Block . . . . . . . . . . . . . . . . . . . . . . . . 371
Instrument Panel Fuse
Block (Left) . . . . . . . . . . . . . . . . . 374
Instrument Panel Fuse Block (Right) . . . . . . . . . . . . . . . . . . . . . . 376
Wheels and Tires
Tires . . . . . . . . . . . . . . . . . . . . . . . . . . 379
All-Season Tires . . . . . . . . . . . . . . 379
Winter Tires . . . . . . . . . . . . . . . . . . 380
Low-Profile Tires . . . . . . . . . . . . . 380
All-Terrain Tires . . . . . . . . . . . . . . . 381
Tire Sidewall Labeling . . . . . . . . 381
Tire Designations . . . . . . . . . . . . . 383
Tire Terminology andDefinitions . . . . . . . . . . . . . . . . . . 385
Page 346 of 502
GMC Sierra/Sierra Denali Owner Manual (GMNA-Localizing-U.S./Canada/
Mexico-13337776) - 2020 - CRC - 4/10/19
Vehicle Care 345
3. Disconnect the electricalharness connector (2) from the
cover.
4. Remove the three screws on top of the cover of the housing,
then slide and lift the cover.
5. Lift and remove the engine air cleaner/filter.
6. Lightly tap and shake the engine air cleaner/filter, away
from the vehicle, to release
loose dust and dirt. Replace
the engine air filter if damaged.
7. Reverse steps 2–5 to reinstall the engine air cleaner/filter
cover housing.
8. If equipped, reset the engine air filter life system after
replacing the engine air filter.
See Engine Air Filter Life
System 0343.
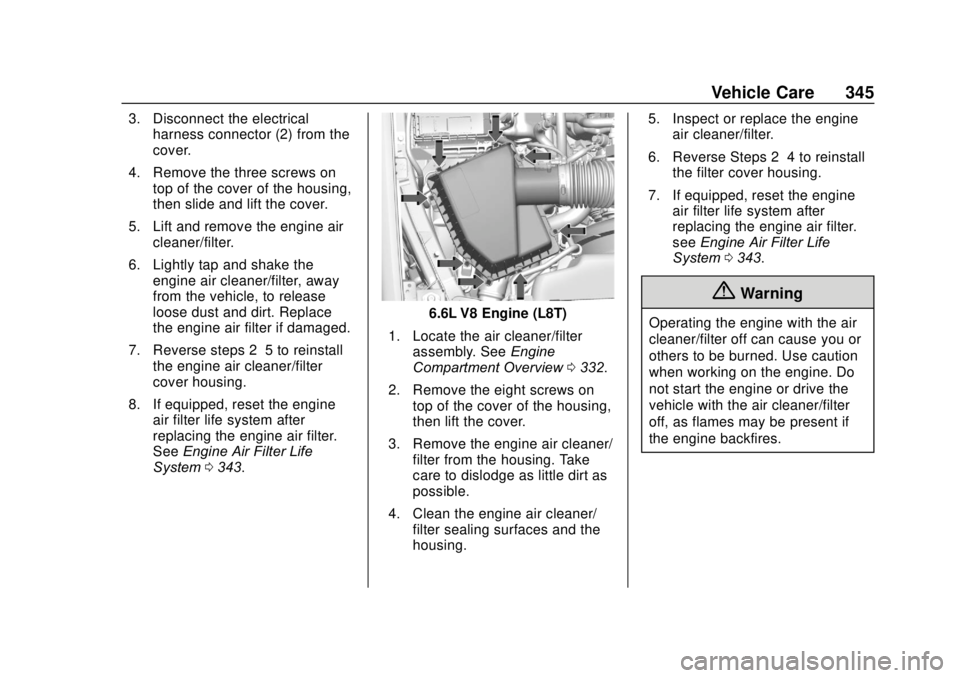
6.6L V8 Engine (L8T)
1. Locate the air cleaner/filter assembly. See Engine
Compartment Overview 0332.
2. Remove the eight screws on top of the cover of the housing,
then lift the cover.
3. Remove the engine air cleaner/ filter from the housing. Take
care to dislodge as little dirt as
possible.
4. Clean the engine air cleaner/ filter sealing surfaces and the
housing. 5. Inspect or replace the engine
air cleaner/filter.
6. Reverse Steps 2–4 to reinstall the filter cover housing.
7. If equipped, reset the engine air filter life system after
replacing the engine air filter.
see Engine Air Filter Life
System 0343.
{Warning
Operating the engine with the air
cleaner/filter off can cause you or
others to be burned. Use caution
when working on the engine. Do
not start the engine or drive the
vehicle with the air cleaner/filter
off, as flames may be present if
the engine backfires.
Page 359 of 502
GMC Sierra/Sierra Denali Owner Manual (GMNA-Localizing-U.S./Canada/
Mexico-13337776) - 2020 - CRC - 4/10/19
358 Vehicle Care
Warning (Continued)
Add brake fluid only when work is
done on the brake hydraulic
system.
When the brake fluid falls to a low
level, the brake warning light comes
on. See Brake System Warning
Light 0140.
Brake fluid absorbs water over time
which degrades the effectiveness of
the brake fluid. Replace brake fluid
at the specified intervals to prevent
increased stopping distance. See
Maintenance Schedule 0442.
What to Add
Use only GM approved DOT 3 or
DOT 4 brake fluid, as indicated on
the reservoir cap, from a clean,
sealed container. See
Recommended Fluids and
Lubricants 0453.
{Warning
The wrong or contaminated brake
fluid could result in damage to the
brake system. This could result in
the loss of braking leading to a
possible injury. Always use the
proper GM approved brake fluid.
Caution
If brake fluid is spilled on the
vehicle's painted surfaces, the
paint finish can be damaged.
Immediately wash off any painted
surface.
Battery - North America
The original equipment battery is
maintenance free. Do not remove
the cap and do not add fluid.
Refer to the replacement number
shown on the original battery label
when a new battery is needed. See
Engine Compartment Overview
0332 for battery location. Stop/Start System
Vehicles equipped with a 2.7L L3B,
3.0L LM2, 5.3L L84 or 6.2L L87 are
equipped with a Stop/Start system
to shut off the engine to help
conserve fuel. See
Stop/Start
System 0213.
Vehicles with the Stop/Start system
have an Absorbed Glass Mat (AGM)
12-volt battery. Installation of a
standard 12-volt battery will result in
reduced 12-volt battery life. When
using a 12-volt battery charger on
the 12-volt AGM battery, some
chargers have an AGM battery
setting on the charger. If available,
use the AGM setting on the charger
to limit charge voltage to 14.8 volts.
Follow the charger manufacturer ’s
instructions.{Warning
WARNING: Battery posts,
terminals, and related
accessories contain lead and lead
compounds, chemicals known to
(Continued)
Page 368 of 502
GMC Sierra/Sierra Denali Owner Manual (GMNA-Localizing-U.S./Canada/
Mexico-13337776) - 2020 - CRC - 4/10/19
Vehicle Care 367
Bulb Replacement
For the proper type of replacement
bulbs, or any bulb changing
procedure not listed in this section,
contact your dealer.
Caution
Do not replace incandescent
bulbs with aftermarket LED
replacement bulbs. This can
cause damage to the vehicle
electrical system.
Halogen Bulbs
{Warning
Halogen bulbs have pressurized
gas inside and can burst if you
drop or scratch the bulb. You or
others could be injured. Be sure
to read and follow the instructions
on the bulb package.
LED Lighting
This vehicle has several LED lamps.
For replacement of any LED lighting
assembly, contact your dealer.
Headlamps, Front Turn
Signal, Sidemarker, and
Parking Lamps
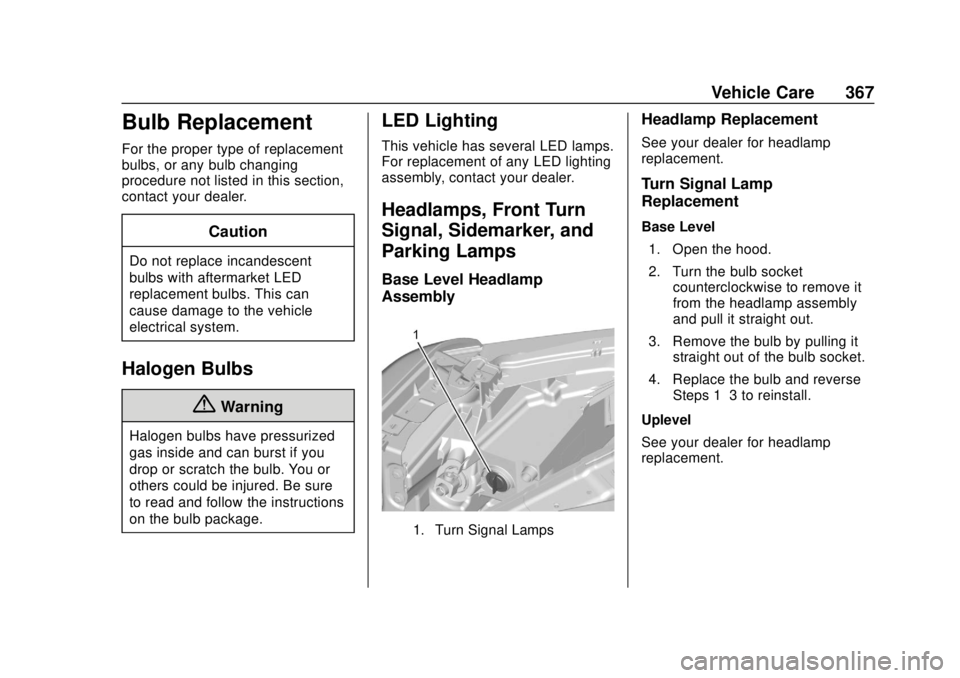
Base Level Headlamp
Assembly
1. Turn Signal Lamps
Headlamp Replacement
See your dealer for headlamp
replacement.
Turn Signal Lamp
Replacement
Base Level1. Open the hood.
2. Turn the bulb socket counterclockwise to remove it
from the headlamp assembly
and pull it straight out.
3. Remove the bulb by pulling it straight out of the bulb socket.
4. Replace the bulb and reverse Steps 1–3 to reinstall.
Uplevel
See your dealer for headlamp
replacement.