brake light GMC SIERRA 2022 Service Manual
[x] Cancel search | Manufacturer: GMC, Model Year: 2022, Model line: SIERRA, Model: GMC SIERRA 2022Pages: 474, PDF Size: 15.09 MB
Page 334 of 474
GMC Sierra/Sierra Denali 1500 Owner Manual (GMNA-Localizing-U.S./
Canada/Mexico-15883563) - 2022 - CRC - 11/19/21
Driving and Operating 333
If a connected trailer becomes disconnected,
a message about the trailer disconnect will
appear on the Driver Information Center
(DIC) immediately (if vehicle is on) or the
next time the vehicle is turned on (if trailer
was disconnected while vehicle is off). Check
your trailer connection if needed.
Connection Problem
If any of the trailer connections are lost, a
message about the connection issue appears
on the DIC. The infotainment screen will also
show the connection issue in the Lights
Status view.
Connection Trailer Lighting Faults Detected
The Trailering App System monitors for
electrical faults on the trailer lights.
A message about the lighting issue appears
on the DIC. The infotainment screen will also
show the lighting issue in the Lights Status
view. Repair your trailer lights if needed.
A trailer lighting issue is not covered by
your GM warranty.
The Running Lights connection may not
detect partial outages. Activate the light test
to check all trailer lamps. See“Light Test”
following. Light Test
Touch Start Light Test to cycle the trailer
lights on and off to determine if they are
working. The test follows this sequence:
1. The running lights turn on first and remain on throughout the sequence.
2. The brake lights turn on for about two seconds.
3. The left turn signal light flashes three times.
4. The right turn signal light flashes three times.
5. The reverse lights turn on for about two seconds.
6. Steps 2-5 repeat for approximately on minute and 45 seconds, or until the test
deactivates.
Touch Stop to stop the test. The test will
automatically end after one minute and
45 seconds.
The sequence also deactivates when any of
the following occur:
.The vehicle is turned off.
.The transmission is shifted out of
P (Park).
.The brake pedal is pressed.
.The turn signal is activated.
.The hazard warning lights are activated.
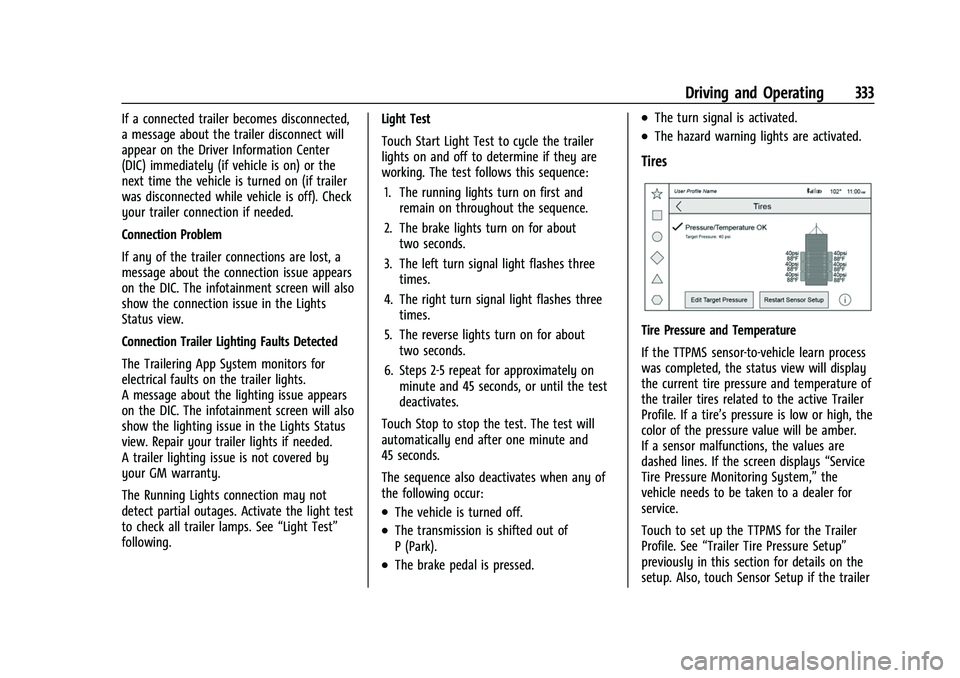
Tires
Tire Pressure and Temperature
If the TTPMS sensor-to-vehicle learn process
was completed, the status view will display
the current tire pressure and temperature of
the trailer tires related to the active Trailer
Profile. If a tire’s pressure is low or high, the
color of the pressure value will be amber.
If a sensor malfunctions, the values are
dashed lines. If the screen displays “Service
Tire Pressure Monitoring System,” the
vehicle needs to be taken to a dealer for
service.
Touch to set up the TTPMS for the Trailer
Profile. See “Trailer Tire Pressure Setup”
previously in this section for details on the
setup. Also, touch Sensor Setup if the trailer
Page 337 of 474
GMC Sierra/Sierra Denali 1500 Owner Manual (GMNA-Localizing-U.S./
Canada/Mexico-15883563) - 2022 - CRC - 11/19/21
336 Driving and Operating
The Custom Trailer Profiles and Guest Trailer
are in order of the most frequently used.
The Accessory/No Trailer profile is shown
below the Custom Trailer Profiles and Guest
Trailer Profile.
All personalization features are based on the
settings for each driver in vehicle
personalization. The list of Trailer Profiles is
based on vehicle personalization settings.
Guest Trailer
If the Guest Trailer Profile is the active
Trailer Profile, trailer detection, lights/
connections status, theft, and the Tow/Haul
reminder alerts can be sent. The system will
not track total mileage or fuel economy, but
the system will track trip mileage and fuel
economy if the Guest Trailer Profile is active.
The TTPMS or maintenance reminders
cannot be set up for a Guest Trailer Profile.
The Guest Trailer Profile cannot be edited.
Touch
4to learn more about the Guest
Trailer option.
Accessory/No Trailer
If the Accessory/No Trailer Profile is active,
alerts will not be sent and the system will
not track mileage or fuel economy. The
TTPMS or maintenance reminders cannot be set up for the Accessory/No Trailer Profile.
The Accessory/No Trailer profile cannot be
edited.
No Trailer Connected
When there is no trailer connected, Trailer
Profiles cannot be activated but most
options can be edited.
Trailer Brake Gain Memory
The system can store the brake gain setting
of a Trailer Profile or a Guest Trailer Profile.
When a Trailer Profile or Guest Trailer Profile
is selected, and a brake gain setting is set
for that Trailer Profile, a quick notice will
appear to indicate that the system has
recalled that profile's brake gain setting.
If a Trailer Profile is already active and the
brake gain setting had been set for that
Trailer Profile, the quick notice will trigger
whenever the vehicle is turned on.
If there was an error in setting the brake
gain for a Trailer Profile, there will be a
notification. This pop-up will not appear if
the Guest Trailer Profile is active or if there
is no trailer connected.
Trailer brake gain should be set for a specific
trailering condition and must be adjusted
anytime vehicle loading, trailer loading,
or road surface conditions change.
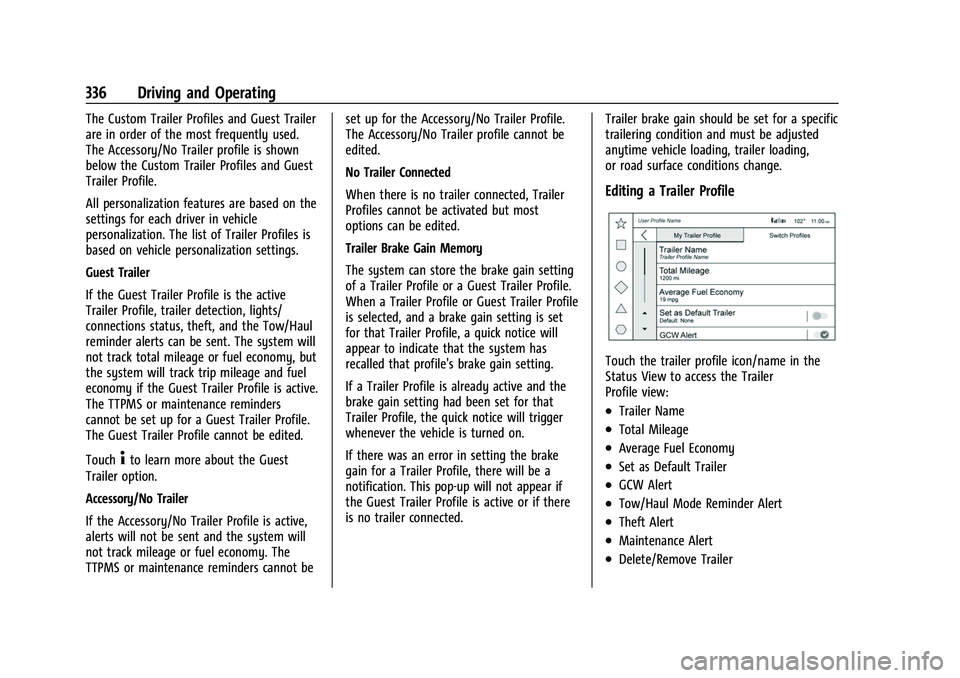
Editing a Trailer Profile
Touch the trailer profile icon/name in the
Status View to access the Trailer
Profile view:
.Trailer Name
.Total Mileage
.Average Fuel Economy
.Set as Default Trailer
.GCW Alert
.Tow/Haul Mode Reminder Alert
.Theft Alert
.Maintenance Alert
.Delete/Remove Trailer
Page 342 of 474
GMC Sierra/Sierra Denali 1500 Owner Manual (GMNA-Localizing-U.S./
Canada/Mexico-15883563) - 2022 - CRC - 11/19/21
Vehicle Care 341
Vehicle Care
General Information
General Information . . . . . . . . . . . . . . . . . . . 342
California Perchlorate MaterialsRequirements . . . . . . . . . . . . . . . . . . . . . . . . 342
Accessories and Modifications . . . . . . . . . 342
Vehicle Checks
Doing Your Own Service Work . . . . . . . . 343
Hood . . . . . . . . . . . . . . . . . . . . . . . . . . . . . . . . . . 343
Engine Compartment Overview . . . . . . . . 345
Engine Oil . . . . . . . . . . . . . . . . . . . . . . . . . . . . . 348
Engine Oil Life System . . . . . . . . . . . . . . . . 350
Automatic Transmission Fluid . . . . . . . . . 350
Engine Air Filter Life System . . . . . . . . . . . 351
Engine Air Cleaner/Filter . . . . . . . . . . . . . . . 351
Cooling System . . . . . . . . . . . . . . . . . . . . . . . . 352
Engine Overheating . . . . . . . . . . . . . . . . . . . 356
Overheated Engine Protection Operating Mode . . . . . . . . . . . . . . . . . . . . . 357
Engine Fan . . . . . . . . . . . . . . . . . . . . . . . . . . . . 358
Washer Fluid . . . . . . . . . . . . . . . . . . . . . . . . . . 358
Brakes . . . . . . . . . . . . . . . . . . . . . . . . . . . . . . . . . 358
Brake Pad Life System . . . . . . . . . . . . . . . . . 359
Brake Fluid . . . . . . . . . . . . . . . . . . . . . . . . . . . . 360
Battery - North America . . . . . . . . . . . . . . . 361
Four-Wheel Drive . . . . . . . . . . . . . . . . . . . . . . 363
Front Axle . . . . . . . . . . . . . . . . . . . . . . . . . . . . . 363
Rear Axle . . . . . . . . . . . . . . . . . . . . . . . . . . . . . . 363 Automatic Transmission Shift Lock
Control Function Check (Mechanical
Shifter) . . . . . . . . . . . . . . . . . . . . . . . . . . . . . . 364
Park Brake and P (Park) Mechanism Check . . . . . . . . . . . . . . . . . . . . . . . . . . . . . . . 364
Wiper Blade Replacement . . . . . . . . . . . . . 364
Glass Replacement . . . . . . . . . . . . . . . . . . . . 365
Windshield Replacement . . . . . . . . . . . . . . 365
Gas Strut(s) . . . . . . . . . . . . . . . . . . . . . . . . . . . 365Headlamp Aiming
Front Headlamp Aiming . . . . . . . . . . . . . . . 366
Bulb Replacement
Bulb Replacement . . . . . . . . . . . . . . . . . . . . . 366
Halogen Bulbs . . . . . . . . . . . . . . . . . . . . . . . . 366
LED Lighting . . . . . . . . . . . . . . . . . . . . . . . . . . 366
Taillamps, Turn Signal, Stoplamps, and Back-Up Lamps . . . . . . . . . . . . . . . . . . . . . . 367
Center High-Mounted Stoplamp (CHMSL) and Cargo Lamp . . . . . . . . . . . . 367
License Plate Lamp . . . . . . . . . . . . . . . . . . . . 368
Electrical System
Electrical System Overload . . . . . . . . . . . . 368
Fuses and Circuit Breakers . . . . . . . . . . . . . 370
Engine Compartment Fuse Block . . . . . . 370
Instrument Panel Fuse Block (Left) . . . . . 373
Instrument Panel Fuse Block (Right) . . . 375
Wheels and Tires
Tires . . . . . . . . . . . . . . . . . . . . . . . . . . . . . . . . . . . 377
All-Season Tires . . . . . . . . . . . . . . . . . . . . . . . . 378
Winter Tires . . . . . . . . . . . . . . . . . . . . . . . . . . . 378
All-Terrain Tires . . . . . . . . . . . . . . . . . . . . . . . . 378
Tire Sidewall Labeling . . . . . . . . . . . . . . . . . 379
Tire Designations . . . . . . . . . . . . . . . . . . . . . . 380
Tire Terminology and Definitions . . . . . . 382
Tire Pressure . . . . . . . . . . . . . . . . . . . . . . . . . . 384
Tire Pressure Monitor System . . . . . . . . . 385
Tire Pressure Monitor Operation . . . . . . 385
Tire Inspection . . . . . . . . . . . . . . . . . . . . . . . . 389
Tire Rotation . . . . . . . . . . . . . . . . . . . . . . . . . . 390
When It Is Time for New Tires . . . . . . . . 391
Buying New Tires . . . . . . . . . . . . . . . . . . . . . . 391
Different Size Tires and Wheels . . . . . . . 392
Uniform Tire Quality Grading . . . . . . . . . 393
Wheel Alignment and Tire Balance . . . . 394
Wheel Replacement . . . . . . . . . . . . . . . . . . . 394
Tire Chains . . . . . . . . . . . . . . . . . . . . . . . . . . . . 395
If a Tire Goes Flat . . . . . . . . . . . . . . . . . . . . . 395
Tire Changing . . . . . . . . . . . . . . . . . . . . . . . . . 397
Full-Size Spare Tire . . . . . . . . . . . . . . . . . . . . 406
Jump Starting
Jump Starting - North America . . . . . . . . 407
Towing the Vehicle
Towing the Vehicle . . . . . . . . . . . . . . . . . . . 409
Recreational Vehicle Towing . . . . . . . . . . . 411
Page 361 of 474
GMC Sierra/Sierra Denali 1500 Owner Manual (GMNA-Localizing-U.S./
Canada/Mexico-15883563) - 2022 - CRC - 11/19/21
360 Vehicle Care
3. Select YES on the confirmation message,or press the trip odometer reset stem on
a base level DIC. Repeat for pads on the
other axle if they were also replaced.
How to Disable the Brake Pad Life
System
The brake pad life system can be turned off.
This may be necessary if aftermarket brake
pads without wear sensors are installed.
When the system is turned off, the front
and rear brake pad life percentages will not
display. However, the built-in wear
indicators that make a high-pitched warning
sound when the brake pads are worn can
still determine when the pads should be
replaced. See Brakes0358.
To turn off the brake pad life system: 1. Display Brake Pad Life on the DIC. See Driver Information Center (DIC) (Base
Level) 0128 or
Driver Information Center (DIC) (Uplevel)
0 130.
2. Select DISABLE.
To turn the brake pad life system back on,
follow the above steps but select ENABLE in
Step 2.
Brake Fluid
The brake master cylinder reservoir is filled
with GM approved DOT 4 brake fluid as
indicated on the reservoir cap. See Engine
Compartment Overview 0345 for the
location of the reservoir.
Checking Brake Fluid
With the vehicle in P (Park) on a level
surface, the brake fluid level should be
between the minimum and maximum marks
on the brake fluid reservoir.
There are only two reasons why the brake
fluid level in the reservoir may go down:
.Normal brake lining wear. When new
linings are installed, the fluid level goes
back up.
.A fluid leak in the brake hydraulic system.
Have the brake hydraulic system fixed.
With a leak, the brakes will not
work well. Always clean the brake fluid reservoir cap
and the area around the cap before
removing it.
Do not top off the brake fluid. Adding fluid
does not correct a leak. If fluid is added
when the linings are worn, there will be too
much fluid when new brake linings are
installed. Add or remove fluid, as necessary,
only when work is done on the brake
hydraulic system.
{Warning
If too much brake fluid is added, it can
spill on the engine and burn, if the
engine is hot enough. You or others could
be burned, and the vehicle could be
damaged. Add brake fluid only when
work is done on the brake hydraulic
system.
When the brake fluid falls to a low level,
the brake warning light comes on. See Brake
System Warning Light 0121.
Brake fluid absorbs water over time which
degrades the effectiveness of the brake fluid.
Replace brake fluid at the specified intervals
to prevent increased stopping distance. See
Maintenance Schedule 0425.
Page 373 of 474
GMC Sierra/Sierra Denali 1500 Owner Manual (GMNA-Localizing-U.S./
Canada/Mexico-15883563) - 2022 - CRC - 11/19/21
372 Vehicle Care
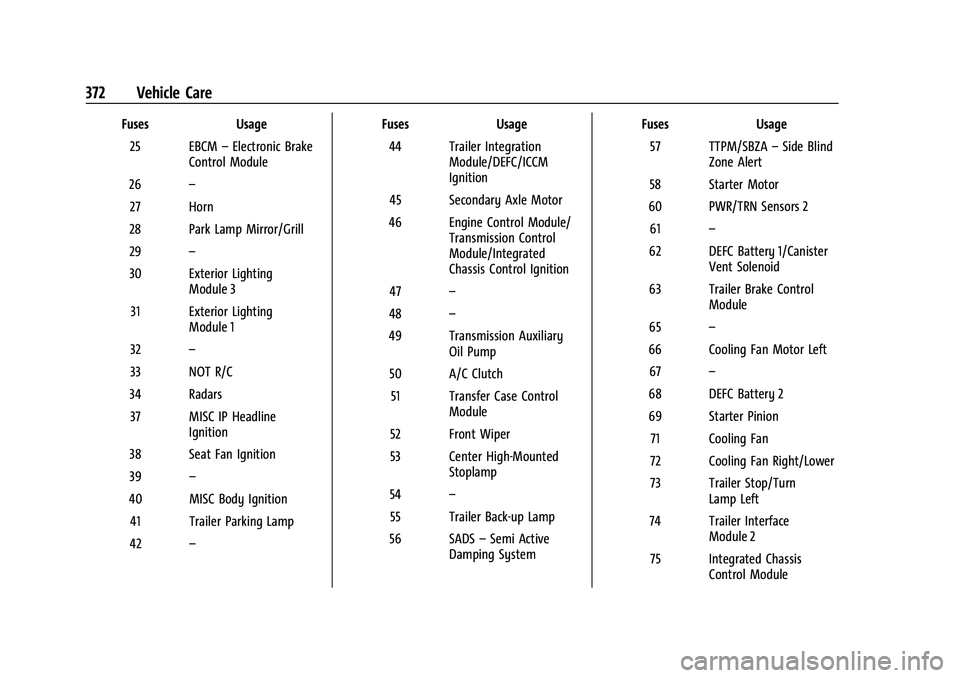
FusesUsage
25 EBCM –Electronic Brake
Control Module
26 –
27 Horn
28 Park Lamp Mirror/Grill
29 –
30 Exterior Lighting Module 3
31 Exterior Lighting Module 1
32 –
33 NOT R/C
34 Radars 37 MISC IP Headline Ignition
38 Seat Fan Ignition
39 –
40 MISC Body Ignition 41 Trailer Parking Lamp
42 – Fuses
Usage
44 Trailer Integration Module/DEFC/ICCM
Ignition
45 Secondary Axle Motor
46 Engine Control Module/ Transmission Control
Module/Integrated
Chassis Control Ignition
47 –
48 –
49 Transmission Auxiliary Oil Pump
50 A/C Clutch 51 Transfer Case Control Module
52 Front Wiper
53 Center High-Mounted Stoplamp
54 –
55 Trailer Back-up Lamp
56 SADS –Semi Active
Damping System Fuses
Usage
57 TTPM/SBZA –Side Blind
Zone Alert
58 Starter Motor
60 PWR/TRN Sensors 2 61 –
62 DEFC Battery 1/Canister Vent Solenoid
63 Trailer Brake Control Module
65 –
66 Cooling Fan Motor Left 67 –
68 DEFC Battery 2
69 Starter Pinion 71 Cooling Fan
72 Cooling Fan Right/Lower
73 Trailer Stop/Turn Lamp Left
74 Trailer Interface Module 2
75 Integrated Chassis Control Module
Page 377 of 474
GMC Sierra/Sierra Denali 1500 Owner Manual (GMNA-Localizing-U.S./
Canada/Mexico-15883563) - 2022 - CRC - 11/19/21
376 Vehicle Care
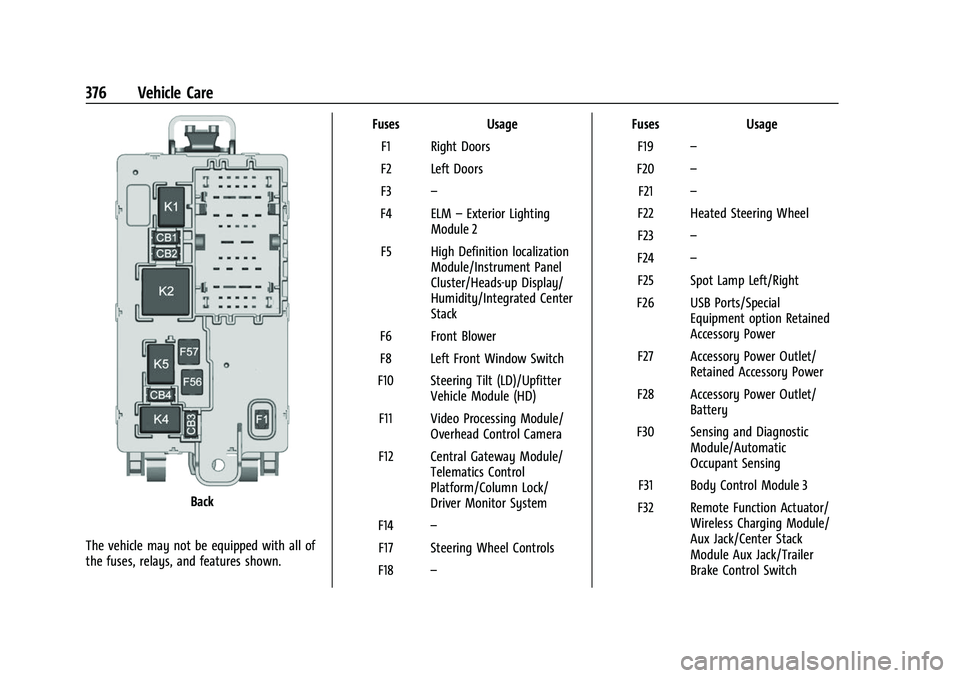
Back
The vehicle may not be equipped with all of
the fuses, relays, and features shown. Fuses Usage
F1 Right Doors
F2 Left Doors
F3 –
F4 ELM –Exterior Lighting
Module 2
F5 High Definition localization Module/Instrument Panel
Cluster/Heads-up Display/
Humidity/Integrated Center
Stack
F6 Front Blower
F8 Left Front Window Switch
F10 Steering Tilt (LD)/Upfitter Vehicle Module (HD)
F11 Video Processing Module/ Overhead Control Camera
F12 Central Gateway Module/ Telematics Control
Platform/Column Lock/
Driver Monitor System
F14 –
F17 Steering Wheel Controls
F18 – Fuses
Usage
F19 –
F20 –
F21 –
F22 Heated Steering Wheel
F23 –
F24 –
F25 Spot Lamp Left/Right
F26 USB Ports/Special Equipment option Retained
Accessory Power
F27 Accessory Power Outlet/ Retained Accessory Power
F28 Accessory Power Outlet/ Battery
F30 Sensing and Diagnostic Module/Automatic
Occupant Sensing
F31 Body Control Module 3
F32 Remote Function Actuator/ Wireless Charging Module/
Aux Jack/Center Stack
Module Aux Jack/Trailer
Brake Control Switch
Page 388 of 474
GMC Sierra/Sierra Denali 1500 Owner Manual (GMNA-Localizing-U.S./
Canada/Mexico-15883563) - 2022 - CRC - 11/19/21
Vehicle Care 387
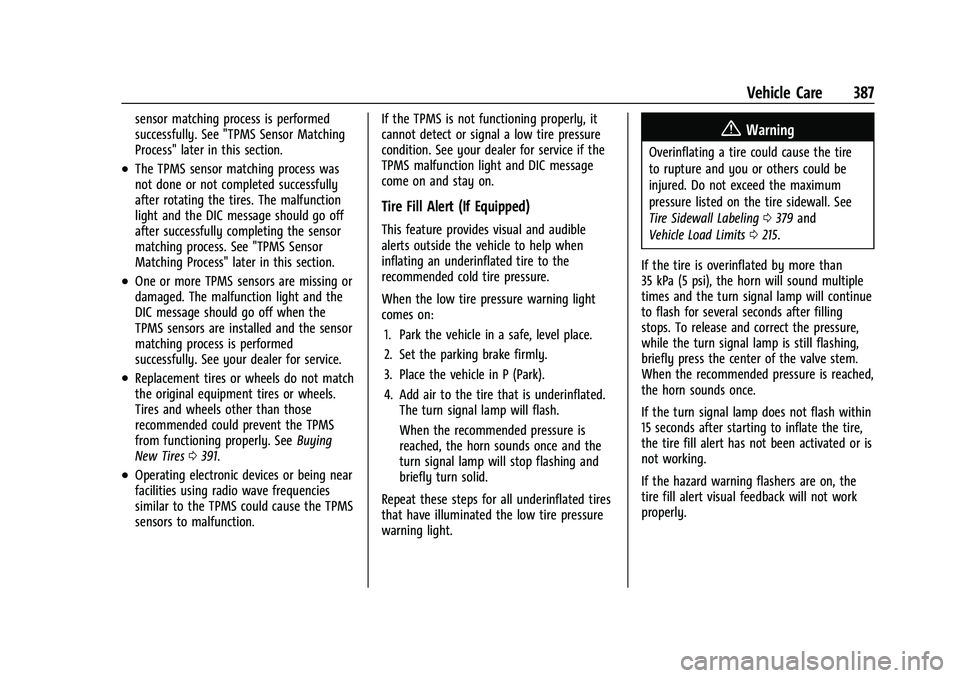
sensor matching process is performed
successfully. See "TPMS Sensor Matching
Process" later in this section.
.The TPMS sensor matching process was
not done or not completed successfully
after rotating the tires. The malfunction
light and the DIC message should go off
after successfully completing the sensor
matching process. See "TPMS Sensor
Matching Process" later in this section.
.One or more TPMS sensors are missing or
damaged. The malfunction light and the
DIC message should go off when the
TPMS sensors are installed and the sensor
matching process is performed
successfully. See your dealer for service.
.Replacement tires or wheels do not match
the original equipment tires or wheels.
Tires and wheels other than those
recommended could prevent the TPMS
from functioning properly. SeeBuying
New Tires 0391.
.Operating electronic devices or being near
facilities using radio wave frequencies
similar to the TPMS could cause the TPMS
sensors to malfunction. If the TPMS is not functioning properly, it
cannot detect or signal a low tire pressure
condition. See your dealer for service if the
TPMS malfunction light and DIC message
come on and stay on.
Tire Fill Alert (If Equipped)
This feature provides visual and audible
alerts outside the vehicle to help when
inflating an underinflated tire to the
recommended cold tire pressure.
When the low tire pressure warning light
comes on:
1. Park the vehicle in a safe, level place.
2. Set the parking brake firmly.
3. Place the vehicle in P (Park).
4. Add air to the tire that is underinflated. The turn signal lamp will flash.
When the recommended pressure is
reached, the horn sounds once and the
turn signal lamp will stop flashing and
briefly turn solid.
Repeat these steps for all underinflated tires
that have illuminated the low tire pressure
warning light.
{Warning
Overinflating a tire could cause the tire
to rupture and you or others could be
injured. Do not exceed the maximum
pressure listed on the tire sidewall. See
Tire Sidewall Labeling 0379 and
Vehicle Load Limits 0215.
If the tire is overinflated by more than
35 kPa (5 psi), the horn will sound multiple
times and the turn signal lamp will continue
to flash for several seconds after filling
stops. To release and correct the pressure,
while the turn signal lamp is still flashing,
briefly press the center of the valve stem.
When the recommended pressure is reached,
the horn sounds once.
If the turn signal lamp does not flash within
15 seconds after starting to inflate the tire,
the tire fill alert has not been activated or is
not working.
If the hazard warning flashers are on, the
tire fill alert visual feedback will not work
properly.
Page 392 of 474
GMC Sierra/Sierra Denali 1500 Owner Manual (GMNA-Localizing-U.S./
Canada/Mexico-15883563) - 2022 - CRC - 11/19/21
Vehicle Care 391
{Warning
Do not apply grease to the wheel
mounting surface, wheel conical
seats, or the wheel nuts or bolts.
Grease applied to these areas could
cause a wheel to become loose or
come off, resulting in a crash.
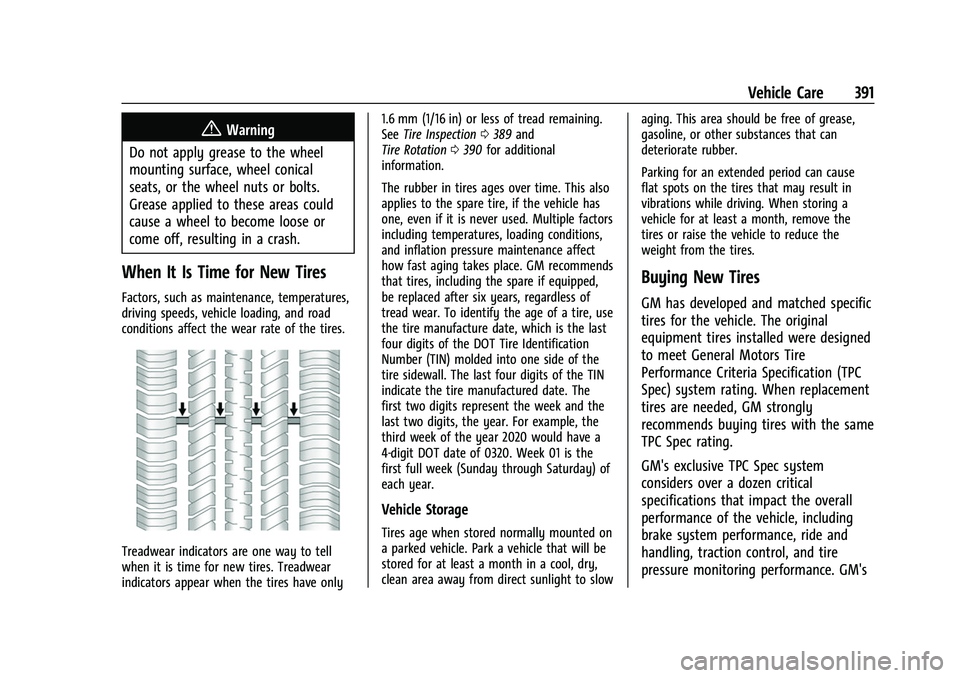
When It Is Time for New Tires
Factors, such as maintenance, temperatures,
driving speeds, vehicle loading, and road
conditions affect the wear rate of the tires.
Treadwear indicators are one way to tell
when it is time for new tires. Treadwear
indicators appear when the tires have only 1.6 mm (1/16 in) or less of tread remaining.
See
Tire Inspection 0389 and
Tire Rotation 0390 for additional
information.
The rubber in tires ages over time. This also
applies to the spare tire, if the vehicle has
one, even if it is never used. Multiple factors
including temperatures, loading conditions,
and inflation pressure maintenance affect
how fast aging takes place. GM recommends
that tires, including the spare if equipped,
be replaced after six years, regardless of
tread wear. To identify the age of a tire, use
the tire manufacture date, which is the last
four digits of the DOT Tire Identification
Number (TIN) molded into one side of the
tire sidewall. The last four digits of the TIN
indicate the tire manufactured date. The
first two digits represent the week and the
last two digits, the year. For example, the
third week of the year 2020 would have a
4-digit DOT date of 0320. Week 01 is the
first full week (Sunday through Saturday) of
each year.
Vehicle Storage
Tires age when stored normally mounted on
a parked vehicle. Park a vehicle that will be
stored for at least a month in a cool, dry,
clean area away from direct sunlight to slow aging. This area should be free of grease,
gasoline, or other substances that can
deteriorate rubber.
Parking for an extended period can cause
flat spots on the tires that may result in
vibrations while driving. When storing a
vehicle for at least a month, remove the
tires or raise the vehicle to reduce the
weight from the tires.
Buying New Tires
GM has developed and matched specific
tires for the vehicle. The original
equipment tires installed were designed
to meet General Motors Tire
Performance Criteria Specification (TPC
Spec) system rating. When replacement
tires are needed, GM strongly
recommends buying tires with the same
TPC Spec rating.
GM's exclusive TPC Spec system
considers over a dozen critical
specifications that impact the overall
performance of the vehicle, including
brake system performance, ride and
handling, traction control, and tire
pressure monitoring performance. GM's
Page 409 of 474
GMC Sierra/Sierra Denali 1500 Owner Manual (GMNA-Localizing-U.S./
Canada/Mexico-15883563) - 2022 - CRC - 11/19/21
408 Vehicle Care
The discharged battery positive (+) terminal
is under a cover. Open the cover to expose
the terminal.1. Check the other vehicle. It must have a 12-volt battery with a negative ground
system.
Caution
If the other vehicle does not have a
12-volt system with a negative ground,
both vehicles can be damaged. Only use
a vehicle that has a 12-volt system with a
negative ground for jump starting.
2. If you have a vehicle with a diesel engine with two batteries, you should
know before you begin that, especially in
cold weather, you may not be able to
get enough power from a single battery
in another vehicle to start your diesel
engine. If your vehicle has more than
one battery, using the battery that is
closer to the starter will reduce electrical
resistance. This is located on the
passenger side, in the rear of the engine
compartment.
3. Get the vehicles close enough so the jumper cables can reach, but be sure the
vehicles are not touching each other. If they are, it could cause an unwanted
ground connection. You would not be
able to start your vehicle, and the bad
grounding could damage the electrical
systems.
To avoid the possibility of the vehicles
rolling, set the parking brake firmly on
both vehicles involved in the jump start
procedure. Put the automatic
transmission in P (Park) before setting
the parking brake. If you have a
four-wheel-drive vehicle, be sure the
transfer case is in a drive gear, not in
N (Neutral).
Caution
If any accessories are left on or plugged
in during the jump starting procedure,
they could be damaged. The repairs
would not be covered by the vehicle
warranty. Whenever possible, turn off or
unplug all accessories on either vehicle
when jump starting.
4. Turn the ignition off on both vehicles. Unplug unnecessary accessories plugged
into the accessory power outlets. Turn
off the radio and all the lamps that are not needed. This will avoid sparks and
help save both batteries. And it could
save the radio!
5. Open the hood on the other vehicle and locate the positive (+) and negative (−)
terminal locations on that vehicle.
{Warning
An electric fan can start up even when
the engine is not running and can injure
you. Keep hands, clothing, and tools
away from any underhood electric fan.
{Warning
Using a match near a battery can cause
battery gas to explode. People have been
hurt doing this, and some have been
blinded. Use a flashlight if you need
more light.
Battery fluid contains acid that can burn
you. Do not get it on you. If you
accidentally get it in your eyes or on
your skin, flush the place with water and
get medical help immediately.
Page 413 of 474
GMC Sierra/Sierra Denali 1500 Owner Manual (GMNA-Localizing-U.S./
Canada/Mexico-15883563) - 2022 - CRC - 11/19/21
412 Vehicle Care
Caution
If a vehicle with two-wheel drive or a
single-speed transfer case is towed with
all four wheels on the ground, the
drivetrain components could be damaged.
The repairs would not be covered by the
vehicle warranty.
Two-wheel-drive vehicles and vehicles with a
single-speed transfer case should not be
towed with all four wheels on the ground.
Dinghy Towing (Vehicles with a
Two-Speed Transfer Case)
Only dinghy tow four-wheel-drive vehicles
with a two-speed transfer case that have an
N (Neutral) and a 4
n(Four-Wheel Drive
Low) setting.
{Warning
Shifting a four-wheel-drive vehicle's
transfer case into N (Neutral) can allow
the vehicle to move even if the
transmission is in P (Park). You or others
could be injured. Set the parking brake
and use wheel blocks before shifting the
transfer case to N (Neutral).
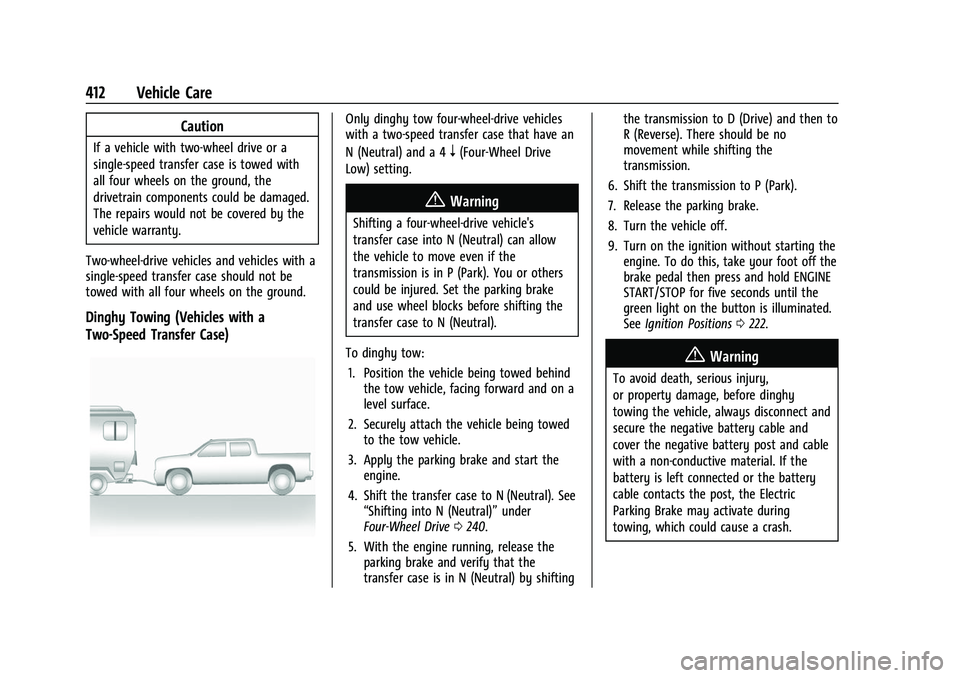
To dinghy tow: 1. Position the vehicle being towed behind the tow vehicle, facing forward and on a
level surface.
2. Securely attach the vehicle being towed to the tow vehicle.
3. Apply the parking brake and start the engine.
4. Shift the transfer case to N (Neutral). See “Shifting into N (Neutral)” under
Four-Wheel Drive 0240.
5. With the engine running, release the parking brake and verify that the
transfer case is in N (Neutral) by shifting the transmission to D (Drive) and then to
R (Reverse). There should be no
movement while shifting the
transmission.
6. Shift the transmission to P (Park).
7. Release the parking brake.
8. Turn the vehicle off.
9. Turn on the ignition without starting the engine. To do this, take your foot off the
brake pedal then press and hold ENGINE
START/STOP for five seconds until the
green light on the button is illuminated.
See Ignition Positions 0222.
{Warning
To avoid death, serious injury,
or property damage, before dinghy
towing the vehicle, always disconnect and
secure the negative battery cable and
cover the negative battery post and cable
with a non-conductive material. If the
battery is left connected or the battery
cable contacts the post, the Electric
Parking Brake may activate during
towing, which could cause a crash.