radio GMC SIERRA 2022 Owners Manual
[x] Cancel search | Manufacturer: GMC, Model Year: 2022, Model line: SIERRA, Model: GMC SIERRA 2022Pages: 474, PDF Size: 15.09 MB
Page 6 of 474
GMC Sierra/Sierra Denali 1500 Owner Manual (GMNA-Localizing-U.S./
Canada/Mexico-15883563) - 2022 - CRC - 11/19/21
Introduction 5
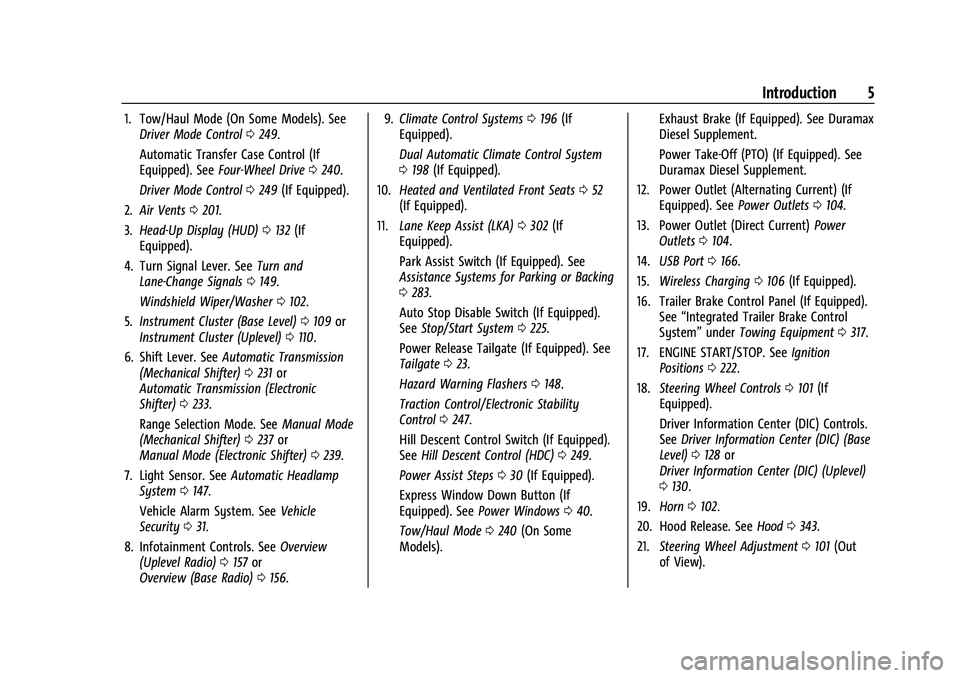
1. Tow/Haul Mode (On Some Models). SeeDriver Mode Control 0249.
Automatic Transfer Case Control (If
Equipped). See Four-Wheel Drive 0240.
Driver Mode Control 0249 (If Equipped).
2. Air Vents 0201.
3. Head-Up Display (HUD) 0132 (If
Equipped).
4. Turn Signal Lever. See Turn and
Lane-Change Signals 0149.
Windshield Wiper/Washer 0102.
5. Instrument Cluster (Base Level) 0109 or
Instrument Cluster (Uplevel) 0110.
6. Shift Lever. See Automatic Transmission
(Mechanical Shifter) 0231 or
Automatic Transmission (Electronic
Shifter) 0233.
Range Selection Mode. See Manual Mode
(Mechanical Shifter) 0237 or
Manual Mode (Electronic Shifter) 0239.
7. Light Sensor. See Automatic Headlamp
System 0147.
Vehicle Alarm System. See Vehicle
Security 031.
8. Infotainment Controls. See Overview
(Uplevel Radio) 0157 or
Overview (Base Radio) 0156. 9.
Climate Control Systems 0196 (If
Equipped).
Dual Automatic Climate Control System
0 198 (If Equipped).
10. Heated and Ventilated Front Seats 052
(If Equipped).
11. Lane Keep Assist (LKA) 0302 (If
Equipped).
Park Assist Switch (If Equipped). See
Assistance Systems for Parking or Backing
0 283.
Auto Stop Disable Switch (If Equipped).
See Stop/Start System 0225.
Power Release Tailgate (If Equipped). See
Tailgate 023.
Hazard Warning Flashers 0148.
Traction Control/Electronic Stability
Control 0247.
Hill Descent Control Switch (If Equipped).
See Hill Descent Control (HDC) 0249.
Power Assist Steps 030 (If Equipped).
Express Window Down Button (If
Equipped). See Power Windows 040.
Tow/Haul Mode 0240 (On Some
Models). Exhaust Brake (If Equipped). See Duramax
Diesel Supplement.
Power Take-Off (PTO) (If Equipped). See
Duramax Diesel Supplement.
12. Power Outlet (Alternating Current) (If Equipped). See Power Outlets0104.
13. Power Outlet (Direct Current) Power
Outlets 0104.
14. USB Port 0166.
15. Wireless Charging 0106 (If Equipped).
16. Trailer Brake Control Panel (If Equipped). See“Integrated Trailer Brake Control
System” underTowing Equipment 0317.
17. ENGINE START/STOP. See Ignition
Positions 0222.
18. Steering Wheel Controls 0101 (If
Equipped).
Driver Information Center (DIC) Controls.
See Driver Information Center (DIC) (Base
Level) 0128 or
Driver Information Center (DIC) (Uplevel)
0 130.
19. Horn 0102.
20. Hood Release. See Hood0343.
21. Steering Wheel Adjustment 0101 (Out
of View).
Page 9 of 474
GMC Sierra/Sierra Denali 1500 Owner Manual (GMNA-Localizing-U.S./
Canada/Mexico-15883563) - 2022 - CRC - 11/19/21
8 Introduction
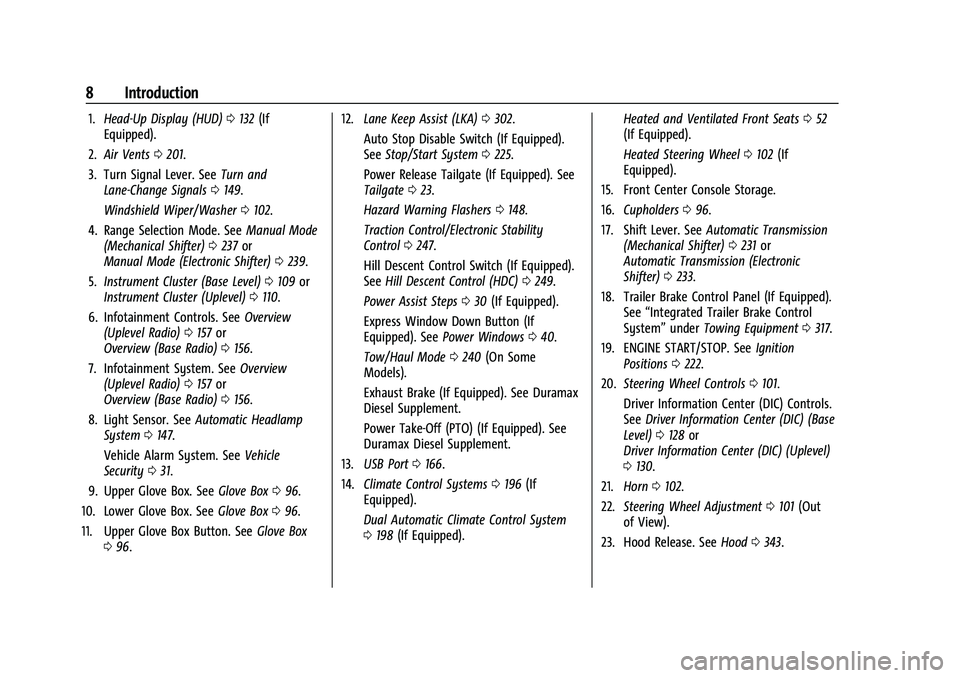
1.Head-Up Display (HUD) 0132 (If
Equipped).
2. Air Vents 0201.
3. Turn Signal Lever. See Turn and
Lane-Change Signals 0149.
Windshield Wiper/Washer 0102.
4. Range Selection Mode. See Manual Mode
(Mechanical Shifter) 0237 or
Manual Mode (Electronic Shifter) 0239.
5. Instrument Cluster (Base Level) 0109 or
Instrument Cluster (Uplevel) 0110.
6. Infotainment Controls. See Overview
(Uplevel Radio) 0157 or
Overview (Base Radio) 0156.
7. Infotainment System. See Overview
(Uplevel Radio) 0157 or
Overview (Base Radio) 0156.
8. Light Sensor. See Automatic Headlamp
System 0147.
Vehicle Alarm System. See Vehicle
Security 031.
9. Upper Glove Box. See Glove Box096.
10. Lower Glove Box. See Glove Box096.
11. Upper Glove Box Button. See Glove Box
0 96. 12.
Lane Keep Assist (LKA) 0302.
Auto Stop Disable Switch (If Equipped).
See Stop/Start System 0225.
Power Release Tailgate (If Equipped). See
Tailgate 023.
Hazard Warning Flashers 0148.
Traction Control/Electronic Stability
Control 0247.
Hill Descent Control Switch (If Equipped).
See Hill Descent Control (HDC) 0249.
Power Assist Steps 030 (If Equipped).
Express Window Down Button (If
Equipped). See Power Windows 040.
Tow/Haul Mode 0240 (On Some
Models).
Exhaust Brake (If Equipped). See Duramax
Diesel Supplement.
Power Take-Off (PTO) (If Equipped). See
Duramax Diesel Supplement.
13. USB Port 0166.
14. Climate Control Systems 0196 (If
Equipped).
Dual Automatic Climate Control System
0 198 (If Equipped). Heated and Ventilated Front Seats
052
(If Equipped).
Heated Steering Wheel 0102 (If
Equipped).
15. Front Center Console Storage.
16. Cupholders 096.
17. Shift Lever. See Automatic Transmission
(Mechanical Shifter) 0231 or
Automatic Transmission (Electronic
Shifter) 0233.
18. Trailer Brake Control Panel (If Equipped). See“Integrated Trailer Brake Control
System” underTowing Equipment 0317.
19. ENGINE START/STOP. See Ignition
Positions 0222.
20. Steering Wheel Controls 0101.
Driver Information Center (DIC) Controls.
See Driver Information Center (DIC) (Base
Level) 0128 or
Driver Information Center (DIC) (Uplevel)
0 130.
21. Horn 0102.
22. Steering Wheel Adjustment 0101 (Out
of View).
23. Hood Release. See Hood0343.
Page 12 of 474
GMC Sierra/Sierra Denali 1500 Owner Manual (GMNA-Localizing-U.S./
Canada/Mexico-15883563) - 2022 - CRC - 11/19/21
Introduction 11
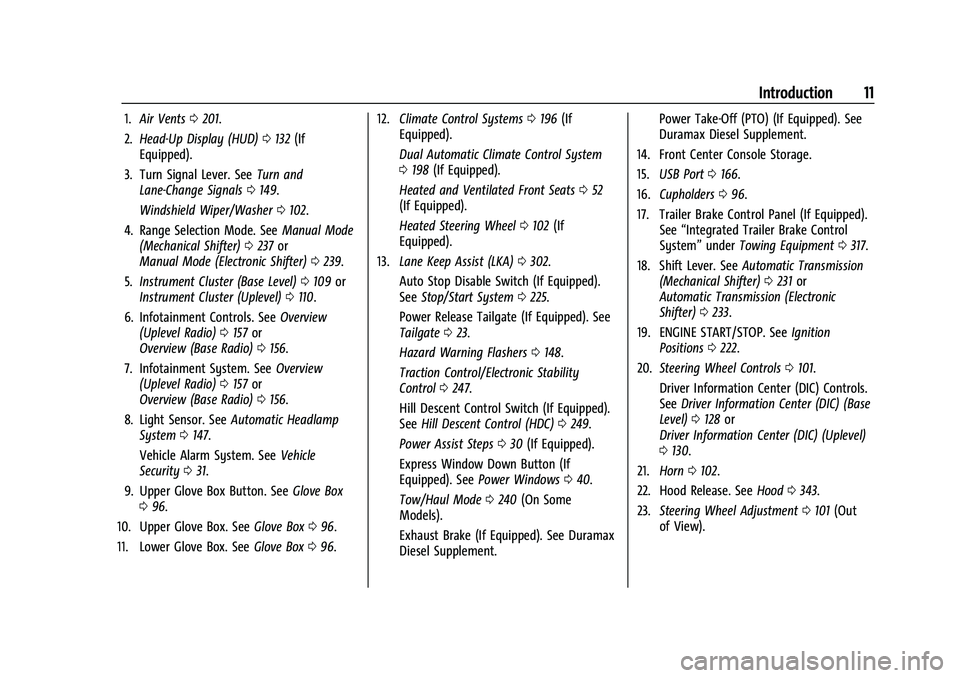
1.Air Vents 0201.
2. Head-Up Display (HUD) 0132 (If
Equipped).
3. Turn Signal Lever. See Turn and
Lane-Change Signals 0149.
Windshield Wiper/Washer 0102.
4. Range Selection Mode. See Manual Mode
(Mechanical Shifter) 0237 or
Manual Mode (Electronic Shifter) 0239.
5. Instrument Cluster (Base Level) 0109 or
Instrument Cluster (Uplevel) 0110.
6. Infotainment Controls. See Overview
(Uplevel Radio) 0157 or
Overview (Base Radio) 0156.
7. Infotainment System. See Overview
(Uplevel Radio) 0157 or
Overview (Base Radio) 0156.
8. Light Sensor. See Automatic Headlamp
System 0147.
Vehicle Alarm System. See Vehicle
Security 031.
9. Upper Glove Box Button. See Glove Box
0 96.
10. Upper Glove Box. See Glove Box096.
11. Lower Glove Box. See Glove Box096. 12.
Climate Control Systems 0196 (If
Equipped).
Dual Automatic Climate Control System
0 198 (If Equipped).
Heated and Ventilated Front Seats 052
(If Equipped).
Heated Steering Wheel 0102 (If
Equipped).
13. Lane Keep Assist (LKA) 0302.
Auto Stop Disable Switch (If Equipped).
See Stop/Start System 0225.
Power Release Tailgate (If Equipped). See
Tailgate 023.
Hazard Warning Flashers 0148.
Traction Control/Electronic Stability
Control 0247.
Hill Descent Control Switch (If Equipped).
See Hill Descent Control (HDC) 0249.
Power Assist Steps 030 (If Equipped).
Express Window Down Button (If
Equipped). See Power Windows 040.
Tow/Haul Mode 0240 (On Some
Models).
Exhaust Brake (If Equipped). See Duramax
Diesel Supplement. Power Take-Off (PTO) (If Equipped). See
Duramax Diesel Supplement.
14. Front Center Console Storage.
15. USB Port 0166.
16. Cupholders 096.
17. Trailer Brake Control Panel (If Equipped). See“Integrated Trailer Brake Control
System” underTowing Equipment 0317.
18. Shift Lever. See Automatic Transmission
(Mechanical Shifter) 0231 or
Automatic Transmission (Electronic
Shifter) 0233.
19. ENGINE START/STOP. See Ignition
Positions 0222.
20. Steering Wheel Controls 0101.
Driver Information Center (DIC) Controls.
See Driver Information Center (DIC) (Base
Level) 0128 or
Driver Information Center (DIC) (Uplevel)
0 130.
21. Horn 0102.
22. Hood Release. See Hood0343.
23. Steering Wheel Adjustment 0101 (Out
of View).
Page 15 of 474
GMC Sierra/Sierra Denali 1500 Owner Manual (GMNA-Localizing-U.S./
Canada/Mexico-15883563) - 2022 - CRC - 11/19/21
14 Keys, Doors, and Windows
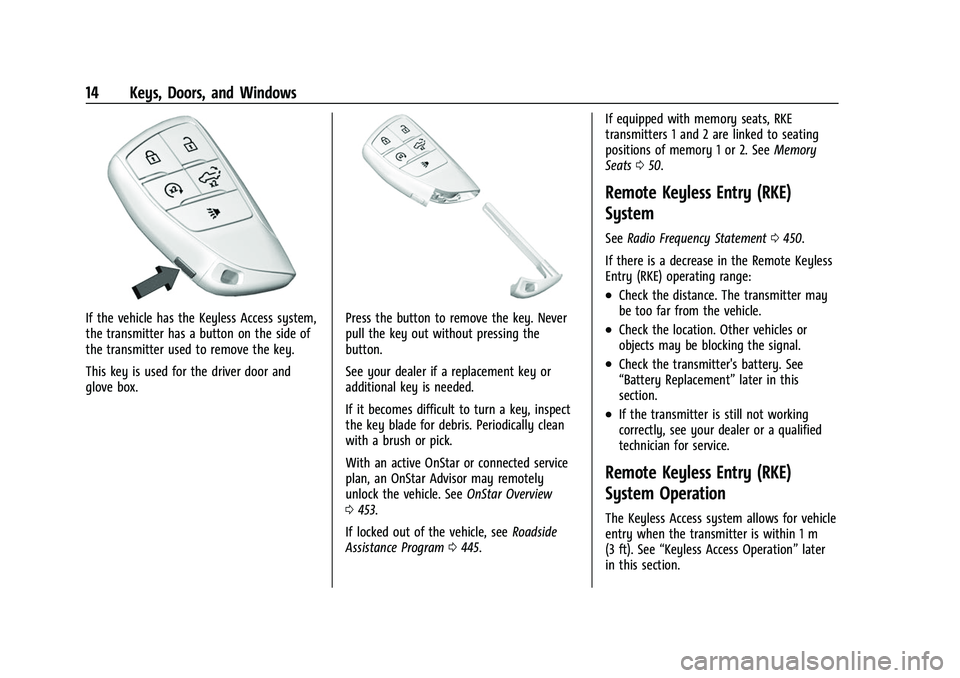
If the vehicle has the Keyless Access system,
the transmitter has a button on the side of
the transmitter used to remove the key.
This key is used for the driver door and
glove box.Press the button to remove the key. Never
pull the key out without pressing the
button.
See your dealer if a replacement key or
additional key is needed.
If it becomes difficult to turn a key, inspect
the key blade for debris. Periodically clean
with a brush or pick.
With an active OnStar or connected service
plan, an OnStar Advisor may remotely
unlock the vehicle. SeeOnStar Overview
0 453.
If locked out of the vehicle, see Roadside
Assistance Program 0445. If equipped with memory seats, RKE
transmitters 1 and 2 are linked to seating
positions of memory 1 or 2. See
Memory
Seats 050.
Remote Keyless Entry (RKE)
System
See Radio Frequency Statement 0450.
If there is a decrease in the Remote Keyless
Entry (RKE) operating range:
.Check the distance. The transmitter may
be too far from the vehicle.
.Check the location. Other vehicles or
objects may be blocking the signal.
.Check the transmitter's battery. See
“Battery Replacement” later in this
section.
.If the transmitter is still not working
correctly, see your dealer or a qualified
technician for service.
Remote Keyless Entry (RKE)
System Operation
The Keyless Access system allows for vehicle
entry when the transmitter is within 1 m
(3 ft). See “Keyless Access Operation” later
in this section.
Page 33 of 474
GMC Sierra/Sierra Denali 1500 Owner Manual (GMNA-Localizing-U.S./
Canada/Mexico-15883563) - 2022 - CRC - 11/19/21
32 Keys, Doors, and Windows
The alarm will also be activated if a
passenger door or the hood is opened
without first disarming the system. When
the alarm is activated, the turn signals flash
and the horn sounds for about 30 seconds.
The alarm system will then re-arm to
monitor for the next unauthorized event.
Disarming the Alarm System
To disarm the alarm system or turn off the
alarm if it has been activated:
.PressKon the RKE transmitter.
.Start the vehicle.
To avoid setting off the alarm by mistake:
.Lock the vehicle after all occupants have
exited.
.Always unlock a door with the RKE
transmitter.
Unlocking the driver door with the key
will not disarm the system or turn off the
alarm.
How to Detect a Tamper Condition
IfKis pressed on the RKE transmitter and
the horn chirps three times, an alarm
occurred previously while the alarm system
was armed. If the alarm has been activated, a message
will appear on the DIC.
Steering Column Lock
If equipped, the steering column lock is a
theft-deterrent device. This feature locks the
steering column when the vehicle is turned
off and the driver door is opened, or when
the driver door is opened and then the
vehicle is turned off. The steering column
unlocks when the vehicle is turned on.
The Driver Information Center (DIC) may
display one of these messages:
.A message to service the steering column
lock indicates that an issue has been
detected with the column lock feature
and the vehicle should be serviced.
.A message that the steering column is
locked indicates that the engine is
running, but the steering column is still
locked. It is normal for the column to be
locked during a remote start, but the
column should unlock after the brake
pedal is pressed and the vehicle is started.
No message will display during a remote
start.
.A message that the steering wheel must
be turned and the vehicle must be started
again indicates that the column lockmechanism is bound, the column locking
device was unable to unlock the steering
column, and the vehicle did not start.
If this happens, immediately turn the
steering wheel from side to side to
unbind the column lock. If this does not
unlock the steering column, turn the
vehicle off and open the driver door to
reset the system. Then turn the vehicle
on and immediately turn the steering
wheel side to side for about 15 seconds.
In some cases, it may take significant
force to unbind the column.
To keep the steering column from binding,
straighten the front wheels before turning
off the vehicle.
Immobilizer
See Radio Frequency Statement 0450.
Immobilizer Operation
This vehicle has a passive theft-deterrent
system.
Page 104 of 474
GMC Sierra/Sierra Denali 1500 Owner Manual (GMNA-Localizing-U.S./
Canada/Mexico-15883563) - 2022 - CRC - 11/19/21
Instruments and Controls 103
L:PressLon the windshield wiper
control to spray windshield washer fluid and
activate the wipers. The front 360 degree
viewing camera will also be washed,
if equipped. The wipers will continue until
Lis released or the maximum wash time
is reached. When
Lis released, additional
wipes may occur depending on how long
the windshield washer had been activated.
See Washer Fluid 0358 for information on
filling the windshield washer fluid reservoir.
Clear snow and ice from the wiper blades
before using them. If frozen to the
windshield, carefully loosen or thaw them.
Damaged blades should be replaced. See
Wiper Blade Replacement 0364.
Heavy snow or ice can overload the wiper
motor.
{Warning
In freezing weather, do not use the
washer until the windshield is warmed.
Otherwise the washer fluid can form ice
on the windshield, blocking your vision.
{Warning
Before driving the vehicle, always clear
snow and ice from the hood, windshield,
washer nozzles, roof, and rear of the
vehicle, including all lamps and windows.
Reduced visibility from snow and ice
buildup could lead to a crash.
Wipe Parking
If the ignition is turned off while the wipers
are on LO, HI, or
3, they will
immediately stop.
If the windshield wiper control is ON then
moved to OFF before the driver door is
opened or within 10 minutes, the wipers will
restart and move to the base of the
windshield.
If the ignition is turned off while the wipers
are performing wipes due to windshield
washing, the wipers continue to run until
they reach the base of the windshield.
Compass
The vehicle may have a compass display on
the Driver Information Center (DIC). The
compass receives its heading and other
information from the Global Positioning
System (GPS) antenna, Electronic Stability
Control (ESC), and vehicle speed information.
The compass system is designed to operate
for a certain number of miles or degrees of
turn before needing a signal from the GPS
satellites. When the compass display shows
CAL, drive the vehicle for a short distance in
an open area where it can receive a GPS
signal. The compass system will
automatically determine when a GPS signal
is restored and provide a heading again.
Clock
Set the time and date using the
infotainment system. See "Time/Date" under
Settings (Uplevel Radio) 0187 or
Settings (Base Radio) 0185.
Page 107 of 474
GMC Sierra/Sierra Denali 1500 Owner Manual (GMNA-Localizing-U.S./
Canada/Mexico-15883563) - 2022 - CRC - 11/19/21
106 Instruments and Controls
The power outlet is not designed for the
following, and may not work properly if
they are plugged in:
.Equipment with high initial peak wattage,
such as compressor-driven refrigerators
and electric power tools
.Other equipment requiring an extremely
stable power supply, such as
microcomputer-controlled electric blankets
and touch sensor lamps
.Medical equipment
Wireless Charging
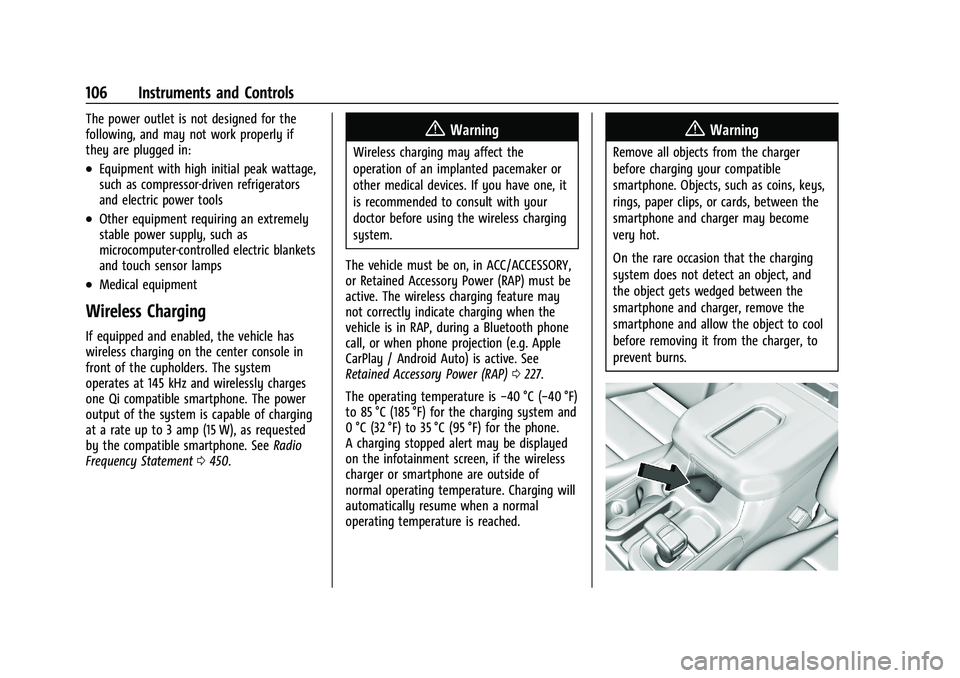
If equipped and enabled, the vehicle has
wireless charging on the center console in
front of the cupholders. The system
operates at 145 kHz and wirelessly charges
one Qi compatible smartphone. The power
output of the system is capable of charging
at a rate up to 3 amp (15 W), as requested
by the compatible smartphone. SeeRadio
Frequency Statement 0450.
{Warning
Wireless charging may affect the
operation of an implanted pacemaker or
other medical devices. If you have one, it
is recommended to consult with your
doctor before using the wireless charging
system.
The vehicle must be on, in ACC/ACCESSORY,
or Retained Accessory Power (RAP) must be
active. The wireless charging feature may
not correctly indicate charging when the
vehicle is in RAP, during a Bluetooth phone
call, or when phone projection (e.g. Apple
CarPlay / Android Auto) is active. See
Retained Accessory Power (RAP) 0227.
The operating temperature is −40 °C (−40 °F)
to 85 °C (185 °F) for the charging system and
0 °C (32 °F) to 35 °C (95 °F) for the phone.
A charging stopped alert may be displayed
on the infotainment screen, if the wireless
charger or smartphone are outside of
normal operating temperature. Charging will
automatically resume when a normal
operating temperature is reached.
{Warning
Remove all objects from the charger
before charging your compatible
smartphone. Objects, such as coins, keys,
rings, paper clips, or cards, between the
smartphone and charger may become
very hot.
On the rare occasion that the charging
system does not detect an object, and
the object gets wedged between the
smartphone and charger, remove the
smartphone and allow the object to cool
before removing it from the charger, to
prevent burns.
Page 118 of 474
GMC Sierra/Sierra Denali 1500 Owner Manual (GMNA-Localizing-U.S./
Canada/Mexico-15883563) - 2022 - CRC - 11/19/21
Instruments and Controls 117
Uplevel
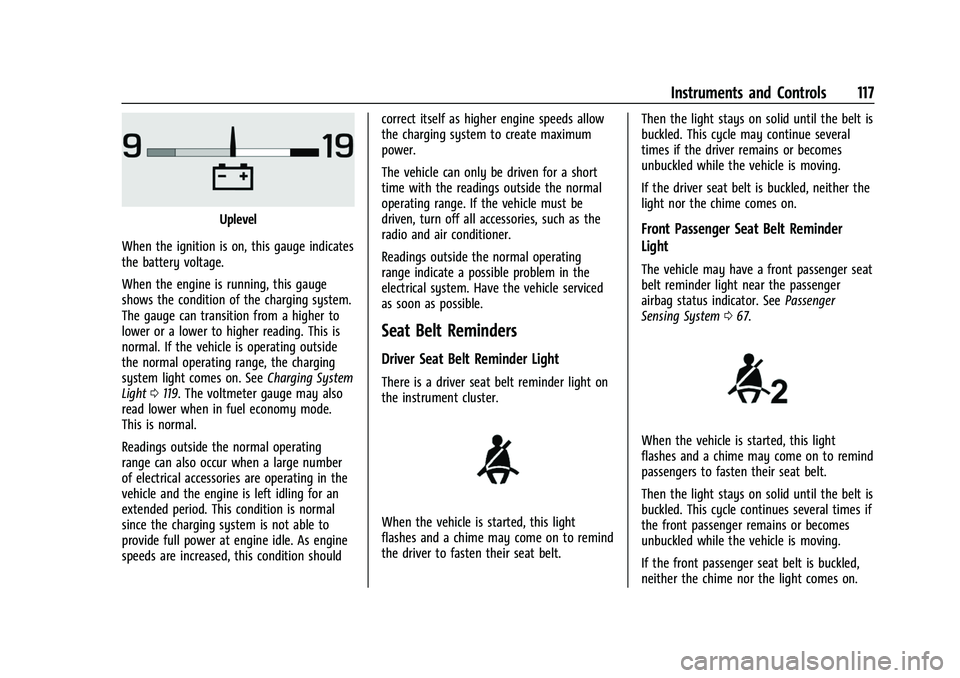
When the ignition is on, this gauge indicates
the battery voltage.
When the engine is running, this gauge
shows the condition of the charging system.
The gauge can transition from a higher to
lower or a lower to higher reading. This is
normal. If the vehicle is operating outside
the normal operating range, the charging
system light comes on. See Charging System
Light 0119. The voltmeter gauge may also
read lower when in fuel economy mode.
This is normal.
Readings outside the normal operating
range can also occur when a large number
of electrical accessories are operating in the
vehicle and the engine is left idling for an
extended period. This condition is normal
since the charging system is not able to
provide full power at engine idle. As engine
speeds are increased, this condition should correct itself as higher engine speeds allow
the charging system to create maximum
power.
The vehicle can only be driven for a short
time with the readings outside the normal
operating range. If the vehicle must be
driven, turn off all accessories, such as the
radio and air conditioner.
Readings outside the normal operating
range indicate a possible problem in the
electrical system. Have the vehicle serviced
as soon as possible.
Seat Belt Reminders
Driver Seat Belt Reminder Light
There is a driver seat belt reminder light on
the instrument cluster.
When the vehicle is started, this light
flashes and a chime may come on to remind
the driver to fasten their seat belt.
Then the light stays on solid until the belt is
buckled. This cycle may continue several
times if the driver remains or becomes
unbuckled while the vehicle is moving.
If the driver seat belt is buckled, neither the
light nor the chime comes on.
Front Passenger Seat Belt Reminder
Light
The vehicle may have a front passenger seat
belt reminder light near the passenger
airbag status indicator. See
Passenger
Sensing System 067.
When the vehicle is started, this light
flashes and a chime may come on to remind
passengers to fasten their seat belt.
Then the light stays on solid until the belt is
buckled. This cycle continues several times if
the front passenger remains or becomes
unbuckled while the vehicle is moving.
If the front passenger seat belt is buckled,
neither the chime nor the light comes on.
Page 120 of 474
GMC Sierra/Sierra Denali 1500 Owner Manual (GMNA-Localizing-U.S./
Canada/Mexico-15883563) - 2022 - CRC - 11/19/21
Instruments and Controls 119
is on, there may be a problem with the
lights or the passenger sensing system. See
your dealer for service right away.
{Warning
If the airbag readiness light ever comes
on and stays on, it means that
something may be wrong with the airbag
system. To help avoid injury to yourself
or others, have the vehicle serviced right
away. SeeAirbag Readiness Light 0118
for more information, including important
safety information.
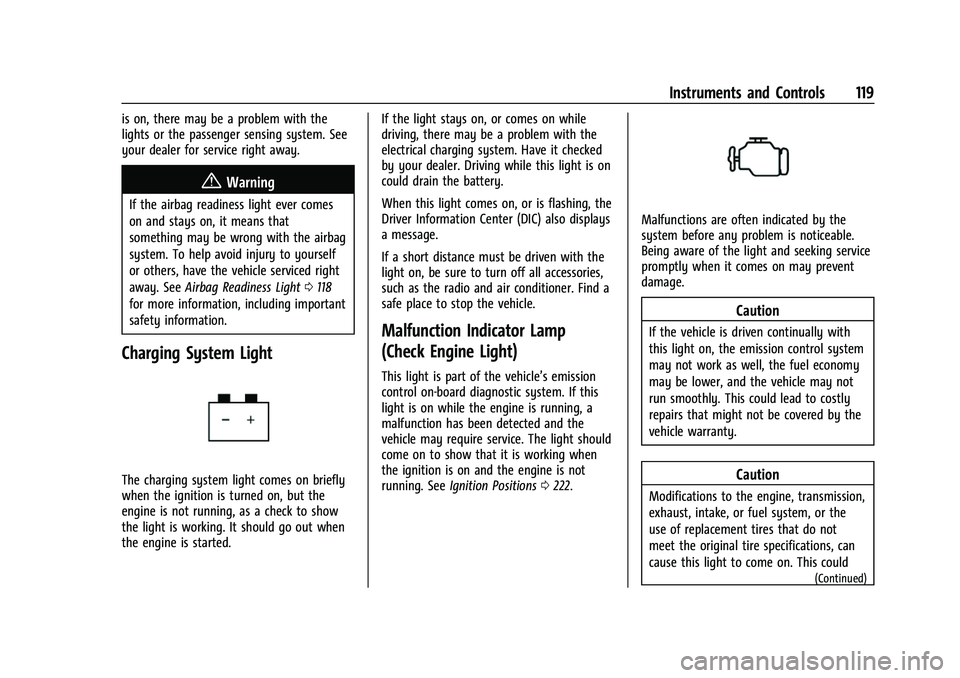
Charging System Light
The charging system light comes on briefly
when the ignition is turned on, but the
engine is not running, as a check to show
the light is working. It should go out when
the engine is started. If the light stays on, or comes on while
driving, there may be a problem with the
electrical charging system. Have it checked
by your dealer. Driving while this light is on
could drain the battery.
When this light comes on, or is flashing, the
Driver Information Center (DIC) also displays
a message.
If a short distance must be driven with the
light on, be sure to turn off all accessories,
such as the radio and air conditioner. Find a
safe place to stop the vehicle.
Malfunction Indicator Lamp
(Check Engine Light)
This light is part of the vehicle’s emission
control on-board diagnostic system. If this
light is on while the engine is running, a
malfunction has been detected and the
vehicle may require service. The light should
come on to show that it is working when
the ignition is on and the engine is not
running. See
Ignition Positions 0222.
Malfunctions are often indicated by the
system before any problem is noticeable.
Being aware of the light and seeking service
promptly when it comes on may prevent
damage.
Caution
If the vehicle is driven continually with
this light on, the emission control system
may not work as well, the fuel economy
may be lower, and the vehicle may not
run smoothly. This could lead to costly
repairs that might not be covered by the
vehicle warranty.
Caution
Modifications to the engine, transmission,
exhaust, intake, or fuel system, or the
use of replacement tires that do not
meet the original tire specifications, can
cause this light to come on. This could
(Continued)
Page 134 of 474
GMC Sierra/Sierra Denali 1500 Owner Manual (GMNA-Localizing-U.S./
Canada/Mexico-15883563) - 2022 - CRC - 11/19/21
Instruments and Controls 133
the instrument panel. The information
appears as an image focused out toward the
front of the vehicle.
Caution
If you try to use the HUD image as a
parking aid, you may misjudge the
distance and damage your vehicle. Do not
use the HUD image as a parking aid.
The HUD information can be displayed in
various languages. The speedometer reading
and other numerical values can be displayed
in either English or metric units.
The language selection is changed through
the radio, and the units of measurement is
changed through the instrument cluster. See
Settings (Uplevel Radio) 0187 or
Settings (Base Radio) 0185 and “Options”
under Instrument Cluster (Base Level) 0109
or Instrument Cluster (Uplevel) 0110.
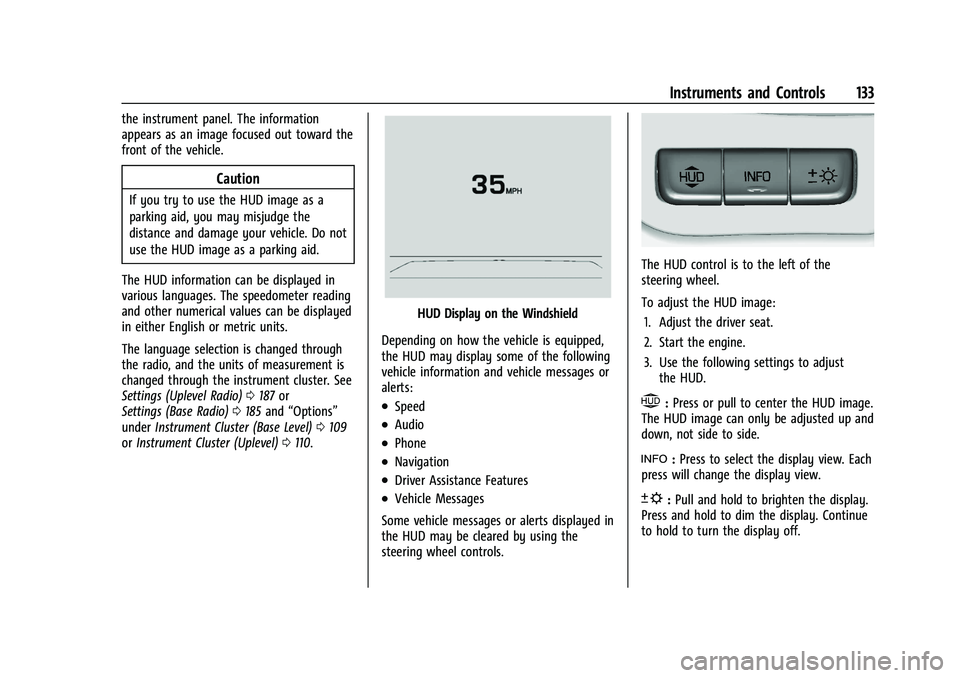
HUD Display on the Windshield
Depending on how the vehicle is equipped,
the HUD may display some of the following
vehicle information and vehicle messages or
alerts:
.Speed
.Audio
.Phone
.Navigation
.Driver Assistance Features
.Vehicle Messages
Some vehicle messages or alerts displayed in
the HUD may be cleared by using the
steering wheel controls.
The HUD control is to the left of the
steering wheel.
To adjust the HUD image: 1. Adjust the driver seat.
2. Start the engine.
3. Use the following settings to adjust the HUD.
$:Press or pull to center the HUD image.
The HUD image can only be adjusted up and
down, not side to side.
!: Press to select the display view. Each
press will change the display view.
D: Pull and hold to brighten the display.
Press and hold to dim the display. Continue
to hold to turn the display off.