height adjustment GMC SIERRA 2023 Owners Manual
[x] Cancel search | Manufacturer: GMC, Model Year: 2023, Model line: SIERRA, Model: GMC SIERRA 2023Pages: 430, PDF Size: 18.76 MB
Page 51 of 430

GMC Sierra/Sierra Denali 2500 HD/3500 HD Owner Manual (GMNA-
Localizing-U.S./Canada-16504257) - 2023 - CRC - 5/9/22
50 Seats and Restraints
Adjust the head restraint so that the top of
the restraint is at the same height as the
top of the occupant's head. This position
reduces the chance of a neck injury in a
crash.
To raise or lower the head restraint, press
the button on the side of the head restraint
and pull up or push the head restraint down
and release the button.
Pull and push on the head restraint after the
button is released to make sure that it is
locked in place.
The front seat outboard head restraints are
not removable.
Rear Head Restraints
The vehicle’s rear seat has head restraints in
the outboard seating positions that cannot
be adjusted.
The head restraint can be folded forward to
allow for better visibility when the rear seat
is unoccupied. To fold the head restraint,
press the button on the side of the head
restraint.
When an occupant is in the seat, always
return the head restraint to the upright
position until it locks into place. Push and
pull on the head restraint to make sure that
it is locked.If you are installing a child restraint in the
rear seat, see
Lower Anchors and Tethers for
Children (LATCH System) 082.
Center Headrest
The vehicle’s rear seat may be equipped
with a headrest in the center seating
position that cannot be adjusted.
If you are installing a child restraint in the
rear seat, see Lower Anchors and Tethers for
Children (LATCH System) 082.
Front Seats
Seat Adjustment
{Warning
You can lose control of the vehicle if you
try to adjust a driver seat while the
vehicle is moving. Adjust the driver seat
only when the vehicle is not moving.
Page 64 of 430

GMC Sierra/Sierra Denali 2500 HD/3500 HD Owner Manual (GMNA-
Localizing-U.S./Canada-16504257) - 2023 - CRC - 5/9/22
Seats and Restraints 63
To unlatch the belt, push the button on the
buckle. The belt should return to its stowed
position.
Always stow the seat belt slowly. If the seat
belt webbing returns quickly to the stowed
position, the retractor may lock and cannot
be pulled out. If this happens, pull the seat
belt straight out firmly to unlock the
webbing, and then release it. If the webbing
is still locked in the retractor, see your
dealer.
Before a door is closed, be sure the seat belt
is out of the way. If a door is slammed
against a seat belt, damage can occur to
both the seat belt and the vehicle.
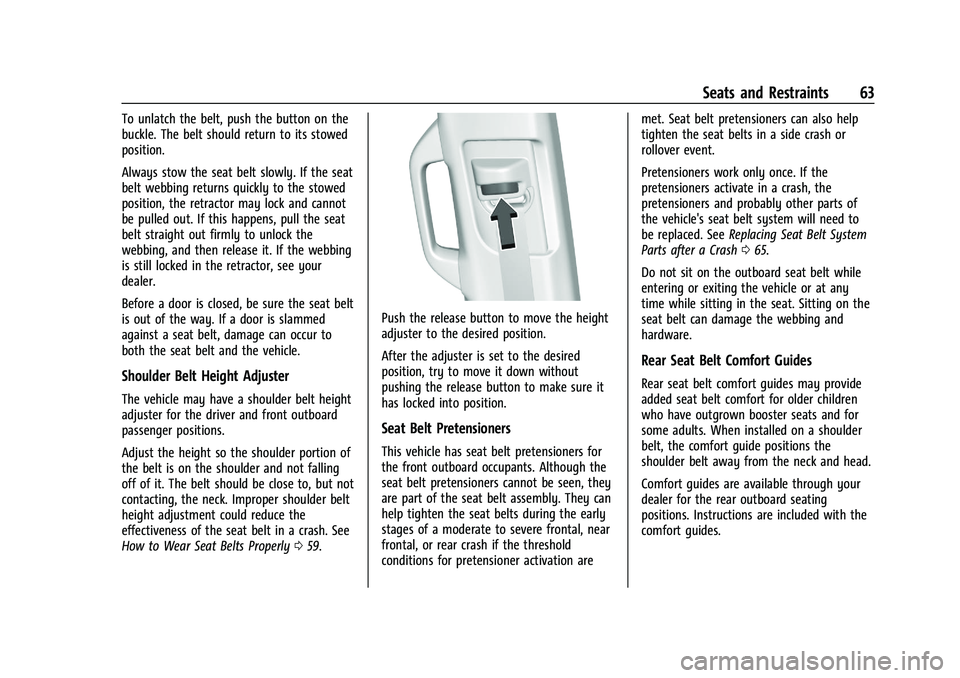
Shoulder Belt Height Adjuster
The vehicle may have a shoulder belt height
adjuster for the driver and front outboard
passenger positions.
Adjust the height so the shoulder portion of
the belt is on the shoulder and not falling
off of it. The belt should be close to, but not
contacting, the neck. Improper shoulder belt
height adjustment could reduce the
effectiveness of the seat belt in a crash. See
How to Wear Seat Belts Properly059.
Push the release button to move the height
adjuster to the desired position.
After the adjuster is set to the desired
position, try to move it down without
pushing the release button to make sure it
has locked into position.
Seat Belt Pretensioners
This vehicle has seat belt pretensioners for
the front outboard occupants. Although the
seat belt pretensioners cannot be seen, they
are part of the seat belt assembly. They can
help tighten the seat belts during the early
stages of a moderate to severe frontal, near
frontal, or rear crash if the threshold
conditions for pretensioner activation are met. Seat belt pretensioners can also help
tighten the seat belts in a side crash or
rollover event.
Pretensioners work only once. If the
pretensioners activate in a crash, the
pretensioners and probably other parts of
the vehicle's seat belt system will need to
be replaced. See
Replacing Seat Belt System
Parts after a Crash 065.
Do not sit on the outboard seat belt while
entering or exiting the vehicle or at any
time while sitting in the seat. Sitting on the
seat belt can damage the webbing and
hardware.
Rear Seat Belt Comfort Guides
Rear seat belt comfort guides may provide
added seat belt comfort for older children
who have outgrown booster seats and for
some adults. When installed on a shoulder
belt, the comfort guide positions the
shoulder belt away from the neck and head.
Comfort guides are available through your
dealer for the rear outboard seating
positions. Instructions are included with the
comfort guides.
Page 186 of 430

GMC Sierra/Sierra Denali 2500 HD/3500 HD Owner Manual (GMNA-
Localizing-U.S./Canada-16504257) - 2023 - CRC - 5/18/22
Infotainment System 185
Comfort and Convenience
Adjusts different comfort and convenience
settings.
Lighting
Adjusts different lighting settings.
Power Door Locks
Adjusts different door lock settings.
Remote Lock, Unlock, and Start
Adjusts different remote lock settings.
Ride Height
Adjusts different ride height settings.
Running Boards
Adjusts different running board settings.
Seating Position
Adjusts different seat settings.
Suspension
Adjusts different suspension settings.
Trailering
Adjusts different trailering camera settings.
Teen Driver
SeeTeen Driver 0186. Valet Mode
This will lock the infotainment system and
steering wheel controls. It may also limit
access to vehicle storage locations,
if equipped.
To enable valet mode:
1. Enter a four-digit code on the keypad.
2. Select Enter to go to the confirmation screen.
3. Re-enter the four-digit code.
Touch Lock or Unlock to lock or unlock the
system. Touch Back to go back to the
previous menu.
Personal
If equipped, this menu allows adjustment of
different user profile settings. See “Users”in
Using the System 0152 for information on
setting up user profiles.
The menu may contain the following:
Name
Touch to edit your user name that will be
displayed in the vehicle. Vehicle Account Information
Touch to view the vehicle account
information and to change the account
password.
An
“unverified user account” pop-up will
display until the account information
verification process has been completed on
the Internet. Check your registered e-mail
account for an activation e-mail to complete
the verification process.
Profile Picture
Touch to choose or change your profile
picture.
Profile Identifiers
Touch to have the vehicle recognize the
identifier you choose.
Touch Vehicle Key 1 and/or Vehicle Key 2.
If the remote key is lost or stolen, see your
dealer.
Security
Touch to have your profile secured with
a PIN.
Touch No or Yes.
Vehicle Name
Touch to edit your vehicle name.