power steering GMC SIERRA DENALI 2003 Owners Manual
[x] Cancel search | Manufacturer: GMC, Model Year: 2003, Model line: SIERRA DENALI, Model: GMC SIERRA DENALI 2003Pages: 428, PDF Size: 20.35 MB
Page 99 of 428
To Use the Engine Coolant Heater
1. Turn off the engine.
2. Open the hood and unwrap the electrical cord. The
cord is located on the driver’s side of the engine
compartment, near the power steering fluid
reservoir. If you have a diesel engine, refer to
diesel supplement for location.
3. Plug it into a normal, grounded 11 0-volt AC outlet.
Plugging the cord into an ungrounded outlet
could cause an electrical shock. Also, the
wrong kind of extension cord could overheat
and cause a fire. You could
be seriously
injured. Plug the cord into a properly grounded
three-prong
11 0-volt AC outlet. If the cord
won’t reach, use a heavy-duty three-prong
extension cord rated for at least
15 amps.
4. Before starting the engine, be sure to unplug ana
store the cord as it was before to keep it away
from moving engine parts.
If you don’t, it could be
damaged.
How long should you keep the coolant heater plugged
in? The answer depends on the outside temperature, the
kind of oil you have, and some other things. Instead
of trying to list everything here, we ask that you contact
your dealer in the area where you’ll be parking your
vehicle. The dealer can give you the best advice for that
particular area.
Automatic Transmission Operation
Your vehicle is equipped with an automatic transmission
that features an electronic shift position indicator
located within the instrument panel cluster. This display
is powered anytime the shift lever
is capable of being
moved out
of PARK (P). See Fuses and Circuit Breakers
on page
5-95.
There are several different positions for your shift lever.
PARK
(P): This position locks your wheels. It’s the
best position to use when you start your engine because
your vehicle can’t move easily.
2-1 8
Page 126 of 428
Section 3 Instrument Panel
I~s~Pu~~~IP Panel OWWV~~W ............................... 3.2
Hazard Warning Flashers
................................ 3.3
Other Warning Devices ................................... 3.4
Horn
............................................................. 3.4
Tilt Wheel
..................................................... 3.4
Turn SignaVMultifunction Lever
......................... 3.5
Exterior Lamps
............................................. 3.11
Interior Lamps
.............................................. 3.15
Accessory Power Outlets
............................... 3.16
Ashtrays and Cigarette Lighter
........................ 3.17
Climate Controls
............................................ 3.18
Dual Automatic Climate Control System
........... 3.18
Warning Lights, Gages and Indicators
............. 3.24
Instrument Panel Cluster
................................ 3.25
Speedometer and Odometer
........................... 3.26
Tachometer
................................................ -3-26
Safety Belt Reminder Light
............................. 3.26
Air Bag Readiness Light
................................ 3-27
Passenger Air Bag Status Indicator
................. 3.30
Battery Warning Light
.................................... 3.33
Brake System Warning Light
.......................... 3.34
Anti-Lock Brake System Warning Light
............. 3.35
Air
Bag
Off Light .......................................... 3-28
Voltmeter Gage
............................................ 3-33
Engine Coolant Temperature Gage
..... ..... 3.36 Transmission Temperature
Gage
..................... 3.36
Malfunction Indicator Lamp
............................. 3.38
Oil Pressure Gage
........................................ 3-40
Cruise Control Light
...................................... 3.41
Tow/Haul Mode Light
.................................... 3-41
Fuel Gage
................................................... 3.42
Driver Information Center (DIC)
....................... 3.43
DIC Operation and Displays
........................... 3.43
DIC Warnings and Messages
......................... 3.53
Audio System(s)
............................................. 3.61
Setting the Time
...................... .......... 3.6 1
Radio with Cassette and CD ..... .............. 3.62
Rear Seat Audio (RSA)
............................. 3.76
CD Changer
................................................ 3-78
Theft-Deterrent Feature
................................. -3-81
Audio Steering Wheel Controls
....................... 3.81
Understanding Radio Reception
...................... 3-82
Care of Your Cassette Tape Player
................ -3-83
Care of Your CDs
......................................... 3.84
Care of Your CD Player
................................ 3.84
Fixed Mast Antenna
...................................... 3.84
XMTM Satellite Radio Antenna System
............. 3.84
DAB Radio Antenna System
........................... 3.84
Low Fuel Warning Light
................................. 3-42
Page 128 of 428
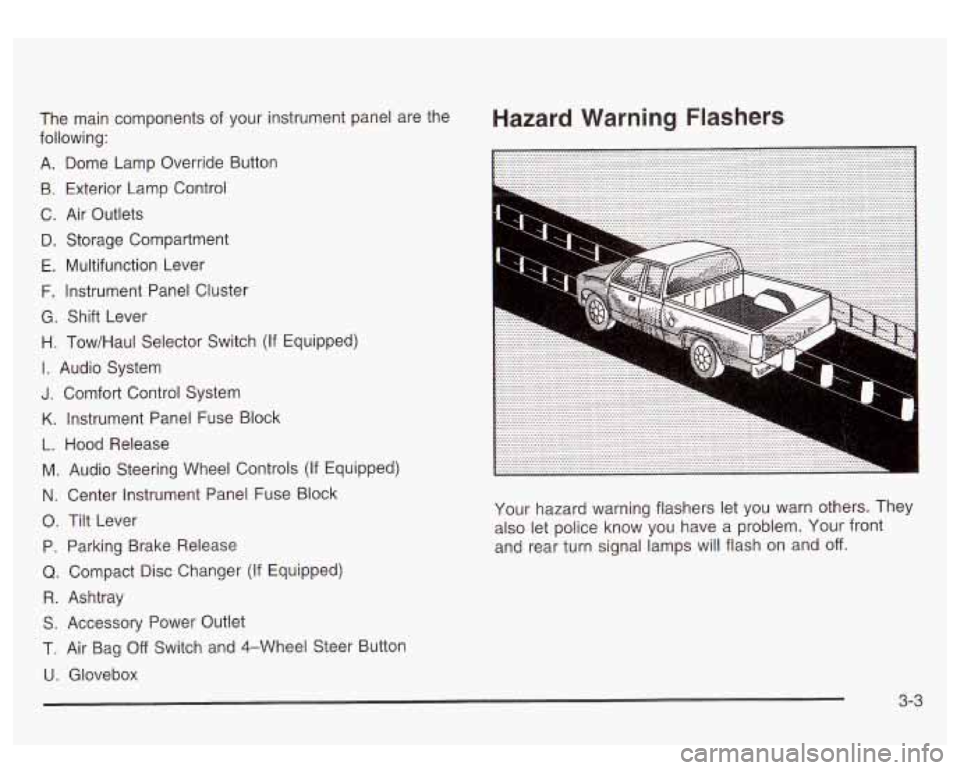
Hazard Warning Flashers The main components of your instrument panel are the
following:
A. Dome Lamp Override Button
9. Exterior Lamp Control
C. Air Outlets
D. Storage Compartment
E. Multifunction Lever
F. Instrument Panel Cluster
G. Shift Lever
H. Tow/Haul Selector Switch (If Equipped)
I. Audio System
J. Comfort Control System
K. Instrument Panel Fuse Block
L. Hood Release
M. Audio Steering Wheel Controls
(If Equipped)
N. Center Instrument Panel Fuse Block
0. Tilt Lever
P. Parking Brake Release
Q. Compact Disc Changer (If Equipped)
R. Ashtray
S. Accessory Power Outlet
1. Air Bag Off Switch and 4-Wheel Steer Button
U. Glovebox Your hazard
warning flashers let you warn others. They
also let police know you have a problem. Your front
and rear turn signal lamps will flash on and
off.
3-3
Page 182 of 428
REDUCED BRAKE POWER
If your vehicle has vacuum assist power brakes, this
message will be displayed and you may notice that the
brake pedal is harder to push and it will take longer
to stop. You may also hear a motor running and feel a
slight vibration in the brake pedal or steering wheel
when you apply or release the brake pedal even
if your
foot is not on the brake pedal. This indicates that the
Supplemental Brake Assist system is working to
maintain braking power.
If you are braking lightly, you
may not notice any difference in the operation
of
your brakes.
This message may also be displayed for brief periods
if
you are driving at higher elevations and are pumping
your brakes or braking hard. The message may
clear after you’ve lifted your foot from the accelerator
pedal an allowed the vehicle to coast
in gear or after you
have driven down to a lower elevation. This is a
normal operation of your brake system and does not
require that the brake system be serviced. However,
if
the message does not clear, your brake system
needs service. While the message is displayed you will
notice that the brake pedal is harder to push and
it
will take longer to stop. See Brake System Warning
Light
on page 3-34.
Your brake system may not be working
properly if the REDUCED BRAKE POWER
message is displayed. If this message comes
on and stays on while driving, pull
off the road
and stop carefully. The brake pedal will be
harder to push and
it will take longer to stop.
If the message is no longer displayed after you
have pulled
off the road and stopped, you can
continue driving.
However, if the message is still displayed, or if
it comes on again when you are driving, there
is a problem with your brake system. If you
continue to drive with this message displayed
it can lead to an accident. You should have the
vehicle towed for service. Also, see Brake
System Warning Light in the Index.
3-57
Page 218 of 428
Steering
Power Steering
If you lose power steering assist because the engine
stops or the system is not functioning, you can steer but
it will take much more effort.
Steering Tips
Driving on Curves
It’s important to take curves at a reasonable speed.
A lot of the “driver lost control” accidents mentioned on
the news happen on curves. Here’s why:
Experienced driver or beginner, each of us is subject to
the same laws of physics when driving on curves.
The traction of the tires against the road surface makes
it possible for the vehicle to change its path when
you turn the front wheels.
If there’s no traction, inertia
will keep the vehicle going in the same direction.
If
you’ve ever tried to steer a vehicle on wet ice, you’ll
understand this.
The traction you can get in a curve depends on the
condition of your tires and the road surface, the angle at
which the curve is banked, and your speed. While you’re
in a curve, speed
is the one factor you can control. Suppose
you’re steering through a sharp curve. Then you
suddenly accelerate. Both control systems
- steering
and acceleration
- have to do their work where the tires
meet the road. Adding the sudden acceleration can
demand too much of those places. You can
lose control.
What should you do
if this ever happens? Ease up on
the accelerator pedal, steer the vehicle the way
you want
it to go, and slow down.
Speed limit signs near curves warn that you should
adjust your speed. Of course, the posted speeds
are based on good weather and road conditions. Under
less favorable conditions you’ll want to go slower.
If you need to reduce your speed as you approach a
curve, do it before you enter the curve, while your front
wheels are straight ahead.
Try to adjust your speed
so you can “drive” through the
curve. Maintain a reasonable, steady speed. Wait to
accelerate until you are out of the curve, and then
accelerate gently into the straightaway.
Steering in Emergencies
There are times when steering can be more effective than
braking. For example, you come over a hill and find a
truck stopped in your lane, or a car suddenly pulls out
from nowhere, or a child darts out from between parked
cars and stops right in front of you. You can avoid these
problems by braking
- if you can stop in time. But
sometimes you can’t; there isn’t room. That’s the time for
evasive action
- steering around the problem.
4-9
Page 231 of 428
Driving Uphill
Once you decide you can safely drive up the hill, you
need to take some special steps.
Use a low gear and get a firm grip on the steering
wheel.
0 Get a smooth start up the hill and try to maintain
your speed. Don’t use more power than yo need,
because you don’t want your wheels to start
spinning or sliding.
Try to drive straight up the hill if at all possible. If
the path twists and turns, you might want to find
another route.
0
0
Ease up on your speed as you approach the tip of
the hill.
Attach a flag to the vehicle to make you more
visible to approaching traffic on trails or hills.
Sound the horn as you approach the top of the hill
to let opposing traffic know you’re there.
Use your headlamps even during the day. They
make you more visible
~ oncoming traffic.
Turning or driving across steep hills can be
dangerous. You could lose traction, slide
sideways, and possibly roll over. You could be
seriously injured or killed. When driving up
hills, always try to go straight up.
A CAUTION: 0
Driving to the top (crest) of a hill at full speed
can cause an accident. There could be
a
drop-off, embankment, cliff, or even another
vehicle. You could be seriously injured or
killed.
As you near the top of a hill, slow down
and stay alert.
4-22
Page 270 of 428
Section 5 Service and Appearance Care
Service ............................................................ 5.3
Doing Your Own Service Work
......................... 5-4
Adding Equipment to the Outside
of Your Vehicle
........................................... 5-4
Fuel
................................................................ 5.5
Gasoline Octane
............................................ 5.5
Gasoline Specifications
.................................... 5.5
California Fuel
............................................... 5.6
Additives
....................................................... 5.6
Fuels in Foreign Countries
................. ....... 5.7
Filling Your Tank
......................................... 5-7
Filling a Portable Fuel Container
.................... 5-9
the Hood
............................................. 5.10
Hood Release
........................................ ,.5-10
Engine Compartment Overview
....................... 5.12
Checking
Things Under
Engine Oil
................................................... 5.13
Engine Air Cleaner/Filter
................................ 5.19
Engine Coolant
............................................. 5.24
Engine Overheating
....................................... 5.27
Cooling System
............................................ 5.30
Automatic
Transmission Fluid
........................ -5-21
Coolant Surge Tank Pressure Cap
.................. 5-27 Engine
Fan Noise
......................................... 5.36
Power Steering Fluid
..................................... 5.37
Windshield Washer Fluid
................................ 5-38
Brakes
........................................................ 5.39
Battery
........................................................ 5.42
Jump Starting
............................................... 5.43
All-Wheel Drive
......................... .............. 5-49
Rear Axle
....................................................... 5-50
Front Axle
...................................................... 5-51
Bulb Replacement
.......................................... 5-52
Halogen Bulbs
.............................................. 5-52
Headlamps
................................................. -5-52
Roof Marker Lamps
...................................... 5-54
Cargo Lamp
............................................. 5-56
Taillamps
..................................................... 5-58
Replacement Bulbs
....................................... 5-59
Front
Turn Signal, Sidemarker
and Daytime
Running Lamps
......................................... 5-53
Center High-Mounted Stoplamp (CHMSL) and
Pickup
Box Identification and Fender Marker
Lamps
..................................................... 5-58
Windshield Wiper Blade Replacement
.............. 5-60
5-
1
Page 282 of 428
A. Engine Air CleanedFilter
B. Coolant Surge Tank
C. Air CleanerlFilter Restriction Indicator
B. Engine Oil Dipstick
E. Engine Oil Fill Cap
F. Automatic Transmission Dipstick
G. Fan
H. Remote Negative
(-) Terminal (GND)
I. Remote Positive (+) Terminal
J. Power Steering Fluid Reservoir
K. Brake Fluid Reservoir
L. Underhood Fuse Block
M. Battery
N. Windshield Washer Fluid Reservoir
Engine Oil
If the CHECK ENG OIL LEVEL message appears on
the instrument cluster, it means you need to check your
engine
oil level right away.
For more information, see “CHECK ENG
OIL LEVEL”
under
DIC Warnings and Messages on page 3-53.
You should check your engine oil level regularly; this is
an added reminder.
5-1 3
Page 306 of 428
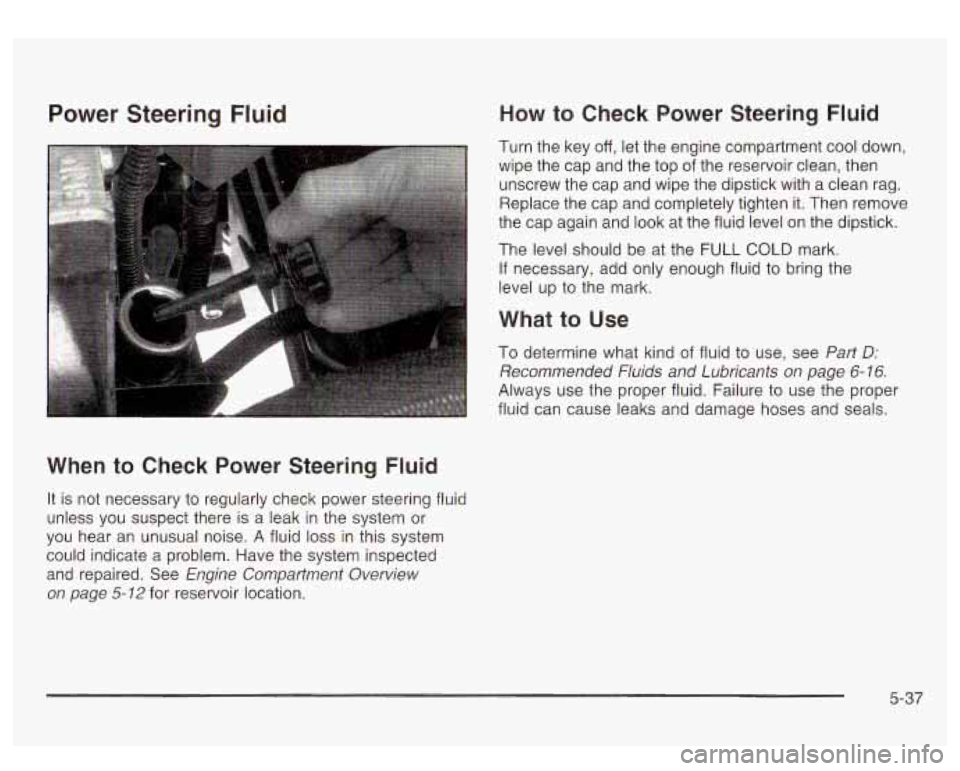
Power Steering Fluid
When to Check Power Steering Fluid
It is not necessary to regularly check power steering fluid
unless you suspect there is a leak in the system or
you hear an unusual noise. A fluid loss in this system
could indicate a problem. Have the system inspected
and repaired. See
Engine Compartment Overview
on page
5-12 for reservoir location.
How to Check Power Steering Fluid
Turn the key off, let the engine compartment cool down,
wipe the cap and the top of the reservoir clean, then
unscrew the cap and wipe the dipstick with a clean rag.
Replace the cap and completely tighten it. Then remove
the cap again and look at the fluid level on the dipstick.
The level should be at the
FULL COLD mark.
If necessary, add only enough fluid to bring the
level up to the mark.
What to Use
To determine what kind of fluid to use, see Part Dr
Recommended Fluids and Lubricants on page 6- 16.
Always use the proper fluid. Failure to use the proper
fluid can cause leaks and damage hoses and seals.
5-37
Page 367 of 428
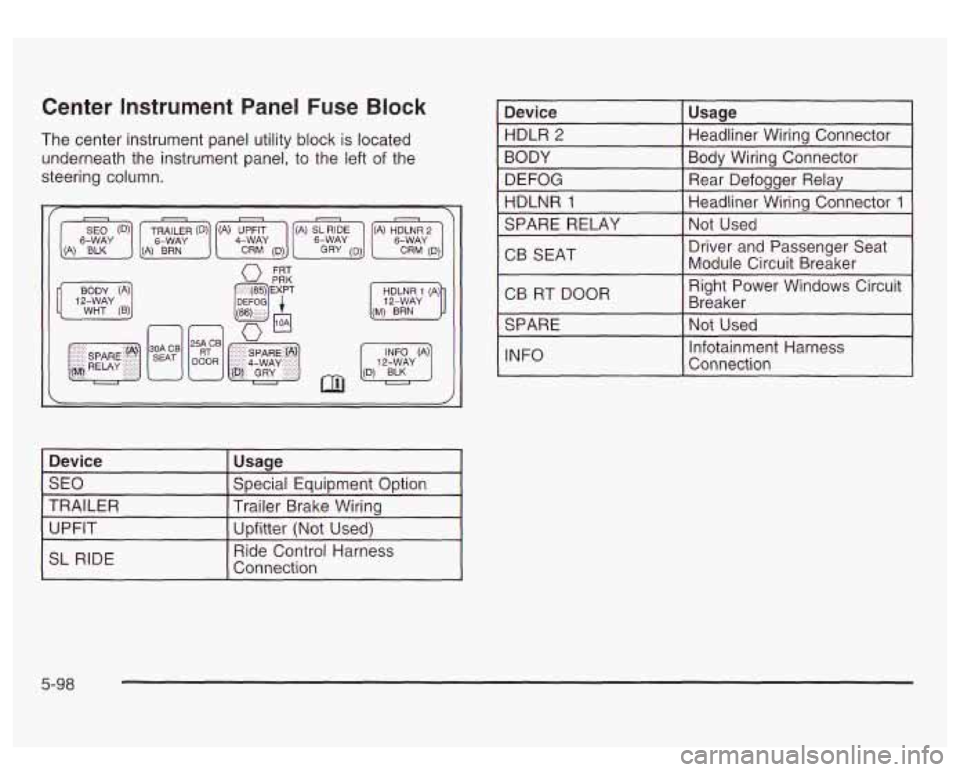
Center Instrument Panel Fuse Block
The center instrument panel utility block is located
underneath the instrument panel, to the left of the
steering column.
Device Special Equipment ODtion
SEO Usage
TRAILER Upfitter (Not Used)
UPFIT Trailer
Brake Wiring
1 SL RIDE I
Ride Control Harness
Connection
I Device I Usage I
HDLR 2
Bodv Wiring Connector
BODY Headliner Wiring
connector-
DEFOG Headliner Wiring Connector
1 HDLNR 1
Rear Defogger Relay
I SPARE RELAY I Not Used I
CB SEAT Driver
and Passenger Seat
Module Circuit Breaker
I CB RT DOOR I
Right Power Windows Circuit
Breaker
I
I SPARE I Not Used I
I INFO I
~-
Infotainment Harness
Connection
1
5-98