oil pressure GMC SIERRA DENALI 2005 Owners Manual
[x] Cancel search | Manufacturer: GMC, Model Year: 2005, Model line: SIERRA DENALI, Model: GMC SIERRA DENALI 2005Pages: 428, PDF Size: 2.5 MB
Page 115 of 428
Instrument Panel Overview...............................3-4
Hazard Warning Flashers................................3-6
Other Warning Devices...................................3-6
Horn.............................................................3-6
Tilt Wheel.....................................................3-6
Turn Signal/Multifunction Lever.........................3-7
Turn and Lane-Change Signals........................3-7
Headlamp High/Low-Beam Changer..................3-8
Flash-to-Pass.................................................3-9
Windshield Wipers..........................................3-9
Windshield Washer.......................................3-10
Cruise Control..............................................3-10
Headlamps..................................................3-13
Headlamps on Reminder................................3-14
Daytime Running Lamps (DRL).......................3-14
Automatic Headlamp System..........................3-15
Puddle Lamps..............................................3-16
Fog Lamps..................................................3-16
Instrument Panel Brightness...........................3-16
Dome Lamps...............................................3-17
Dome Lamp Override....................................3-17
Entry Lighting...............................................3-17
Exit Lighting.................................................3-17
Front Reading Lamps....................................3-18
Cargo Lamp.................................................3-18
Battery Run-Down Protection..........................3-18
Accessory Power Outlets...............................3-18Ashtrays and Cigarette Lighter........................3-19
Climate Controls............................................3-20
Dual Automatic Climate Control System...........3-20
Outlet Adjustment.........................................3-25
Warning Lights, Gages, and Indicators............3-26
Instrument Panel Cluster................................3-27
Speedometer and Odometer...........................3-28
Trip Odometer..............................................3-28
Tachometer.................................................3-28
Safety Belt Reminder Light.............................3-28
Airbag Readiness Light..................................3-29
Passenger Airbag Status Indicator...................3-29
Battery Warning Light....................................3-31
Voltmeter Gage............................................3-31
Brake System Warning Light..........................3-32
Anti-Lock Brake System Warning Light.............3-33
Engine Coolant Temperature Gage..................3-34
Transmission Temperature Gage.....................3-34
Malfunction Indicator Lamp.............................3-36
Oil Pressure Gage........................................3-39
Security Light...............................................3-40
Cruise Control Light......................................3-40
Highbeam On Light.......................................3-40
Tow/Haul Mode Light....................................3-40
Fuel Gage...................................................3-41
Low Fuel Warning Light.................................3-41
Section 3 Instrument Panel
3-1
Page 153 of 428
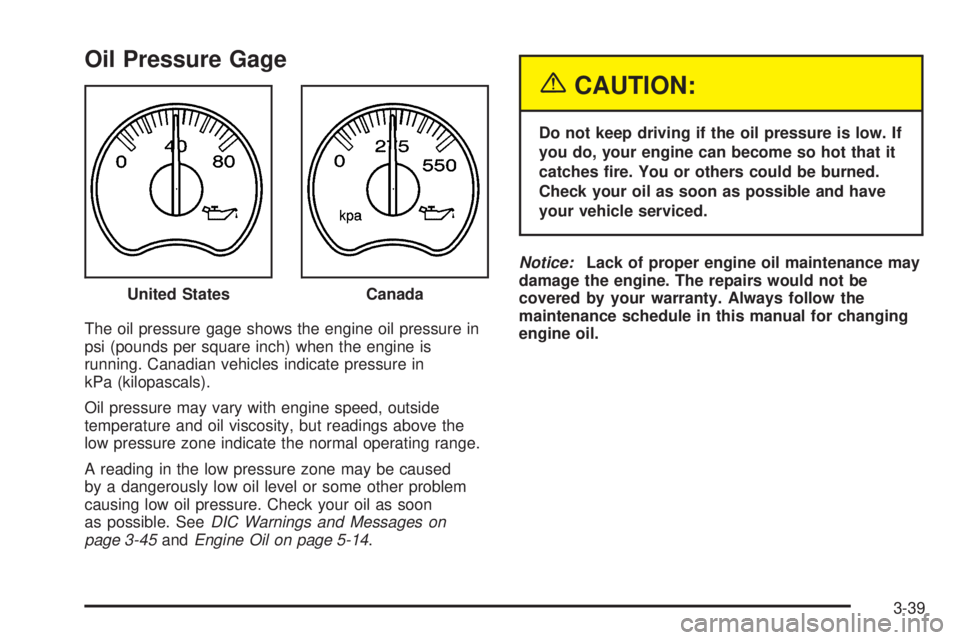
Oil Pressure Gage
The oil pressure gage shows the engine oil pressure in
psi (pounds per square inch) when the engine is
running. Canadian vehicles indicate pressure in
kPa (kilopascals).
Oil pressure may vary with engine speed, outside
temperature and oil viscosity, but readings above the
low pressure zone indicate the normal operating range.
A reading in the low pressure zone may be caused
by a dangerously low oil level or some other problem
causing low oil pressure. Check your oil as soon
as possible. SeeDIC Warnings and Messages on
page 3-45andEngine Oil on page 5-14.
{CAUTION:
Do not keep driving if the oil pressure is low. If
you do, your engine can become so hot that it
catches �re. You or others could be burned.
Check your oil as soon as possible and have
your vehicle serviced.
Notice:Lack of proper engine oil maintenance may
damage the engine. The repairs would not be
covered by your warranty. Always follow the
maintenance schedule in this manual for changing
engine oil. United States
Canada
3-39
Page 156 of 428
Driver Information Center (DIC)
The Driver Information Center (DIC) display is located
on the instrument panel cluster, below the speedometer.
The DIC buttons, if equipped, are located on the
steering wheel. The DIC can display information such
as the trip odometer, fuel economy, customization
features and warning/status messages.
If your vehicle is not equipped with the DIC steering
wheel buttons, you will not have all of the features listed.
You will scroll through the odometer, trip odometer
and engine hours by pressing the trip odometer reset
stem located on the instrument panel cluster. You
will also turn off, or acknowledge, DIC messages by
pressing the trip odometer reset stem. SeeSpeedometer
and Odometer on page 3-28for information on
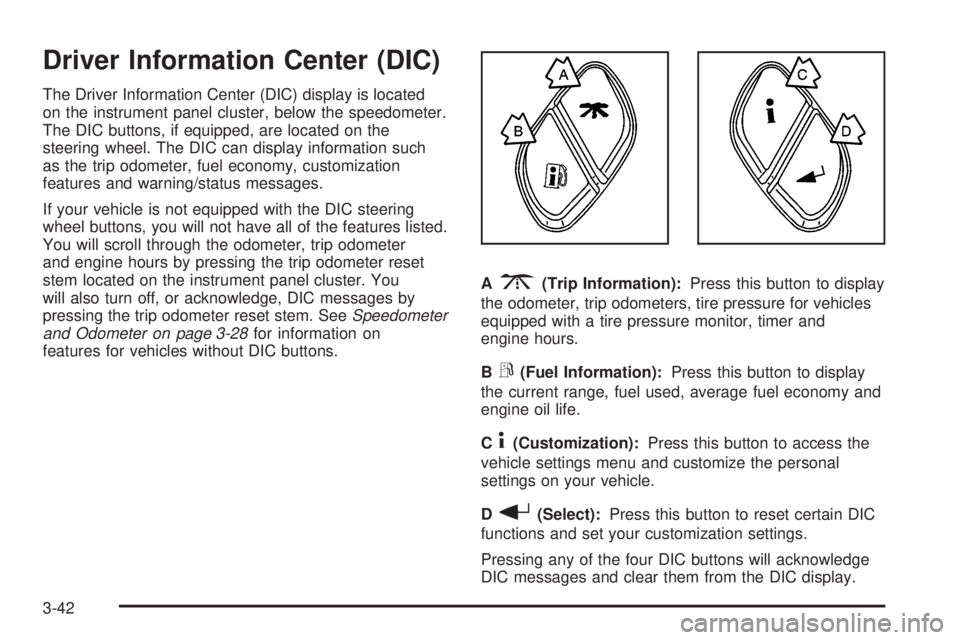
features for vehicles without DIC buttons.A
3(Trip Information):Press this button to display
the odometer, trip odometers, tire pressure for vehicles
equipped with a tire pressure monitor, timer and
engine hours.
B
r(Fuel Information):Press this button to display
the current range, fuel used, average fuel economy and
engine oil life.
C
4(Customization):Press this button to access the
vehicle settings menu and customize the personal
settings on your vehicle.
D
r(Select):Press this button to reset certain DIC
functions and set your customization settings.
Pressing any of the four DIC buttons will acknowledge
DIC messages and clear them from the DIC display.
3-42
Page 163 of 428
KEYFOB X BATTERY LOW
If a remote keyless entry transmitter battery is low, this
message will appear on the DIC. The battery needs to be
replaced in the transmitter. See “Battery Replacement”
underRemote Keyless Entry System Operation on
page 2-4. Pressing any of the four DIC buttons, if
equipped, will acknowledge the message and clear it
from the DIC display. If your vehicle is not equipped with
the four DIC buttons, pressing the trip odometer reset
stem will acknowledge the message and clear it from the
DIC display.
LOW COOLANT LEVEL
If your vehicle is equipped with a low coolant level sensor,
this message will appear on the DIC if the engine coolant
level is low. Adding coolant will clear the message. See
Cooling System on page 5-29. Pressing any of the
four DIC buttons, if equipped, will acknowledge the
message and clear it from the DIC display. If your vehicle
is not equipped with the four DIC buttons, pressing the
trip odometer reset stem will acknowledge the message
and clear it from the DIC display.
Notice:Engine damage from running your engine
without coolant is not covered by your warranty. See
“Overheated Engine Protection Operating Mode”
in the Index for information on driving to a safe
place in an emergency.
OIL LIFE RESET
This message will appear on the display for about
10 seconds after resetting the change engine oil
message. See “Engine Oil Life System” underDIC
Operation and Displays on page 3-43andEngine Oil on
page 5-14for more information.
OIL PRESSURE LOW
If low oil pressure levels occur, this message will be
displayed on the DIC and a chime will sound. Stop the
vehicle as soon as safely possible and do not operate
it until the cause of the low oil pressure has been
corrected. Check your oil as soon as possible and have
your vehicle serviced by your GM dealer.
Notice:If you drive your vehicle while the engine
oil pressure is low, severe engine damage may
occur. If a low oil pressure warning appears on the
Driver Information Center (DIC), stop the vehicle
as soon as possible. Do not drive the vehicle until
the cause of the low oil pressure is corrected.
SeeEngine Oil on page 5-14for more information.
3-49
Page 241 of 428
Reduce your speed according to your speedometer, not
to your sense of motion. After driving for any distance
at higher speeds, you may tend to think you are
going slower than you actually are.
Before Leaving on a Long Trip
Make sure you are ready. Try to be well rested. If you
must start when you are not fresh — such as after
a day’s work — do not plan to make too many miles that
�rst part of the journey. Wear comfortable clothing
and shoes you can easily drive in.
Is your vehicle ready for a long trip? If you keep it
serviced and maintained, it is ready to go. If it needs
service, have it done before starting out. Of course, you
will �nd experienced and able service experts in GM
dealerships all across North America. They will be ready
and willing to help if you need it.
Here are some things you can check before a trip:
Windshield Washer Fluid:Is the reservoir full? Are
all windows clean inside and outside?
Wiper Blades:Are they in good shape?
Fuel, Engine Oil, Other Fluids:Have you checked
all levels?
Lamps:Are they all working? Are the lenses clean?
Tires:They are vitally important to a safe,
trouble-free trip. Is the tread good enough for
long-distance driving? Are the tires all in�ated to the
recommended pressure?
Weather Forecasts:What is the weather outlook
along your route? Should you delay your trip a
short time to avoid a major storm system?
Maps:Do you have up-to-date maps?
Highway Hypnosis
Is there actually such a condition as highway hypnosis?
Or is it just plain falling asleep at the wheel? Call it
highway hypnosis, lack of awareness, or whatever.
There is something about an easy stretch of road with
the same scenery, along with the hum of the tires on the
road, the drone of the engine, and the rush of the
wind against the vehicle that can make you sleepy. Do
not let it happen to you! If it does, your vehicle can
leave the road in less than a second, and you could
crash and be injured.
What can you do about highway hypnosis? First, be
aware that it can happen.
4-33
Page 273 of 428
Service............................................................5-3
Doing Your Own Service Work.........................5-4
Adding Equipment to the Outside of Your
Vehicle......................................................5-5
Fuel................................................................5-5
Gasoline Octane............................................5-5
Gasoline Speci�cations....................................5-5
California Fuel...............................................5-6
Additives.......................................................5-6
Fuels in Foreign Countries...............................5-7
Filling Your Tank............................................5-7
Filling a Portable Fuel Container.......................5-9
Checking Things Under the Hood....................5-10
Hood Release..............................................5-10
Engine Compartment Overview.......................5-12
Engine Oil...................................................5-14
Engine Oil Life System..................................5-17
Engine Air Cleaner/Filter................................5-19
Automatic Transmission Fluid.........................5-21
Engine Coolant.............................................5-24
Coolant Surge Tank Pressure Cap..................5-26
Engine Overheating.......................................5-26
Overheated Engine Protection Operating Mode . . .5-28
Cooling System............................................5-29
Engine Fan Noise.........................................5-34
Power Steering Fluid.....................................5-34Windshield Washer Fluid................................5-36
Brakes........................................................5-37
Battery........................................................5-40
Jump Starting...............................................5-41
All-Wheel Drive..............................................5-46
Rear Axle.......................................................5-47
Front Axle......................................................5-48
Bulb Replacement..........................................5-49
Halogen Bulbs..............................................5-49
Headlamps..................................................5-49
Front Turn Signal, Sidemarker and Daytime
Running Lamps.........................................5-50
Center High-Mounted Stoplamp (CHMSL) and
Cargo Lamp.............................................5-51
Taillamps.....................................................5-53
Replacement Bulbs.......................................5-54
Windshield Wiper Blade Replacement..............5-55
Tires..............................................................5-56
Tire Sidewall Labelling...................................5-57
Tire Terminology and De�nitions.....................5-60
In�ation - Tire Pressure.................................5-62
Tire Inspection and Rotation...........................5-63
When It Is Time for New Tires.......................5-65
Buying New Tires.........................................5-66
Uniform Tire Quality Grading..........................5-67
Section 5 Service and Appearance Care
5-1
Page 285 of 428
A. Engine Air Cleaner/Filter. SeeEngine Air
Cleaner/Filter on page 5-19.
B. Coolant Surge Tank and Pressure Cap. SeeCooling
System on page 5-29andCoolant Surge Tank
Pressure Cap on page 5-26.
C. Air Filter Restriction Indicator (If Equipped). See
Engine Air Cleaner/Filter on page 5-19.
D. Engine Oil Fill Cap. See “When to Add Engine Oil”
underEngine Oil on page 5-14.
E. Engine Oil Dipstick. See “Checking Engine Oil”
underEngine Oil on page 5-14.
F. Automatic Transmission Dipstick. See “Checking the
Fluid Level” underAutomatic Transmission Fluid
on page 5-21.
G. Electric Engine Cooling Fan (If Equipped). See
Cooling System on page 5-29.H. Remote Negative (−) Terminal (GND). SeeJump
Starting on page 5-41.
I. Remote Positive (+) Terminal. SeeJump Starting on
page 5-41.
J. Power Steering Fluid Reservoir. SeePower Steering
Fluid on page 5-34.
K. Brake Fluid Reservoir. See “Brake Fluid” under
Brakes on page 5-37.
L. Underhood Fuse Block. SeeUnderhood Fuse Block
on page 5-107.
M. Battery. SeeBattery on page 5-40.
N. Windshield Washer Fluid Reservoir. See “Adding
Washer Fluid” underWindshield Washer Fluid
on page 5-36.
5-13
Page 297 of 428
What to Use
Use a mixture of one-halfclean, drinkable waterand
one-half DEX-COOL®coolant which will not damage
aluminum parts. If you use this coolant mixture, you do
not need to add anything else.
{CAUTION:
Adding only plain water to your cooling system
can be dangerous. Plain water, or some other
liquid such as alcohol, can boil before the
proper coolant mixture will. Your vehicle’s
coolant warning system is set for the proper
coolant mixture. With plain water or the wrong
mixture, your engine could get too hot but you
would not get the overheat warning. Your
engine could catch �re and you or others could
be burned. Use a 50/50 mixture of clean,
drinkable water and DEX-COOL
®coolant.Notice:If you use an improper coolant mixture, your
engine could overheat and be badly damaged. The
repair cost would not be covered by your warranty.
Too much water in the mixture can freeze and crack
the engine, radiator, heater core and other parts.
If you have to add coolant more than four times a year,
have your dealer check your cooling system.
Notice:If you use the proper coolant, you do not
have to add extra inhibitors or additives which claim
to improve the system. These can be harmful.
Checking Coolant
The coolant surge tank is located in the engine
compartment on the passenger’s side of the vehicle.
SeeEngine Compartment Overview on page 5-12
for more information on location.
{CAUTION:
Turning the surge tank pressure cap when the
engine and radiator are hot can allow steam
and scalding liquids to blow out and burn you
badly. Never turn the surge tank pressure
cap — even a little — when the engine and
radiator are hot.
5-25
Page 301 of 428
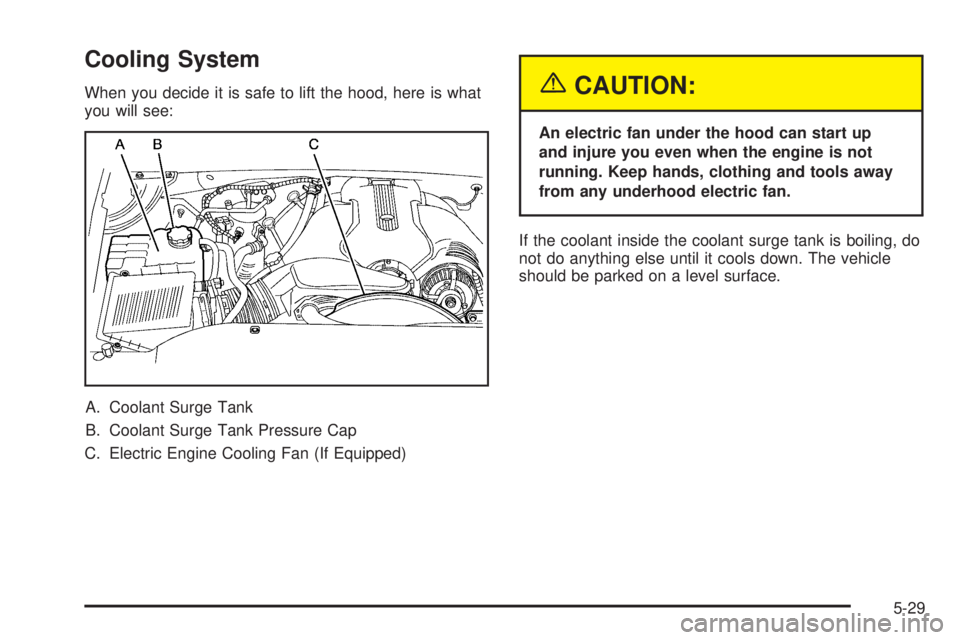
Cooling System
When you decide it is safe to lift the hood, here is what
you will see:
A. Coolant Surge Tank
B. Coolant Surge Tank Pressure Cap
C. Electric Engine Cooling Fan (If Equipped){CAUTION:
An electric fan under the hood can start up
and injure you even when the engine is not
running. Keep hands, clothing and tools away
from any underhood electric fan.
If the coolant inside the coolant surge tank is boiling, do
not do anything else until it cools down. The vehicle
should be parked on a level surface.
5-29
Page 304 of 428
{CAUTION:
Adding only plain water to your cooling
system can be dangerous. Plain water, or
some other liquid such as alcohol, can boil
before the proper coolant mixture will. Your
vehicle’s coolant warning system is set for the
proper coolant mixture. With plain water or the
wrong mixture, your engine could get too hot
but you would not get the overheat warning.
Your engine could catch �re and you or others
could be burned. Use a 50/50 mixture of clean,
drinkable water and DEX-COOL
®coolant.
Notice:In cold weather, water can freeze and crack
the engine, radiator, heater core and other parts.
Use the recommended coolant and the proper
coolant mixture.
{CAUTION:
You can be burned if you spill coolant on hot
engine parts. Coolant contains ethylene glycol
and it will burn if the engine parts are hot
enough. Do not spill coolant on a hot engine.
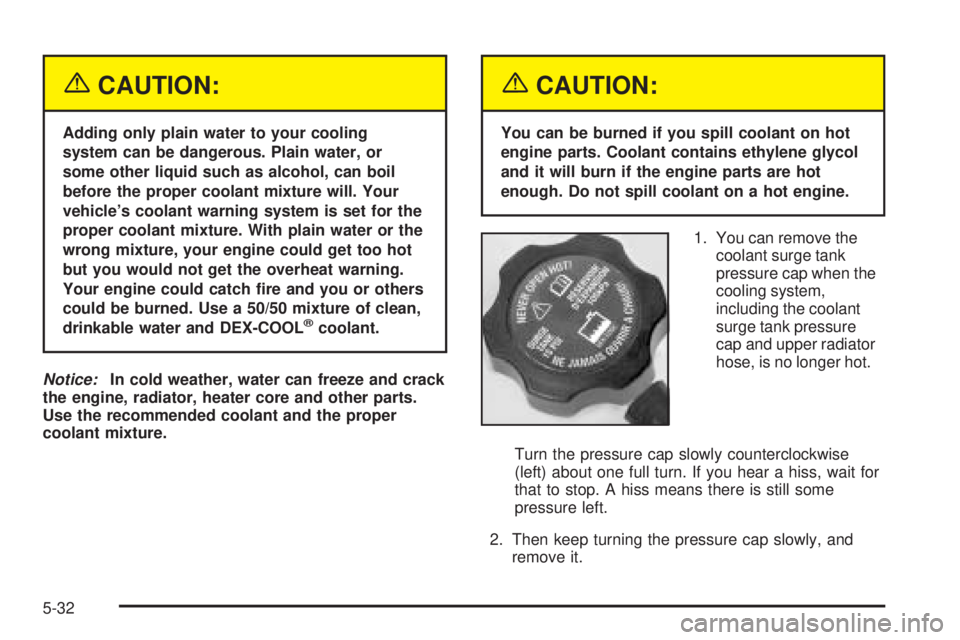
1. You can remove the
coolant surge tank
pressure cap when the
cooling system,
including the coolant
surge tank pressure
cap and upper radiator
hose, is no longer hot.
Turn the pressure cap slowly counterclockwise
(left) about one full turn. If you hear a hiss, wait for
that to stop. A hiss means there is still some
pressure left.
2. Then keep turning the pressure cap slowly, and
remove it.
5-32