key GMC SIERRA DENALI 2010 Owners Manual
[x] Cancel search | Manufacturer: GMC, Model Year: 2010, Model line: SIERRA DENALI, Model: GMC SIERRA DENALI 2010Pages: 550, PDF Size: 4.17 MB
Page 1 of 550

2010 GMC Sierra Denali Owner ManualM
In Brief. . . . . . . . . . . . . . . . . . . . . . . . . . . . . . . . . . . . . . . . . . . . 1-1
Instrument Panel . . . . . . . . . . . . . . . . . . . . . . . . . . . . . . . . . 1-2
Initial Drive Information . . . . . . . . . . . . . . . . . . . . . . . . . . . 1-4
Vehicle Features . . . . . . . . . . . . . . . . . . . . . . . . . . . . . . . . 1-18
Performance and Maintenance . . . . . . . . . . . . . . . . . . 1-24
Seats and Restraint System . . . . . . . . . . . . . . . . . . . . . . 2-1
Head Restraints . . . . . . . . . . . . . . . . . . . . . . . . . . . . . . . . . . 2-2
Front Seats . . . . . . . . . . . . . . . . . . . . . . . . . . . . . . . . . . . . . . . 2-3
Rear Seats . . . . . . . . . . . . . . . . . . . . . . . . . . . . . . . . . . . . . . 2-10
Safety Belts . . . . . . . . . . . . . . . . . . . . . . . . . . . . . . . . . . . . . 2-11
Child Restraints . . . . . . . . . . . . . . . . . . . . . . . . . . . . . . . . . 2-33
Airbag System . . . . . . . . . . . . . . . . . . . . . . . . . . . . . . . . . . 2-56
Restraint System Check . . . . . . . . . . . . . . . . . . . . . . . . . 2-73
Features and Controls . . . . . . . . . . . . . . . . . . . . . . . . . . . . 3-1
Keys . . . . . . . . . . . . . . . . . . . . . . . . . . . . . . . . . . . . . . . . . . . . . 3-3
Doors and Locks . . . . . . . . . . . . . . . . . . . . . . . . . . . . . . . . 3-10
Windows . . . . . . . . . . . . . . . . . . . . . . . . . . . . . . . . . . . . . . . . 3-15
Theft-Deterrent Systems . . . . . . . . . . . . . . . . . . . . . . . . 3-18
Starting and Operating Your Vehicle . . . . . . . . . . . . . 3-22
Mirrors . . . . . . . . . . . . . . . . . . . . . . . . . . . . . . . . . . . . . . . . . . 3-39 Object Detection Systems . . . . . . . . . . . . . . . . . . . . . . . 3-43
Universal Home Remote System . . . . . . . . . . . . . . . . 3-51
Storage Areas . . . . . . . . . . . . . . . . . . . . . . . . . . . . . . . . . . . 3-57
Sunroof . . . . . . . . . . . . . . . . . . . . . . . . . . . . . . . . . . . . . . . . . 3-61
Instrument Panel . . . . . . . . . . . . . . . . . . . . . . . . . . . . . . . . . 4-1
Instrument Panel Overview . . . . . . . . . . . . . . . . . . . . . . . 4-3
Climate Controls . . . . . . . . . . . . . . . . . . . . . . . . . . . . . . . . 4-17
Warning Lights, Gages, and Indicators . . . . . . . . . . 4-27
Driver Information Center (DIC) . . . . . . . . . . . . . . . . . 4-44
Audio System(s) . . . . . . . . . . . . . . . . . . . . . . . . . . . . . . . . 4-76
Driving Your Vehicle . . . . . . . . . . . . . . . . . . . . . . . . . . . . . . 5-1
Your Driving, the Road, and the Vehicle . . . . . . . . . . 5-2
Towing . . . . . . . . . . . . . . . . . . . . . . . . . . . . . . . . . . . . . . . . . . 5-38
Service and Appearance Care . . . . . . . . . . . . . . . . . . . 6-1
Service . . . . . . . . . . . . . . . . . . . . . . . . . . . . . . . . . . . . . . . . . . . 6-4
Fuel . . . . . . . . . . . . . . . . . . . . . . . . . . . . . . . . . . . . . . . . . . . . . . 6-6
Checking Things Under the Hood . . . . . . . . . . . . . . . 6-14
All-Wheel Drive . . . . . . . . . . . . . . . . . . . . . . . . . . . . . . . . . 6-49
Rear Axle . . . . . . . . . . . . . . . . . . . . . . . . . . . . . . . . . . . . . . . 6-50
Page 7 of 550
Section 1 In Brief
Instrument Panel. . . . . . . . . . . . . . . . . . . . . . . . . . . . . . . . . . . 1-2
Initial Drive Information . . . . . . . . . . . . . . . . . . . . . . . . . . . 1-4
Remote Keyless Entry (RKE) System . . . . . . . . . . . 1-4
Remote Vehicle Start . . . . . . . . . . . . . . . . . . . . . . . . . . . 1-5
Door Locks . . . . . . . . . . . . . . . . . . . . . . . . . . . . . . . . . . . . . 1-5
Windows . . . . . . . . . . . . . . . . . . . . . . . . . . . . . . . . . . . . . . . . 1-6
Seat Adjustment . . . . . . . . . . . . . . . . . . . . . . . . . . . . . . . . 1-7
Heated Seats . . . . . . . . . . . . . . . . . . . . . . . . . . . . . . . . . . . 1-9
Heated and Ventilated Seats . . . . . . . . . . . . . . . . . . . . 1-9
Head Restraint Adjustment . . . . . . . . . . . . . . . . . . . . 1-10
Safety Belt . . . . . . . . . . . . . . . . . . . . . . . . . . . . . . . . . . . . . 1-10
Sensing System for Passenger Airbag . . . . . . . . . 1-11
Mirror Adjustment . . . . . . . . . . . . . . . . . . . . . . . . . . . . . . 1-11
Steering Wheel Adjustment . . . . . . . . . . . . . . . . . . . . 1-12
Throttle and Brake Pedal Adjustment . . . . . . . . . . 1-13
Interior Lighting . . . . . . . . . . . . . . . . . . . . . . . . . . . . . . . . 1-13
Exterior Lighting . . . . . . . . . . . . . . . . . . . . . . . . . . . . . . . 1-14
Windshield Wiper/Washer . . . . . . . . . . . . . . . . . . . . . . 1-15
Climate Controls . . . . . . . . . . . . . . . . . . . . . . . . . . . . . . . 1-15
Transmission . . . . . . . . . . . . . . . . . . . . . . . . . . . . . . . . . . 1-17 Vehicle Features
. . . . . . . . . . . . . . . . . . . . . . . . . . . . . . . . . . 1-18
Radio(s) . . . . . . . . . . . . . . . . . . . . . . . . . . . . . . . . . . . . . . . 1-18
Satellite Radio . . . . . . . . . . . . . . . . . . . . . . . . . . . . . . . . . 1-19
Portable Audio Devices . . . . . . . . . . . . . . . . . . . . . . . . 1-19
Steering Wheel Controls . . . . . . . . . . . . . . . . . . . . . . . 1-20
Bluetooth
®. . . . . . . . . . . . . . . . . . . . . . . . . . . . . . . . . . . . . 1-20
Navigation System . . . . . . . . . . . . . . . . . . . . . . . . . . . . . 1-20
Driver Information Center (DIC) . . . . . . . . . . . . . . . . 1-21
Cruise Control . . . . . . . . . . . . . . . . . . . . . . . . . . . . . . . . . 1-22
Rear Vision Camera (RVC) . . . . . . . . . . . . . . . . . . . . 1-23
Ultrasonic Parking Assist . . . . . . . . . . . . . . . . . . . . . . 1-23
Power Outlets . . . . . . . . . . . . . . . . . . . . . . . . . . . . . . . . . 1-23
Universal Remote System . . . . . . . . . . . . . . . . . . . . . 1-23
Sunroof . . . . . . . . . . . . . . . . . . . . . . . . . . . . . . . . . . . . . . . . 1-24
Performance and Maintenance . . . . . . . . . . . . . . . . . .1-24
StabiliTrak
®. . . . . . . . . . . . . . . . . . . . . . . . . . . . . . . . . . . . 1-24
Tire Pressure Monitor . . . . . . . . . . . . . . . . . . . . . . . . . . 1-25
Engine Oil Life System . . . . . . . . . . . . . . . . . . . . . . . . 1-25
Fuel E85 (85% Ethanol) . . . . . . . . . . . . . . . . . . . . . . . 1-26
Driving for Better Fuel Economy . . . . . . . . . . . . . . . 1-26
Roadside Assistance Program . . . . . . . . . . . . . . . . . 1-27
OnStar
®. . . . . . . . . . . . . . . . . . . . . . . . . . . . . . . . . . . . . . . 1-27
1-1
Page 10 of 550
Initial Drive Information
This section provides a brief overview about some of
the important features that may or may not be on your
specific vehicle.
For more detailed information, refer to each of the
features which can be found later in this owner manual.
Remote Keyless Entry (RKE) System
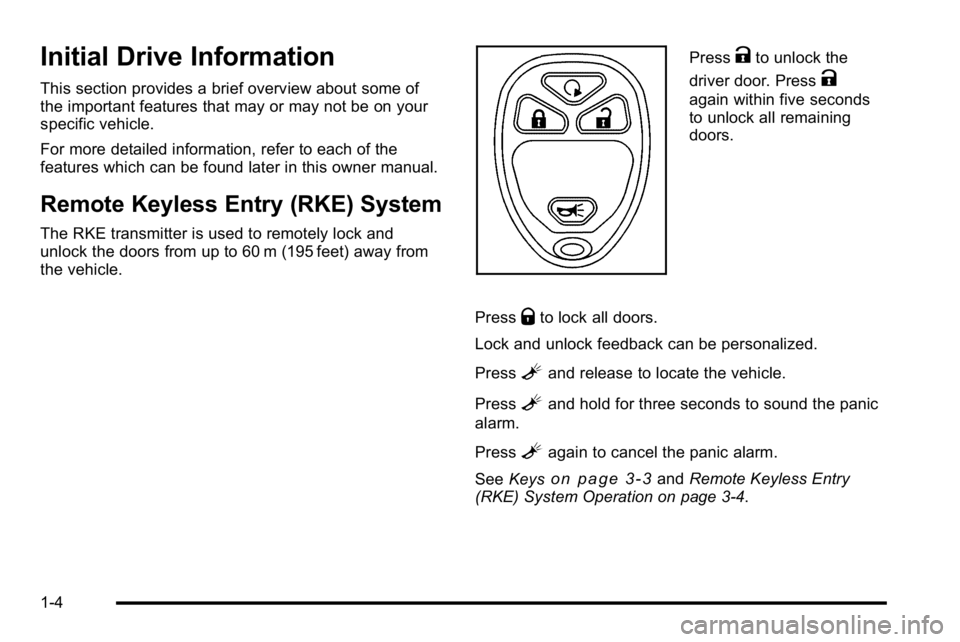
The RKE transmitter is used to remotely lock and
unlock the doors from up to 60 m (195 feet) away from
the vehicle.
PressKto unlock the
driver door. Press
K
again within five seconds
to unlock all remaining
doors.
Press
Qto lock all doors.
Lock and unlock feedback can be personalized.
Press
Land release to locate the vehicle.
Press
Land hold for three seconds to sound the panic
alarm.
Press
Lagain to cancel the panic alarm.
See Keys
on page 3‑3andRemote Keyless Entry
(RKE) System Operation on page 3‑4.
1-4
Page 11 of 550
Remote Vehicle Start
With this feature the engine can be started from outside
of the vehicle.
Starting the Vehicle
1. Aim the RKE transmitter at the vehicle.
2. Press
Q.
3. Immediately after completing Step 2, press and hold
/until the turn signal lamps flash.
When the vehicle starts, the parking lamps will turn on
and remain on as long as the engine is running. The
doors will be locked and the climate control system may
come on.
The engine will continue to run for 10 minutes. Repeat
the steps for a 10-minute time extension. Remote start
can be extended only once.
Canceling a Remote Start
To cancel a remote start:
.Aim the RKE transmitter at the vehicle and press
and hold
/until the parking lamps turn off.
.Turn on the hazard warning flashers.
.Turn the ignition on and then back off.
See Remote Vehicle Start on page 3‑7.
Door Locks
There are several ways to lock and unlock the vehicle.
From outside, use the Remote Keyless Entry (RKE)
transmitter or the key in the driver door. From inside,
use the power door locks or the manual door locks. To
lock or unlock the door with the manual locks, push
down or pull up on the manual lock knob.
Power Door Locks
If available, these switches are located on the front
doors.
K:Press to unlock the doors.
Q:Remove the key from the ignition and press to lock
the doors.
For more information, see:
.Programmable Automatic Door Lockson
page 3‑11.
.Rear Door Security Locks on page 3‑12.
1-5
Page 24 of 550
Vehicle Features
Radio(s)
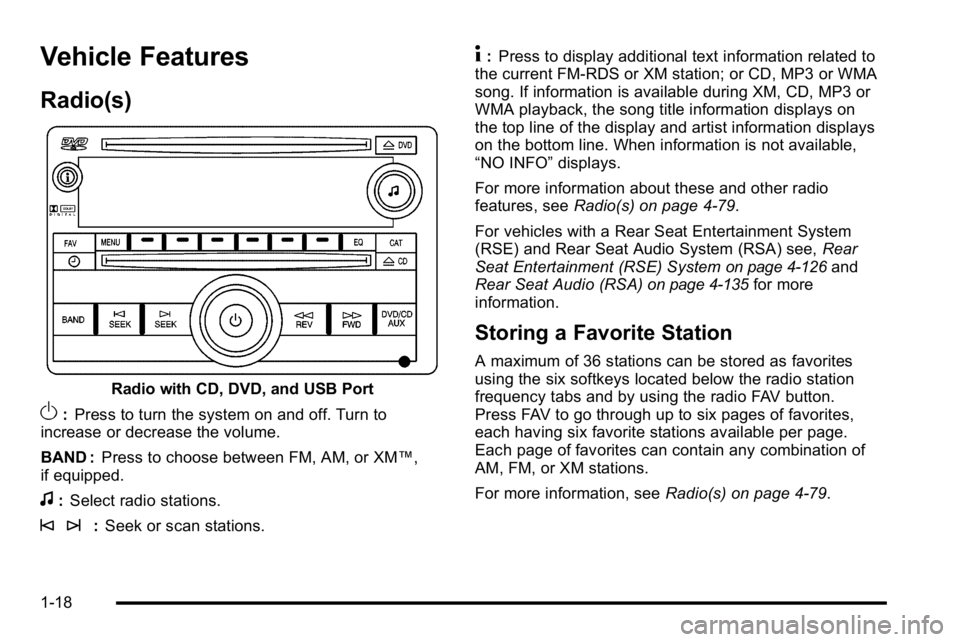
Radio with CD, DVD, and USB Port
O:Press to turn the system on and off. Turn to
increase or decrease the volume.
BAND : Press to choose between FM, AM, or XM™,
if equipped.
f: Select radio stations.
© ¨: Seek or scan stations.
4:Press to display additional text information related to
the current FM-RDS or XM station; or CD, MP3 or WMA
song. If information is available during XM, CD, MP3 or
WMA playback, the song title information displays on
the top line of the display and artist information displays
on the bottom line. When information is not available,
“NO INFO” displays.
For more information about these and other radio
features, see Radio(s) on page 4‑79.
For vehicles with a Rear Seat Entertainment System
(RSE) and Rear Seat Audio System (RSA) see, Rear
Seat Entertainment (RSE) System
on page 4‑126and
Rear Seat Audio (RSA)on page 4‑135for more
information.
Storing a Favorite Station
A maximum of 36 stations can be stored as favorites
using the six softkeys located below the radio station
frequency tabs and by using the radio FAV button.
Press FAV to go through up to six pages of favorites,
each having six favorite stations available per page.
Each page of favorites can contain any combination of
AM, FM, or XM stations.
For more information, see Radio(s) on page 4‑79.
1-18
Page 25 of 550
Setting the Clock
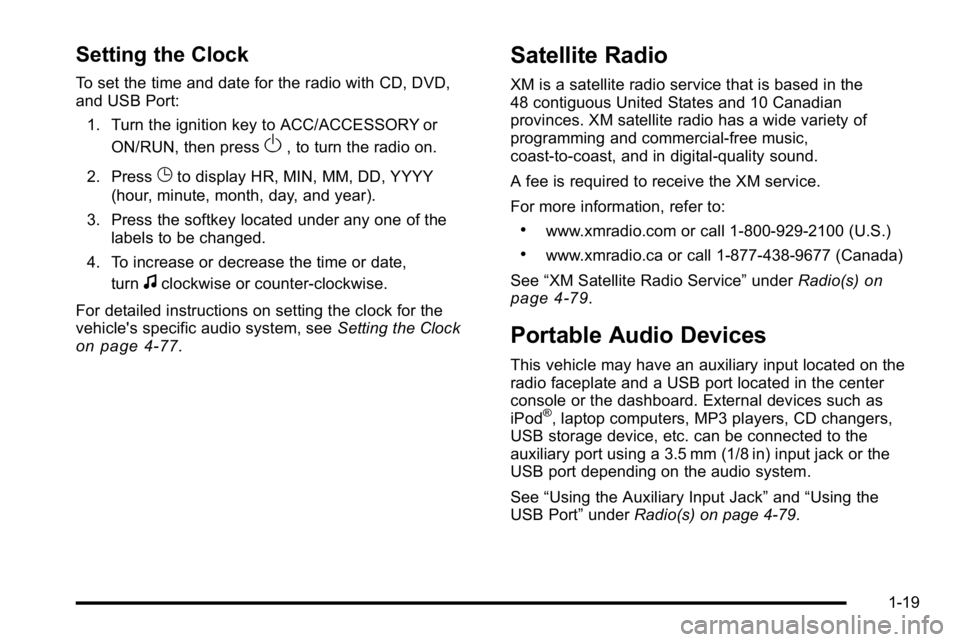
To set the time and date for the radio with CD, DVD,
and USB Port:1. Turn the ignition key to ACC/ACCESSORY or ON/RUN, then press
O, to turn the radio on.
2. Press
Gto display HR, MIN, MM, DD, YYYY
(hour, minute, month, day, and year).
3. Press the softkey located under any one of the labels to be changed.
4. To increase or decrease the time or date, turn
fclockwise or counter‐clockwise.
For detailed instructions on setting the clock for the
vehicle's specific audio system, see Setting the Clock
on page 4‑77.
Satellite Radio
XM is a satellite radio service that is based in the
48 contiguous United States and 10 Canadian
provinces. XM satellite radio has a wide variety of
programming and commercial-free music,
coast-to-coast, and in digital-quality sound.
A fee is required to receive the XM service.
For more information, refer to:
.www.xmradio.com or call 1-800-929-2100 (U.S.)
.www.xmradio.ca or call 1-877-438-9677 (Canada)
See “XM Satellite Radio Service” underRadio(s)
on
page 4‑79.
Portable Audio Devices
This vehicle may have an auxiliary input located on the
radio faceplate and a USB port located in the center
console or the dashboard. External devices such as
iPod
®, laptop computers, MP3 players, CD changers,
USB storage device, etc. can be connected to the
auxiliary port using a 3.5 mm (1/8 in) input jack or the
USB port depending on the audio system.
See “Using the Auxiliary Input Jack” and“Using the
USB Port” underRadio(s) on page 4‑79.
1-19
Page 27 of 550
Driver Information Center (DIC)
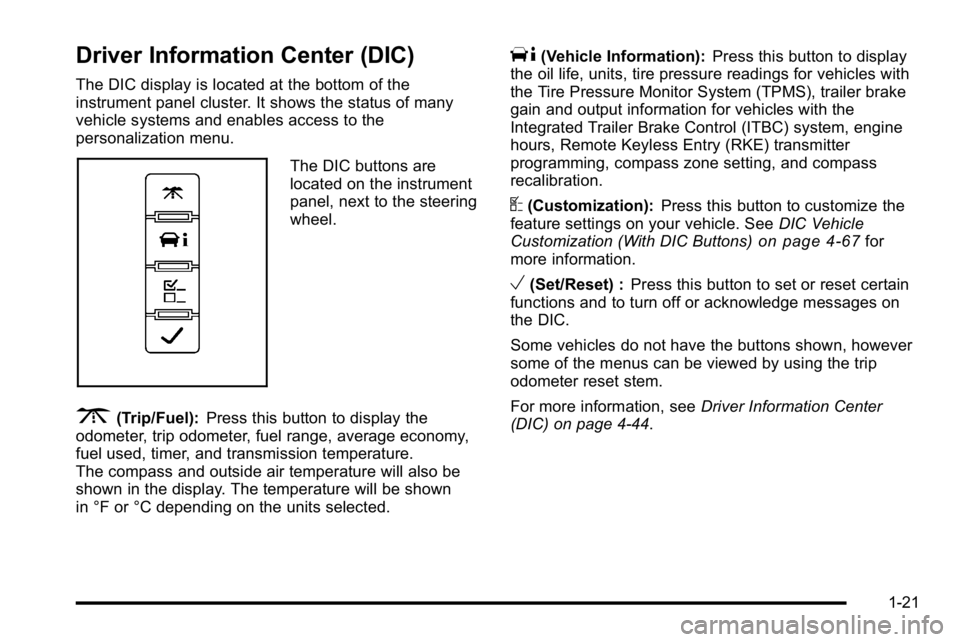
The DIC display is located at the bottom of the
instrument panel cluster. It shows the status of many
vehicle systems and enables access to the
personalization menu.
The DIC buttons are
located on the instrument
panel, next to the steering
wheel.
3(Trip/Fuel):Press this button to display the
odometer, trip odometer, fuel range, average economy,
fuel used, timer, and transmission temperature.
The compass and outside air temperature will also be
shown in the display. The temperature will be shown
in °F or °C depending on the units selected.
T(Vehicle Information): Press this button to display
the oil life, units, tire pressure readings for vehicles with
the Tire Pressure Monitor System (TPMS), trailer brake
gain and output information for vehicles with the
Integrated Trailer Brake Control (ITBC) system, engine
hours, Remote Keyless Entry (RKE) transmitter
programming, compass zone setting, and compass
recalibration.
U(Customization): Press this button to customize the
feature settings on your vehicle. See DIC Vehicle
Customization (With DIC Buttons)
on page 4‑67for
more information.
V(Set/Reset) : Press this button to set or reset certain
functions and to turn off or acknowledge messages on
the DIC.
Some vehicles do not have the buttons shown, however
some of the menus can be viewed by using the trip
odometer reset stem.
For more information, see Driver Information Center
(DIC) on page 4‑44.
1-21
Page 43 of 550
To save your positions in memory, do the following:1. Adjust the driver's seat, including the seatback recliner, both outside mirrors, steering wheel, and
the throttle and brake pedals to a comfortable
position.
See Outside Power Foldaway Mirrors
on
page 3‑40and Adjustable Throttle and Brake
Pedalon page 3‑26for more information.
Not all mirrors will have the ability to save and
recall the mirror positions.
2. Press and hold button 1 until two beeps sound.
A second seating, mirror, steering wheel position, and
throttle and brake pedal position can be programmed by
repeating the above steps and pressing button 2.
To recall the memory positions, the vehicle must be in
P (Park). Press and release either button 1 or button 2
corresponding to the desired driving position. The seat,
outside mirrors, steering wheel position, and adjustable
throttle and brake pedals will move to the position
previously stored. You will hear a single beep. If you use the remote keyless entry transmitter to enter
your vehicle and the remote recall memory feature is
on, automatic seat, mirror, steering wheel position, and
adjustable pedal movement will occur. See
“MEMORY
SEAT RECALL” underDIC Vehicle Customization (With
DIC Buttons)
on page 4‑67for more information.
To stop recall movement of the memory feature at any
time, press one of the power seat controls, memory
buttons, power mirror buttons, power tilt wheel control,
or adjustable pedal switch.
If something has blocked the driver ’s seat and/or the
adjustable pedals while recalling a memory position, the
driver ’s seat and/or the adjustable pedals recall may
stop working. If this happens, remove the obstruction
and press the appropriate function control for
two seconds. Then try recalling the memory position
again by pressing the appropriate memory button. If the
memory position is still not recalling, see your
dealer/retailer for service.
2-7
Page 44 of 550
Easy Exit Seat
The control for this feature is located on the driver’s
door panel between buttons 1 and 2.
With the vehicle in P (Park), the exit position can be
recalled by pressing the exit button. A single beep
sounds and the driver ’s seat moves back.
If the easy exit seat feature is on in the Driver
Information Center (DIC), automatic seat movement will
occur when the key is removed from the ignition. See
“EASY EXIT SEAT” underDIC Vehicle Customization
(With DIC Buttons)
on page 4‑67for more information.
Power Reclining Seatbacks
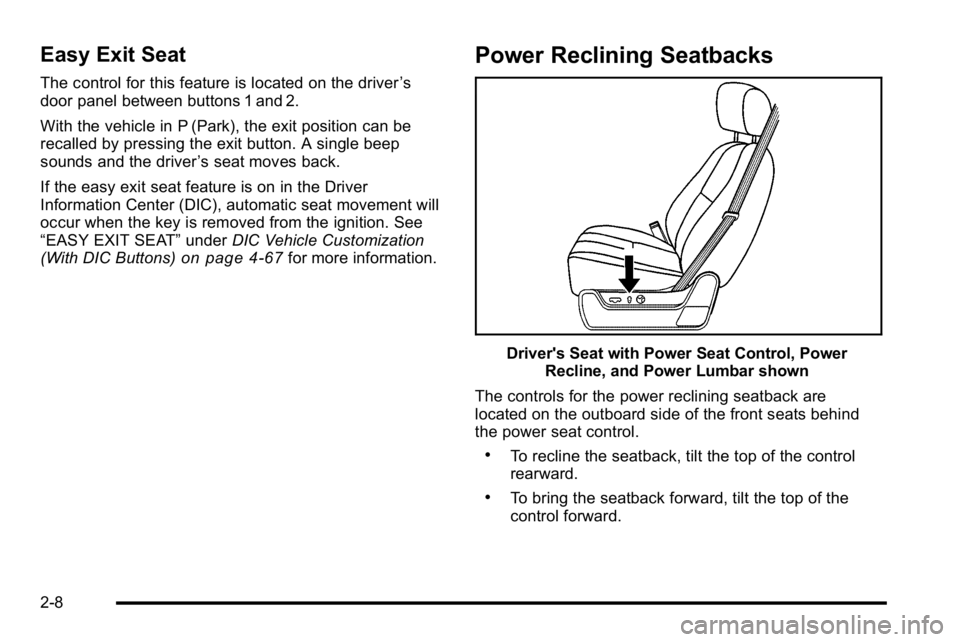
Driver's Seat with Power Seat Control, Power Recline, and Power Lumbar shown
The controls for the power reclining seatback are
located on the outboard side of the front seats behind
the power seat control.
.To recline the seatback, tilt the top of the control
rearward.
.To bring the seatback forward, tilt the top of the
control forward.
2-8
Page 67 of 550
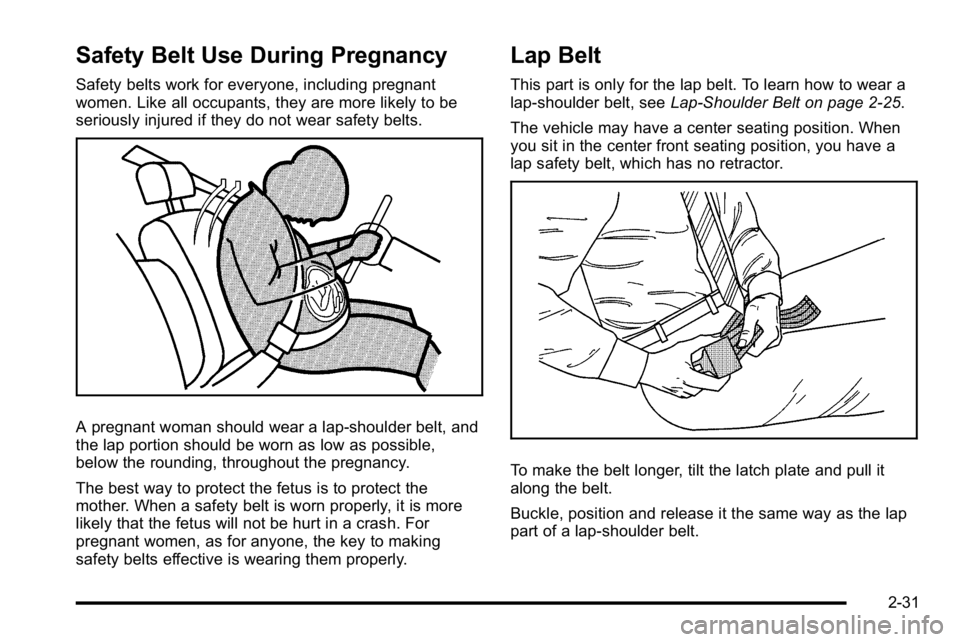
Safety Belt Use During Pregnancy
Safety belts work for everyone, including pregnant
women. Like all occupants, they are more likely to be
seriously injured if they do not wear safety belts.
A pregnant woman should wear a lap-shoulder belt, and
the lap portion should be worn as low as possible,
below the rounding, throughout the pregnancy.
The best way to protect the fetus is to protect the
mother. When a safety belt is worn properly, it is more
likely that the fetus will not be hurt in a crash. For
pregnant women, as for anyone, the key to making
safety belts effective is wearing them properly.
Lap Belt
This part is only for the lap belt. To learn how to wear a
lap-shoulder belt, seeLap-Shoulder Belt on page 2‑25.
The vehicle may have a center seating position. When
you sit in the center front seating position, you have a
lap safety belt, which has no retractor.
To make the belt longer, tilt the latch plate and pull it
along the belt.
Buckle, position and release it the same way as the lap
part of a lap-shoulder belt.
2-31