sunroof GMC SIERRA DENALI 2010 Owners Manual
[x] Cancel search | Manufacturer: GMC, Model Year: 2010, Model line: SIERRA DENALI, Model: GMC SIERRA DENALI 2010Pages: 550, PDF Size: 4.17 MB
Page 1 of 550

2010 GMC Sierra Denali Owner ManualM
In Brief. . . . . . . . . . . . . . . . . . . . . . . . . . . . . . . . . . . . . . . . . . . . 1-1
Instrument Panel . . . . . . . . . . . . . . . . . . . . . . . . . . . . . . . . . 1-2
Initial Drive Information . . . . . . . . . . . . . . . . . . . . . . . . . . . 1-4
Vehicle Features . . . . . . . . . . . . . . . . . . . . . . . . . . . . . . . . 1-18
Performance and Maintenance . . . . . . . . . . . . . . . . . . 1-24
Seats and Restraint System . . . . . . . . . . . . . . . . . . . . . . 2-1
Head Restraints . . . . . . . . . . . . . . . . . . . . . . . . . . . . . . . . . . 2-2
Front Seats . . . . . . . . . . . . . . . . . . . . . . . . . . . . . . . . . . . . . . . 2-3
Rear Seats . . . . . . . . . . . . . . . . . . . . . . . . . . . . . . . . . . . . . . 2-10
Safety Belts . . . . . . . . . . . . . . . . . . . . . . . . . . . . . . . . . . . . . 2-11
Child Restraints . . . . . . . . . . . . . . . . . . . . . . . . . . . . . . . . . 2-33
Airbag System . . . . . . . . . . . . . . . . . . . . . . . . . . . . . . . . . . 2-56
Restraint System Check . . . . . . . . . . . . . . . . . . . . . . . . . 2-73
Features and Controls . . . . . . . . . . . . . . . . . . . . . . . . . . . . 3-1
Keys . . . . . . . . . . . . . . . . . . . . . . . . . . . . . . . . . . . . . . . . . . . . . 3-3
Doors and Locks . . . . . . . . . . . . . . . . . . . . . . . . . . . . . . . . 3-10
Windows . . . . . . . . . . . . . . . . . . . . . . . . . . . . . . . . . . . . . . . . 3-15
Theft-Deterrent Systems . . . . . . . . . . . . . . . . . . . . . . . . 3-18
Starting and Operating Your Vehicle . . . . . . . . . . . . . 3-22
Mirrors . . . . . . . . . . . . . . . . . . . . . . . . . . . . . . . . . . . . . . . . . . 3-39 Object Detection Systems . . . . . . . . . . . . . . . . . . . . . . . 3-43
Universal Home Remote System . . . . . . . . . . . . . . . . 3-51
Storage Areas . . . . . . . . . . . . . . . . . . . . . . . . . . . . . . . . . . . 3-57
Sunroof . . . . . . . . . . . . . . . . . . . . . . . . . . . . . . . . . . . . . . . . . 3-61
Instrument Panel . . . . . . . . . . . . . . . . . . . . . . . . . . . . . . . . . 4-1
Instrument Panel Overview . . . . . . . . . . . . . . . . . . . . . . . 4-3
Climate Controls . . . . . . . . . . . . . . . . . . . . . . . . . . . . . . . . 4-17
Warning Lights, Gages, and Indicators . . . . . . . . . . 4-27
Driver Information Center (DIC) . . . . . . . . . . . . . . . . . 4-44
Audio System(s) . . . . . . . . . . . . . . . . . . . . . . . . . . . . . . . . 4-76
Driving Your Vehicle . . . . . . . . . . . . . . . . . . . . . . . . . . . . . . 5-1
Your Driving, the Road, and the Vehicle . . . . . . . . . . 5-2
Towing . . . . . . . . . . . . . . . . . . . . . . . . . . . . . . . . . . . . . . . . . . 5-38
Service and Appearance Care . . . . . . . . . . . . . . . . . . . 6-1
Service . . . . . . . . . . . . . . . . . . . . . . . . . . . . . . . . . . . . . . . . . . . 6-4
Fuel . . . . . . . . . . . . . . . . . . . . . . . . . . . . . . . . . . . . . . . . . . . . . . 6-6
Checking Things Under the Hood . . . . . . . . . . . . . . . 6-14
All-Wheel Drive . . . . . . . . . . . . . . . . . . . . . . . . . . . . . . . . . 6-49
Rear Axle . . . . . . . . . . . . . . . . . . . . . . . . . . . . . . . . . . . . . . . 6-50
Page 7 of 550
Section 1 In Brief
Instrument Panel. . . . . . . . . . . . . . . . . . . . . . . . . . . . . . . . . . . 1-2
Initial Drive Information . . . . . . . . . . . . . . . . . . . . . . . . . . . 1-4
Remote Keyless Entry (RKE) System . . . . . . . . . . . 1-4
Remote Vehicle Start . . . . . . . . . . . . . . . . . . . . . . . . . . . 1-5
Door Locks . . . . . . . . . . . . . . . . . . . . . . . . . . . . . . . . . . . . . 1-5
Windows . . . . . . . . . . . . . . . . . . . . . . . . . . . . . . . . . . . . . . . . 1-6
Seat Adjustment . . . . . . . . . . . . . . . . . . . . . . . . . . . . . . . . 1-7
Heated Seats . . . . . . . . . . . . . . . . . . . . . . . . . . . . . . . . . . . 1-9
Heated and Ventilated Seats . . . . . . . . . . . . . . . . . . . . 1-9
Head Restraint Adjustment . . . . . . . . . . . . . . . . . . . . 1-10
Safety Belt . . . . . . . . . . . . . . . . . . . . . . . . . . . . . . . . . . . . . 1-10
Sensing System for Passenger Airbag . . . . . . . . . 1-11
Mirror Adjustment . . . . . . . . . . . . . . . . . . . . . . . . . . . . . . 1-11
Steering Wheel Adjustment . . . . . . . . . . . . . . . . . . . . 1-12
Throttle and Brake Pedal Adjustment . . . . . . . . . . 1-13
Interior Lighting . . . . . . . . . . . . . . . . . . . . . . . . . . . . . . . . 1-13
Exterior Lighting . . . . . . . . . . . . . . . . . . . . . . . . . . . . . . . 1-14
Windshield Wiper/Washer . . . . . . . . . . . . . . . . . . . . . . 1-15
Climate Controls . . . . . . . . . . . . . . . . . . . . . . . . . . . . . . . 1-15
Transmission . . . . . . . . . . . . . . . . . . . . . . . . . . . . . . . . . . 1-17 Vehicle Features
. . . . . . . . . . . . . . . . . . . . . . . . . . . . . . . . . . 1-18
Radio(s) . . . . . . . . . . . . . . . . . . . . . . . . . . . . . . . . . . . . . . . 1-18
Satellite Radio . . . . . . . . . . . . . . . . . . . . . . . . . . . . . . . . . 1-19
Portable Audio Devices . . . . . . . . . . . . . . . . . . . . . . . . 1-19
Steering Wheel Controls . . . . . . . . . . . . . . . . . . . . . . . 1-20
Bluetooth
®. . . . . . . . . . . . . . . . . . . . . . . . . . . . . . . . . . . . . 1-20
Navigation System . . . . . . . . . . . . . . . . . . . . . . . . . . . . . 1-20
Driver Information Center (DIC) . . . . . . . . . . . . . . . . 1-21
Cruise Control . . . . . . . . . . . . . . . . . . . . . . . . . . . . . . . . . 1-22
Rear Vision Camera (RVC) . . . . . . . . . . . . . . . . . . . . 1-23
Ultrasonic Parking Assist . . . . . . . . . . . . . . . . . . . . . . 1-23
Power Outlets . . . . . . . . . . . . . . . . . . . . . . . . . . . . . . . . . 1-23
Universal Remote System . . . . . . . . . . . . . . . . . . . . . 1-23
Sunroof . . . . . . . . . . . . . . . . . . . . . . . . . . . . . . . . . . . . . . . . 1-24
Performance and Maintenance . . . . . . . . . . . . . . . . . .1-24
StabiliTrak
®. . . . . . . . . . . . . . . . . . . . . . . . . . . . . . . . . . . . 1-24
Tire Pressure Monitor . . . . . . . . . . . . . . . . . . . . . . . . . . 1-25
Engine Oil Life System . . . . . . . . . . . . . . . . . . . . . . . . 1-25
Fuel E85 (85% Ethanol) . . . . . . . . . . . . . . . . . . . . . . . 1-26
Driving for Better Fuel Economy . . . . . . . . . . . . . . . 1-26
Roadside Assistance Program . . . . . . . . . . . . . . . . . 1-27
OnStar
®. . . . . . . . . . . . . . . . . . . . . . . . . . . . . . . . . . . . . . . 1-27
1-1
Page 30 of 550
Sunroof
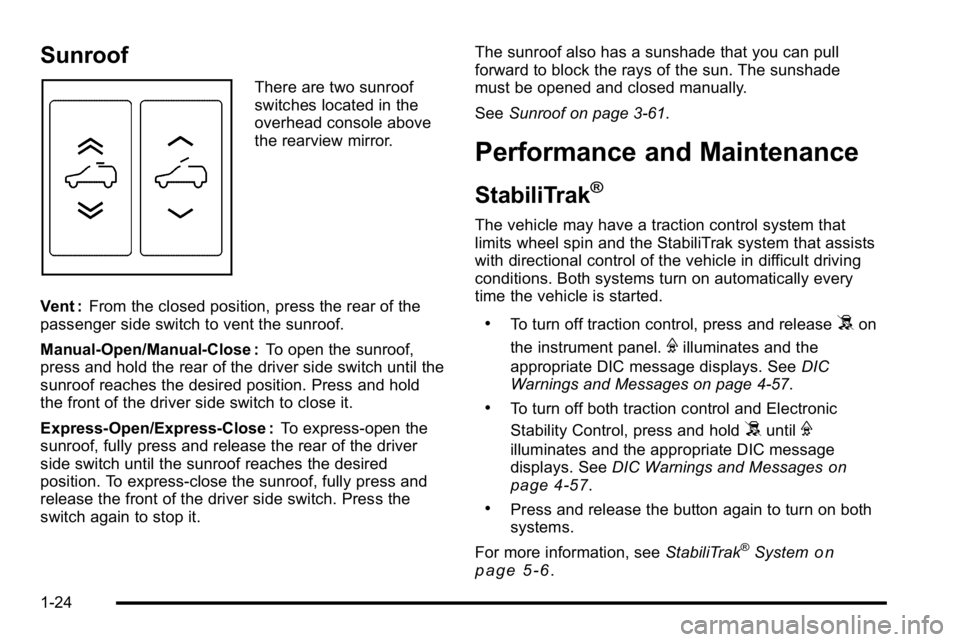
There are two sunroof
switches located in the
overhead console above
the rearview mirror.
Vent : From the closed position, press the rear of the
passenger side switch to vent the sunroof.
Manual-Open/Manual-Close : To open the sunroof,
press and hold the rear of the driver side switch until the
sunroof reaches the desired position. Press and hold
the front of the driver side switch to close it.
Express-Open/Express-Close : To express-open the
sunroof, fully press and release the rear of the driver
side switch until the sunroof reaches the desired
position. To express-close the sunroof, fully press and
release the front of the driver side switch. Press the
switch again to stop it. The sunroof also has a sunshade that you can pull
forward to block the rays of the sun. The sunshade
must be opened and closed manually.
See
Sunroof on page 3‑61.
Performance and Maintenance
StabiliTrak®
The vehicle may have a traction control system that
limits wheel spin and the StabiliTrak system that assists
with directional control of the vehicle in difficult driving
conditions. Both systems turn on automatically every
time the vehicle is started.
.To turn off traction control, press and release5on
the instrument panel.
Filluminates and the
appropriate DIC message displays. See DIC
Warnings and Messages on page 4‑57.
.To turn off both traction control and Electronic
Stability Control, press and hold
5untilF
illuminates and the appropriate DIC message
displays. See DIC Warnings and Messageson
page 4‑57.
.Press and release the button again to turn on both
systems.
For more information, see StabiliTrak
®Systemon
page 5‑6.
1-24
Page 112 of 550
Section 3 Features and Controls
Object Detection Systems. . . . . . . . . . . . . . . . . . . . . . .3-43
Ultrasonic Rear Parking Assist (URPA) . . . . . . . . 3-43
Rear Vision Camera (RVC) . . . . . . . . . . . . . . . . . . . . 3-45
Universal Home Remote System . . . . . . . . . . . . . . . .3-51
Universal Home Remote System Operation
(With Three Round LED) . . . . . . . . . . . . . . . . . . . . 3-51 Storage Areas
. . . . . . . . . . . . . . . . . . . . . . . . . . . . . . . . . . . . 3-57
Glove Box . . . . . . . . . . . . . . . . . . . . . . . . . . . . . . . . . . . . . 3-57
Cupholders . . . . . . . . . . . . . . . . . . . . . . . . . . . . . . . . . . . . 3-57
Instrument Panel Storage . . . . . . . . . . . . . . . . . . . . . 3-58
Center Console Storage . . . . . . . . . . . . . . . . . . . . . . 3-58
Roof Rack System . . . . . . . . . . . . . . . . . . . . . . . . . . . . . 3-59
Rear Seat Armrest . . . . . . . . . . . . . . . . . . . . . . . . . . . . . 3-60
Cargo Management System . . . . . . . . . . . . . . . . . . . 3-60
Sunroof . . . . . . . . . . . . . . . . . . . . . . . . . . . . . . . . . . . . . . . . . . . 3-61
3-2
Page 134 of 550

C (ON/RUN) :This position can be used to operate the
electrical accessories and to display some instrument
panel cluster warning and indicator lights. The switch
stays in this position when the engine is running. The
transmission is also unlocked in this position on
automatic transmission vehicles.
If you leave the key in the ACC/ACCESSORY or ON/
RUN position with the engine off, the battery could be
drained. You may not be able to start the vehicle if the
battery is allowed to drain for an extended period
of time.
D (START) : This is the position that starts the engine.
When the engine starts, release the key. The ignition
switch returns to ON/RUN for driving.
A warning tone will sound when the driver door is
opened, the ignition is in ACC/ACCESSORY or LOCK/
OFF and the key is in the ignition.Retained Accessory Power (RAP)
The following vehicle accessories can be used for up to
10 minutes after the engine is turned off:
.Audio System
.Power Windows
.OnStar®System (if equipped)
.Sunroof (if equipped)
These features work when the key is in ON/RUN or
ACC/ACCESSORY. Once the key is turned from ON/
RUN to LOCK/OFF, the windows and sunroof continue
to work up to 10 minutes until any door is opened. The
radio continues to work for up to 10 minutes or until the
driver door is opened.
Starting the Engine
Move the shift lever to P (Park) or N (Neutral). The
engine will not start in any other position. To restart the
engine when the vehicle is already moving, use
N (Neutral) only.
Notice: Do not try to shift to P (Park) if the vehicle is
moving. If you do, you could damage the
transmission. Shift to P (Park) only when the vehicle
is stopped.
3-24
Page 171 of 550
To remove or install cargo tie-downs at the front of the
bed, slide the corner cap towards the center of the bed
to expose the rail notches. To remove the corner cap,
pull either edge away from the rail.
To remove the system, loosen the toggle bolts on each
rail until they can be removed from the bed of the truck.
To replace the system, place the toggle bolts and rails
into their original locations and tighten them to a torque
setting of 12.5 ft lbs (17Y).
If the system is removed to install a bed liner, make
sure there is no bed liner material in the installation
points.
Notice: If cargo is tied down using the horizontal
slots on the top of the pickup box, the box could be
damaged. Using the horizontal slots on the top of
the pickup box for tie-down locations may cause
damage to the pickup box and would not be
covered by the vehicle warranty. Only use the
tie-down loops if the vehicle does not have the
cargo management system.Sunroof
On vehicles with a power sliding sunroof, the ignition
needs to be turned to RUN, or the Retained Accessory
Power (RAP) must be activated to open or close the
sunroof. When RAP is active, the sunroof will work for
10 minutes after the ignition is turned off, or until the
driver's door is opened. See Retained Accessory Power
(RAP)
on page 3‑24for more information.
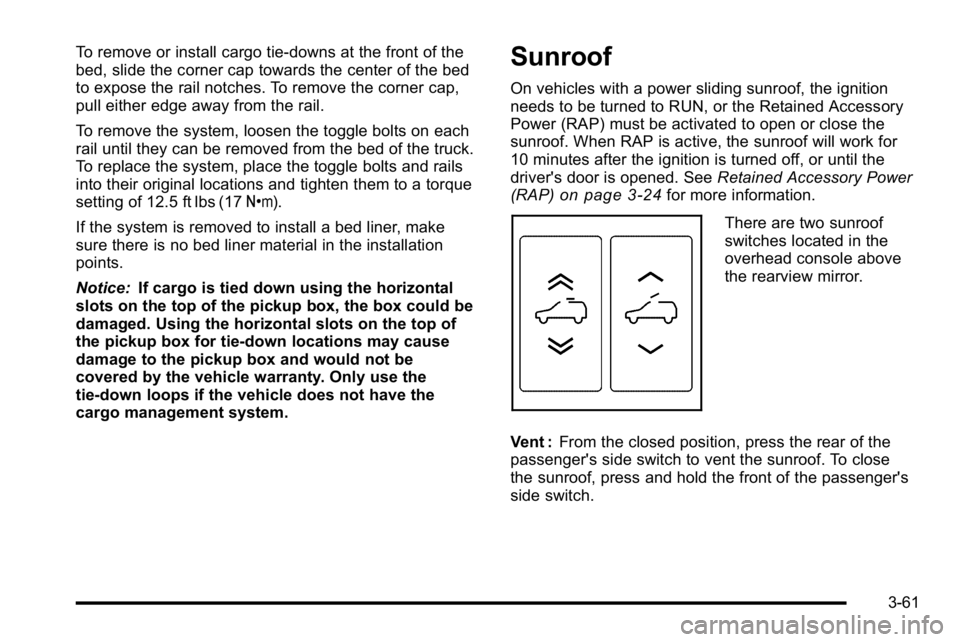
There are two sunroof
switches located in the
overhead console above
the rearview mirror.
Vent : From the closed position, press the rear of the
passenger's side switch to vent the sunroof. To close
the sunroof, press and hold the front of the passenger's
side switch.
3-61
Page 172 of 550
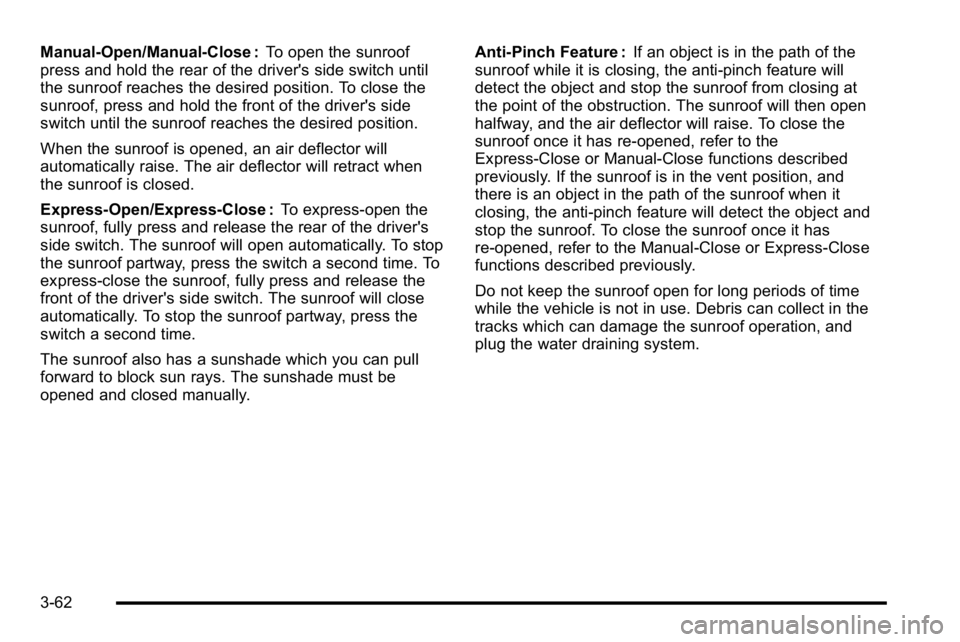
Manual-Open/Manual-Close :To open the sunroof
press and hold the rear of the driver's side switch until
the sunroof reaches the desired position. To close the
sunroof, press and hold the front of the driver's side
switch until the sunroof reaches the desired position.
When the sunroof is opened, an air deflector will
automatically raise. The air deflector will retract when
the sunroof is closed.
Express-Open/Express-Close : To express-open the
sunroof, fully press and release the rear of the driver's
side switch. The sunroof will open automatically. To stop
the sunroof partway, press the switch a second time. To
express-close the sunroof, fully press and release the
front of the driver's side switch. The sunroof will close
automatically. To stop the sunroof partway, press the
switch a second time.
The sunroof also has a sunshade which you can pull
forward to block sun rays. The sunshade must be
opened and closed manually. Anti-Pinch Feature :
If an object is in the path of the
sunroof while it is closing, the anti-pinch feature will
detect the object and stop the sunroof from closing at
the point of the obstruction. The sunroof will then open
halfway, and the air deflector will raise. To close the
sunroof once it has re-opened, refer to the
Express-Close or Manual-Close functions described
previously. If the sunroof is in the vent position, and
there is an object in the path of the sunroof when it
closing, the anti-pinch feature will detect the object and
stop the sunroof. To close the sunroof once it has
re-opened, refer to the Manual-Close or Express-Close
functions described previously.
Do not keep the sunroof open for long periods of time
while the vehicle is not in use. Debris can collect in the
tracks which can damage the sunroof operation, and
plug the water draining system.
3-62
Page 229 of 550
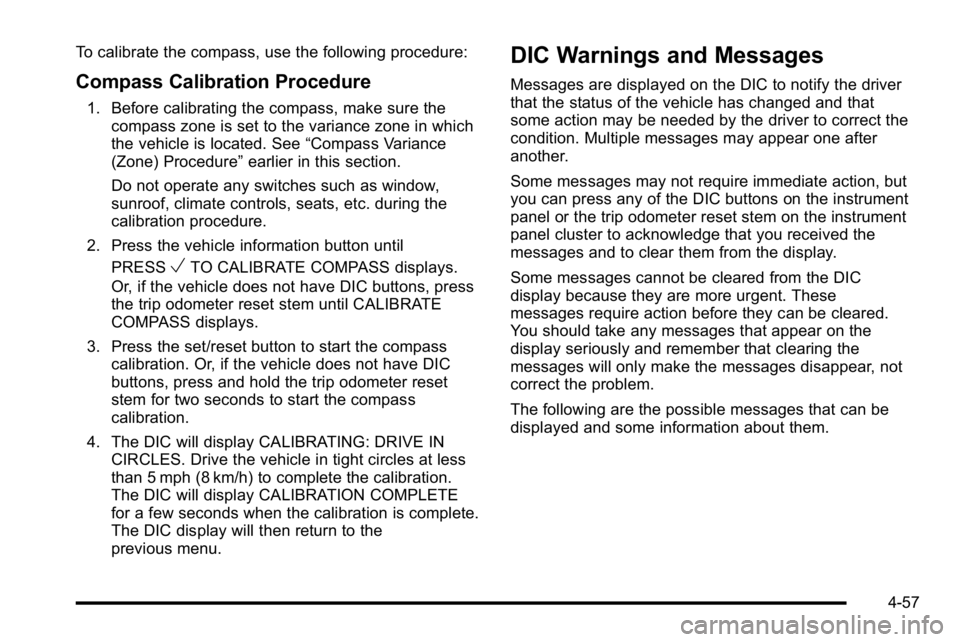
To calibrate the compass, use the following procedure:
Compass Calibration Procedure
1. Before calibrating the compass, make sure thecompass zone is set to the variance zone in which
the vehicle is located. See “Compass Variance
(Zone) Procedure” earlier in this section.
Do not operate any switches such as window,
sunroof, climate controls, seats, etc. during the
calibration procedure.
2. Press the vehicle information button until PRESS
VTO CALIBRATE COMPASS displays.
Or, if the vehicle does not have DIC buttons, press
the trip odometer reset stem until CALIBRATE
COMPASS displays.
3. Press the set/reset button to start the compass calibration. Or, if the vehicle does not have DIC
buttons, press and hold the trip odometer reset
stem for two seconds to start the compass
calibration.
4. The DIC will display CALIBRATING: DRIVE IN CIRCLES. Drive the vehicle in tight circles at less
than 5 mph (8 km/h) to complete the calibration.
The DIC will display CALIBRATION COMPLETE
for a few seconds when the calibration is complete.
The DIC display will then return to the
previous menu.
DIC Warnings and Messages
Messages are displayed on the DIC to notify the driver
that the status of the vehicle has changed and that
some action may be needed by the driver to correct the
condition. Multiple messages may appear one after
another.
Some messages may not require immediate action, but
you can press any of the DIC buttons on the instrument
panel or the trip odometer reset stem on the instrument
panel cluster to acknowledge that you received the
messages and to clear them from the display.
Some messages cannot be cleared from the DIC
display because they are more urgent. These
messages require action before they can be cleared.
You should take any messages that appear on the
display seriously and remember that clearing the
messages will only make the messages disappear, not
correct the problem.
The following are the possible messages that can be
displayed and some information about them.
4-57
Page 312 of 550
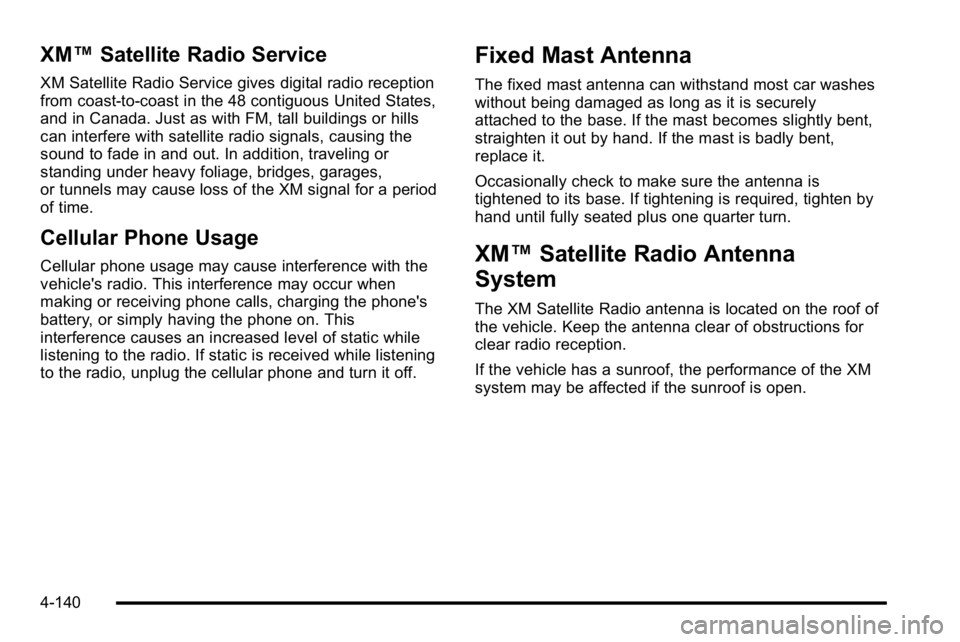
XM™Satellite Radio Service
XM Satellite Radio Service gives digital radio reception
from coast-to-coast in the 48 contiguous United States,
and in Canada. Just as with FM, tall buildings or hills
can interfere with satellite radio signals, causing the
sound to fade in and out. In addition, traveling or
standing under heavy foliage, bridges, garages,
or tunnels may cause loss of the XM signal for a period
of time.
Cellular Phone Usage
Cellular phone usage may cause interference with the
vehicle's radio. This interference may occur when
making or receiving phone calls, charging the phone's
battery, or simply having the phone on. This
interference causes an increased level of static while
listening to the radio. If static is received while listening
to the radio, unplug the cellular phone and turn it off.
Fixed Mast Antenna
The fixed mast antenna can withstand most car washes
without being damaged as long as it is securely
attached to the base. If the mast becomes slightly bent,
straighten it out by hand. If the mast is badly bent,
replace it.
Occasionally check to make sure the antenna is
tightened to its base. If tightening is required, tighten by
hand until fully seated plus one quarter turn.
XM™Satellite Radio Antenna
System
The XM Satellite Radio antenna is located on the roof of
the vehicle. Keep the antenna clear of obstructions for
clear radio reception.
If the vehicle has a sunroof, the performance of the XM
system may be affected if the sunroof is open.
4-140
Page 494 of 550
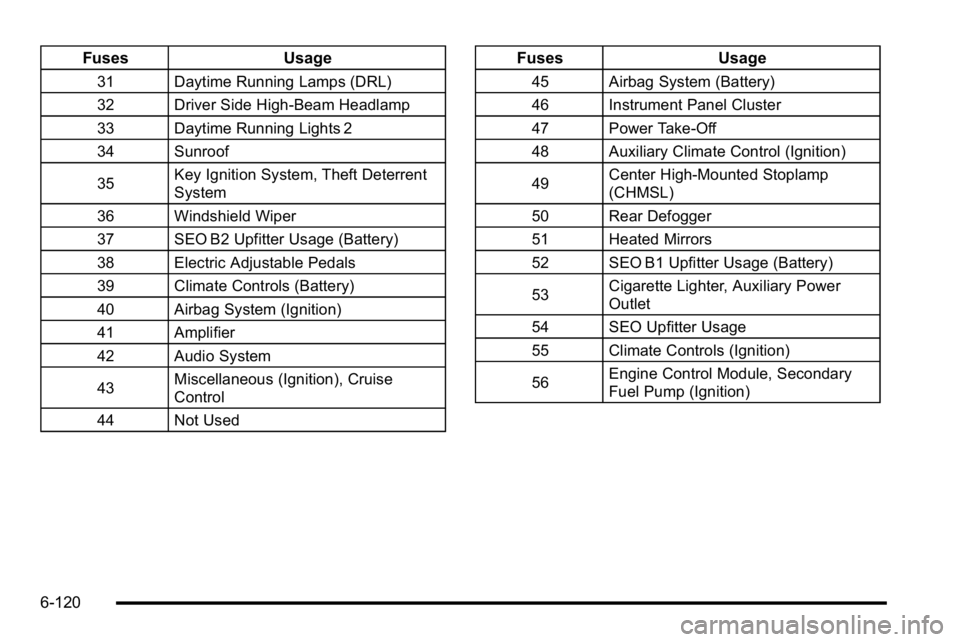
FusesUsage
31 Daytime Running Lamps (DRL)
32 Driver Side High-Beam Headlamp
33 Daytime Running Lights 2
34 Sunroof
35Key Ignition System, Theft Deterrent
System
36 Windshield Wiper
37 SEO B2 Upfitter Usage (Battery)
38 Electric Adjustable Pedals
39 Climate Controls (Battery)
40 Airbag System (Ignition)
41 Amplifier
42 Audio System
43 Miscellaneous (Ignition), Cruise
Control
44 Not Used
Fuses Usage
45 Airbag System (Battery)
46 Instrument Panel Cluster
47 Power Take-Off
48 Auxiliary Climate Control (Ignition)
49Center High-Mounted Stoplamp
(CHMSL)
50 Rear Defogger
51 Heated Mirrors
52 SEO B1 Upfitter Usage (Battery)
53 Cigarette Lighter, Auxiliary Power
Outlet
54 SEO Upfitter Usage
55 Climate Controls (Ignition)
56 Engine Control Module, Secondary
Fuel Pump (Ignition)
6-120