ECO mode GMC SIERRA DENALI 2017 Owners Manual
[x] Cancel search | Manufacturer: GMC, Model Year: 2017, Model line: SIERRA DENALI, Model: GMC SIERRA DENALI 2017Pages: 511, PDF Size: 6.88 MB
Page 10 of 511
GMC Sierra/Sierra Denali Owner Manual (GMNA-Localizing-U.S./Canada/
Mexico-9955992) - 2017 - crc - 4/18/17
In Brief 9
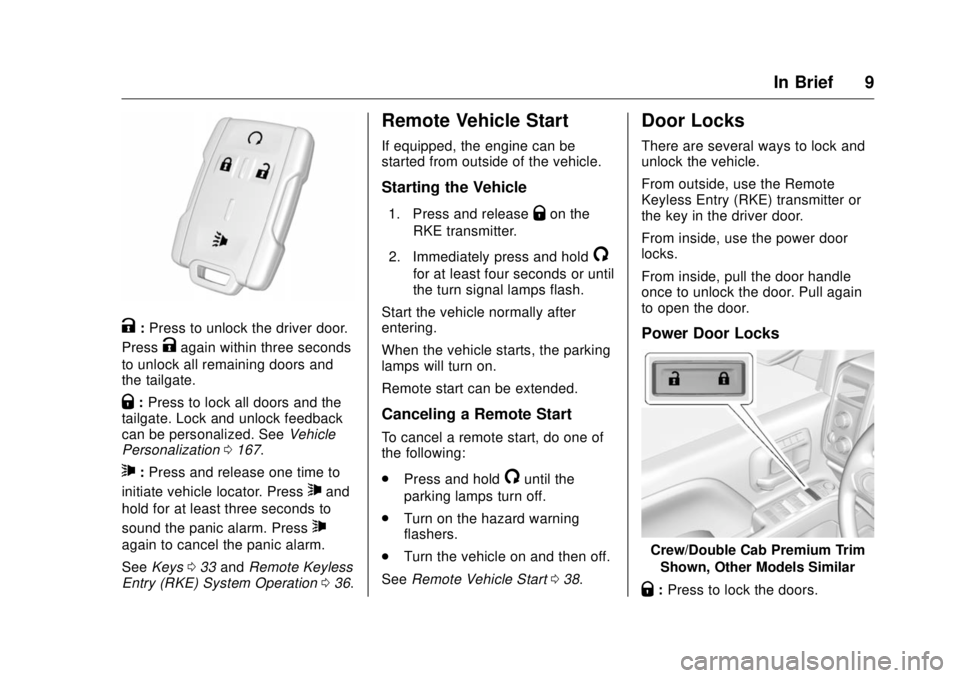
K : Press to unlock the driver door.
Press
K again within three seconds
to unlock all remaining doors and
the tailgate.
Q : Press to lock all doors and the
tailgate. Lock and unlock feedback
can be personalized. See Vehicle
Personalization 0 167 .
7 : Press and release one time to
initiate vehicle locator. Press
7 and
hold for at least three seconds to
sound the panic alarm. Press
7again to cancel the panic alarm.
See Keys 0 33 and Remote Keyless
Entry (RKE) System Operation 0 36 .Remote Vehicle Start If equipped, the engine can be
started from outside of the vehicle.
Starting the Vehicle 1. Press and release
Q on the
RKE transmitter.
2. Immediately press and hold
/for at least four seconds or until
the turn signal lamps flash.
Start the vehicle normally after
entering.
When the vehicle starts, the parking
lamps will turn on.
Remote start can be extended.
Canceling a Remote Start To cancel a remote start, do one of
the following:
.
Press and hold
/ until the
parking lamps turn off.
.
Turn on the hazard warning
flashers.
.
Turn the vehicle on and then off.
See Remote Vehicle Start 0 38 .Door Locks There are several ways to lock and
unlock the vehicle.
From outside, use the Remote
Keyless Entry (RKE) transmitter or
the key in the driver door.
From inside, use the power door
locks.
From inside, pull the door handle
once to unlock the door. Pull again
to open the door.
Power Door Locks
Crew/Double Cab Premium Trim
Shown, Other Models Similar
Q : Press to lock the doors.
Page 24 of 511
GMC Sierra/Sierra Denali Owner Manual (GMNA-Localizing-U.S./Canada/
Mexico-9955992) - 2017 - crc - 4/18/17
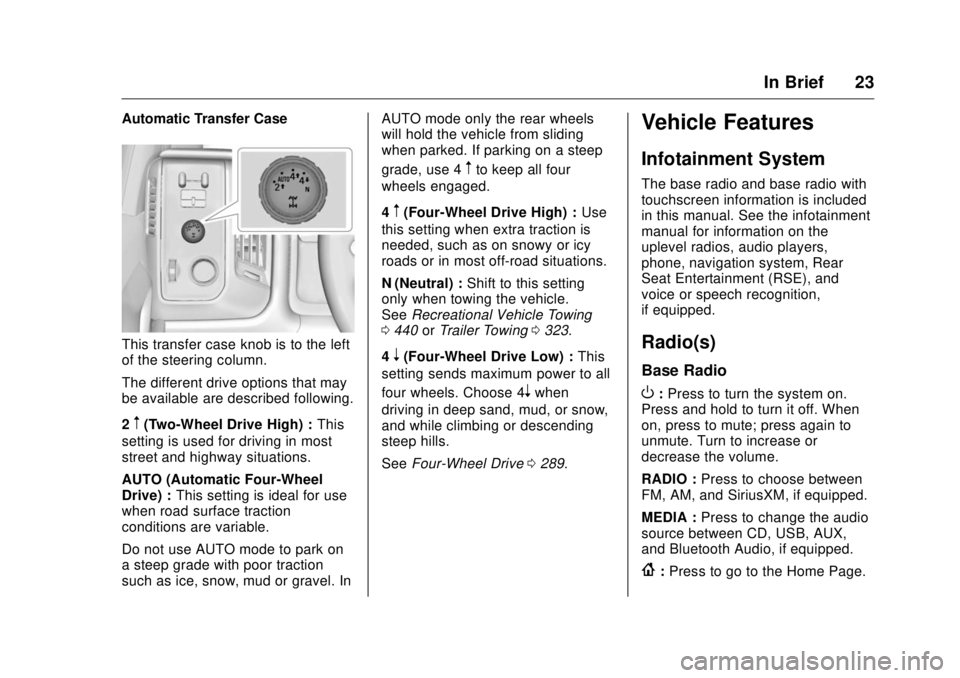
In Brief 23Automatic Transfer Case
This transfer case knob is to the left
of the steering column.
The different drive options that may
be available are described following.
2
m (Two-Wheel Drive High) : This
setting is used for driving in most
street and highway situations.
AUTO (Automatic Four-Wheel
Drive) : This setting is ideal for use
when road surface traction
conditions are variable.
Do not use AUTO mode to park on
a steep grade with poor traction
such as ice, snow, mud or gravel. In AUTO mode only the rear wheels
will hold the vehicle from sliding
when parked. If parking on a steep
grade, use 4
m to keep all four
wheels engaged.
4
m (Four-Wheel Drive High) : Use
this setting when extra traction is
needed, such as on snowy or icy
roads or in most off-road situations.
N (Neutral) : Shift to this setting
only when towing the vehicle.
See Recreational Vehicle Towing
0 440 or Trailer Towing 0 323 .
4
n (Four-Wheel Drive Low) : This
setting sends maximum power to all
four wheels. Choose 4
n when
driving in deep sand, mud, or snow,
and while climbing or descending
steep hills.
See Four-Wheel Drive 0 289 .Vehicle Features Infotainment System The base radio and base radio with
touchscreen information is included
in this manual. See the infotainment
manual for information on the
uplevel radios, audio players,
phone, navigation system, Rear
Seat Entertainment (RSE), and
voice or speech recognition,
if equipped.
Radio(s) Base Radio
O : Press to turn the system on.
Press and hold to turn it off. When
on, press to mute; press again to
unmute. Turn to increase or
decrease the volume.
RADIO : Press to choose between
FM, AM, and SiriusXM, if equipped.
MEDIA : Press to change the audio
source between CD, USB, AUX,
and Bluetooth Audio, if equipped.
{ : Press to go to the Home Page.
Page 32 of 511
GMC Sierra/Sierra Denali Owner Manual (GMNA-Localizing-U.S./Canada/
Mexico-9955992) - 2017 - crc - 4/18/17
In Brief 31
Fuel (Diesel) For diesel vehicles, do not use
gasoline. See “ Fuel for Diesel
Engines ” in the Duramax diesel
supplement.
E85 or FlexFuel
FlexFuel Possible
Certain models are compatible with
E85 fuel. See E85 or FlexFuel
0 317 .
Engine Oil Life System The engine oil life system calculates
engine oil life based on vehicle use
and, on most vehicles, displays a
DIC message when it is necessary
to change the engine oil and filter.
The oil life system should be reset
to 100% only following an oil
change. Resetting the Oil Life System
To reset the engine oil life system:
1. Display OIL LIFE REMAINING
on the DIC.
See Driver Information Center
(DIC) (Base Level Cluster)
0 152 or Driver Information
Center (DIC) (Uplevel and
Denali Cluster) 0 154 . If the
vehicle does not have DIC
buttons, the vehicle must be in
P (Park) to access this display.
2. Press and hold
V on the DIC,
or the trip odometer reset stem
if the vehicle does not have
DIC buttons, for several
seconds. The oil life will
change to 100%.
The oil life system can also be reset
as follows:
1. Display OIL LIFE REMAINING
on the DIC.
See Driver Information Center
(DIC) (Base Level Cluster)
0 152 or Driver Information
Center (DIC) (Uplevel and
Denali Cluster) 0 154 . 2. Fully press the accelerator
pedal slowly three times within
five seconds.
3. If the display changes to 100%,
the system is reset.
See Engine Oil Life System 0 367 .
Driving for Better Fuel
Economy Driving habits can affect fuel
mileage. Here are some driving tips
to get the best fuel economy
possible.
.
Avoid fast starts and accelerate
smoothly.
.
Brake gradually and avoid
abrupt stops.
.
Avoid idling the engine for long
periods of time.
.
When road and weather
conditions are appropriate, use
cruise control.
.
Always follow posted speed
limits or drive more slowly when
conditions require.
Page 38 of 511
GMC Sierra/Sierra Denali Owner Manual (GMNA-Localizing-U.S./Canada/
Mexico-9955992) - 2017 - crc - 4/18/17
Keys, Doors, and Windows 37personalization, the horn chirps
when
Q is pressed again within
three seconds. See Vehicle
Personalization 0 167 .
Pressing
Q arms the alarm system.
See Vehicle Alarm System 0 43 .
If equipped with auto mirror folding,
pressing and holding
Q for
one second will fold the mirrors. The
auto mirror folding feature will not
operate unless it is enabled.
See Folding Mirrors 0 48 and
Vehicle Personalization 0 167 .
K : Press once to unlock only the
driver door. If
K is pressed again
within three seconds, all remaining
doors and the tailgate unlock. The
interior lamps may come on and
stay on for 20 seconds or until the
ignition is turned on.
If enabled in Vehicle
Personalization, the turn signal
lamps flash twice to indicate
unlocking has occurred. See Vehicle
Personalization 0 167 . If enabled
through vehicle personalization, the
exterior lamps may turn on. See
Vehicle Personalization 0 167 . Pressing
K on the RKE transmitter
disarms the alarm system. See
Vehicle Alarm System 0 43 .
If equipped with auto mirror folding,
pressing and holding
K for
one second will unfold the mirrors.
The auto mirror folding feature will
not operate unless it is enabled.
See Folding Mirrors 0 48 and
Vehicle Personalization 0 167 .
On some models, press, release
and then press and hold
K to open
all of the windows. Pressing the
button again will stop the windows.
See Vehicle Personalization 0 167 .
7 : Press and release one time to
initiate vehicle locator. The turn
signal lamps flash and the horn
sounds three times.
Press and hold
7 for at least
three seconds to sound the panic
alarm. The turn signal lamps flash
and the horn sounds repeatedly for
30 seconds. The alarm turns off
when the ignition is moved to ON/ RUN or
7 is pressed again. The
ignition must be in LOCK/OFF for
the panic alarm to work.
Programming Transmitters to
the Vehicle Only RKE transmitters programmed
to this vehicle will work. If a
transmitter is lost or stolen, a
replacement can be purchased and
programmed through your dealer.
Each vehicle can have up to
eight transmitters programmed to it.
See your dealer for transmitter
programming.
Battery Replacement Replace the battery in the
transmitter soon if the REPLACE
BATTERY IN REMOTE KEY
message displays in the DIC.
Caution
When replacing the battery, do
not touch any of the circuitry on
the transmitter. Static from your
body could damage the
transmitter.
Page 41 of 511
GMC Sierra/Sierra Denali Owner Manual (GMNA-Localizing-U.S./Canada/
Mexico-9955992) - 2017 - crc - 4/18/17
40 Keys, Doors, and Windows Warning (Continued).
Young children who get into
unlocked vehicles may be
unable to get out. A child
can be overcome by
extreme heat and can suffer
permanent injuries or even
death from heat stroke.
Always lock the vehicle
whenever leaving it.
.
Outsiders can easily enter
through an unlocked door
when you slow down or stop
the vehicle. Locking the
doors can help prevent this
from happening.
There are several ways to lock and
unlock the vehicle.
From outside, use the Remote
Keyless Entry (RKE) transmitter or
the key in the driver door.
From inside, use the power door
locks or manual door locks. To lock
or unlock the door with the manual
locks, push down or pull up on the
manual lock knob. From inside, pull the door handle
once to unlock the door. Pull the
handle again to open the door.
See Vehicle Alarm System 0 43 .
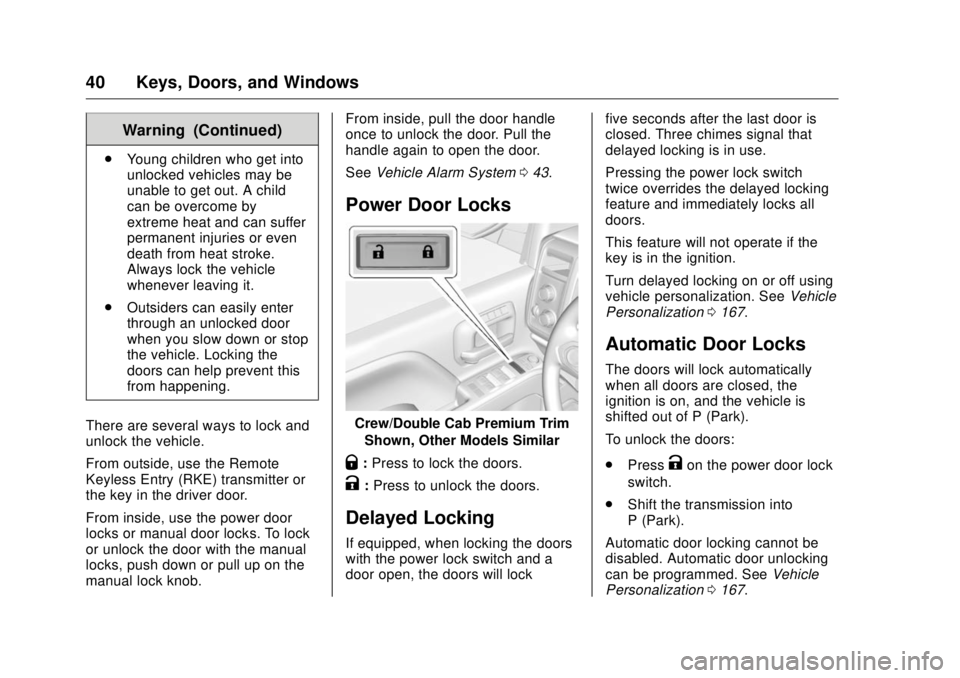
Power Door Locks
Crew/Double Cab Premium Trim
Shown, Other Models Similar
Q : Press to lock the doors.
K : Press to unlock the doors.
Delayed Locking If equipped, when locking the doors
with the power lock switch and a
door open, the doors will lock five seconds after the last door is
closed. Three chimes signal that
delayed locking is in use.
Pressing the power lock switch
twice overrides the delayed locking
feature and immediately locks all
doors.
This feature will not operate if the
key is in the ignition.
Turn delayed locking on or off using
vehicle personalization. See Vehicle
Personalization 0 167 .
Automatic Door Locks The doors will lock automatically
when all doors are closed, the
ignition is on, and the vehicle is
shifted out of P (Park).
To unlock the doors:
.
Press
K on the power door lock
switch.
.
Shift the transmission into
P (Park).
Automatic door locking cannot be
disabled. Automatic door unlocking
can be programmed. See Vehicle
Personalization 0 167 .
Page 49 of 511
GMC Sierra/Sierra Denali Owner Manual (GMNA-Localizing-U.S./Canada/
Mexico-9955992) - 2017 - crc - 4/18/17
48 Keys, Doors, and Windows
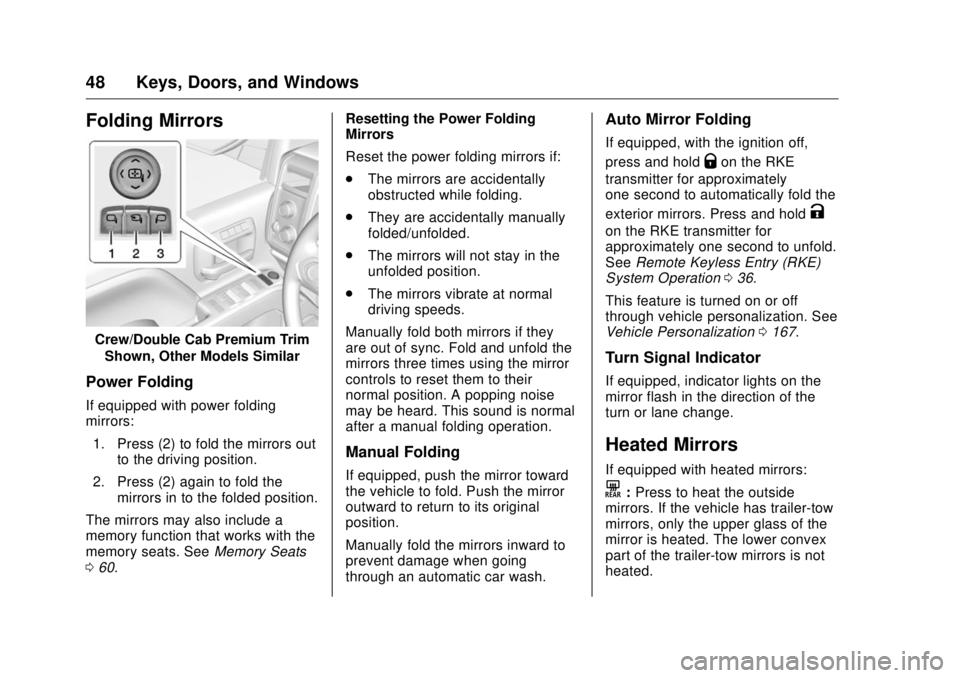
Folding Mirrors
Crew/Double Cab Premium Trim
Shown, Other Models Similar
Power Folding If equipped with power folding
mirrors:
1. Press (2) to fold the mirrors out
to the driving position.
2. Press (2) again to fold the
mirrors in to the folded position.
The mirrors may also include a
memory function that works with the
memory seats. See Memory Seats
0 60 . Resetting the Power Folding
Mirrors
Reset the power folding mirrors if:
.
The mirrors are accidentally
obstructed while folding.
.
They are accidentally manually
folded/unfolded.
.
The mirrors will not stay in the
unfolded position.
.
The mirrors vibrate at normal
driving speeds.
Manually fold both mirrors if they
are out of sync. Fold and unfold the
mirrors three times using the mirror
controls to reset them to their
normal position. A popping noise
may be heard. This sound is normal
after a manual folding operation.
Manual Folding
If equipped, push the mirror toward
the vehicle to fold. Push the mirror
outward to return to its original
position.
Manually fold the mirrors inward to
prevent damage when going
through an automatic car wash. Auto Mirror Folding If equipped, with the ignition off,
press and hold
Q on the RKE
transmitter for approximately
one second to automatically fold the
exterior mirrors. Press and hold
Kon the RKE transmitter for
approximately one second to unfold.
See Remote Keyless Entry (RKE)
System Operation 0 36 .
This feature is turned on or off
through vehicle personalization. See
Vehicle Personalization 0 167 .
Turn Signal Indicator If equipped, indicator lights on the
mirror flash in the direction of the
turn or lane change.
Heated Mirrors If equipped with heated mirrors:
K : Press to heat the outside
mirrors. If the vehicle has trailer-tow
mirrors, only the upper glass of the
mirror is heated. The lower convex
part of the trailer-tow mirrors is not
heated.
Page 52 of 511
GMC Sierra/Sierra Denali Owner Manual (GMNA-Localizing-U.S./Canada/
Mexico-9955992) - 2017 - crc - 4/18/17
Keys, Doors, and Windows 51
Windows
{ WarningNever leave a child, a helpless
adult, or a pet alone in a vehicle,
especially with the windows
closed in warm or hot weather.
They can be overcome by the
extreme heat and suffer
permanent injuries or even death
from heat stroke.
The vehicle aerodynamics are
designed to improve fuel economy
performance. This may result in a pulsing sound when either rear
window is down and the front
windows are up. To reduce the
sound, open either a front window
or the sunroof, if equipped.
Manual Windows If equipped, turn the hand crank on
each door to manually raise or lower
the manual windows.
Power Windows
{ WarningChildren could be seriously
injured or killed if caught in the
path of a closing window. Never
leave keys in a vehicle with
children. When there are children
in the rear seat, use the window
lockout button to prevent
operation of the windows. See
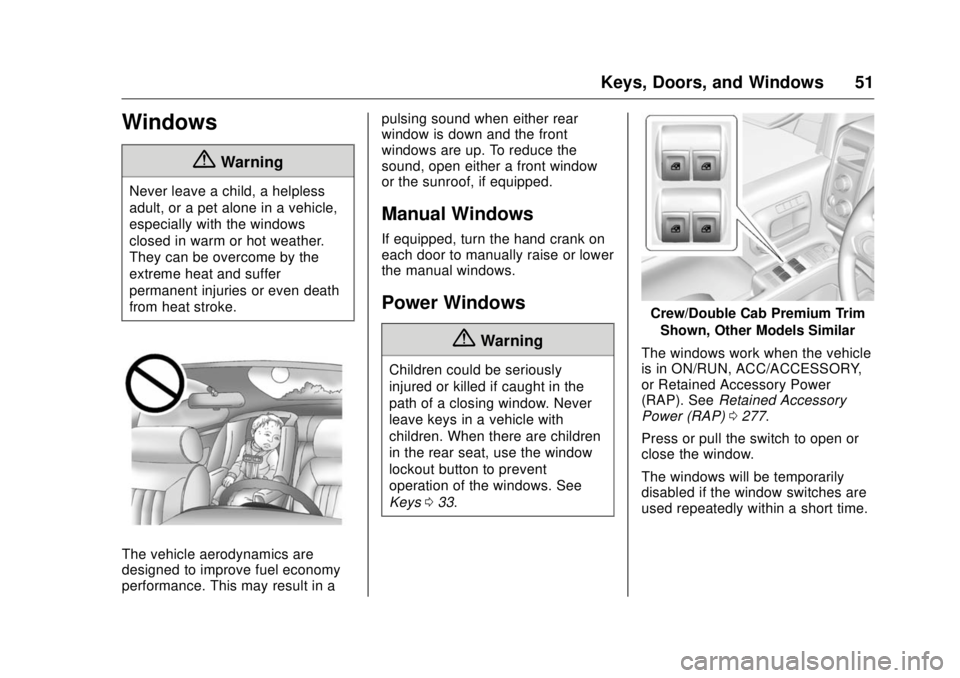
Keys 0 33 . Crew/Double Cab Premium Trim
Shown, Other Models Similar
The windows work when the vehicle
is in ON/RUN, ACC/ACCESSORY,
or Retained Accessory Power
(RAP). See Retained Accessory
Power (RAP) 0 277 .
Press or pull the switch to open or
close the window.
The windows will be temporarily
disabled if the window switches are
used repeatedly within a short time.
Page 61 of 511
GMC Sierra/Sierra Denali Owner Manual (GMNA-Localizing-U.S./Canada/
Mexico-9955992) - 2017 - crc - 4/18/17
60 Seats and Restraints To return the seatback to the upright
position:
1. Lift the lever fully without
applying pressure to the
seatback, and the seatback will
return to the upright position.
2. Push and pull on the seatback
to make sure it is locked.
Power Reclining Seatbacks
To recline a power seatback,
if equipped:
.
Tilt the top of the control
rearward to recline.
.
Tilt the top of the control forward
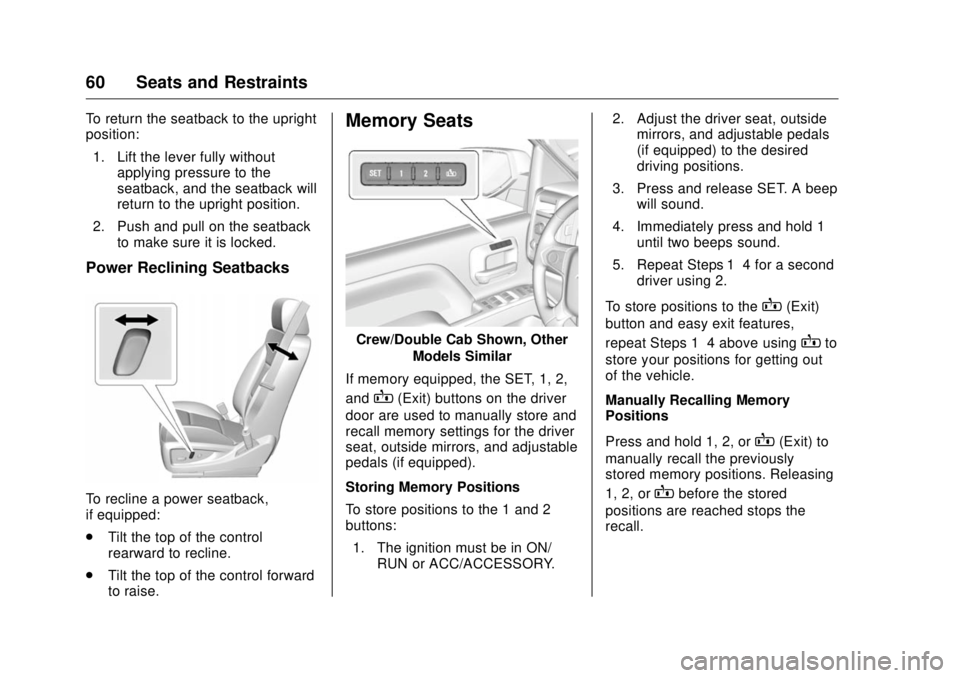
to raise. Memory Seats
Crew/Double Cab Shown, Other
Models Similar
If memory equipped, the SET, 1, 2,
and
B (Exit) buttons on the driver
door are used to manually store and
recall memory settings for the driver
seat, outside mirrors, and adjustable
pedals (if equipped).
Storing Memory Positions
To store positions to the 1 and 2
buttons:
1. The ignition must be in ON/
RUN or ACC/ACCESSORY. 2. Adjust the driver seat, outside
mirrors, and adjustable pedals
(if equipped) to the desired
driving positions.
3. Press and release SET. A beep
will sound.
4. Immediately press and hold 1
until two beeps sound.
5. Repeat Steps 1 – 4 for a second
driver using 2.
To store positions to the
B (Exit)
button and easy exit features,
repeat Steps 1 – 4 above using
B to
store your positions for getting out
of the vehicle.
Manually Recalling Memory
Positions
Press and hold 1, 2, or
B (Exit) to
manually recall the previously
stored memory positions. Releasing
1, 2, or
B before the stored
positions are reached stops the
recall.
Page 80 of 511
GMC Sierra/Sierra Denali Owner Manual (GMNA-Localizing-U.S./Canada/
Mexico-9955992) - 2017 - crc - 4/18/17
Seats and Restraints 79
{ WarningA crash severe enough to inflate
the airbags may have also
damaged important functions in
the vehicle, such as the fuel
system, brake and steering
systems, etc. Even if the vehicle
appears to be drivable after a
moderate crash, there may be
concealed damage that could
make it difficult to safely operate
the vehicle.
Use caution if you should attempt
to restart the engine after a crash
has occurred.
In many crashes severe enough to
inflate the airbag, windshields are
broken by vehicle deformation.
Additional windshield breakage may
also occur from the front outboard
passenger airbag.
.
Airbags are designed to inflate
only once. After an airbag
inflates, you will need some new
parts for the airbag system.
If you do not get them, the airbag system will not be there
to help protect you in another
crash. A new system will include
airbag modules and possibly
other parts. The service manual
for the vehicle covers the need
to replace other parts.
.
The vehicle has a crash sensing
and diagnostic module which
records information after a
crash.
See Vehicle Data Recording and
Privacy 0 485 and Event Data
Recorders 0 486 .
.
Let only qualified technicians
work on the airbag systems.
Improper service can mean that
an airbag system will not work
properly. See your dealer for
service.
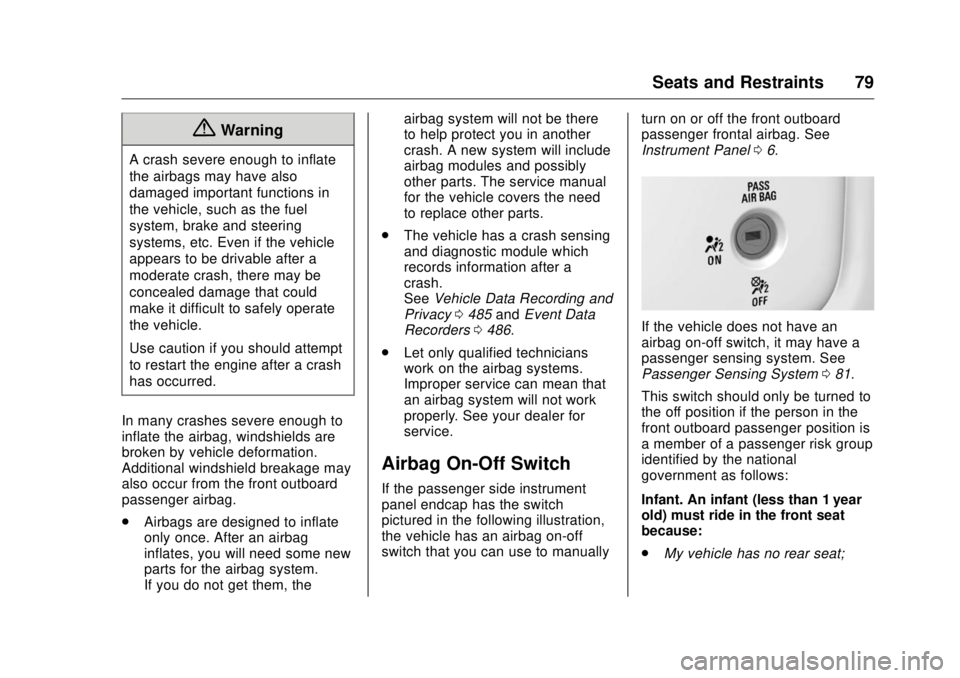
Airbag On-Off Switch If the passenger side instrument
panel endcap has the switch
pictured in the following illustration,
the vehicle has an airbag on-off
switch that you can use to manually turn on or off the front outboard
passenger frontal airbag. See
Instrument Panel 0 6 .
If the vehicle does not have an
airbag on-off switch, it may have a
passenger sensing system. See
Passenger Sensing System 0 81 .
This switch should only be turned to
the off position if the person in the
front outboard passenger position is
a member of a passenger risk group
identified by the national
government as follows:
Infant. An infant (less than 1 year
old) must ride in the front seat
because:
.
My vehicle has no rear seat;
Page 101 of 511
GMC Sierra/Sierra Denali Owner Manual (GMNA-Localizing-U.S./Canada/
Mexico-9955992) - 2017 - crc - 4/18/17
100 Seats and Restraints secure the restraints. Some
restraints also use another vehicle
anchor to secure a top tether.
Regular Cab Models
1. For models without a rear seat,
forward-facing child restraints
should only be installed in the
right front seating position with
safety belts and a top tether.
See Securing Child Restraints
(With the Safety Belt in the
Center Front Seat) 0 110 or
Securing Child Restraints (With
the Safety Belt in the Rear
Seat) 0 106 or Securing Child
Restraints (With the Safety Belt
in the Front Passenger Seat)
0 110 .
If the child restraint
manufacturer recommends that
the top tether be attached,
attach and tighten the top
tether to the top tether anchor, if your vehicle has one. Refer
to the child restraint
instructions and the following
steps:
1.1. Fold the passenger
seatback forward to
access the top tether
anchor. See Reclining
Seatbacks 0 59 .
1.2. Find the top tether
anchor.
1.3. Remove the cover to
expose the anchor.
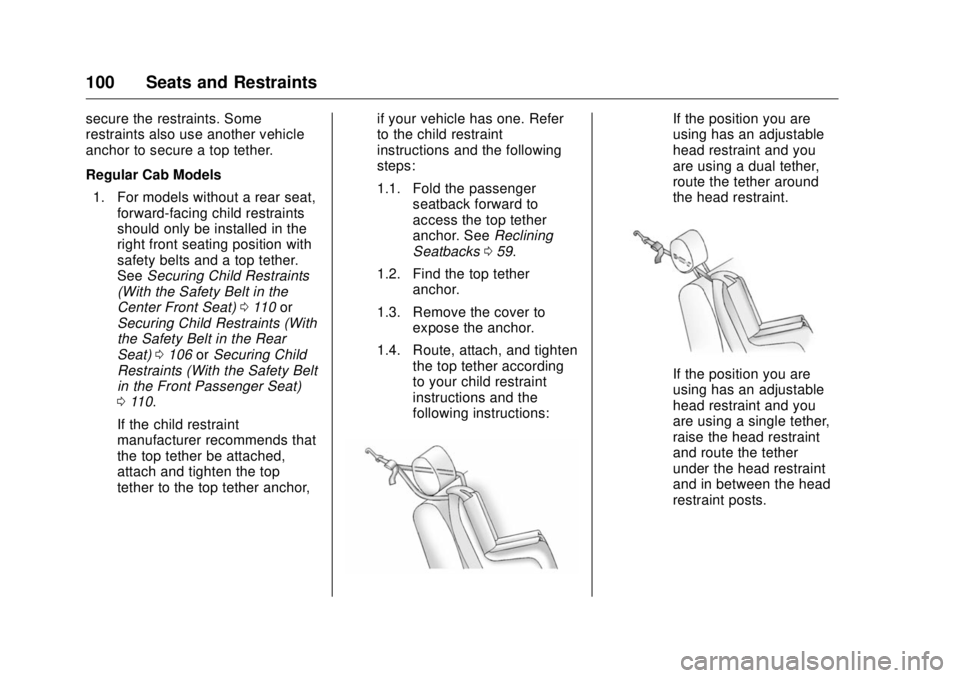
1.4. Route, attach, and tighten
the top tether according
to your child restraint
instructions and the
following instructions: If the position you are
using has an adjustable
head restraint and you
are using a dual tether,
route the tether around
the head restraint.
If the position you are
using has an adjustable
head restraint and you
are using a single tether,
raise the head restraint
and route the tether
under the head restraint
and in between the head
restraint posts.