set clock GMC SIERRA DENALI 2018 Owners Manual
[x] Cancel search | Manufacturer: GMC, Model Year: 2018, Model line: SIERRA DENALI, Model: GMC SIERRA DENALI 2018Pages: 505, PDF Size: 8.27 MB
Page 26 of 505
GMC Sierra/Sierra Denali Owner Manual (GMNA-Localizing-U.S./Canada/
Mexico-11349177) - 2018 - CRC - 10/17/17
In Brief 25MENU : Press to select a menu.
g : Press to seek the previous
station or track.
l : Press to seek the next station
or track.
See “ Base Radio ” in Overview
0 188 .
Base Radio with Touchscreen
O : Press to turn the system on.
Press and hold to turn it off. When
on, press to mute; press again to
unmute. Turn to increase or
decrease the volume.
{ : Press to go to the Home Page.
7 : Press to seek the previous
station or track.
6 : Press to seek the next station
or track.
See “ Base Radio with Touchscreen ”
in Overview 0 188 .
Setting the Clock
See Clock 0 132 . Satellite Radio Vehicles with a SiriusXM satellite
radio tuner and a valid SiriusXM
satellite radio subscription can
receive SiriusXM programming.
SiriusXM Satellite Radio
Service SiriusXM is a satellite radio service
based in the 48 contiguous United
States and 10 Canadian provinces.
SiriusXM satellite radio has a wide
variety of programming and
commercial-free music, coast to
coast, and in digital-quality sound.
A fee is required to receive the
SiriusXM service.
For more information refer to:
.
www.siriusxm.com or call
1-888-601-6296 (U.S.).
.
www.siriusxm.ca or call
1-877-438-9677 (Canada).
See Satellite Radio 0 192 .Portable Audio Devices This vehicle may have a 3.5 mm
(1/8 in) auxiliary input jack and USB
ports in the center stack, center
console, or under armrest. There
may be a USB port in the upper
glove box. External devices such as
iPods, laptop computers, MP3
players, and USB storage devices
may be connected, depending on
the audio system.
See USB Port 0 197 and Auxiliary
Jack 0 203 .
Bluetooth The Bluetooth system allows users
with a Bluetooth-enabled cell phone
to make and receive hands-free
calls using the vehicle audio system
and controls.
The Bluetooth-enabled cell phone
must be paired with the in-vehicle
Bluetooth system before it can be
used in the vehicle. Not all phones
will support all functions.
Page 133 of 505
GMC Sierra/Sierra Denali Owner Manual (GMNA-Localizing-U.S./Canada/
Mexico-11349177) - 2018 - CRC - 10/17/17
132 Instruments and Controls
Clock Setting the Time and Date with
Faceplate Controls To set the time or date:
1. Select SETTINGS from the
Home Page, then select Time
and Date.
2. Select the desired function.
3. Turn the MENU knob to
increase or decrease the value.
4. Press the MENU knob to go to
the next value. After the last
value is selected, the system
will update and return to the
Settings menu. Press
o BACK
to go to the last menu and
save the changes.
Auto Set requires an active OnStar
service plan.
If auto timing is set, the time
displayed on the clock may not
update immediately when driving
into a new time zone. To set the clock display:
1. Select SETTINGS from the
Home Page, then select Time
and Date.
2. Select Clock Display.
3. Turn the MENU knob to Off
or On.
4. Press the MENU knob to
select.
Press
o BACK to go to the last
menu and save the changes.
Setting the Time and Date with
Touchscreen Controls To set the time:
1. Touch SETTINGS from the
Home Page, then touch Time
and Date.
2. Touch Set Time and touch
«or
ª to increase or decrease
hours, minutes, and AM or PM.
Touch 12 – 24 Hr for 12 or
24 hour clock. 3. Touch the
} or
0 screen
button to go back to the
previous menu.
Auto Set requires an active OnStar
service plan.
If auto timing is set, the time
displayed on the clock may not
update immediately when driving
into a new time zone.
To set the date:
1. Touch SETTINGS from the
Home Page, then touch Time
and Date.
2. Touch Set Date and touch
« or
ª to increase or decrease
month, day, or year.
3. Touch the
} or
0 screen
button to go back to the
previous menu.
To set the clock display:
1. Touch SETTINGS and touch
Time and Date.
2. Touch Clock Display and touch
OFF or ON to turn the clock
display off or on.
Page 166 of 505
GMC Sierra/Sierra Denali Owner Manual (GMNA-Localizing-U.S./Canada/
Mexico-11349177) - 2018 - CRC - 10/17/17
Instruments and Controls 165
Vehicle
Personalization Use the audio system controls to
access the personalization menus
for customizing vehicle features.
The following are all possible
personalization features. Depending
on the vehicle, some may not be
available.
Base Radio Audio System
Controls
{ : Press to access the Home
Page Menu.
Q or
R : Touch to scroll through the
menus or setup items.
0 : Touch to exit or return to the
previous screen or menu.
Uplevel Radio Audio System
Controls
1. Touch the desired feature to
display a list of available
options.
2. Select the desired feature
setting. 3. Press
o BACK on the center
stack or touch
0 to return to
the previous menu or exit.
Turn the ignition on to access the
Settings menu, then select
SETTINGS from the Home Page on
the infotainment display.
Personalization Menus
The following list of menu items may
be available:
.
Time and Date
.
Rear Seat Reminder
.
Language
.
Video Voice-Over
.
Valet Mode
.
Teen Driver
.
Radio
.
Vehicle
.
Bluetooth
.
Apple CarPlay
.
Android Auto
.
USB Auto Launch .
Voice
.
Display
.
Rear Camera
.
Return to Factory Settings
.
Software Information
.
Wi-Fi
Detailed information for each menu
follows.
Time and Date Manually set the time and date. See
Clock 0 132 .
Rear Seat Reminder This allows for a chime and a
message when the rear door has
been opened before or during
operation of the vehicle.
Select Off or On.
Language
Select Language, then select from
the available language(s).
Page 204 of 505
GMC Sierra/Sierra Denali Owner Manual (GMNA-Localizing-U.S./Canada/
Mexico-11349177) - 2018 - CRC - 10/17/17
Infotainment System 203Rotating a Picture
Touch
w from the picture screen.
Enlarging a Picture
Touch
x from the picture screen.
Using the USB Picture Menu
1. Touch MENU from the picture
screen.
2. Touch the appropriate menu:
.
Slide Show Time: Allows
selection of the slide show
interval.
.
Clock, Temp. Display:
Allows selection of On or
Off to show the clock and
temperature on the full
screen.
.
Display Settings: Adjusts
for Brightness and Contrast.
3. Touch
0 to exit.
Auxiliary Jack This vehicle may have an AUX jack
in the center console or armrest.
See Center Console Storage 0 125 . Possible auxiliary audio sources
include:
.
Laptop computer
.
Audio music player
This jack is not an audio output. Do
not plug headphones into the
auxiliary input jack. Auxiliary
devices should be set up while the
vehicle is in P (Park).
Connect a 3.5 mm (1/8 in) cable
from the auxiliary device to the
auxiliary input jack.
If an auxiliary device has already
been connected, but a different
source is currently active, press the
MEDIA faceplate button repeatedly
to scroll through all of the available
audio source screens, until the AUX
source screen is shown.
Base Radio
Playing from the AUX Jack
An auxiliary device is played
through the audio system and
controlled through the device itself. AUX Menu
Press the MENU knob to display the
AUX menu and the following may
display:
Tone Settings : Select to adjust
Bass, Midrange, Treble, Balance,
Fade, and EQ (Equalizer). See
“ Tone Settings ” in AM-FM Radio
0 190 .
Auto Volume : If equipped, see
“ Playing an Audio CD. ”
DSP : If equipped, this feature
adjusts the pre-defined settings.
See “ DSP ” in AM-FM Radio 0 190 .
EQ (Equalizer) : If equipped, this
feature adjusts the pre-defined
equalizer settings. See “ EQ
(Equalizer) ” in AM-FM Radio 0 190 .
Base Radio with Touchscreen
Play will begin when the system has
finished reading the information on
the device.
Page 230 of 505
GMC Sierra/Sierra Denali Owner Manual (GMNA-Localizing-U.S./Canada/
Mexico-11349177) - 2018 - CRC - 10/17/17
Climate Controls 229The recirculation light will not come
on when automatically controlled.
Press
@ to manually select
recirculation; press it again to select
outside air.
Do not cover the solar sensor on the
top of the instrument panel near the
windshield. This sensor regulates
air temperature based on sun load.
See “ Sensors ” later in this section.
Manual Operation
O : Press to turn the climate control
system on or off. Outside air still
enters the vehicle, and is directed to
the floor. This direction can be
changed by pressing the air
delivery mode.
9 : Turn clockwise or
counterclockwise to increase or
decrease the fan speed. Press the
knob to turn the fan off.
Press AUTO to return to automatic
operation. Driver and Passenger
Temperature Control : The
temperature can be adjusted
separately for the driver and
passenger.
Turn the knob clockwise or
counterclockwise to increase or
decrease the driver or passenger
temperature setting.
SYNC : Press to link the passenger
temperature setting to the driver
setting. The SYNC indicator light will
turn on. When the passenger setting
is adjusted, the SYNC indicator light
is off.
The driver side or passenger side
temperature display shows the
temperature setting increasing or
decreasing.
Air Delivery Mode Control :
Press
Y ,
\ ,
[ , or
- to change
the direction of the airflow. An
indicator light comes on in the
selected mode button. Changing the mode cancels the
automatic operation and the system
goes into manual mode. Press
AUTO to return to automatic
operation.
Y : Air is directed to the instrument
panel outlets.
\ : Air is divided between the
instrument panel and floor outlets.
Some air is directed toward the
windshield and side window outlets.
[ : Air is directed to the floor
outlets, with some to the windshield,
side window outlets, and second
row floor outlets.
- : This mode clears the windows
of fog or moisture. Air is directed to
the windshield, floor outlets, and
side window vents. The system
automatically forces outside air into
the vehicle and the air conditioning
compressor will run, unless the
outside temperature is close to
freezing.
0 : Press to clear the windshield
of fog or frost more quickly. Air is
directed to the windshield and the
side window vents. The air
Page 277 of 505
GMC Sierra/Sierra Denali Owner Manual (GMNA-Localizing-U.S./Canada/
Mexico-11349177) - 2018 - CRC - 10/17/17
276 Driving and Operating 2. Turn the knob to 4
n . Wait for
the 4
n indicator light to stop
flashing before shifting the
transmission into gear.
If the transmission is in gear and/or
moving more than 5 km/h (3 mph),
the 4
n indicator light will flash for
30 seconds and not complete the
shift. After 30 seconds the transfer
case will shift to 4
m . Turn the knob
to 4
m to see the indicator. With the
vehicle moving less than 5 km/h
(3 mph), and the transmission in
N (Neutral), attempt the shift again.
Shifting Out of 4
n1. To shift out of 4
n the vehicle
must be stopped or moving
less than 5 km/h (3 mph) with
the transmission in N (Neutral)
and the ignition in on. It is best
for the vehicle to be moving
1.6 to 3.2 km/h (1 to 2 mph). 2. Turn the knob to 4
m or 2
m .
Wait for the 4
m or 2
m indicator
light to stop flashing before
shifting the transmission
into gear.
If the transmission is in gear and/or
moving more than 5 km/h (3 mph),
the 4
m or 2
m indicator light will flash
for 30 seconds, but will not complete
the shift. With the vehicle moving
less than 5 km/h (3 mph), and the
transmission in N (Neutral), attempt
the shift again.
Shifting Into N (Neutral)
To shift:
1. Park the vehicle on a level
surface.
2. Set the parking brake and
press and hold the brake
pedal. See Parking Brake
0 281 .
3. Start the vehicle or turn the
ignition on.
4. Shift the transmission to
N (Neutral). 5. Shift the transfer case to 2
m .
6. Turn the transfer case knob
clockwise to N (Neutral) until it
stops and hold it there until the
N (Neutral) light starts blinking.
This will take at least
10 seconds. Then slowly
release the knob to the 4
n position. The N (Neutral) light
will come on when the transfer
case shift to N (Neutral) is
complete.
7. With the engine running, verify
that the transfer case is in
N (Neutral) by shifting the
transmission to R (Reverse),
then to D (Drive). There should
be no movement of the vehicle
while shifting the transmission.
8. Turn the engine off, and the
ignition to ACC/ACCESSORY.
9. Place the transmission shift
lever in P (Park). See
Recreational Vehicle Towing
0 430 .
10. Turn the ignition off.
Page 280 of 505
GMC Sierra/Sierra Denali Owner Manual (GMNA-Localizing-U.S./Canada/
Mexico-11349177) - 2018 - CRC - 10/17/17
Driving and Operating 279Shifting Out of 4
nTo shift:
1. The vehicle must be stopped or
moving less than 5 km/h
(3 mph) with the transmission
in N (Neutral) and the ignition
on. It is best for the vehicle to
be moving 1.6 to 3.2 km/h
(1 to 2 mph).
2. Turn the knob to 4
m , AUTO,
or 2
m . Wait for the 4
m , AUTO,
or 2
m indicator light to stop
flashing before shifting the
transmission into gear.
Caution
Shifting the transmission into gear
before the requested mode
indicator light has stopped
flashing could damage the
transfer case. If the transmission is in gear and/or
moving more than 5 km/h (3 mph),
the 4
m , AUTO, or 2
m indicator light
will flash for 30 seconds but will not
complete the shift. With the vehicle
moving less than 5 km/h (3 mph),
and the transmission in N (Neutral),
attempt the shift again.
Shifting Into N (Neutral)
To shift into N (Neutral):
1. Park the vehicle on a level
surface.
2. Set the parking brake and
press and hold the brake
pedal. See Parking Brake
0 281 .
3. Start the vehicle or turn the
ignition on.
4. Shift the transmission to
N (Neutral).
5. Shift the transfer case to 2
m . 6. Turn the transfer case knob
clockwise to N (Neutral) until it
stops and hold it there until the
N (Neutral) light starts blinking.
This will take at least
10 seconds. Then slowly
release the knob to the 4
n position. The N (Neutral) light
will come on when the transfer
case shift to N (Neutral) is
complete.
7. With the engine running, verify
that the transfer case is in
N (Neutral) by shifting the
transmission to R (Reverse),
then shift the transmission to
D (Drive). There should be no
movement of the vehicle while
shifting the transmission.
8. Turn the engine off, and the
ignition to ACC/ACCESSORY.
9. Place the transmission shift
lever in P (Park). See
Recreational Vehicle Towing
0 430 .
10. Turn the ignition to off.
Page 380 of 505
GMC Sierra/Sierra Denali Owner Manual (GMNA-Localizing-U.S./Canada/
Mexico-11349177) - 2018 - CRC - 10/17/17
Vehicle Care 379
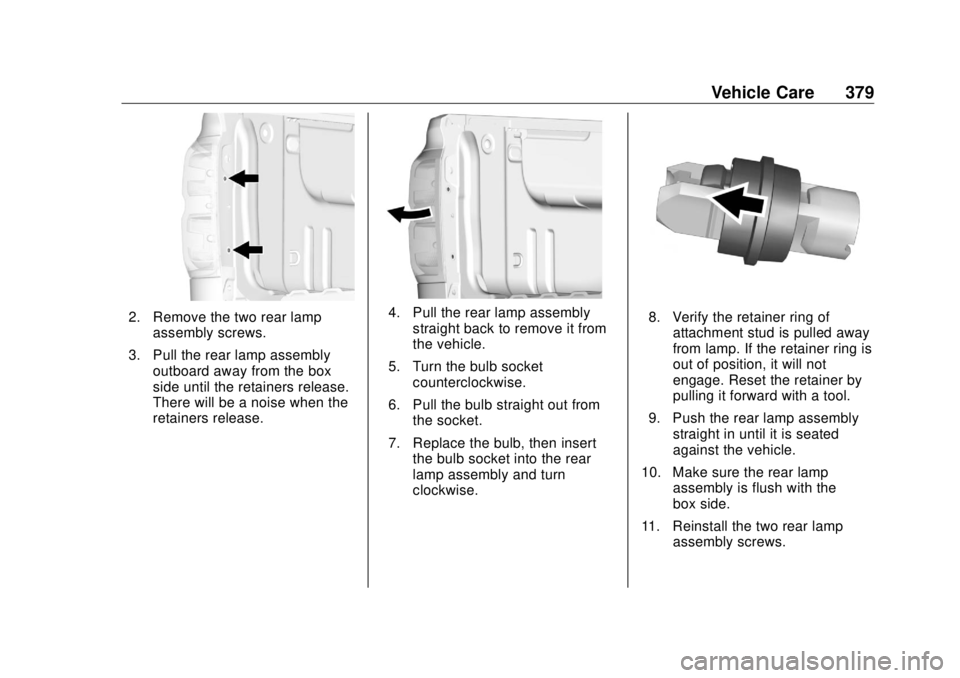
2. Remove the two rear lamp
assembly screws.
3. Pull the rear lamp assembly
outboard away from the box
side until the retainers release.
There will be a noise when the
retainers release. 4. Pull the rear lamp assembly
straight back to remove it from
the vehicle.
5. Turn the bulb socket
counterclockwise.
6. Pull the bulb straight out from
the socket.
7. Replace the bulb, then insert
the bulb socket into the rear
lamp assembly and turn
clockwise. 8. Verify the retainer ring of
attachment stud is pulled away
from lamp. If the retainer ring is
out of position, it will not
engage. Reset the retainer by
pulling it forward with a tool.
9. Push the rear lamp assembly
straight in until it is seated
against the vehicle.
10. Make sure the rear lamp
assembly is flush with the
box side.
11. Reinstall the two rear lamp
assembly screws.